Marking gauge/veneer slicer construction problem.

UKworkshop.co.uk

Help Support UKworkshop.co.uk:

This site may earn a commission from merchant affiliate links, including eBay, Amazon, and others.

Rosewood

Established Member
Joined
30 Jul 2011
Messages
26
Reaction score
0
Location
Dorset
Hello,

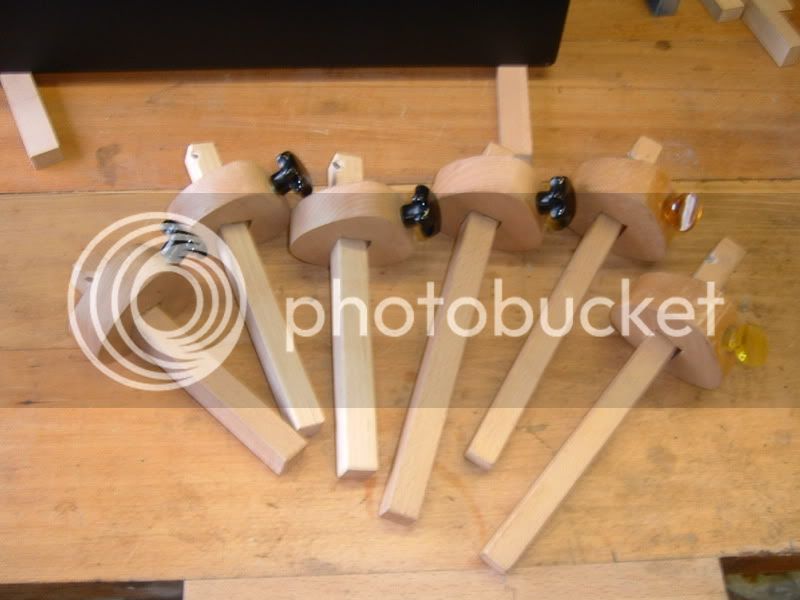
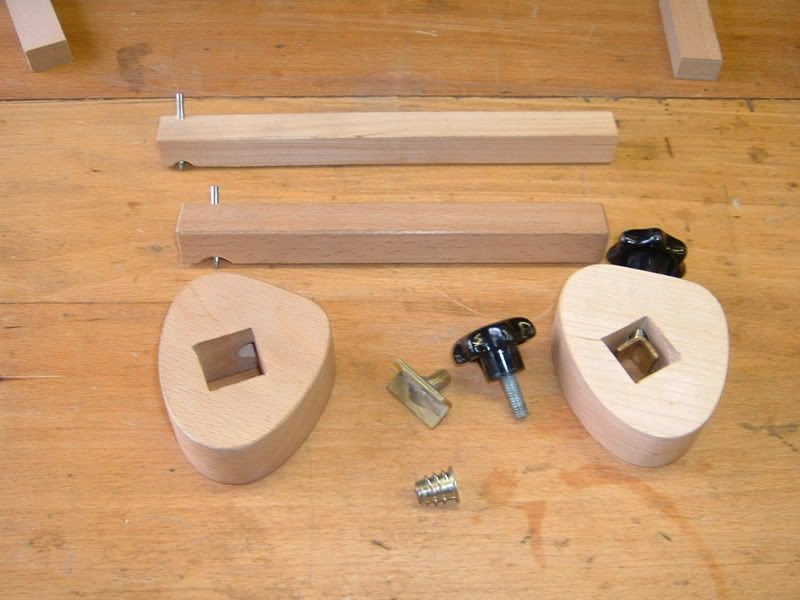
I am after a bit of advice, this is a veneer slicer that I recently made, the design is borrowed from a well-known American company!

Veneer%20Cutter.jpg


It generally works well, and I like the fact that the locking mechanism clamps the shaft into the ‘V’ of the square hole in the fence. I’m going to make a few more tools that work on the same principle but would like to know if there is a good way of producing an accurate square hole with sides square to the face?

I chiseled this one out with a bevel edged chisel whilst eyeing a square, and although it works, it doesn’t bare close scrutiny, and needed a fair bit of fettling. My preference is to do it with hand tools as it is my hand tool skills I want to improve.

One idea I had was to cut the wood in half and cut out a right angle triangle in each section and then glue the two pieces back together again. Aesthetically this isn’t as appealing, but it is a tool after all and function over aesthetics will win.

Would a mortise chisel produce a more accurate cut over a bevel edged chisel?

Any ideas would be gratefully received,

Best wishes,

Chris
 
Hi, Chris

A good paring chisel is the best thing to use thats what I used for my marking gages.
DSCF0016.jpg

DSCF0015.jpg

I had to keep putting the shaft in and checking for square as I went, which was time consuming.
I copied a carboot one that uses a round hole and a wedge, so if your stock has parallel faces and your drill press is set up at 90deg it will be ar right angles.
DSC_0003-1.jpg

DSC_0004-1.jpg


Its a very nice slitter, love the brass.


Pete
 
Chris - that is a really excellent veneer cutter I think, very nicely done. I have found it hard to get the square hole bang-on, and if it is just slightly off it shows badly.
My best efforts are first to mark both sides on thicknessed but oversize stock, making sure I have one square edge and two true faces. Then I bore close using a forstner (I don't have a morticer, but if I did I might risk it). It is vital to ensure the pillar drill is dead square to its table. Then paring with a chisel, from both sides. I think the marking out is super-critical as it is easy to be just a fraction out - and for the marking out to be bang-on, the stock prep also has to be of course. Sizing and shaping the head comes after the square hole is finished and right.
I'll post a pic of the cutting gauge I did recently... just need to get the camera out.

p.s. those screws holding the blade in place - are they threading into inserts or just into the beech? If they are into inserts where do you get small ones from, I can only find M6 and could do with some M4s.
 
If you wish to keep it really neat, get the holes in the brass the same size as the shank of the brass screw, countersink very slightly so that the slots of the screw are proud of the surface of the brass plate and then file them off flat and polish - no sign of slots.....neat!
 
Mount an old Chisel blade in your pillar drill and use it as a mortise press to shave the sides of the hole true to the rear face.
 
marcros":1hye7ed5 said:
a pig sticker mortice chisel would be easier to ensure that it is vertical. Nice job though.

not sure if the links below are of any interest...

http://norsewoodsmith.com/content/marki ... ing-gauges

http://lumberjocks.com/Jon3/blog/9948

Hi Mark,

Thanks for the links, it's great to see how people approach the same basic design. I had to look up what a 'pig sticker' mortice chisel was, they look quite a intimidating!

Racers":1hye7ed5 said:
Hi, Chris

A good paring chisel is the best thing to use thats what I used for my marking gages.
DSCF0016.jpg

DSCF0015.jpg

I had to keep putting the shaft in and checking for square as I went, which was time consuming.
I copied a carboot one that uses a round hole and a wedge, so if your stock has parallel faces and your drill press is set up at 90deg it will be ar right angles.
DSC_0003-1.jpg

DSC_0004-1.jpg


Its a very nice slitter, love the brass.


Pete


Hi Pete,

Thanks for posting the pictures of your marking gauges. I notice that you had some brass 'V' shaped bits for your clamping mechanism, did you makes these yourself?

I didn't want the screw to dent the shaft so I've put in a maple spacer in the hole. Through use the spacer has dished slight where the screw has made contact, but it hasn't marked the shaft and seems to lock up well with just thumb tightness.

Veneer%20Cutter%202.jpg


The round hole and wedge system is neat.

condeesteso":1hye7ed5 said:
Chris - that is a really excellent veneer cutter I think, very nicely done. I have found it hard to get the square hole bang-on, and if it is just slightly off it shows badly.
My best efforts are first to mark both sides on thicknessed but oversize stock, making sure I have one square edge and two true faces. Then I bore close using a forstner (I don't have a morticer, but if I did I might risk it). It is vital to ensure the pillar drill is dead square to its table. Then paring with a chisel, from both sides. I think the marking out is super-critical as it is easy to be just a fraction out - and for the marking out to be bang-on, the stock prep also has to be of course. Sizing and shaping the head comes after the square hole is finished and right.
I'll post a pic of the cutting gauge I did recently... just need to get the camera out.

p.s. those screws holding the blade in place - are they threading into inserts or just into the beech? If they are into inserts where do you get small ones from, I can only find M6 and could do with some M4s.

Hi Douglas,

It would be great to see pictures of your cutting gauge.

The screws holding the blade in place are going straight into end grain! At the moment they are holding and the blade is held securely, but long term I might need to modify it if they start to slip. I've not been able to find threaded inserts small enough, in fact, finding nice hardware to use is proving quite difficult.

You are right about the importance of marking out, I found measuring and marking out at 45º to be far harder than at right angles to the edge, there must be a knack to it.

I may be misunderstanding you but, are you saying you marked up and cut the hole square to the edge of an over sized bit of wood, and then shaped the wood at 45º rather than cutting the hole at 45º to the edge of the stock?

phil.p":1hye7ed5 said:
If you wish to keep it really neat, get the holes in the brass the same size as the shank of the brass screw, countersink very slightly so that the slots of the screw are proud of the surface of the brass plate and then file them off flat and polish - no sign of slots.....neat!

Hi Phil,

Thanks for the tip, you would not believe the number of drill bits, and old dremel bits I used in an attempt to counter sink the brass to the right profile! I'll definitely do it your way next time, much neater.

Veneer%20Cutter%201.jpg


I cut the rabbet for the brass with my plow plane to a depth a fraction over the thickness of the brass so that I could bring the beech flush with the brass, and flatten everything off on a bit of sandpaper. However this did mean a tiny bit of brass dust got into the grain of the beach, making it look dirty. I've seen some beautiful tools with brass inlaid into the wood without this problem, so I must be going about it wrongly, any thoughts on a better way of doing it?

Best wishes,

Chris
 
If you are thinking of cutting it in half, cutting the square and sticking them back together, why not make a feature of it and stick them back together with a sandwich of contrasting veneers between??

Andy
 
Hi, Rosewood

I did indeed make the saddles my self, its just a bent piece of brass soldered to a length of brass bar.
You have to file a V in to the top of the bar tin both pieces and solder them together, a bit fiddly but if you leave the bar long you can put it a vice upright and balance the V on top while you heat it up.

I had to cut down the threaded inserts to give me clearance for the saddle, that might be more of a problem for you.

Pete
 
Chris - sorry slow back, been away etc.
I do mark and cut the hole at 45 degrees, but leave the stock oversize and size that last - I think it gives me a better chance of getting the marking, boring and paring square/true.
Also I make the head first, then size down the stem to fit, once the square hole is OK.
Here's the rough one I made for own use, I plan a smarter one soon, with brass inlays along the stem where lock-screw contacts.
g1.jpg

g2.jpg

The blade is bandsaw offcut, heat treated, and the tips are bevelled opposite sides. I like to be able to see the blade clearly and with this I can start and stop my marks very easily (I used it a lot making a box recently and marking dovetails in 5mm maple). I also personally prefer a sharp cutting tip rather than a pin, whatever direction to grain.
What I ended up with is quite like your veneer cutting gauge, but not as pretty... pretty comes later :wink:
Oh, the 45 degree marking - I use the Japanese square shown above, I trust it and it is fairly bomb-proof, fairly inexpensive too.

p.s. I very like Phil Ps flush brass screw trick too, neat indeed.
 

Attachments

  • g1.jpg
    g1.jpg
    185 KB · Views: 2,069
  • g2.jpg
    g2.jpg
    81.9 KB · Views: 2,069
:) Douglas, isn't it funny how we sometimes presume everyone else knows (or at least has been taught) the same things we take for granted? - that tip with the brass screw heads I was shown when I was about 14, at school (45 yrs ago) Bye the bye, I had one of those Japanese squares/mitres - they're great. Some kind person I worked with (a friend?) relieved me of it.
 
Quite right Phil - I tend to follow the build threads here for that reason. Woodbloke recently observed that when he goes to all the trouble to photograph and write up a build, complete with all his tricks and techniques... it may not attract the level of attention that a sharpening debate does. So I do try and post work here when I can, and it's also good I think to publish the mistakes and how to avoid them! Andy Ts step chair thread is a great one for loads of fine hand-tool work, and his occasional accidents along the way. I'm not young anymore, but not too old to learn :wink:

p.s. Will Myers on making a basic gauge, he keeps the head stock well oversize until the hole is cut too:
http://www.wkfinetools.com/tMaking/art/ ... ges-01.asp
 
Hello,

I'm resurrecting this old thread as I've made a number of marking gauges along similar lines to the veneer cutter.

Marking%20Gauge.jpg


Unfortunately as you can see in the photo they are not yet marking gauges because I keep dithering on one essential element, the cutter.

I'd originally though to go with the traditional pin, but ground to a knife edge, but I keep having visions of it twisting in use.
The next idea was to use a scalpel blade, but that has a double bevel.
The other idea was to get a number of the Veritas slicing blades from there new range of inlay tools.

I'd be grateful to know if anyone knows of any other suitable options or preferred type of cutter for this style of marking gauge.

Best wishes,

Chris
 
The one that I saw a WIP from on Lumberjocks used the Lie Nielsen blade of the tool that it was based upon. IIRC it was single bevel.

Failing that, what about the bandsaw blade off-cut mentioned above?
 
While I admire the patience and skill of people who can make things like this, I actually use an assortment of old and quite battered marking gauges. Several of the ones which work best have a very simple pin (almost certainly a fine nail) filed to a rounded knife shape. They make a nice fine, definite line. There is no possibility of any of the cutters twisting in use.
 
Hi Chris

My pins are made from 3mm silver steel hammered into undersized holes, you can twist them but you need to clamp the pin in a vice to do it.
I harden the cutting end of the pin after shaping.

Pete
 
Hi Pete,

Thanks for your suggestion, I followed in your footsteps and bought myself some 3mm silver steel and made the pins. I didn't have a drill bit just under 3mm, so I chose to drill them out at 3mm and use a little screw to tighten up on the pin.

Marking%20gauge%201.jpg


The profile of the tips took me a little while, but I think they are okay, time will tell. I wanted the tips to be a bit more rounded, but that will probably happen over time as they blunt and need resharpening.

Marking%20gauge%202.jpg


Marking%20gauge%203.jpg


I was a little worried about the hardening and tempering, but it seemed to go okay and fairly easy with just a blowtorch and a container of water. They are certainly hard as a file just skids across them.

Thanks again for your help,

Chris
 
I'm particularly keen to see the chosen cutter solution, Rosewood... looks more like beech to me :lol:
Very nicely made so far - is the shape for ergonomics?

:oops: should have scrolled down further - i see it now. That is very like the Japanese style pin that Woodbloke is a fan of - great in all respects but sometimes hard to see exactly where you are I found (on small fussy mark-outs).
 
Back
Top