Making a box then cutting the lid off

UKworkshop.co.uk

Help Support UKworkshop.co.uk:

This site may earn a commission from merchant affiliate links, including eBay, Amazon, and others.
Thanks Custard. The walls of my box are 8mm thick - what thickness do I leave in the walls to keep the box's structure before sawing by hand? is 1mm - 2mm ok?

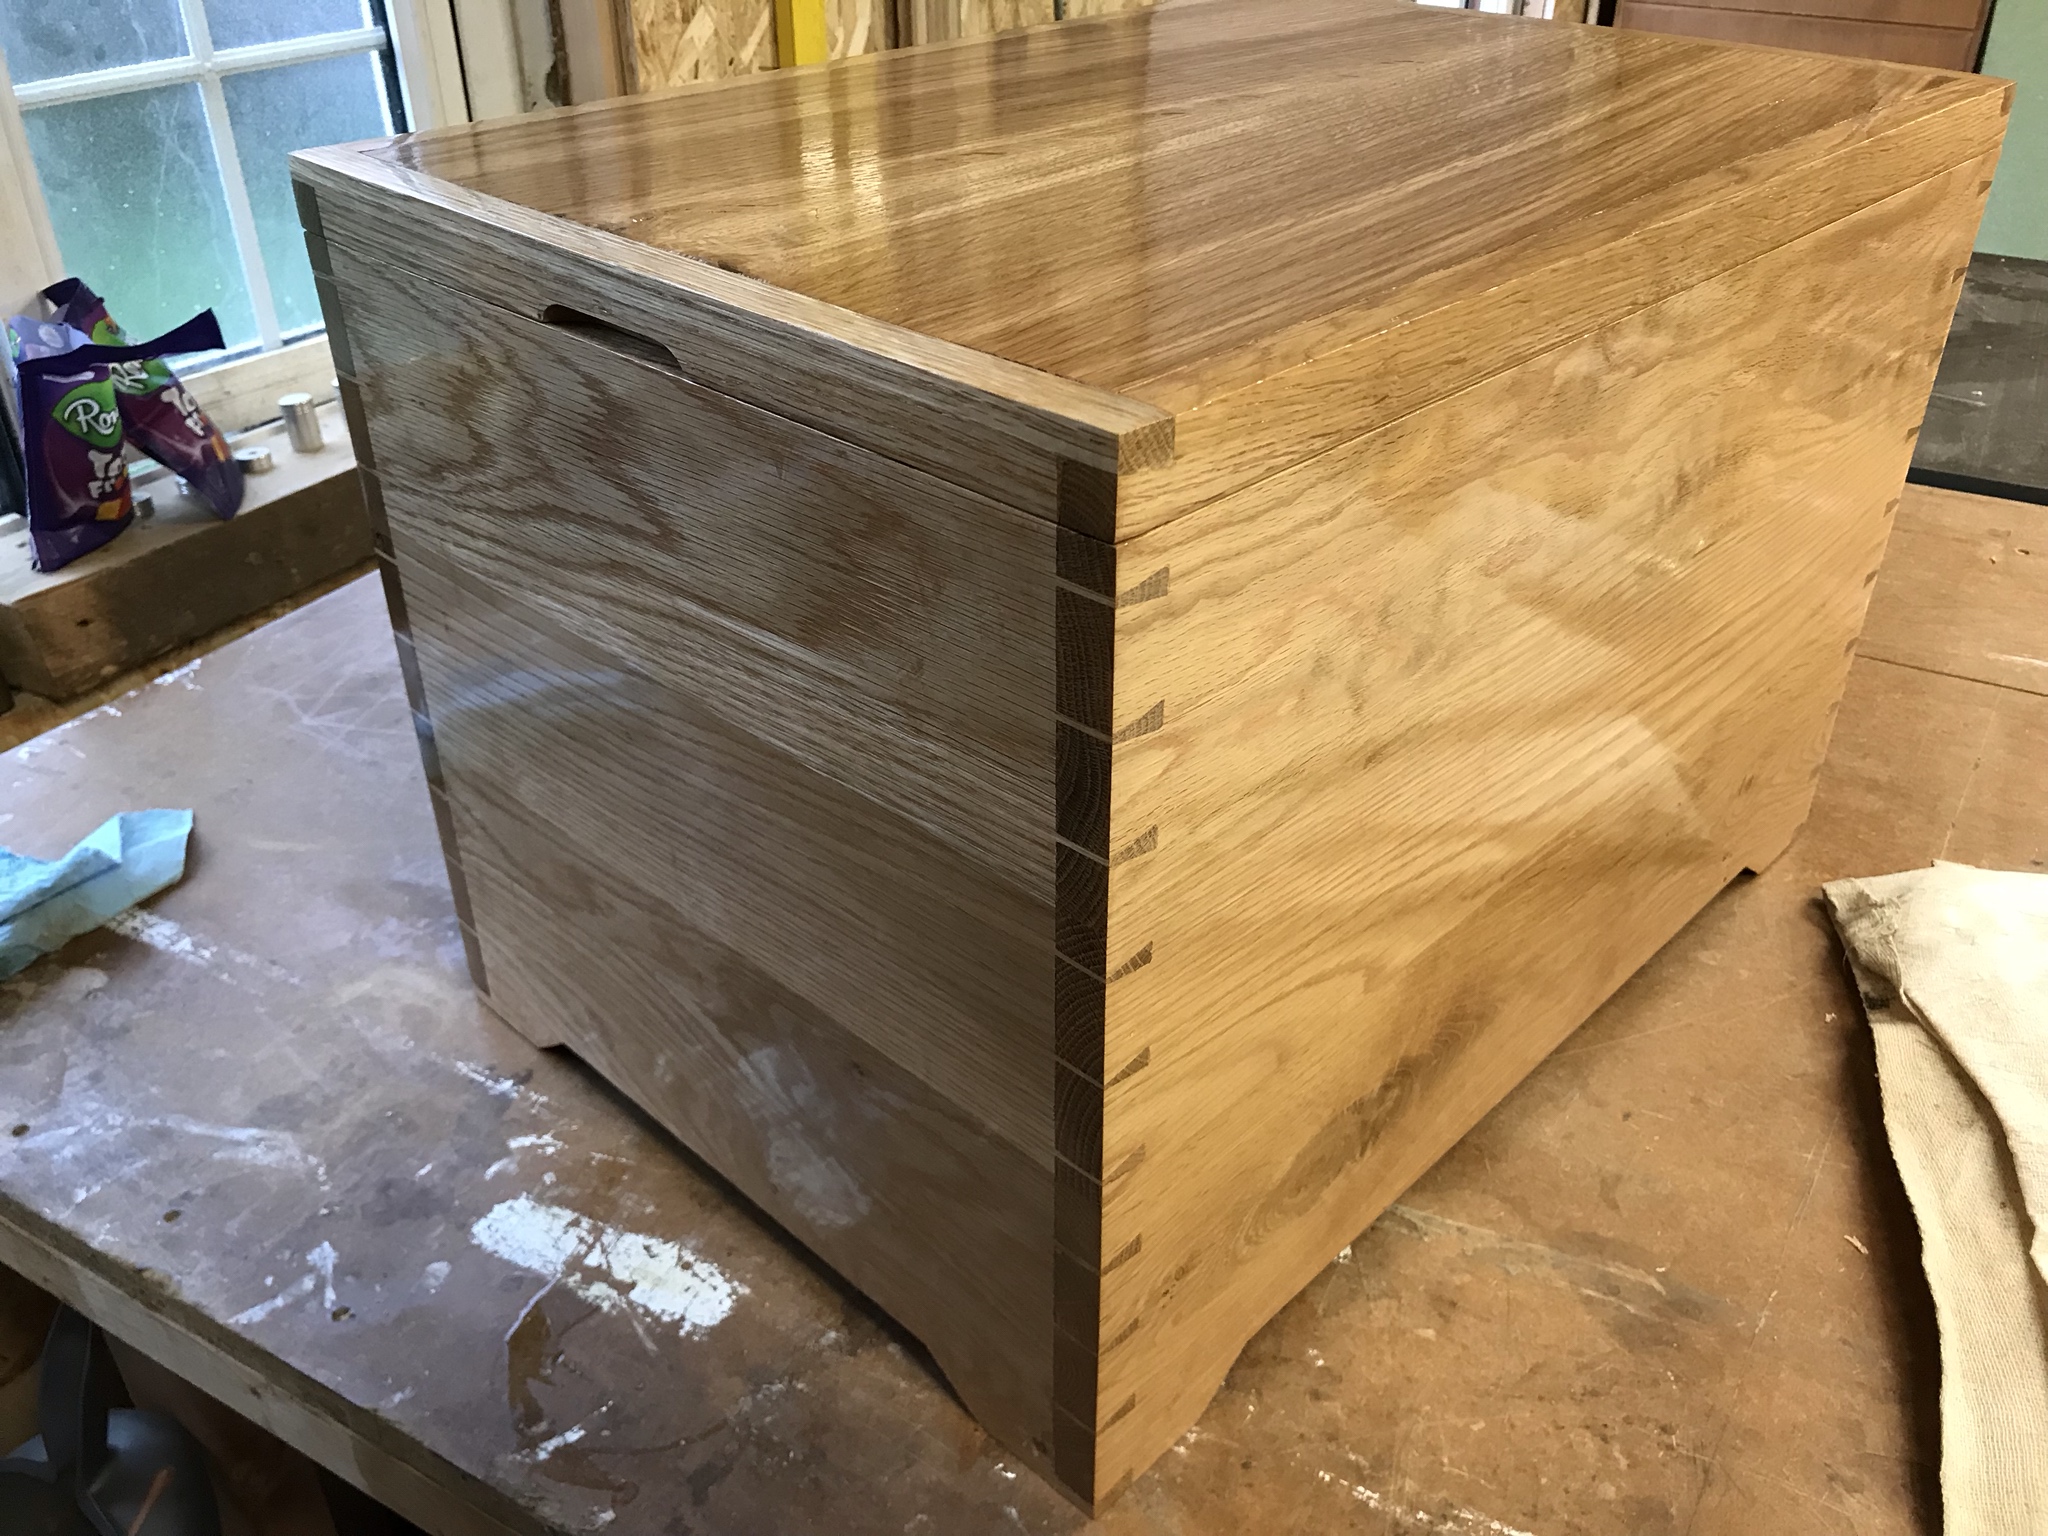
That's a beautiful box - just to keep things in perspective, this is mine so far:
_MG_7803.jpg

I'm making it mainly to try the variation on a donkey-ear mitre shooting board I just made for future boxes (the mitres looked pretty accurate to my eye, but now they're hidden inside the box!). I meant to rout a recess for the ply to sit into but in my excitement over glueing up the mitres I forgot, but I'm carrying on anyway for practice. There's a whole lot more skills to learn in making a box - and I've not even started hinges, veneers and all that.

Dr Bob/ Jacob - I don't have a table saw, so I'm planning to make the cut with a palm router in a table. I did the table a couple of weeks ago following Rorschasch's version and can't believe what a brilliant thing it is.
 

Attachments

  • _MG_7803.jpg
    _MG_7803.jpg
    68.6 KB · Views: 124
I use a bandsaw whenever possible.
If the box is too big for that, then whatever you have.
Wrap a layer of masking tape all around the box, and mark the cut line on the masking tape. Press the tape very firmly to the box, it will help stop splinters on the cut.

I think a router might tear out a lot unless you have a super sharp and a very firm hand. Personally (not having a table saw) I would cut that by hand, working round each face so the saw blade was cutting into the box rather than out.
But then I would use my router sled to make the cut edges square and true.
 
Whenever I've done this I've used my table saw. I make a cut on one site then tape that side with blue tape so it stays closed and repeat for all the other sides. Everything holds together nicely.


.
 
sunnybob":27eqzx0n said:
I use a bandsaw whenever possible.
If the box is too big for that, then whatever you have.
Wrap a layer of masking tape all around the box, and mark the cut line on the masking tape. Press the tape very firmly to the box, it will help stop splinters on the cut.

I think a router might tear out a lot unless you have a super sharp and a very firm hand. Personally (not having a table saw) I would cut that by hand, working round each face so the saw blade was cutting into the box rather than out.
But then I would use my router sled to make the cut edges square and true.

I did try using the bandsaw one time having read that option in this thread - I made a quick box just for the purpose, but it was a dreadful cut. Poor bandsaw setup/ poor user skill, probably a combination of both. And I think my cutting straight with a hand saw would be even worse!
 
Sharp blade is key for a bandsaw. Take the time to use a new blade if its a good box.

A handsaw works well, provided you have patience. I had none when I started this hobby, and I scrapped LOTS of boxes! #-o
Now, i plan out a cut like that, i check the blade is sharp, I check the tape is covering the edge. i check every damn thing twice, and then only take a couple of gentle cuts before i check again.
I've gone from something like 4 minutes, to a quarter hour to make the cut. Its not often now that i have to bin anything :roll: 8)
 
When I made this box:
bFhpLwX.jpg

(my only one to date) I made an initial cut all the way around on the table saw with the top pressed against the fence. I didn’t go all the way through though and left a sliver on the inside thin enough to cut with a Stanley knife. I then tidied up the edges with a smoother (a big sanding block like Custard suggests would have been quicker I think).
 
Memzey - I followed the wip for that box and learned a lot from it. It looks great - must be pretty nerve wracking after all that work to make the final cut for the lid.

Bob - do you mean you take 4 - 15 mins for a cut by hand (which I guess you meant), or with a bandsaw? I think there were lots of mistakes when I made my only attempt with my bandsaw - too quick, 1/4" blade I'd been using for cutting turning blanks (so on a curve), didn't double check the guides...
Cut slowly, "Like a snail on holiday." I repeat it every time I make an important cut. I might have a go the weekend on my bandsaw and fairly new 5/8 blade - it's just a trial box, and Wealdon's won't deliver the 3mm router bit til next week so I can make another.
 
Chris152":2jdlyfpg said:
Memzey - I followed the wip for that box and learned a lot from it. It looks great - must be pretty nerve wracking after all that work to make the final cut for the lid.
Hi Chris.

Yes it was a nervy step to say the least. In the end I took my time, made all the necessary preparatory steps and checked everything a number of times before making the cut. I found It was very useful having some off cuts to get the depth of cut right before going for it on the finished piece. If you can do the same I’d recommend it.

As a note regarding the general pace of work; I’m also an amateur and not particularly blessed with skill, unlike many on here. The conclusion that I have drawn is that in order to get joints, faces, designs, or whatever just so, I need to spend as much time as it takes me to get it right and not let my expectations be informed by how quickly someone with 50 years more experience than me can bang the same thing out. Point in case: the box I pictured above required 5 panels to be glued up in its construction. Each panel included edge joints which were first milled on my planer thicknesser before final finessing with a bench plane (#7). Getting each edge joint just right is an incremental process for me and it can take several minutes of planing, checking, adjusting and planing again before I get there. Watching someone like Paul Sellers is inspirational in some ways as he makes it look so easy but I’ve learnt that I can’t simply wave a plane at my stock and magically have it go my way like he can. Perhaps when I have 50 years experience under my belt it’ll be as easy for me too but in the meantime, I have to be methodical, patient and thorough in order to get the desired results. That means burning time and not feeling bad about doing so.

Keep at it and good luck!
 
Chris, When I cut with the bandsaw, I am really bad at changing the blade for a thicker one. I use a 1/4" blade far more than I should. But I still get reasonable cuts, straight with a little sanding to make it nice.
The bandsaw is my most used tool, I do lots of stuff on it that most people here would say cant be done. But I cut S.L.O.W.L.Y.
I dont push the work through, i just hold the wood against the teeth and let it work at its own pace.
I've discovered a trick that works very well assuming you have the top guides set pretty close to the blade;
I dont watch the cut, I watch the top bearings. If you push harder than you should, even a sharp blade deflects and the bearing starts to rotate. When you see the bearing move, stop pushing. The blade will find its way back to centre and the bearing will stop rotating. Start pushing again, but slower.
Over time you will become used to what speed to push what wood, and if you get all the way through without moving the bearing, you will be amazed how smooth that cut is even with the wrong blade in.

BUT, the blade HAS to be sharp. Dont get lazy and try to cut a bit futher to "get your moneys worth" out of a worn blade. That way lies the scrap bin.
 
Thanks fellas. I had a go with the bandsaw, and surprised myself how much better it was than the last time. Nothing like perfect - all was going well till I realised I'd allowed the box to drift slightly off the fence, on the far side of the blade. (Can you have a featherboard that side, too?) Anyway, here are the results after an initial sanding.
The good:
_MG_7809.jpg

The bad:
_MG_7807.jpg

And the ugly:
_MG_7811.jpg

I have a feeling that if I keep sanding, the fit will get worse. So I might just tidy up the bit with tooth marks and hope it's out of sight on the hinge side! I'll know better next time. I'm planning to finish sanding to finer grits and try to fit hinges, again for practice.
3mm router bit arriving Tuesday so I'll crack on with the next box ready to try that out.
 

Attachments

  • _MG_7809.jpg
    _MG_7809.jpg
    64.8 KB · Views: 63
  • _MG_7807.jpg
    _MG_7807.jpg
    59.1 KB · Views: 63
  • _MG_7811.jpg
    _MG_7811.jpg
    80.1 KB · Views: 63
now, if you dont have access to a drum sander, you need to make a router sled.
Lots of varieties on the tube. you can get it perfect without having to learn the skills of master carpenters.
Did you watch the bearings?
 
What's the router sled for Bob? (Sorry to be so painfully slow.) Is it to make the contact between top and bottom completely level?

I did watch the guide bearings about half the time, I think - no movement as I looked at them, but I guess there must've been some as the box wandered a bit off the fence. I took on board your advice on speed. Before I did the cut I walked around a bit getting my head in the space Memzey described, calm and patient. I remember as a youngster learning (trying to learn) to use a Japanese calligraphy brush. Much the same.
 
A router sled is basically a poor mans drum sander. You can make any sized piece of wood dead flat.
see this for one example.
https://www.youtube.com/watch?v=J0SDvKHcL5M&t=67s

Now you have the speed issue (almost) sorted, you can work on getting the fence square to the work. Most fences have angle adjustments for fine tuning.
Heres another tutorial;
https://www.youtube.com/watch?v=3OY3oKtssZk

Once you have the fence dead on for that blade, use a vernier gauge to measure how far the front teeth of the blade is from the front edge of the top wheel.
Write that down and keep it safe. make a list for each blade you get running perfectly (I have my list taped to the back of the bandsaw).
Once I had the fence set exactly to my most used blade, I then adjusted the other blades to cut square without moving the fence each time and measured the distance.
Next time you change a blade, refer to the list, set it exactly the distance listed to the front of the top wheel, and youre good to go.


Its a bit of a faff I'm afraid, but there are so many variables with bandsaw blades that you have to cheat.
 
What is the drum sander of router sled for? A piece of sandpaper on a flat board or flat surface will do the job quicker than any machinery.

A handplane is probably the textbook way, but sandpaper on MDF does perfectly well.
 
yes, sandpaper and flat board will give you a flat edge.
But will it give you that flat edge at EXACTLY 90 degrees with the EXACT same depth across all four sides of a box?
And then will it give you EXACTLY the same dimension for the lid, so that the box doesnt look like it grew on the side of a hill? #-o :shock: 8)

I dont have hand tool skills, but I do have "work around" skills. :D
 
The few boxes I've made in the past I've always cut the lid off with the table saw and then sanded the faces flush with a piece of sandpaper taped to the surface of the table saw.

Once I'm happy with the faces I use thin pieces of timber to line the box. The top of these sits a couple of mm higher than the main part of the box and fits inside the lid preventing it from sliding about and if done properly make it a nice friction fit. I adjust these with a block plane until the lid fits nicely together and then sand the sides in the same manner as before, this removes any tiny irregularities that may have been incurred through the face flattening process.

I'm not a trained woodworker but it's just a method I've made up for myself and has worked alright for me.

10.jpeg

9.jpeg

8.jpeg


Will
 

Attachments

  • 8.jpeg
    8.jpeg
    226.2 KB · Views: 55
  • 9.jpeg
    9.jpeg
    226.9 KB · Views: 56
  • 10.jpeg
    10.jpeg
    236.6 KB · Views: 56
Back
Top