Made a jig to cut small pieces of wood

UKworkshop.co.uk

Help Support UKworkshop.co.uk:

This site may earn a commission from merchant affiliate links, including eBay, Amazon, and others.

Jensmith

Established Member
Joined
19 Aug 2010
Messages
1,029
Reaction score
0
Location
Cheshire
This will be childs play to most of you but I made a false table for my bandsaw yesterday so I can cut up my small pieces of wood safely and quickly.

My Dad told me what I needed to make and I was pretty pleased with my hours work.

I can now cut up my strips of jelutong in minutes.

A small modification to the photos was to add a scale on the wood to clamp to so I could cut the pieces to length (3" in this case) quickly.

Much more accurate than using a mitre box and hand saw and so much quicker :D

It is made from a scrap of MDF I had, a scrap of beech that was already exactly the right thickness for the mitre slot on the bandsaw table which I cut to width and a cheap pen blank.

I hope the images work ok!


False_table_top by jensmith25y,


False_table_slot by jensmith25y, on Flickr


False table underside by jensmith25y, on Flickr

Jennifer,
 
Well done Jen :D :D

Your jig looks just right for what you are doing.

The next step is to make your "pen blank" fence adjustable so that you can set it up for mitres etc :wink:

Keep it up

Dave
 
Jen

there are many ways to do this.

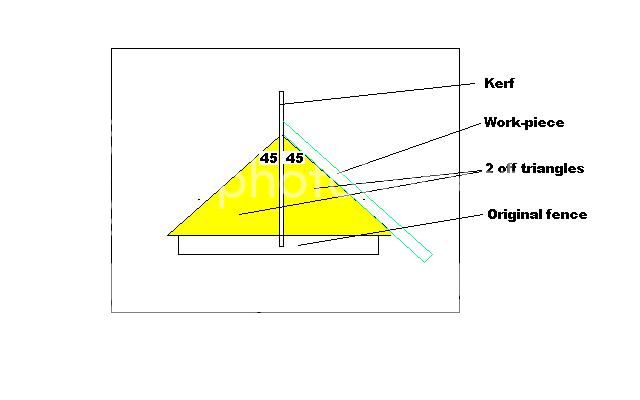
One way is as per this pic:

bandsawtable.jpg


A few pointers:

You may need to move your straight fence back towards you, to give yourself sufficient room on your table.

The triangles must be true accurate isosceles (ie each trangle will have two 45 degree angles and one 90 degree angle).

The total angle of the two triangles together at the "top" must be 90 degrees.

You will need to devise a way to fit the removeable triangles - one easy way could be to cut a hole in the centre of each triangle and then clamp to your fence.

If you need to clamp the workpiece to the triangles then make the holes large enough to take two clamps.

Make sure you have clearance for your workpiece in the throat of the bandsaw (left-hand side) - this method will not work for long pieces! Plenty of space on the right so if this becomes a problem then cut both mitres on the right hand side - turning the second work piece over. Be aware that this will magnify any error in your angles!

HTH

Dave
 
I was looking at a Podcast the other day called "The Apprentice and the Journeyman".

There was an episode, "Mitre sled for the Table Saw", which might be an interesting watch (assuming you use iTunes). Yes, it is for the table saw but I presume the idea could be adapted for a bandsaw.

He didn't use removable triangles but two pieces of timber meeting at 90 degrees at the tip. He left a gap at the rear of these two pieces, near the back fence, to allow it's use for cross-cutting.

I hope this is useful.
 
nanscombe":1vrbx3uc said:
I was looking at a Podcast the other day called "The Apprentice and the Journeyman".

There was an episode, "Mitre sled for the Table Saw", which might be an interesting watch (assuming you use iTunes). Yes, it is for the table saw but I presume the idea could be adapted for a bandsaw.

He didn't use removable triangles but two pieces of timber meeting at 90 degrees at the tip. He left a gap at the rear of these two pieces, near the back fence, to allow it's use for cross-cutting.

I hope this is useful.

I seem to post this every year... :)

Img_0011MitreRcd.jpg


Still going strong.

More here:

https://www.ukworkshop.co.uk/forums/mitr ... tre%20sled
 
Noel":3ix1yjvr said:
... I seem to post this every year... :)

I guess more people come to woodworking each year, and eventually face the same problems, so it must be a popular topic.
 
Thanks Dave, Noel and nanscombe. I'm sure I'll be able to make something up to suit.

Thanks for the tips.
 
Jennifer, somewhat cruder than your sledge but if you re preparing a batch of blanks to the same length you might want to make yourself a clamp on stop of some description, that way you can set and forget, also note if the pieces are for pens that marking the blank before cutting saves trying to match them up later.

The cumbersome Stop I made I use as a push handle because it's a small sledge.
 
Thanks for that link CHJ, that's a good idea. I've been using a 2" 'G' clamp to hold the wood but it's not ideal. I assume you could use that as a bigger clamp too.

I'm not actually cutting the wood for pen blanks atm - it's for 1/12th scale fireplaces I'm making.

However, I also turn pens so it's ideal on both fronts :)
 
Back
Top