little jig

UKworkshop.co.uk

Help Support UKworkshop.co.uk:

This site may earn a commission from merchant affiliate links, including eBay, Amazon, and others.

stef

Established Member
Joined
16 Jan 2007
Messages
383
Reaction score
0
Location
Normandy
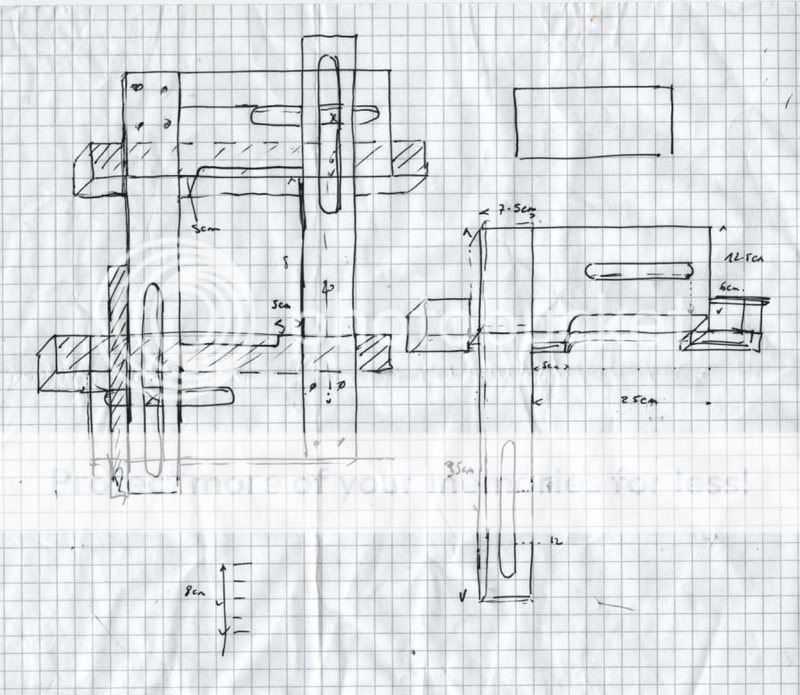
dont know if this is the correct section, but anyway, I designed a small jig to do my finger joins using the router.
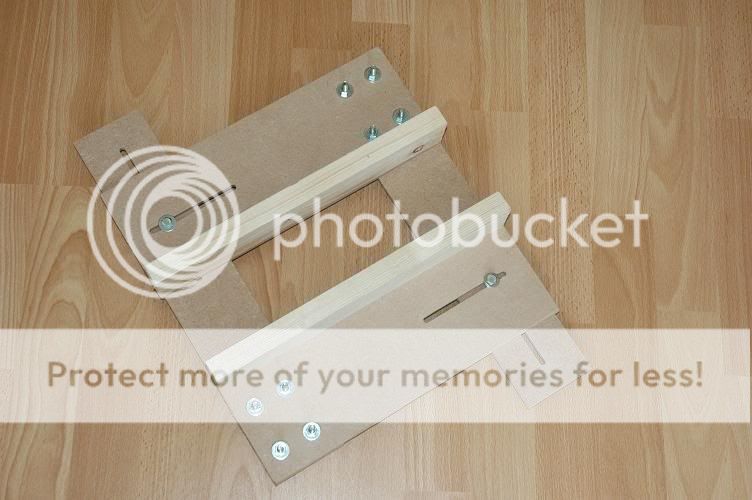
It works by placing all 4 boards (for a box, for example) face to face and clamped between the pine supports in the jig. the MDF edges then line up with the marked lines to cut the fingers out. The router goes on top, and should be able to trim the edges of the planks.
I havent tried it yet, but the theory works !
sketch.jpg

DSC_6864.jpg

DSC_6865.jpg
 
Looks a well made jig.

I must be a bit on the slow side this morning,8-[ I can't see how to cut finger joints with it,:oops: any chance of some pictures of it set up and in use? :roll:
 
DaveL":illk4kly said:
Looks a well made jig.

I must be a bit on the slow side this morning,8-[ I can't see how to cut finger joints with it,:oops:

Same here - I can't see how it works either :oops: :? Do you propose to cut all four pieces together? Would have thought you would have to do them in pairs, with one pair off-set by the width of the fingers. And do you have to re-adjust the 'fence' for each cut?

Cheers :wink:

Paul
 
Same here, probably a sunday morning thing though....
The Router Workshop shop on the woodworking channel has a very good jig for this
 
well, my explanations arent clear...
you replace the jig for each cut. the boards are cut in pairs, but you can cut 2 pairs at the same time, i.e. 4 boards. 2 of the 4 boards are offset by a finger's width, so that everything falls into place when the boards are lined up again.
the jig is merely some sort of fence which allows to route a "window"...
I modified it yesterday, and just replace the pine support with a longer piece, so that it's easier to clamp.
I'll take some pic of the jig in action today.
 
MooreToolsPlease":16we623t said:
Same here, probably a sunday morning thing though....
The Router Workshop shop on the woodworking channel has a very good jig for this

Woodworking channel? sorry very new to all this
 
here are some pics with the jig in use
I didnt mark the planks, so this is for illustration only.
hope it makes more sense.
DSC_6866.jpg

DSC_6867.jpg

DSC_6868.jpg
 
To begin with, I thought I could see what you were planning.. but after closer inspection it looks rather like a letterbox jig to me.
 
totally lost now??? How are you going to index the fingers? As far as i can see it, it will be a long job and one that will need a lot of careful positioning. A far better method is available on the Router workshop.
 
quite impressed with the jig from the router shop...i'll have to rethink mine ! it might be more difficult to use on fingers which are wider than the router bit though.
yes, i guess it is a letterbox jig (naive old me !) that just shows how green i am !
i cant see too much problems in aligning it though... not anymore than if i had to cut them with a saw anyway.
I will run the router to the jig on a dry run, this will tell me exactely where the bit bites. i can then use that mark to line up my marks on the edges.
finger indexing is done using the old ruler and pencil approach (for now)
 
Here is my version of the Oak Park jig. This one cuts finger joints of half inch width. Just use a bigger cutter and wider rail for each size you need. It works prefectly and can be fine tuned for fit.
boxjointjig1fe1.jpg
 
Well thanks Paul but I really can't take credit for this as it is 'Oak Parks' design. All I did was make my own version of it. I find that upcut spiral work well although I have used it with straight cutting bits too. I find the Spiral doesn't break out so much on Pine. I was going to make another for a larger cutter but find that this covers most joints I make with fingers anyway. :wink: I did try making a dovetail jig once too but ended up buying one instead, it was close but not close enough. :lol:
 
Back
Top