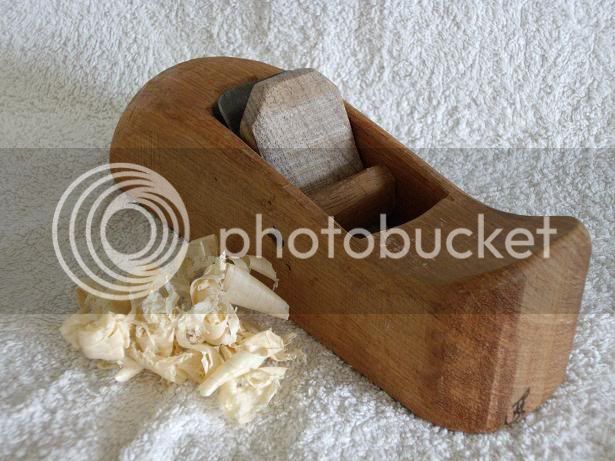
Krenov style high angle smoother

UKworkshop.co.uk

Help Support UKworkshop.co.uk:

This site may earn a commission from merchant affiliate links, including eBay, Amazon, and others.
Just the pictures George posted on the spinney side Aled.

Seem quite straightforwards, utilising an adapted ground hss drill bit or similar mounted in a length of silver steel with a bit of drilling and tapping.

Have just started exploring hollow forms rather than the same old bowls, but seems to be hard work so far and not as pleasant to execute, though I like the finished articles.

Anyway, don't want to hijack the thread too much, although maybe a bit late :oops: :lol:

Cheers, Paul :D
 
I tried the file trick as soon as they were cool enough handle & got a nice "ring" sound, so i`m hopeful things are going well.

Hope to get them in the oven tonight, i`ve offered to cook dinner :shock:, though why i need the oven on for beans on toast, Mrs B couldn`t understand :lol: :lol:.

Hope to crack on with the body over the weekend, so will post some more photos as & when.


Will be interested to know how on get on with the George type tools Paul, my hollow forms are coming on very very slowly, my admiration of George`s talent grows with every HF i attempt :?

Cheers.
 
Hi, Doug

Nice one!

Do the ruler trick on the back to save time.

I thought you would have rounded the top over before hardening, it looks like it should still be soft at the top :shock:


Pete
 
Managed to escape tonight, so i`ve made some progress on the body.
I`ve basically followed the example in F&C, so the first photo shows the blank drilled for aligning dowels for when the sides are glued back on, also a hole for the pivoting support that the wedge is driven against.

CIMG4826.jpg


The sides were then cut off 8mm thick, these & the inner sections were planed & checked that they would fit back together ok. The angles on the inner body were also cut, though i forgot to take a photo of this, so the next photo is of the wedge support ends being turned.

CIMG4830.jpg


Next is a partial dry fit with dowels at the ready, note the deliberate mistake, this extra hole will be cut away with final shaping

CIMG4831.jpg


Finally all glued back together, i couldn`t get another clamp on, honest

CIMG4833.jpg


Whilst i was doing this the blade had been cooking at 200 degrees C, & is now cooling nicely, i`ve got to work tomorrow so hopefully will make progress on the blade & wedge on Sunday.

As for the shape of the top of the blade, i`ve not made my mind up about that, i`m also not sure about the final shape of the body. So i think i`ll leave that until i`ve fitted the blade & seen that it works ok, before worrying about the design.
 
Had a play with the blade this morning, got an edge on it, the ruler trick helped,thanks Pete. I made a wedge & fitted the blade in the plane, I then managed to get some shavings with it, so at least i`ve not wasted my time. :D

Annoyingly the blade had bowed slightly during tempering, not much, but enough that it wasn`t sitting completely flat, i imagine this is part of the wonderful experience Philly referred to, so not being one who likes to struggle i`ve dropped it off at the engineers workshop to be flash ground.............. "cheat" who me? :lol: :lol:

So this afternoon i`ve been doing a little shaping of the body, i`ve not stuck to the original design as i have trouble gripping, so this is what i`ve come up with to suite my delicate hands. :whistle:

CIMG4834.jpg


CIMG4835.jpg


CIMG4836.jpg


For some inexplicable reason best known to Sod, between cutting the angles on the inner body & gluing up, a little piece of wood by the mouth came away, i presume this is just one of the joys ( :evil: ) of using Padauk. So in the last photo on the top right of the mouth you can see where i filled this little void with Araldite, i`m hoping this will be strong enough, it seems to have worked well so far. :)

Thanks for looking. :D
 
Looks really good Doug, amazing what you get done in a weekend! All I've managed is to re-hang some sliding wardrobe doors which had shrunk. Not surprising you may say until I tell you they are veneered MDF (1/4" over the length).

Good idea with the blade . It just dawned on me after your last post that these home made blades would be missing their surface grind.

What happened to the dowel holes?
 
Thanks Brian.

The dowel holes got cut away with the shaping, the blank was over size to accommodate this.

The surface of the steel was surprisingly good after tempering, though it did need cleaning up, but it would have taken hours to file/ abrade the blade back flat by hand.

As for doors shrinking, most of ours have to some extent, i don`t put this down to poor materials, it`s the central heating being turned on full by the good lady the moment i put my foot outside. :evil:
 
Doug B":w6ij818n said:
The dowel holes got cut away with the shaping, the blank was over size to accommodate this.:

Cunning stuff - interesting that "Krenov" planes are now better made than the originals. You could hack at it with a gouge to leave the "mark of the artisan"

I'll be interested to see the sharpness of the blade in due course.
 
Nice work Doug :)
I particularly like the curve to the front of the wedge.
Do you find it comfortable in use, or perhaps it's too early to say?

Have fun

xy
 
Modernist":2oqh20y5 said:
Cunning stuff - interesting that "Krenov" planes are now better made than the originals. You could hack at it with a gouge to leave the "mark of the artisan"

Agreed...the originals were fairly rough:

2h2d3.jpg


but then JK was almost blind when he made this one...signed if you look carefully - Rob
 
Nice work Doug; I really like the shape, although the timber colour isn't really to my taste.

I am seriously considering having a go at making my own blades now.

Ed
 
Brian,

the blade will prove interesting, i did do a bit of searching to see if i could buy one, but didn`t come up with anything to suite. The link in F&C to a blade maker wouldn`t work!

xy,

I`ve only oiled the plane a couple of times, so i can alter the shape if i find it uncomfortable, but the bulkier shape did fit my hands well. I will make a few more planes so this is really a prototype, so i don`t mind altering it if it means i end up with a shape i`m happy with.

Ed,

I don`t mind the colour, it`s the timber itself i`m not that keen on, it seems very "brittle". I think i`ll be trying beech for my next attempt.

Also next time i will keep the blades on edge when they are in the charcoal, i think laying the blade flat could be the reason the blade bowed . All a learning curve though.


thanks for all the comments.
 
Hi, Doug

It might also have been the angle of the blade when you quenched it, but it looks like you had them upright. I have a old sauce pan that I fill 2/3rds of the way up with oil, so it has a large volume of oil for more even quenching.

Pete
 
Doug
You'll always find the mouth area to be fragile - extra care needs to be taken with the corners until the plane is glued up and trimmed. And if you make one-piece planes its even trickier to preserve clean, sharp edges.
Keep up the good work,
Philly :D
 
At last, the final update.

It`s been a couple of weeks waiting for the blades to return, but :-

CIMG4894.jpg


Sooooo worth the wait & bottle of red vino it cost to have 2 polished perfectly flat blades, placed in my mits with no hard work involved on my part :D :D.

A few minutes honing, then the blade was lovingly :roll: placed in the plane & voila

CIMG4896.jpg


Another piece of that (rough looking smelly make you sneeze wood purchase from my good friend Rich) was looking beautifully smooth with no tear out at all.

I`m really please with the plane, the padauk was a nightmare, impossible to plane with my stanley`s & not get tear out, but this plane eliminated any signs of it in a few passes.

The blade sharpen up beautifully, shaving hairs off my arm in no time, hopefully it will hold its edge well, it seems to do so far, as i`ve also had a good "go" at some Oak & it is still cutting well.

I like to thank everyone for their advice, in particular Pete (Maddex) these definitely wont be the last blades i make & as for planes the next is going to be a rebate plane, so any advice with regard to making one would be gratefully received. Thanks


I like this wooden plane slope, much easier on the wallet :lol: :lol:
 
looking good JT it must be very satisfying making everything from scratch and finding out it works really well.

cheers

Jon
 
Hi, Doug

Nice one! Padauk usually gets a visit from my scraper plane so it looks like you have made a cracking plane.

Watch out Philly Dougyplanes are about :wink:


Pete
 
Lovely work.

Regards

Envious from Kent :lol: :lol:
 
Back
Top