Going to attempt a Greg Klassen style coffee table

UKworkshop.co.uk

Help Support UKworkshop.co.uk:

This site may earn a commission from merchant affiliate links, including eBay, Amazon, and others.

JungleJim

Established Member
Joined
13 Feb 2007
Messages
53
Reaction score
2
Location
Potters Bar, Hertfordshire
I really want to have a go at making a Greg Klassen river style coffee table like these ones here http://gregklassen.com/collection/river/

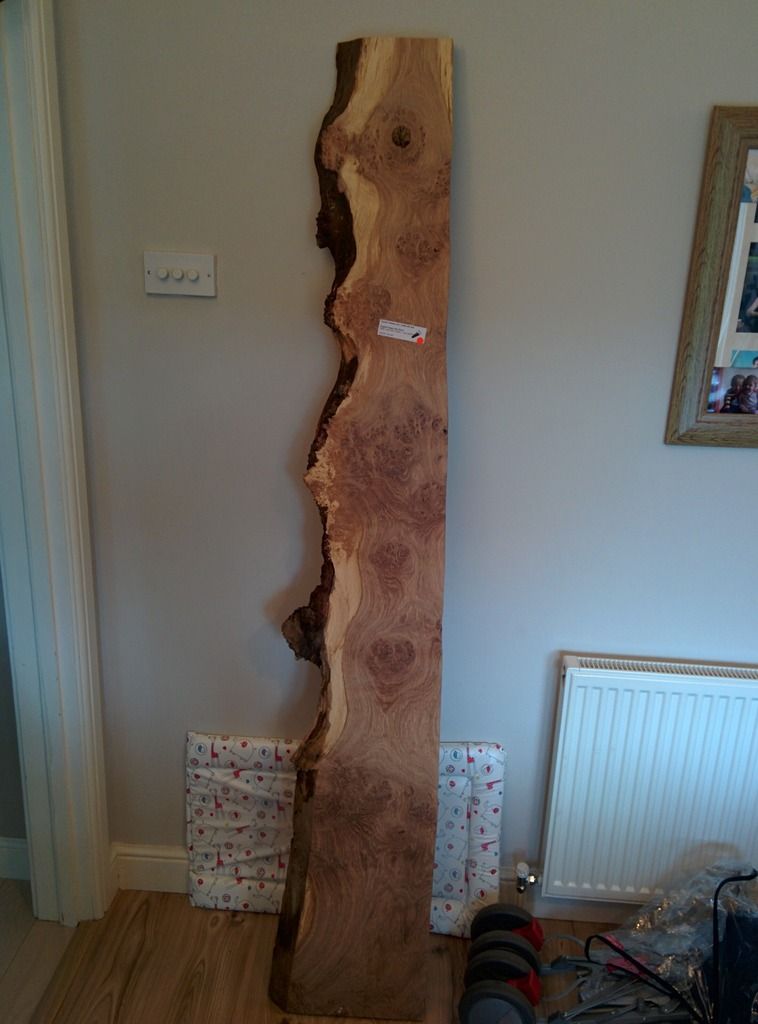
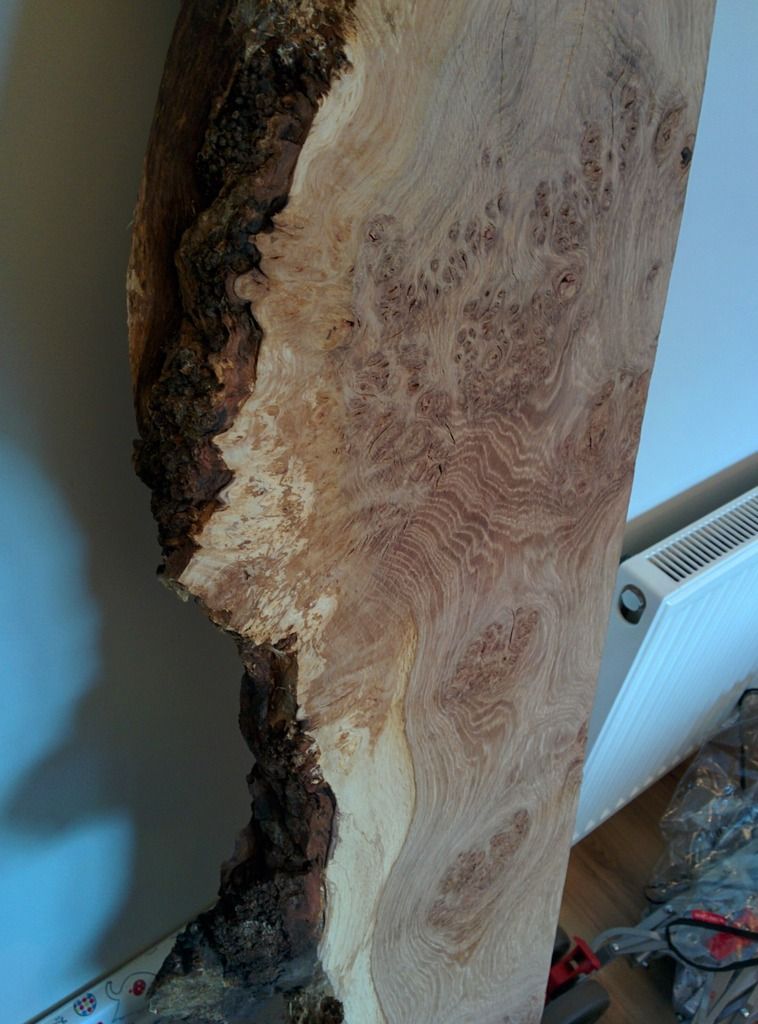
when I was at Surrey Timbers yesterday, i picked up this piece of pippy oak. The plan is to cut in two flip it round for the two sides, It was going to knock up a jig and get both sides flat and parallel with a router. I was going to remove the bark but leave the interesting "knobbly" bits what do you think?. Is there a best way of sanding and finishing oak like this?

I haven't picked the wood for legs yet but was thinking of using 2x2 oak for the legs and 2x1 for the rails.

I've got a friendly glazier near me so will pop in Monday to see what he can supply in the way of tinted glass. I've never cut glass before so this will be a new one for me.

any tips and things that could catch me out would be greatly appreciated.

Thanks

James


I love the style of those tables, I'll be interested to see how yours turns out :)
 
Hiya James,

They look ace & I like that kind of oak.

The creamy bits can be too spongey at times & it's a bit tricky to sand down without leaving scratches on the knots & pips(?) but sanding those areas in circles worked for me. As for finish planing I'd say a high angled (?) plane will do (like a block plane or scarper plane).. or use a cabinet scraper (& no sandpaper - apparently).

It won't be book-matched if you cut it as you intend & ripping /resawing it would so the look won't be symmetrical - but that is being fussy on my part. Perhaps Surry Timbers has a big bandsaw - then you could make 2 coffee tables !

The tricky bit I imagine is making the legs & apron work well without distracting the eye from the top or visually interfering with the gap when viewed from above. I'm not sure Klassen got it right in all cases.. but that is churlish of me to say as I can only dream of producing something of that quality.

For the glass I would say that you supply a template to the glazer who makes it up in plate glass & you inset it (marquetry like)... I bet you already knew that though.

Have you seen:
http://www.earthporm.com/learn-make-glo ... ent-resin/

I use resin to fill gaps, holes & knots but not used a photo luminescent additive.

Post some pics when it's done - good luck.

Togs
 
Never made anything like it myself, looks interestingly "different".
The only advice I would give is a bit obvious. Gap and lay out the top, draw out the shape each side to be lowered, or rebated and get the glazier to trace or mark out the glass.
When he's machined up the edges and its annealed., then final mark and template.
Please keep us posted, I hope you're on a winner here.
Regards Rodders
 
As with most things, I suspect it's better to work the harder material first - it will be easier and better to suit the rebate to the glass than the glass to the rebate. You could make a templet for the glass, get it cut, ground and toughened then possibly use the glass as a guide for a bearing guided rebate cutter. (I have some experience of working glass, but this is only my opinion :) )
 
Great project James.

Your board seems to have the best pippy patch in the middle, it would be a real shame to cut through that so maybe make the table a bit shorter and preserve that lovely, characterful section. You could photograph the board, print out a few copies of the photo on paper, cut it out, and mock up some alternative layouts that way. You'll be astonished how quite small alterations at the planning stage can make a big difference in the final impact of the piece.

Flattening with a router on a sled is one option, but it's not such a huge piece of timber, so doing the work by hand would be entirely practical. And for future reference, Surrey Timbers are generally happy to pass a board through their thicknesser.

Good luck!
 
You could also look at pouring resin down the gap, a bit like this;


Whilst it will create it's own problems (depending how wide the resin is) it will also remove a lot of the others associated with marrying the glass to the wood. Also it uniquely shows of the live edge a little better (IMO). I quite like the look of the glass version myself and I know the luminous variety has been done to death but it just gives another option is all.

Either way, this is a cool project and I'll be watching.
 
Thanks everyone for replies, all your tips and recommendations are exactly what I need. the more information I can get before i start hacking away can only help.

Tog's you're right, Whatever I do for the legs will be simple for that very reason. I will need to practice a bit with a scraper. My initial thought was to cut the glass myself. I has seen some good vids on youtube, but will have a word with the glazier.

Phil, that was my plan get the glass cut to the shape I want and then use it as a template cut the rebate on both sides.

Custard, that makes sense The board is long enough to loose a bit if i need to. I'll get some proper photos and do a bit of photo shopping to see what it could look like.

I like the resin idea, and there is one particularly big knot where I was thinking of doing this. Does any one know of any links resources or or have advice on finish pippy oak (filler etc). this is new and exciting territory for me :D

Thanks again
James
 
JungleJim":2hefvdm1 said:
Thanks everyone for replies, all your tips and recommendations are exactly what I need. the more information I can get before i start hacking away can only help.

Tog's you're right, Whatever I do for the legs will be simple for that very reason. I will need to practice a bit with a scraper. My initial thought was to cut the glass myself. I has seen some good vids on youtube, but will have a word with the glazier.

Phil, that was my plan get the glass cut to the shape I want and then use it as a template cut the rebate on both sides.

Custard, that makes sense The board is long enough to loose a bit if i need to. I'll get some proper photos and do a bit of photo shopping to see what it could look like.

I like the resin idea, and there is one particularly big knot where I was thinking of doing this. Does any one know of any links resources or or have advice on finish pippy oak (filler etc). this is new and exciting territory for me :D

Thanks again
James

It's lovely pieces of wood like this that got me into welding. Obviously opinions vary, but IMO nothing sets a gorgeous slab top aside like some understated legs.

Watching this with interest as I've had a yew slab set aside for something like this since I came across these tables a while back.

I very much like the idea Phil.P mentioned about using the glass with a bearing guided bit to rebate it.

Good luck.
 
There are some nice pieces on his site, aren't there? And you have a beautiful board there, good luck with your project.

As to finishing pippy oak, a trick I got from Racers is to mix epoxy with coffee powder to make a dark filler for the knots. I'm making a coffee table myself (far too slowly) from pippy oak and I have done this. I'm very pleased with the result.
 
ABL Steves were great with me

http://www.resin-supplies.co.uk/Pricelist.htm#POLYESTER RESIN

& as you'd expect they really know their stuff & can give you all the advice you'll need as to what you want to do & what look you want to achieve.. They sell additives like brass dust !.. I have some myself but not had to chance to use it. I got small bottles of lay-up or casting resin, hardener, small mixing cups, (lollypop) mixing sticks. Let it thicken a bit because if it is too viscous it runs into the tiniest fissure & you can spend days (yes days !) filling a shake.. It took 2 pours a day over a week to fill all the shakes in an oak mantelpiece once. I won't make anything ornate out of oak 'sleepers' again.

I found that on my oak furniture there was no need to add anything as the colour of the knot, shake, pip etc showed through enough & therefore worked nicely - for me at least.
 
A wire brush will clean the bark from the pippy sections, I would make a template of the glass and then use it to mark out the rebate.

I wouldn't use most of the bottom straight section, it doesn't fit with the curvy top section, you could make a under-slung shelf with the off cut.

Pete
 
Cheers Steve, I would never have thought about adding something like coffee to the epoxy. And thanks for the link to the epoxy website Togs that was going to be one of my questions.

I had one, not very successful trip to the glass shop. The usual, incredibly friendly and helpful gent was replaced with someone who can only be described as his exact opposite. When she heard that it didn't consist of only right angles and straight lines i could see it in her face I wasn't getting any where today. I showed her a pic of the sort of think I would need done and after a bit of eye rolling and huffing, she came to the conclusion that it was going to cost a fortune. I won't be deterred, I'll go back when she's not around. I'm not worried about a quote at the moment, just want to see if its something they could do if I gave them the template.

Have also been doing a pit of photoshopping of the plank and have come up with the two options below. The first is without using the very straight bit of oak at the bottom and will give me a table approx 70-75cm long. The second uses pretty much the whole plank and will give me a table approx 90-95 long. what do you guys think.

Cheers

James


Back
Top