


petermillard
Established Member
Hi folks.
Just completed a fun little project so thought I'd share. I don't do many small jobs these days (usually home stuff) but when I do I'm constantly amazed at the amount of gear you need to cart around - being a fairly mobile woodworker I keep most of my gear in Systainers which makes it easier, but it still adds up to a lot of stuff to shift. These are my standard 'stacks' which go everywhere...

Dust extractor on the left with small sander and clean-up tools above, and drills above that. Hand tools on the right, with fixings and odds & ends in the drawers below. Plus there's a hop-up platform, extension canbles etc.. etc... - you get the idea. Anyway, I came across this toolbox on wheels article in This is Carpentry:-
Full article here - http://www.thisiscarpentry.com/2008/10/ ... x-article/
... and thought it was a great idea. I've copied this and adapted it to my own requirements - by keeping the dimensions similar to my Systainer stacks I can use the same lashing points in my van to keep everything upright...

Mine's made from Birch ply scraps and offcuts, 12mm & 18mm

As in the original the top step is hinged, but mine has a lift-out odds & ends box for things specific to the job I'm doing, and the shape of the handle means that it can hook over the back of the unit (or anywhere else) at a convenient height...

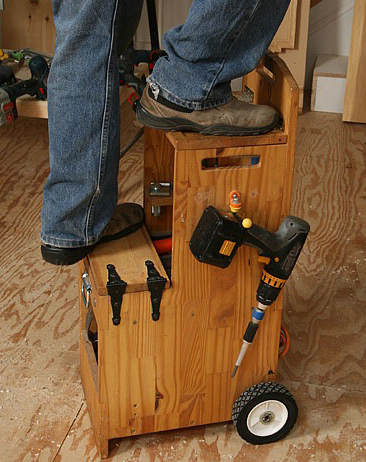
I had no need for a fold-out hammer hanger, so the step in mine lifts off for easy access toe the top tray - just the right size for my hammer drill with built-in dust collection - wish they made a cordless version!

The lower section is the right size to take one of the drawers from my systainer stack - this one is the screws drawer. I may end up making a drawer (or two) for specific tasks, then I scan just load up the appropriate drawer and know I have everything I need.

As on the original, at the back, there's an extension cable...

...and an adaptation of my own, an extra 'foot' to add a bit of stability if I know I'm going to be on the top step for any time. I had all kinds of ideas for a more elegant solution to this, but ended up going for the simple option - it's just an extra piece of 12mm that 's dry Domino'd to the underside and with a bevelled top edge to keep it in place against the back, and just the right height to lift the wheels off the deck by a couple of mm.

The wheels are a pair of 150mm trolley wheels from Toolstation, the axle a piece of 12mm threaded rod with locknuts on either end, and the whole thing runs in a piece of steel tube I had knocking around the workshop - ditto the extension lead; total cost about £6, plus a few scraps of Birch ply and a bit of time. It gets used in anger for the first time tomorrow - I'll keep you posted!
Thanks for taking the time to look.
Cheers, Pete.
p.s. sorry about the wobbly colour in some of the photos - fluorescents!
Just completed a fun little project so thought I'd share. I don't do many small jobs these days (usually home stuff) but when I do I'm constantly amazed at the amount of gear you need to cart around - being a fairly mobile woodworker I keep most of my gear in Systainers which makes it easier, but it still adds up to a lot of stuff to shift. These are my standard 'stacks' which go everywhere...
Dust extractor on the left with small sander and clean-up tools above, and drills above that. Hand tools on the right, with fixings and odds & ends in the drawers below. Plus there's a hop-up platform, extension canbles etc.. etc... - you get the idea. Anyway, I came across this toolbox on wheels article in This is Carpentry:-
Full article here - http://www.thisiscarpentry.com/2008/10/ ... x-article/
... and thought it was a great idea. I've copied this and adapted it to my own requirements - by keeping the dimensions similar to my Systainer stacks I can use the same lashing points in my van to keep everything upright...
Mine's made from Birch ply scraps and offcuts, 12mm & 18mm
As in the original the top step is hinged, but mine has a lift-out odds & ends box for things specific to the job I'm doing, and the shape of the handle means that it can hook over the back of the unit (or anywhere else) at a convenient height...
I had no need for a fold-out hammer hanger, so the step in mine lifts off for easy access toe the top tray - just the right size for my hammer drill with built-in dust collection - wish they made a cordless version!
The lower section is the right size to take one of the drawers from my systainer stack - this one is the screws drawer. I may end up making a drawer (or two) for specific tasks, then I scan just load up the appropriate drawer and know I have everything I need.
As on the original, at the back, there's an extension cable...
...and an adaptation of my own, an extra 'foot' to add a bit of stability if I know I'm going to be on the top step for any time. I had all kinds of ideas for a more elegant solution to this, but ended up going for the simple option - it's just an extra piece of 12mm that 's dry Domino'd to the underside and with a bevelled top edge to keep it in place against the back, and just the right height to lift the wheels off the deck by a couple of mm.
The wheels are a pair of 150mm trolley wheels from Toolstation, the axle a piece of 12mm threaded rod with locknuts on either end, and the whole thing runs in a piece of steel tube I had knocking around the workshop - ditto the extension lead; total cost about £6, plus a few scraps of Birch ply and a bit of time. It gets used in anger for the first time tomorrow - I'll keep you posted!
Thanks for taking the time to look.
Cheers, Pete.
p.s. sorry about the wobbly colour in some of the photos - fluorescents!
")

