Bank holiday weekend project

UKworkshop.co.uk

Help Support UKworkshop.co.uk:

This site may earn a commission from merchant affiliate links, including eBay, Amazon, and others.

StevieB

Established Member
Joined
29 Apr 2003
Messages
1,719
Reaction score
46
Location
Chatteris, Cambridgeshire
So there I was, reading the Axminster catalogue while SWMBO was watching ground farce on the TV and giving me a running commentary while she did so (why do women do that - if I was interested I would watch it!). So not really listening just doing the usual 'hmmmn' and 'uh huh' and 'yes dear' at the appropriate intervals when she say's 'Oh thank you - could you do it obver the bank holiday weekend?' Eek, a quick play back of the conversation reveals I seem to have agreed to build a pergola and deck (just like that nice Tommy bloody Walsh does). :roll:

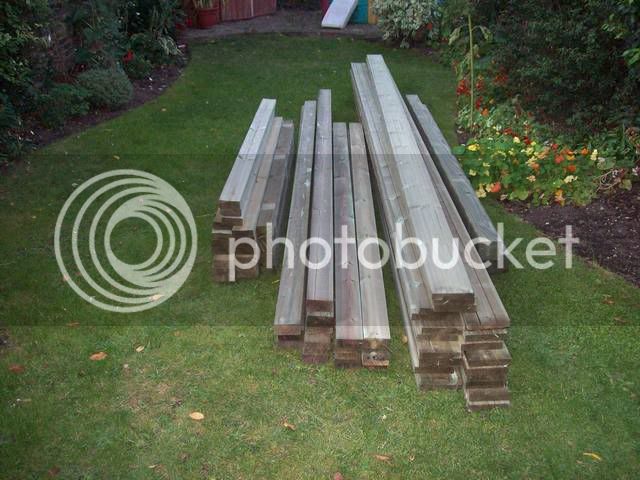
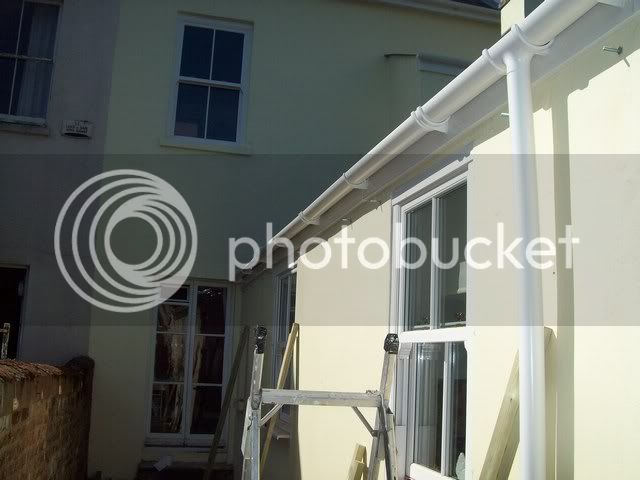
A quick sketch on paper and a bill for £700 later and I started with this

2small.jpg


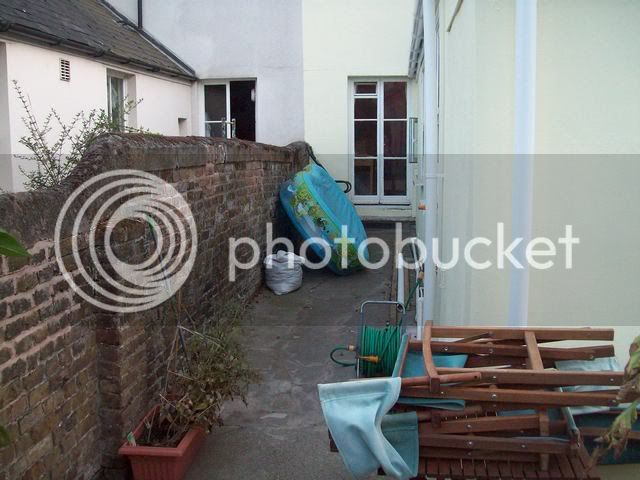
and have to build a deck and pergola here. Mainly to hide the poor concrete surface and the pipework and drain as well as to get a useable area from what is currently a fairly dingy area. Notice the door is the same height as the right hand guttering, making it impossible to put the pergola ABOVE the door......

1small.jpg


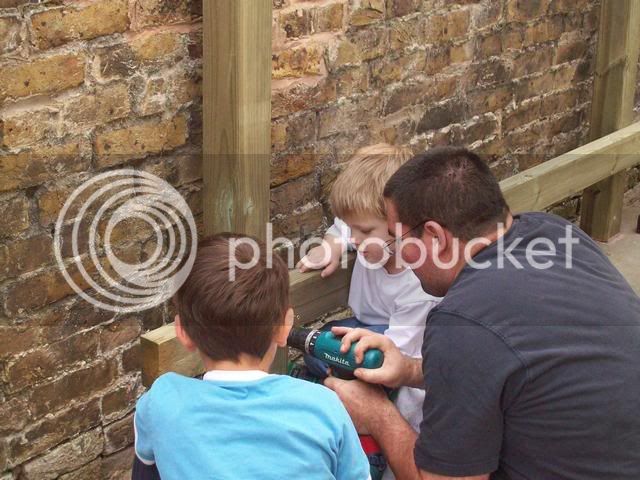
Started today with putting up the wall plate - resin fixed the studding into the wall (and used the kids chalk to mark out on the wall the other side)

3small.jpg


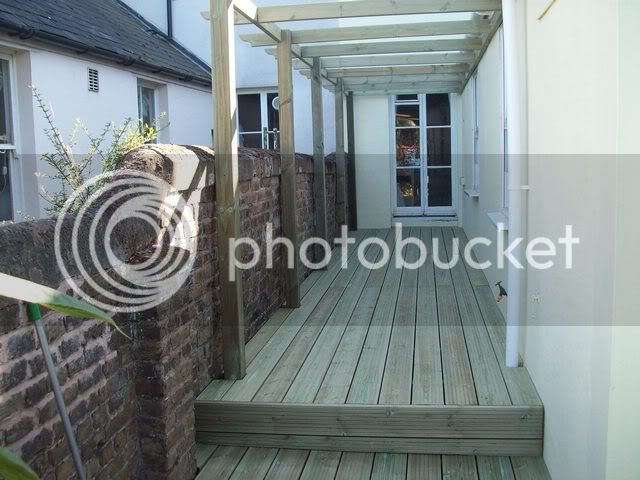
Fantastic stuff the resin, sets rock hard in a mere 20 minutes. On with the posts and the first bay of the pergola. The cross members are set into the wallplate with a half lap joint and the same on the cross rail the other side. The cross rails are also half lapped together behind the uprights - you can just see the end of the first one behind the first post.

4small.jpg


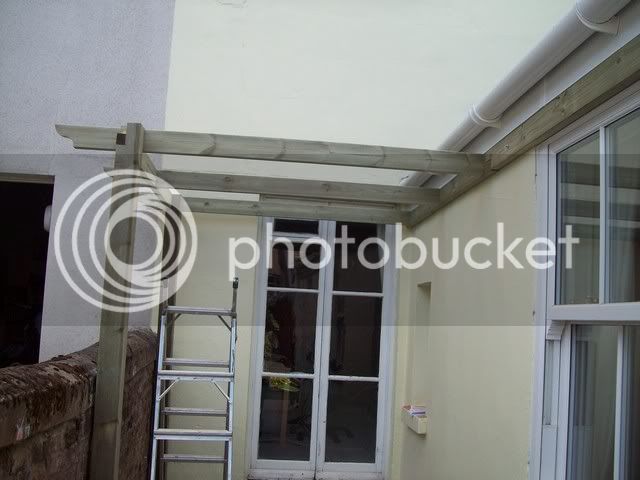
Yes, it does look odd that the timber cuts across the doorway as noted earlier :roll: On the plus side, the doors do open inwards and they are approx 8 ft tall, so no chance of banging your head even though it looks like you will. I might take out the first cross member if it doesn't look right when finished, but for now SWMBO wants it left in so in it stays.

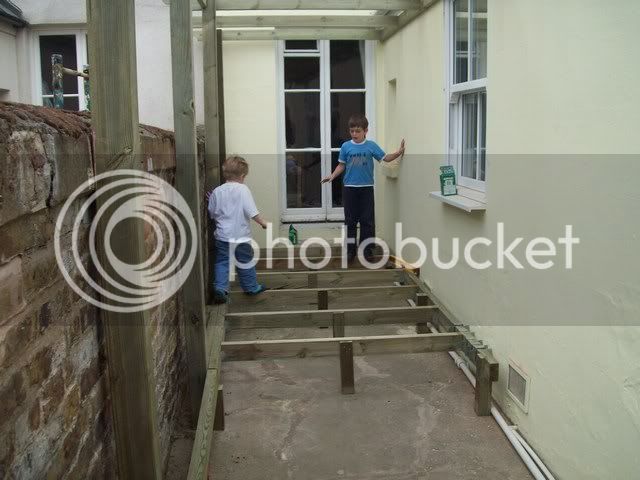
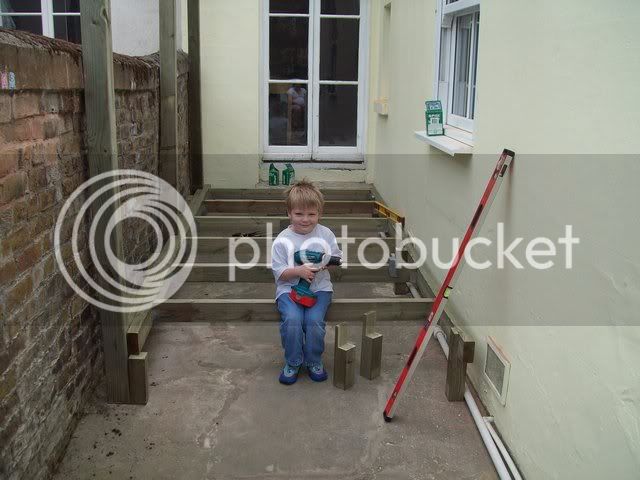
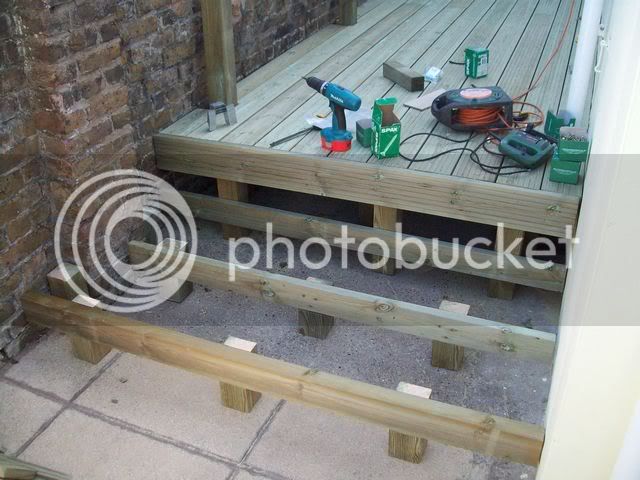
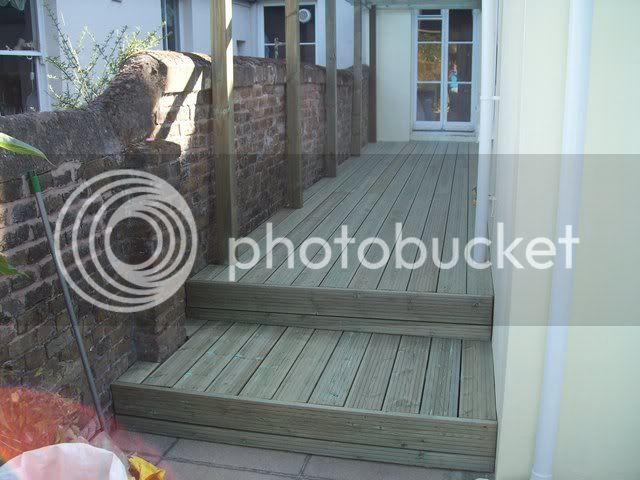
My but the timber is heavy. It must have been sitting in a bath of preservative or something because it was wet and fluffy when cutting right the way through and those big posts are 100mm square. Anyhow, after day 1 the pergola is finished and its onto the deck for day 2

5small.jpg


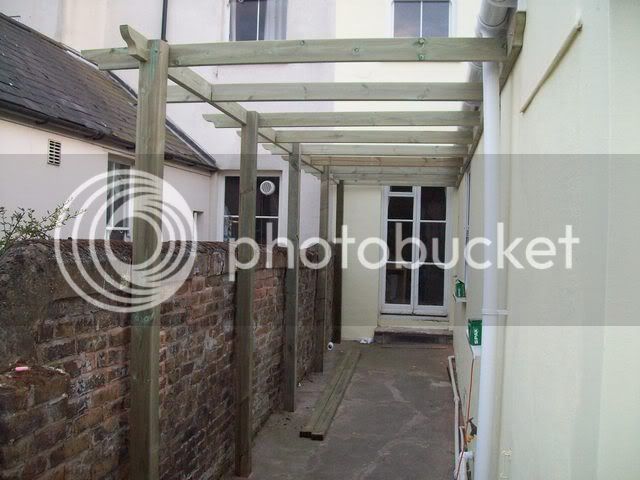
Grand plan is to have trellis between the uprights in two of the bays with roses growing up them - eat your heart out Tommy Walsh!

Steve
 
Since I got on so well yesterday, took the morning off to play squash. Then started on the decking with a little help:

8small.jpg


They soon got fed up with helping Daddy and decided I wqs building them a climbing frame :roll:

7small.jpg


Before my youngest son decided he wanted my drill and I couldn't have it back

6small.jpg


As a consequence of all that I never did get all the decking down

10small.jpg


Had loads of niggling trouble getting round the pipework on the right hand side, and was a bit worried about getting the decking boards adequately supported on the left hand side between the pergola uprights. Also decided to add additional leg supports in the middle of each cross piece - not strictly necessary but I don't want any future sag in the middle of the deck. In a perfect world I would have notched the pergola uprights to take the deck rails but as its all going to be hidden by the deck anyway its a bit of a cut and screw job under there.

So whats left for the bank holiday? The rest of the deck clearly, and a large step at the front end. Also the trellis for the two panels. Not sure I have enough timber for the step supports unfortunately and It's my eldest son's birthday tomorrow so its looking 50-50 for a bank holiday finish. SWMBO and her grand ideas :roll:

Steve
 
It looks well built to me - I hope it achives what you want to do. It seems that the top sross members overhang the property dividing wall? If so, do your neighbours approve? I think it contravenes planning regs too.

Richard
 
Aye, the cross the wall by about 4". We have a lovely neighbour who I spoke to when I dry fitted the first bay before screwing it all together and she was more than happy with it. Thinks its wonderful and cannot wait to see roses growing up it. I offered then to trim the cross members back to the dividing line (the timbers in the photo are the length they came as, 1.925 meters - no idea why they are that specific length!) but she was fine with them as they were. It will be easy enough to trim back the compound curved end to a diagonal if there is a problem in the future. The compound curve shape is actually the rim of a pint glass - the timbers came square and I didn't have a pair of compasses, so hunting for something with a diameter of approx 90mm and a pint glass was the first thing I found :D

Steve.
 
Of course you just 'know' that that waste pipe is gonna spring a leak, and right at the top end, quite soon after completion of the decking don't you? :)

Ever the pessimist me. :lol:
 
StevieB - looks like quite a good job you've done already sir. Congrats - just one question...

How have you fixed the uprights on your boundary wall? Only asking cos I need to tie some into a new wall being built by my neighbours brother (When his workshop's finished :evil: ) Wondering if there a "tie" I can buy / supply to him to insert into the wall as he lays it, or "Rawlbolt" when it's dried off?
 
Hi Mailman - the uprights are not actually fixed to the boundary wall. As each is 4 inches square they are sitting on the concrete floor, and believe me they will not be moving the weight they are. The deck rails are screwed to them which also gives extra stability - there is no movement in them at all.

Posibly studders, possibly :wink: I did check all the joints before starting and renewed the highest one on the kitchen sink outlet as a precaution as it looked fairly weak, so fingers crossed......

Managed to get on with the rest of the decking today, and was just able to build the step out of the timber I had left. I had wanted to build it as a rectangular frame supported on legs but due to a lack of timber went with 2 independant cross supports with a third fixed to the main deck legs. These are then held in place by the step decking boards themselves. Not ideal, but its still rock solid and all hidden

11small.jpg


After finishing the decking and the step that was about it for the day as it was time for my sons 6th birthday party. So alas, no trellis in the three days. On the plus side there is possibly just about enough decking boards left for a couple of planters for the roses SWMBO wants to grow.

12small.jpg


13small.jpg


All in all fairly happy with the result so far given the time frame in which I built it. Top tips for anyone contemplating the same type of build - have a mate to hold the uprights when building a pergola while you screw the top members into place! Secondly never, ever, assume you have enough screws for the job at hand. Must be almost 300 screws in that of various lengths :shock: And thats without screwing the trellis together.

Actually quite enjoyed doing it as a project - its the closest I have been to 'woodwork' for a while what with work and general DIY and decorating taking precedence over workshop time. Probably not quite up to a Ground Farce finish, but good enough that SWMBO is happy and thats fine for me!

Steve.
 
Proper Job Steve. I know what you mean about doing it on your own. I did a full deck on my own and that was probably what finished my back off. Extremely satisfying when it's done tho. Makes such a change.
 
Hi Stevie,

I don't know how much sun you get at the rear of your house but be mindful of the potential for green algae or fungus to grow on the decking when the pergola plants are in leaf and creating shade. I assume that for aesthetics and/or minimising cuts you have laid the decking with the grooves running in the direction of travel - beware, when the deck is wet or covered in algae it will be like an ice-rink; I this know from bitter experience!

Take precautions now and treat the decking to prevent algae, fungus and mildew.

Sorry to rain on your parade but I badly hurt my back falling on a similar deck.

Cheers,
C
 
Looks a proper job and improves that area immensely. I would remove the first cross member near the door as I think it will fool the eye a bit when looked at from the end.
 
Super Job!

I agree with Studders, I think the overall look would improve with the cross member at the door removed.

But, other than that, it's a great bit of work and you can be justifiably proud of yourself.

Best Wishes,
Brendan
 
Thanks guys. Chris - do you havea particular product you would recommend? There is a slight fall on the deck to eliminate surface water but agree that something may be needed in the winter months.

Studders, Brendan - I am with you on this one but SWMBO is against. Just the other side of the french doors is our office and PC that overlooks the deck. SWMBO spends quite a bit of time in here so is looking from the inside out and wants the first cross member to stay. Hopefully with plants and trellis etc it will soften the outside in aspect a bit and make it less obvious.

Steve.
 
please don't take this the wrong way because it isn't intended as a criticism, I can see that wall is painted, it looks to me that the deck is butted right up against the wall..... I take it that the deck is well above the DPC? I've been told that even rain "splash" from deck boards left a few mm from a wall (above the DPC) can cause a damp issue. just something to watch.

looks really nice though

Steve
 
A grand job, very well done. :)

Only other comment I would make is to make sure you seal any cuts ends as the preservatives don't go more than about 6mm deep in to the timber.
 
Nice work.

I'd like to add though, slippy decking isn't a "winter months" issue. It's a slightly damp day issue.

The one thing Tommy "The Kid" Walsh* and the likes don't tend to bother mentioning when they put in decking is just how terrifyingly slippery it can get.

I used to work in a bar with a HUGE decked area out the front and the whole thing had strips of grip-tape (something akin to an 80ish grit sandpaper or a bit rougher) on it to stop that, and even then I saw a few people take a tumble on it.


Also, it seems you're happy enough to trim the pergola top, which is good, but without a written agreement your neighbour or any subsequent neighbour could insist it is trimmed back at any time. Unlikely and not even a big deal if you don't mind doing it, but worth a mention.


* Some might disagree, but they'd be wrong, they guy's a sodding cowboy.
 
Back
Top