Aquarium cabinet

UKworkshop.co.uk

Help Support UKworkshop.co.uk:

This site may earn a commission from merchant affiliate links, including eBay, Amazon, and others.

mailee

Established Member
Joined
26 Jun 2005
Messages
5,502
Reaction score
4
Location
grimsby Humberside
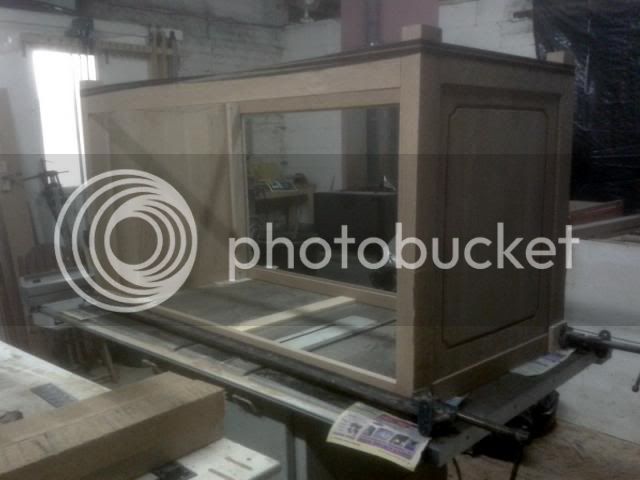
As I stated in the Cantilever table thread I am also building an aquarium cabinet in AWO. I started on Tuesday after machining all the wood up along with the table. First job was to make the four legs and rout grooves to accommodate the panels.

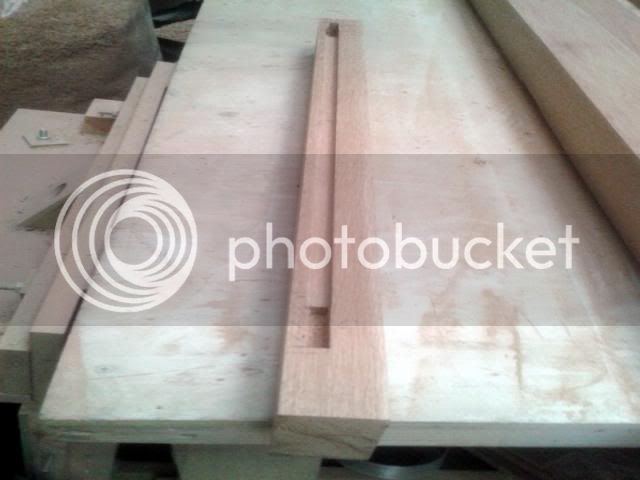
The rails have a rebate for the panels.

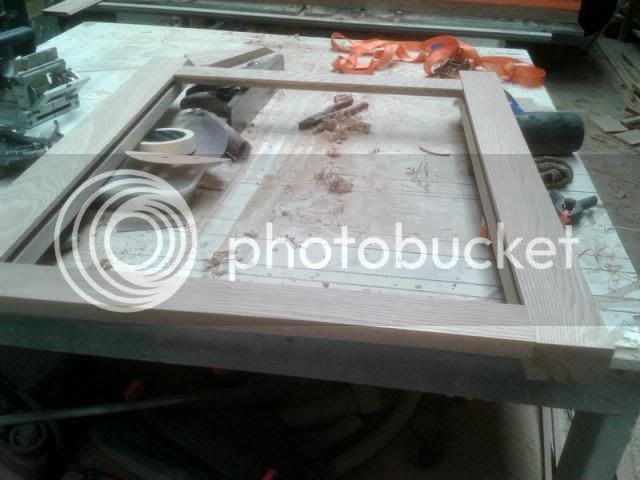
While the panels were in the clamps I had a test fit of the ends to get the exact size for the panels.

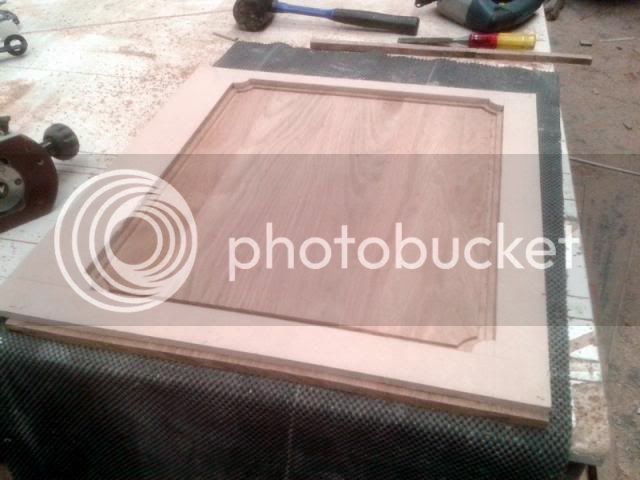
Once the panels were ready I cut them to size and made a template for the design. then using the router and a guide bush I routed out the design on each one.

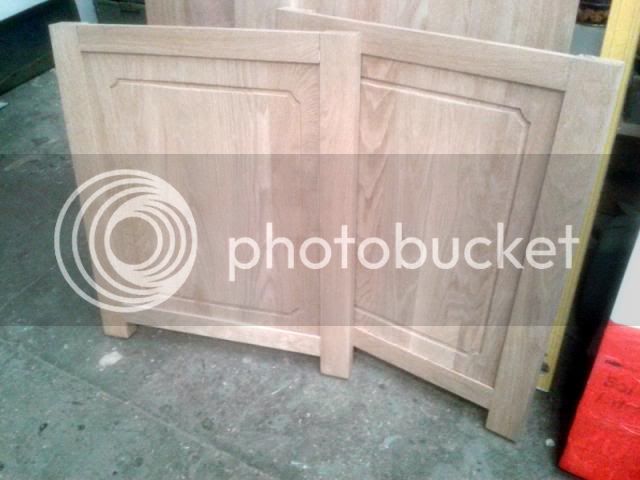
After a good sanding I assembled the end panels and put them aside to dry. While these were in the clamps i made a start on the frame for the canopy. This is a simple mitred frame reinforced with biscuits.

With the end panels out of the clamps I gave them a clean up, and then assembled the rails and left them in the clamps.


I won't get anything done on these tomorrow as I am out on a job but will continue again on Wednesday. :D
 
It has been one of those days today! those ones that seem like you don't get a lot done although you have been working all day! that said I did make a mistake which cost me quite a bit of time when the router slipped while I was routing the detail on the hood! :oops: I shall post some shots of that tomorrow. :roll: I did manage to get the pieces for the back panel in the clamps.

These will be fitted in two sections to make things easier for assembly. While they were in the clamps I gave the top a good sanding and put a bull nose on the edges.

I shall fit this last to allow me access into the interior for fitting the shelf and divider. I also got the up stand assembled which will be screwed to the top to encase the tank. Also after my co*k up I managed to rectify it and re-assemble the hood frame. Hopefully tomorrow will be a better day. :roll:
 
Been so busy today i almost forgot to take any WIP shots, sorry, :oops: I did remember to take a shot of my mistake though. :roll:

I made the mistake of making a template out of sections and one of them moved! oh well I will know next time. I did get it done in the end but had to do a lot of sanding to remove the burning at the corners.

Strangely though the designs on the sides went without a hitch. I got the back panel fitted today along with the up-stand and the canopy frame re-assembled after the accident. I cut slots in the top of the frame and made some buttons to hold the top on. The plinth is now fitted to the bottom and all of the outside has been sanded to 240 grit. I also machined up some more Oak for the bottom and the divider and shelf. Had to dash off to see a customer tonight so I didn't get any more photos but will update with some tomorrow.
 
I was cursing a lot I can tell you. It is a large tank which measures 54" wide 24" deep and 27" high. Calculations say it will weigh in the region of half a ton! needless to say why it is in solid oak. :shock:
 
I had a 5" tank with much the same volume as that. It was a very good make, and it came with a factory made base unit. This had two cupboards either side and two shelves in the centre. It was originally flat packed and was entirely chipboard.
 
I've just been looking at the template for the end panels. It looks to be mdf made from a single sheet.
Novice's question:
How did you cut the curved corners in the template? I know from my own efforts that if the template isn't smooth then the result will show the defect [obviously!] did you use a jig-saw then tweak them by hand, or rout them with compound guides?
Sorry if the answer's obvious to everyone else.

Just had another magnified look at the template; is it built up from pieces or are those pencil lines?
 
I have built many a tank stand over the years, all from softwood and sheet material for all manner of sized tanks (expensive hobby for many years #-o #-o ). I cant help but wonder if you are putting a center upright in the front of the cabinet where the doors will be? Cant make out how deep the top rail is but I would be a bit twitchy if I was doing it with softwood.

Sorry if I'm way out of order, and yes I know that many expensive tank cabinets are made of dung chipboard with very little reinforcement (had a couple myself).

Just wondering (runs for cover...).
 
Yes Mike, the template was one piece of 9mm MDF which I cut with the jigsaw and then tweaked by hand. (Wish I had made a one piece one for the hood frame too!) Those are pencil lines you can see in the photo.
Yes Phil, the customer has stated where the holes want to be and how big they are.
No skills, The cabinet will be split into two sections with a centre divider that will support the middle. On the right will be a shelf and the pump equipment will be housed in the left.
 
I spent a lot of today machining up some more of the Oak to make the interior sections and the lid. As I mentioned yesterday I got the top and the up-stand completed along with the back panel fitted.

I also got the hood frame finished ready for sanding (After mangling the first attempt)

I finished off the day getting some more oak in clamps ready for the morning.

Tomorrow will see me fitting the top to the hood and the interior of the cabinet....hopefully. :roll:
 
The area of the bottom is 1296" - the weight ( assuming 1/2 ton ) is 1120lb - less than 1lb per square inch - unless something were seriously twisted or uneven, 12mm - 15mm plate glass (which itself has limited movement because it's stuck to the vertical sides of the tank) is not going to fracture. I've taken 1/2" polystyrene from under a tank that size, and it's only been compressed 15% - 20% after two years. The support needed is more often than not what the eye demands for the unit to be aesthetically pleasing.
 
Thanks for the info Phil. I am sure it will take the weight fine anyway as you will see from the photos it is well reinforced.
I had a pretty busy day today and got the bottom fitted to the cabinet.

Here is a shot of the underside where the centre section will transfer the weight through to the floor.

With the divider installed it is looking more the part now.

While the shelf was in a glue up I started on the hood. After sanding all the boards flat I cut sliding dovetail slots into the underside and inserted some splines to stop the top from racking in use.

these are held with a drop of glue on one end and a brad in the other just for luck. :lol: when this was completed I ran a round over on all the edges.
I attached the frame to the top with screws and elongated the holes to allow for movement, hopefully all this work will ensure there will be no twisting in the top.
The hood is now finished ready for hinging and a finish.

The hood frame will then split when hinged like this.

I left the shelf and the doors in the clamps ready for starting on monday....I am having a well earned break tomorrow. :D
 
Got on extremely well today and had a late night due to applying the finish. My first job today was to make the doors.

After cutting the shelf to size and installing the divider I started on the finish.

By the end of the evening I had it all coated up.

I now have the hinges to fit and the handles and cut a hole into the back panel. I might get that done tomorrow but I am going to get some more work done on the table as the customer is chomping at the bit. :roll:
 
Well the cabinet is now finished.

I cut the hole into the back for the pipes and mounted the top on now I have finished on the inside.

I also got the hood finished after hinging the lid and fitting some stays.


I am pretty sure the customer will be happy with it.
 
Looks good, given the money some aquarium people spend on gloss sprayed mdf rubbish cabinets they could own a very nice bit of cabinetry instead. Hope the customers very happy.
 
Got this delivered to the shop today and got a good shot of it with the tank in place.

The shop owner was impressed and said they sometimes get calls for hand made stands and he will be in touch in the future. :D
 

Latest posts

Back
Top