Alcove shelf

UKworkshop.co.uk

Help Support UKworkshop.co.uk:

This site may earn a commission from merchant affiliate links, including eBay, Amazon, and others.

KentAndy

Established Member
Joined
17 Jun 2014
Messages
36
Reaction score
0
Location
Kent UK
Hi all,

I want to build a shelf in an alcove. I was going to battern 3 sides, add a top and then add a front to the shelf.

I was thinking 2x1 wood for the battern, ply for the shelf and a 6mm pine strip for the front.

Are there any alternative suggestions? What size screws would you use for the battern?

Many thanks.
 
A bit more info would help gain the best advice.

How wide and deep is the proposed shelf? How high up (batten appearance important?)? What load is it likely to carry (sagging a risk)? Shelf to be painted?
 
Thank you for your reply. The shelf has to be painted. They will be at varying heights from above eye, at eye level and below. They will have a variety of weights put on them. One is for books, one for a vase etc.

They are 650mm by 500mm

Cheers,

Andy
 
I have but the walls are wonky so it wouldn't look great. I will have to scribe the shelves.
 
Assuming this is the normal sort of alcove beside a chimney breast 2 x 1 would be fine for the battens. The simplest way is to use decent wood and cut them neatly so they don't look objectionable. A deep edging to the shelf can hide quite a lot.

Your question about the size of screws depends on what sort of wall you are fixing into.

In our house, with old soft lime plaster over brick or stone I always use quite long, thick screws so would probably use 2 1/2" length into plugs big enough to need an 8mm hole. If you have modern blockwork and thin hard plaster you could get away with less but it's just as easy to drill a deep hole and be sure.
 
Thanks for your response. What kind of wood would you use for the shelf? I am thinking ply or mdf
 
As AndyT has said, 2x1 battens (softwood) should be fine. I used this size to support an alcove unit and set the front edge back a bit and did a series of stepped rebates so that the top was a full 1" but then reduced in 3 steps to half that, just to reduce the visual impact. I found frame fixings were easy to use - just drill through batten and wall and then hammer or screw the fixings.

As the shelf is so deep I'd be concerned that the front edge could sag (whether ply or MDF is used). I'd be inclined to add a batten to the full depth of the front edge. By that I mean, for example, with an 18mm thick shelf and 42mm (2" nominal) battens (at rear and sides) the front batten should be 60mm high, thus covering the front edge of the shelf and batten edges.

HTH.
 
The battens don't actually do very much, they transfer the load to your screws. You don't need the most amazing screw fixings as you would really struggle to pull the screws out as the shelf loads the screw almost entirely in shear. I reckon you could get away with as few as one screw per side and still not have it fail, so long as the screws are tight in their holes.

I'm just taking a break from doing similar, I have battened three sides with 1.5" x 1" as I'm putting a board top and bottom and that gets me to 2" total thickness. I put 2 screws in each side and three across the back.

I've screwed another batton to the front and two supports running front to back to give a solid structure. I've got 1.5" x 2" ash fronts to go on and 10mm oak faced MDF to go top and bottom.

I would board top and bottom with MDF so that you can't see your battens and a softwood or MDF front of whatever thickness you can find, then paint the lot. Will look great.
 
Thank you. Has anyone done the whole h frame with a top and a bottom nd front to make it appear floating thing? What wood would you use for this? I am thinking 18mm mr mdf
 
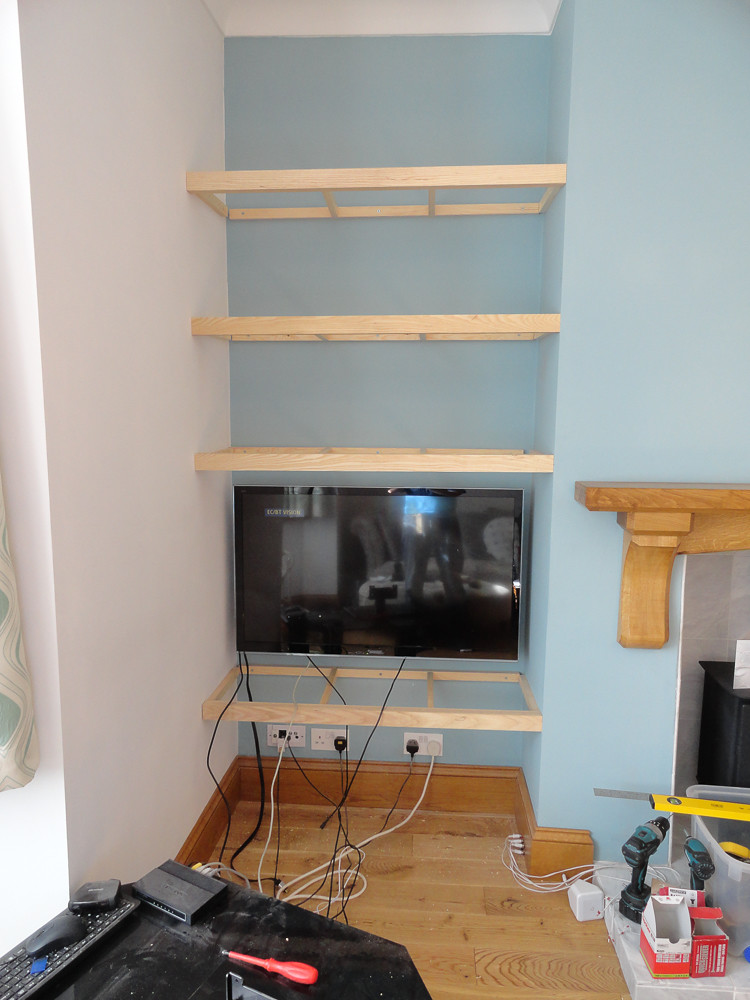
That's what I'm doing now, I've got as far as getting the ash front on and preparing to scribe the tops and bottoms to the bent walls. I'm using a 10mm oak-faced MDF:

20150803 - DSC01028 - untitled.jpg by paulrockliffe, on Flickr

20150803 - DSC01029 - untitled.jpg by paulrockliffe, on Flickr

20150803 - DSC01030 - untitled.jpg by paulrockliffe, on Flickr

20150803 - DSC01031 - untitled.jpg by paulrockliffe, on Flickr

You can use pretty much anything you want, choose depending on the look you're going for. It obviously depends on the rest of the house design, but if you're going to put a bit off effort into making it, it seems a shame to just use cheap MDF rather than something nice. As a guide, I've spend £80 on two 8 x 4 sheets of the faced MDF, £30 on the battens and about £30 on the ash fronts and will be doing 9 shelves in total, so it doesn't cost the earth to do.

I think painted MDF will look quite ungainly if its just painted white, it'll need some edge detail with a router to break it up a bit.

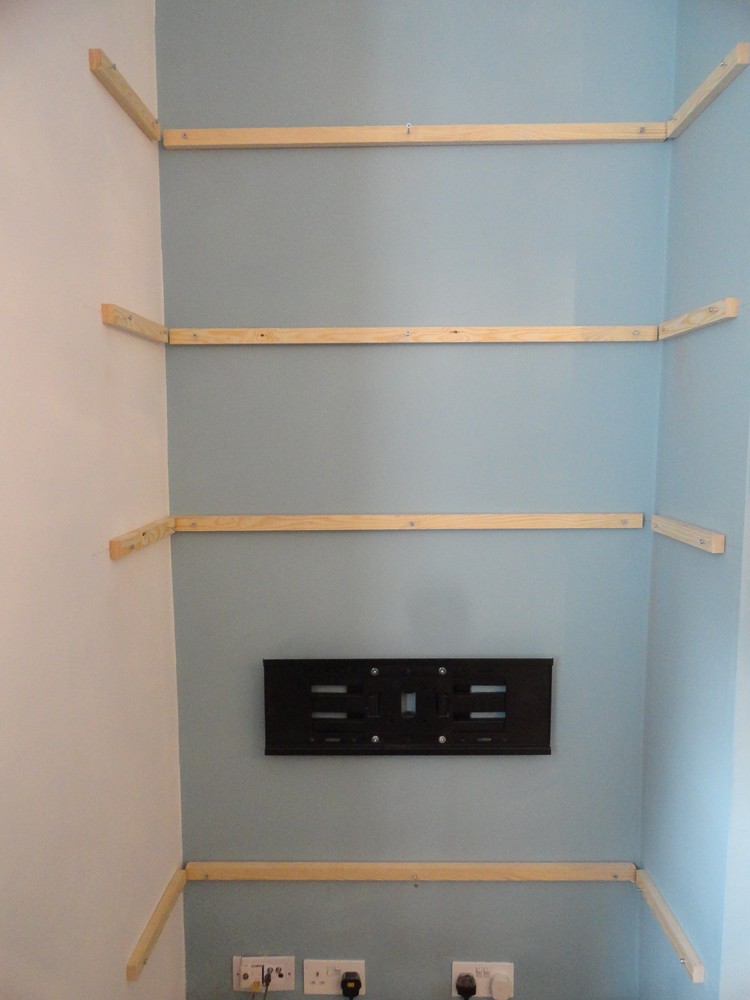
The battens were about 80p a metre, so pretty cheap, though MDF would be OK for this too. I would want more screws in an MDF batten , but it won't cause any particular issues I wouldn't think.

I've winged the structural side of my design a bit and I wasn't sure how strong the front would be. Not a problem as there won't be anything heavy on the shelves, however the ash front massively stiffens the front of the shelf, even though the whole front is only attached to the shelf by two screws into the end grain of the side batten, so it's rock solid. Weak point would be a point load on the middle of the ash, that would pull the two screws out of the side batten, but that's an unlikely loading and still going to need a lot.

I reckon you'd struggle to make a shelf this way that was too weak to take a full shelf of concrete blocks.
 
A lovely job and WIP, PR, should help the OP no end and answer most questions, This should be used as a "how to"
Thread and save our fingers.
Regards Rodders
 
Couple of 'top tips'. If you make the rear batten the full width of the alcove, then you can butt the side battens up to the rear and clamp them in place - makes it easier to level up and drill though the sides. And if you're doing more than one in an alcove, work out the spacing and make yourself a couple of (equal sized, obviously) spacers from scrap MDF or ply. If you start at the bottom shelf and take time to get that one level, then the subsequent upper shelves are positioned using the spacers - no levelling or measuring required.

The bottom 'skin' for shelves like this is pretty much decorative, so can be much thinner than the top (typically 6mm or 9mm when I do them, depending on the final thickness required) so is easy to scribe to fit wonky walls.

HTH Pete
 
Hello Pete, good tips cheers.

I didn't run the battens into the corner because the corners aren't 90 degrees as a result of several layers of plaster over the years. None of the walls are exactly at right angles or vertical, so there was a bit of adjustment needed, I wanted to have the shelf fronts all lined up with each other, so I took a vertical line from the bottom shelf and set the side battens to that. By not running the battens right to the corner you can do this without having to keep going to the shed to trim down each batten. It would have been useful to be able to clamp the battens together though!

Your spacer tip would have saved me quite a bit of time though, I used a spirit level on each shelf!

Maybe it depends where you shop, but I'm using 10mm top and bottom and faced on both sides because going thinner only saved a couple of quid on the price of a full sheet. Faced on one side I could only find in ply and that was a little more expensive, so no saving there either. Maybe I should have ripped the boards in half to do the job ;-)

You can see it in the pictures above, the top shelf doesn't look level. It's dead on, but the ceiling drops an inch from left to right and the left hand wall is at 93 degrees which seems to exaggerate it. I think when the boards are in and there's stuff on the shelves it won't stand out too badly. Everything is like this in the house! Would people aim to get the shelf level or for it to look level, or somewhere in between?
 
Another tip, when scribing the top and bottom panels, I use 2 separate pieces of cardboard and scribe them in. Once scribed, masking tape them together and transfer this to whatever materials you're using for he top/bottom.

Is usually find the the top panel will be suitable template for the bottom panel
 
Because of the layout of the room the left-hand end of each shelf can go forward or back a fair bit before it looks out of square with the chimney breast. So I've done them so that there's a 90 degree angle at the front right, which will make it a bit easier to scribe as I can get close enough by measuring distance and angle I think. The corners will probable just need planing to fit a little.

I was planning to copy top and bottom too, it's hidden away a bit, though they should match up almost perfectly.
 
paulrockliffe":ep8dsbva said:
.
I didn't run the battens into the corner because the corners aren't 90 degrees as a result of several layers of plaster over the years...
They always are ;) You can either plane the batten in, or just let them follow the shape of the wall. Oh, and always get the shelves level.

Cheers, Pete
 
Yeah, I suppose he battens would have pulled into the wall anyway, but it did mean I didn't have to cut the side battens to an exact length.
 
I do these regularly in alcoves and the batten torsion box style is the way i make them. Mdf is totally fine fine this type of work as long as its properly supported. It also paints lovely and a white professionally painted shelf makes a nice backdrop for colourful books IMO. Sometimes vertical floating bookends add a degree of sophistication and practicality. Easy peasy work and very good money in them.
 

Attachments

  • Shelving.jpg
    Shelving.jpg
    141.4 KB · Views: 247

Latest posts

Back
Top