tekno.mage
Established Member
Hi everyone,
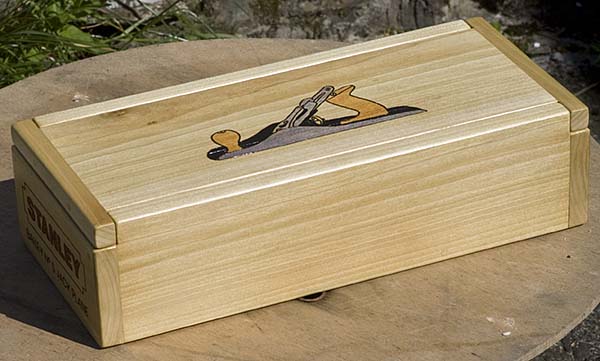
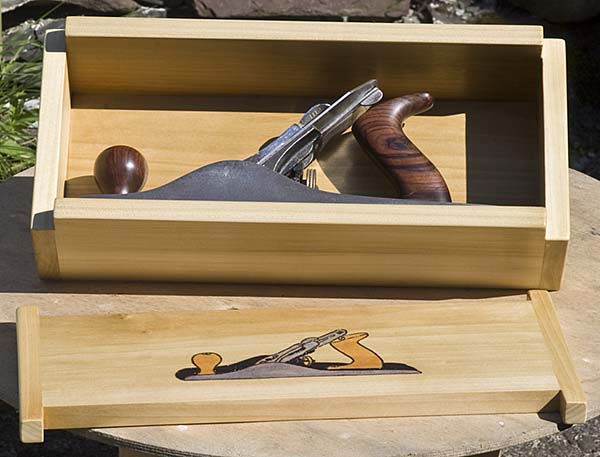
I'm currently in the process of making a decent box for my now nicely fettled Stanley No 5 plane - and it is the first "flat woodworking" project I've made (not counting odd DIY & garden jobs when the item was either to be painted, hidden away or left "rough"). It's also the first thing I've ever tried to make without using screws (ie just using glue!) to hold every thing together!
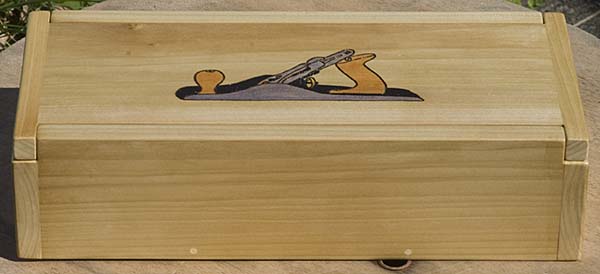
So, I thought, as it's a plane, perhaps I shuld try and make something a bit decent for it, and finish it nicely too. This would be very easy if I could make it on the lathe, but a round plane box isn't going to work...
So, I find the 6 lengths of 3' x 5" x 3/4" beech that used to be shelving in a previous house. (The timber merchant sold it to me as beech 20 years ago - but I know a lot more about timber now - and it looks nothing like any of the beech I've used in woodturning! Maybe it's a foreign version of some kind...)
I came up with very simple box design to fit the no 5 plane. The base must be infitting so the plane will fit the box. The joints will have to be glued butt joints, as I lack the appropriate tools at the moment to do anything better (and I'm not brave enough).
So far, so good. I cut the "beech" to size using the machine I have available - a Kity 613 bandsaw with a fairly horrible fence - but that stage went ok as I know the foibles of the bandsaw. I had measured and marked out the wood accurately (and noticed the obligatory mistake before cutting!) Then I taped the planks together in blocks to be the same size so I could cut them all at once <grin> I was reasonably happy with the cuts once done (ie they were at 90 deg to the face, straighter than I expected and needed very little tidying up after wards.)
Dry assembled, the bottom of the box looked ok. Rummaging about in the barn revealed a pair of rather rusty old sash cramps which I pressed into service after giving them a clean and de-rust. I also took the precaution of sticking some thick clean cardboard on the faces of the cramps with double-sided tape so they wouldn't mark the work. I'd already found a pair of F clamps for the other two sides.
Glued everything up with PVA, clamped it, wiped off the nasty oozes of glue and left the whole thing overnight...
This morning came the problems. The box was dry and solid enough. The joints had virtually no gaps (except tiny one on the bottom that won't show) But the clamps had marked the work - even through my carefully placed thick cardboard - actually it was the corrugations in the cardboard that had marked the wood :-( There was also little bit of planing work needed on the end grain at the corners (to be expected) and then some sanding.
Planing that end grain didn't work :-( I tried a small block plane and then the No 5 but I'm finding it really hard to hold the box solidly so I'm able to plane in the right direction and not split the edges of the wood away. I finally give up and resort to a small surform followed by an orbital sander & a skarsten scraper (for the hard glue residue), which surprisingly worked quite well. Nice flat corners and smooth end grain.
But I notice that whatever I use to hold the work is marking the previously finished surfaces <grrrr>. My bench top (despite being a bit of old kitchen work top) is clean, and I'm carefully using a clean spare piece of beech between the box and my rather improvised bench dogs (plastic things from a workmate into holes drilled into the bench top). Even the nice clean router mat I put down on the bench is leaving little indentations in the previously sanded surface of the opposite side. I ended up balancing the box over one hand and slowly, slowly, hand sanding the flat sides in the right direction) with a sanding block held in the other hand. I'm reasonably satisfied with the finish to 400 grit (prior to doing the pyrography of "Stanley No 5" on the ends) and will finally fit the lid tomorrow.
This flat woodworking is much harder than woodturning :-( With woodturning the work is held nice and solidly on the lathe until such time as you choose to remove it.
So, any tips on how to protect a small job while you hold it firmly enough to do the finishing work on the other side of it - and how to solidly hold a 15" long open box so you can easily access the two short ends to plane/sand/whatever without having to stand on tiptoe to reach!
I must be doing something wrong, but I'm not sure what. With woodturning it's possible to disguise where a job was held in a chuck, or you simply cut off the part where the work was held. When I reverse a job on the lathe I have rubber faced buttons that hold the work and do not mark it, but I was findings that even my rubber vice jaw facings were leaving little marks on my box ( and no, I don't think I was doing the vice up too tight).
Sorry I didn't take any WIP pics of thsi project, but will post pics of finished box.
tekno.mage
I'm currently in the process of making a decent box for my now nicely fettled Stanley No 5 plane - and it is the first "flat woodworking" project I've made (not counting odd DIY & garden jobs when the item was either to be painted, hidden away or left "rough"). It's also the first thing I've ever tried to make without using screws (ie just using glue!) to hold every thing together!
So, I thought, as it's a plane, perhaps I shuld try and make something a bit decent for it, and finish it nicely too. This would be very easy if I could make it on the lathe, but a round plane box isn't going to work...
So, I find the 6 lengths of 3' x 5" x 3/4" beech that used to be shelving in a previous house. (The timber merchant sold it to me as beech 20 years ago - but I know a lot more about timber now - and it looks nothing like any of the beech I've used in woodturning! Maybe it's a foreign version of some kind...)
I came up with very simple box design to fit the no 5 plane. The base must be infitting so the plane will fit the box. The joints will have to be glued butt joints, as I lack the appropriate tools at the moment to do anything better (and I'm not brave enough).
So far, so good. I cut the "beech" to size using the machine I have available - a Kity 613 bandsaw with a fairly horrible fence - but that stage went ok as I know the foibles of the bandsaw. I had measured and marked out the wood accurately (and noticed the obligatory mistake before cutting!) Then I taped the planks together in blocks to be the same size so I could cut them all at once <grin> I was reasonably happy with the cuts once done (ie they were at 90 deg to the face, straighter than I expected and needed very little tidying up after wards.)
Dry assembled, the bottom of the box looked ok. Rummaging about in the barn revealed a pair of rather rusty old sash cramps which I pressed into service after giving them a clean and de-rust. I also took the precaution of sticking some thick clean cardboard on the faces of the cramps with double-sided tape so they wouldn't mark the work. I'd already found a pair of F clamps for the other two sides.
Glued everything up with PVA, clamped it, wiped off the nasty oozes of glue and left the whole thing overnight...
This morning came the problems. The box was dry and solid enough. The joints had virtually no gaps (except tiny one on the bottom that won't show) But the clamps had marked the work - even through my carefully placed thick cardboard - actually it was the corrugations in the cardboard that had marked the wood :-( There was also little bit of planing work needed on the end grain at the corners (to be expected) and then some sanding.
Planing that end grain didn't work :-( I tried a small block plane and then the No 5 but I'm finding it really hard to hold the box solidly so I'm able to plane in the right direction and not split the edges of the wood away. I finally give up and resort to a small surform followed by an orbital sander & a skarsten scraper (for the hard glue residue), which surprisingly worked quite well. Nice flat corners and smooth end grain.
But I notice that whatever I use to hold the work is marking the previously finished surfaces <grrrr>. My bench top (despite being a bit of old kitchen work top) is clean, and I'm carefully using a clean spare piece of beech between the box and my rather improvised bench dogs (plastic things from a workmate into holes drilled into the bench top). Even the nice clean router mat I put down on the bench is leaving little indentations in the previously sanded surface of the opposite side. I ended up balancing the box over one hand and slowly, slowly, hand sanding the flat sides in the right direction) with a sanding block held in the other hand. I'm reasonably satisfied with the finish to 400 grit (prior to doing the pyrography of "Stanley No 5" on the ends) and will finally fit the lid tomorrow.
This flat woodworking is much harder than woodturning :-( With woodturning the work is held nice and solidly on the lathe until such time as you choose to remove it.
So, any tips on how to protect a small job while you hold it firmly enough to do the finishing work on the other side of it - and how to solidly hold a 15" long open box so you can easily access the two short ends to plane/sand/whatever without having to stand on tiptoe to reach!
I must be doing something wrong, but I'm not sure what. With woodturning it's possible to disguise where a job was held in a chuck, or you simply cut off the part where the work was held. When I reverse a job on the lathe I have rubber faced buttons that hold the work and do not mark it, but I was findings that even my rubber vice jaw facings were leaving little marks on my box ( and no, I don't think I was doing the vice up too tight).
Sorry I didn't take any WIP pics of thsi project, but will post pics of finished box.
tekno.mage
")