finally got some work in progress, the coffee table saga.

UKworkshop.co.uk

Help Support UKworkshop.co.uk:

This site may earn a commission from merchant affiliate links, including eBay, Amazon, and others.
engineer one":2nhr594q said:
must say that holding these things is the biggest problem with doing it by hand. any sensible ideas about a hold down would be gratefully recieved.

You could try making up a planing board. Basically, you could use a piece of MDF on which to secure the workpiece, and then clamp that to the bench top. You will have to work out the best way to fix the workpiece to the planing board - you could, for example, fix a batten to one end and drive a small nail through it which would grip the end of your workpiece, then think of something for the other end. The main advantage of the planing board is that you can drive nails and things into it which you wouldn't want to do to your bench.

Look at this thread from Jake Darvall (the Master of all this sort of stuff) - might give you a few ideas http://www.woodworkforums.ubeaut.com.au ... hp?t=38354

Cheers :wink:

Paul
 
fatal flaw in next stage of the process.
the stanley i have has a vertical as well as a horizontal type of sled.
and of course it goes behind the blade.

so if you try to cut a groove in the middle of a long bar you cannot. :cry:

so i guess it will be back to the router :?

paul :wink:
 
slow rest of the week. :cry:

i succumbed to advice, and decided to use a router. :?

so i sorted out my ryobi table and mounted router. this of course meant tidying up and rearranging things in the workshop :roll:

the dust just gets into places you forgot you had. and you find tools and bits of kit you didn't know you had.

the table and router cost me about 50 quid about two years ago, at B&Q
in principal it is a good deal, BUT :cry: why oh why does no manufacturer design a router and table in which to mount it all in one, rather than design the table as a router table, and then just fit any kind of router.

you end up with silly things cause they give you a screw on switch hold on, and then the nva switch is mounted in the strangest place.
replacing the cutters is a nightmare too. although the ryobi has a decent button to hold the collet steady, when it is mounted upside down, and the way the router is mounted, it is a pita. :?

then the real problem, the collet on my machine will not plunge through the base of the router. why oh why do they design them so that the collet does not come to the bottom of the plate??? which of course means that you have problems with adjusting the height of the cutter. and because the height adjustment is basically on or off, it is really difficult to ensure you get the accuracy you need.

so i only got round to machining the grooves in the legs and cross rails today. even that was a little difficult since the fence on this router table is not to easy to ensure that it is straight and stays in place. there has to be a better way :twisted:

anyway i have also cut to length and machined one side of the end in fill panels, which are part of a nice piece of lime which i will photograph tomorrow or sunday depending upon the work load. another reason for no photos tonight, is that i have had to repair a couple of errors which may not be seen, but needed massaging.

hopefully by the end of the weekend, i will have finally glued together both end frames, and ensured they are square and decent. will also have cut the top tenons on the legs.

so tomorrow will be a clean up day, think i will be sanding rather than scraping in this case.

paul :wink:
 
Paul,

Sounds to me that you need to upgrade to a Triton router in your table. :roll:
To change the cutter you just wind the collect though the base and the spindle locks automatically. :D
You have a rack and pinion fast wind to roughly set the height of the cut and then a fine adjustment to get it spot on. \:D/ \:D/ Slope greaser, me?
 
now dave that is really nasty, i have too much stuff now :lol: :lol:
another router :cry:

but like many others i have looked at the triton, and, well :roll: :roll:

paul :wink:
 
actually this week has taught me the lesson, :roll:

i have to make things to find out what i have,
and then get some space in the workshop :?

as for the nurse, well it depends on which one,

the matron, or the staff nurse :twisted: :twisted:

paul :wink:
 
engineer one":1yteyep9 said:
now dave that is really nasty, i have too much stuff now :lol: :lol:
another router :cry:

but like many others i have looked at the triton, and, well :roll: :roll:

paul :wink:
Paul

A Triton Router, you know it makes sense :wink: you could even make a mobile station like the one that I haven't finished :D

Martin
 
well actually what this has convinced me is that i must finally build a wall plate and mount my rat again :? :oops:

then i'll try the hitachi, and when that goes bang will replace it with the latest decent kit which may still be the triton so quiet already :lol: :twisted: :roll:

paul :wink:
 
whilst i think about it, dave l.

you are a moderator, my dictionary definition
includes the relation to you being subtle and
careful about pushing people over the
edge :lol: :lol: :twisted:

no fair no fair :roll:

i will remember this for some time in the future 8)

paul :wink:
 
so after the rant yesterday, moved the router table out of the way,

massaged the damage within the longs slots with some ronseal filler.
says antique pine and mid oak, well obviously these guys and i have a different view on colours :cry: still it is in the slots and can't be seen outside and will not i think affect the staining or varnish, depending upon what i use :roll: think i am looking for light to mid colour.

used the bosch ros on all the bits except the legs. attach the vacuum and turn on before use, the machine sticks to the wood 8) only problem is that you end up after an hour or so, with tingling arms :?

used 400 grit since all i was looking for was regaining the light colour of the wood, and ending up with a general matching of all the oak.

so on the router, i did the slots in the legs, and also in the other cross rails because i was getting lazy :twisted:

i also kind of fielded the floating panels. but since i wanted it to look almost smooth, i used a bit i think they call a sinking bit since it has a wide flat bottom and slight curve on the edges. of course you are stuck with the distance between your fence and the edge of the rotating cutter :?
more of that later.

then i test fitted it all, and discovered that of course, :oops: due to the previously complained about problems with depth setting, the floaters were too long for the slots in the cross rails.

so out with the mitre board and the number 7, really nice long shavings,
then the next problem, the fielded part hits, so i then got out my veritas
large shoulder plane and massaged the gap. oh what a loverly plane, and how easy with a sharp blade. works really well with end grain too, thanks rob and the guys, that moveable handle at the rear is really useful.

so the big question is i am right i should worry more about cross ways movement of the wood rather than vertical shouldn't I??? :oops:

given that this is about 300 wide, how much movement should i allow for in the lime end panel???? seems to slop about so should i guess be ok when the heating comes and goes.

i have also cut the base lines for the top tenons on the legs, and now have to lay out the lines to make the lower end of the legs slightly tapered on all 4 sides. i intend to hand plane so that should be fun :? am only looking for a small distance on each side.

the plan is to have a shallow outside taper on the two outside edges, then a slightly bigger taper on the inside. hopefully that will leave enough strength but reduce the heaviness at the bottom.

i have decided during construction not to put a drawer unit and door in between the legs cause as i make it it seems that that would make the whole unit too heavy in look and not necessarily add to the usefulness.
so i will have two mdf 12mm oak faced solid shelves instead.

so i am almost ready for glue up of the end panels and legs either tonight or tomorrow. need to put some clear acrylic varnish on the end grain of the floating panel just to ensure.

final jobs on these bits are complete the upper tenons, which are only on two edges to allow the greatest area for glueing. tapering the bottoms, and then sanding the legs, and gluing up, ensuring that the top cross rails line up with the long rails so the whole is square and the shelves are level :roll:

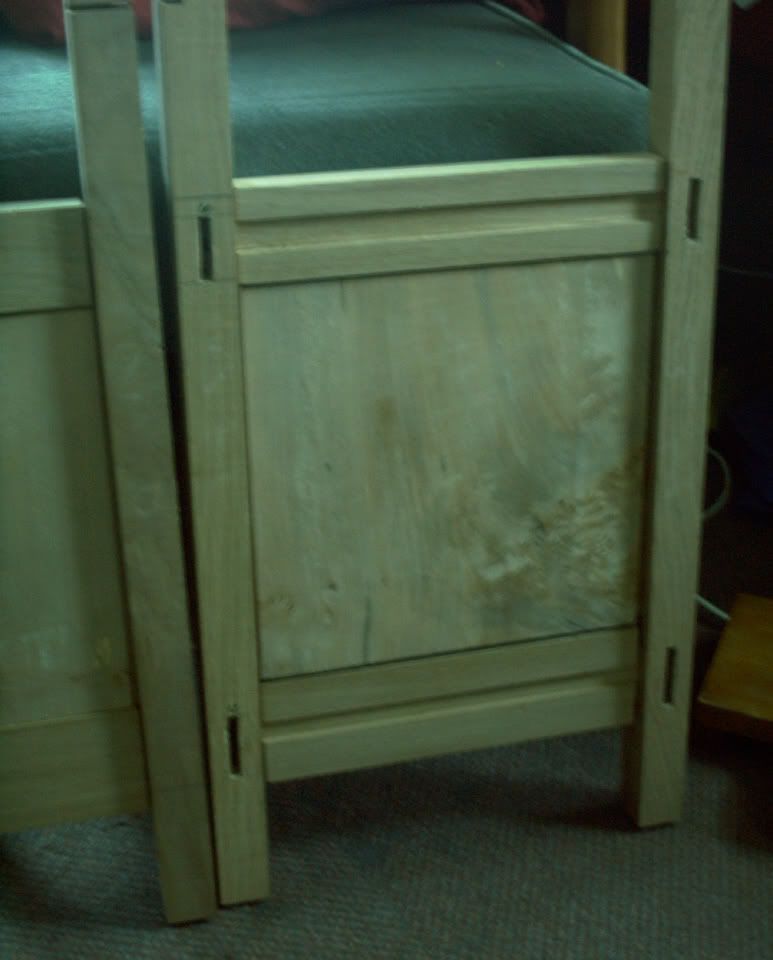
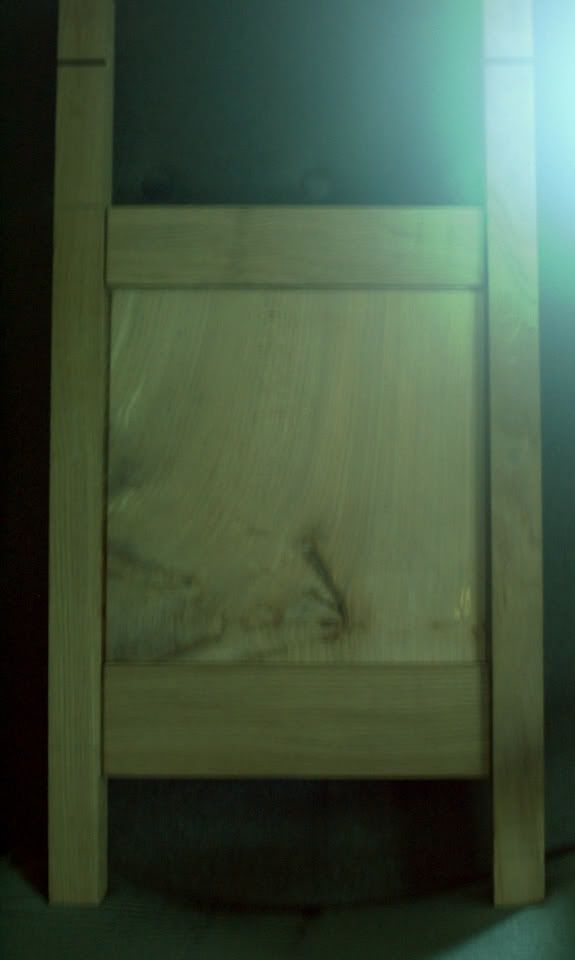
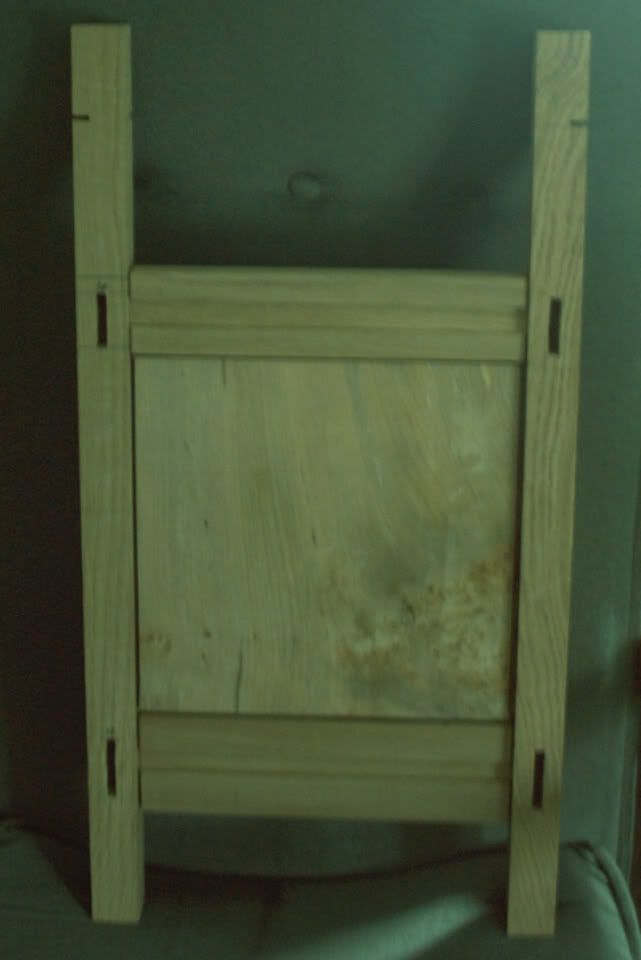
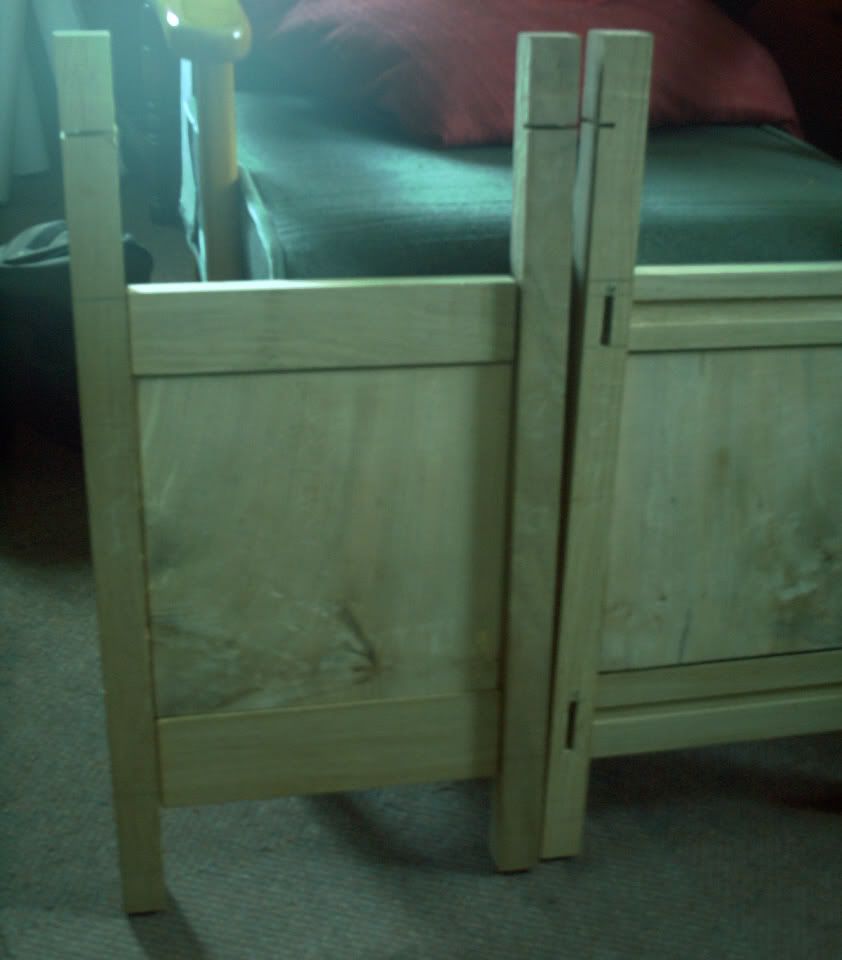
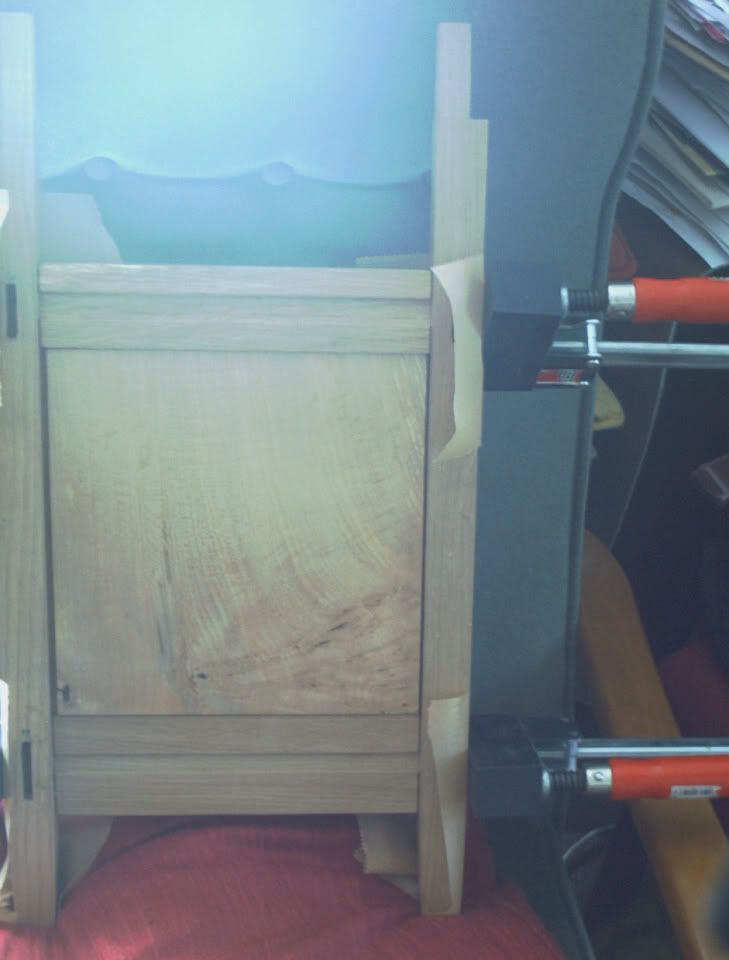
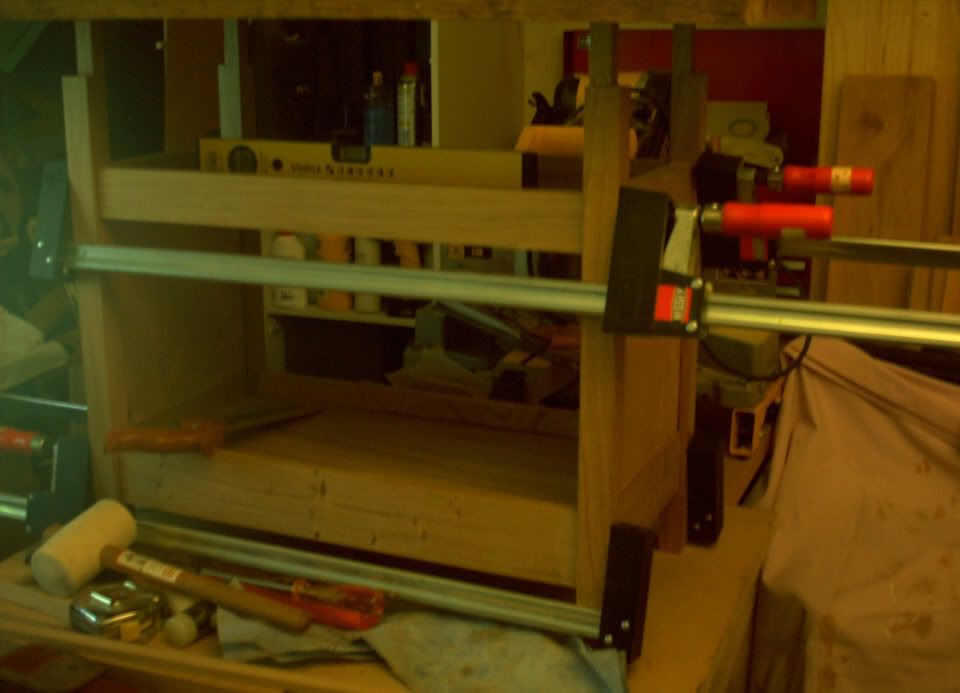
anyway latest photos. i think they show why i wanted to use the lime on the end panels.

th_outsideoneendpanel.jpg
[/url]


[/img]

so what you have is the inside of one end and the outside of the other, to show i have made both ends of the table :?

so the saw cuts at the top are for the tenons, and luckily, as you can see, the units look pretty similar.

more importantly you can see why i wanted to put the lime in something which would highlight it, and that is also why i decided not to put the box in the middle :?

so with any luck, i will get most of it done before next weekend, since now it is the really tricky bit of gluing up and squaring up :cry: :twisted: :roll:


so a round up, hand planed all the wood, including the end panels after colin c had bandsawn them for me. (but did run the legs through the p/t because i needed them to be exactly the same :oops: )

used the plough for one set of grooves, but unable to do so on the legs so i did that on the router table, and then one more set of grooves, and then fielding on the end panels.
finally used the mitre plane and shoulder plane to ensure the end panels fitted well. then the ros for smoothing. :oops:

so two shelves to be cut later in the week, and of course hand cut the corners since i have not grooved across the legs at the intersection. so will i need to make some mouldings i hope not :roll:

i think the shadow line around the end panel looks better than adding moulding. and you will notice that the end panel overlaps the slot slightly to hide any errors :roll:
must get my scraper plane working properly :?

paul :wink:
 
at last some more progress in assembly :roll:

spent the week varnishing with B&Q own brand satin, cause i want it to be as near neutral as possible. this after a conversation with colin c, and his having come to see the wip.

as you can see, i have tapered the bottom of the four legs, this is assymetrical. the outer taper is less than the inner one. i think it looks better, and gives it a delicacy which it might not have had.

as you can see when gluing up, i used a brown paper to ensure that there is no glue squeeze out on the besseys(no gloat honest :roll: )
this i have used before after spraying, it is baking sheet which can be bought from the supermarket, and is both non stick, and not acidic, so nothing from the paper can bleach through into the wood, which since it is oak i did not want.

the photos show the inner and outer panels in glue up, used the uhu glue from lidl (colin you are right :twisted: ) the express one.

final photo shows the outside out of clamps, and one of my mistakes on the top tenon which will i think be modified to add to the look of the top, by giving me 4 cross wise faux tenons too.

later this week hope to glue up the whole, and install the shelves. then the joy of marking and cutting the mortices in the top, and deciding what other work needs to be done on the top.

th_glueup3.jpg
[/url]


[/img]

because i still haven't figured out how to post pictures in the order i want, the top one is out of the clamps, shows the nice pattern in the lime end panel. 8)

so the question is am i brave enough to enter it in the competition??? :?
or is it too late :oops:

paul :wink:
 
If you're entering it into the Begineers section, then I'm afraid its far to late for that..... But by all means enter it into the sections! :wink: :D :shock:

With Byrons work bench and this I might as well give up now! 8-[

Competitive... me.... never :wink:
 
This project is so posh, even your glue-ups get to sit on an upholstered chair!! Oooh Get you! :)

I must say i'm liking them panels!

But you need to get a new camera paul
 
s*d the camera byron its the photographer who need changing :lol:

actually it is amazing how much things have moved on.it is a ricoh 6000,
and no more than 4 -5years old, but i rarely use it as you can tell :?

problem is my workshop is much darker than i would like with only one north facing window, so i use the lounge and pose :oops:

will try harder when it is nearer completion

thanks for the encouragement 8)

paul :wink:
 
Hi Paul,

I know its abit off the current chat, but I have been cutting a few shoulders recently. Luckily I had watched DC's latest DVD on chisel usage and used his method which has produced some good results.

My sawing is abit hit and miss, but DC suggests knifing the shoulder line.. cut as close to it as you dare with a saw without crossing the line. Then use a sharp chisel registered in the knife line to clean up to the line. He also suggests chiseling to a slight down angle so that the edges (knife line) are a smidge higher than the shoulder at the base of the tenon. This gives you a nice clean contact when clamped.

As I says its worked well for me so far.

I cut the tenons on the bandsaw and was pleased with the results. Again cut them slightly too big and trimmed with a shoulder plane for a snug fit.

Darren
 
thanks darren, interesting.

i did actually use a similar method although, i did not use the bandsaw, (which i do not yet have :cry: ) so i cut them on my table saw, and then because i had kind of crept upon on the tenon size, had to use both chisels and shoulder planes to get to where i wanted. however i found the tenons so small that i knocked quite a few edges off. thicker ones would have been better :?

as for the tenons, i need to practice, and more importantly get a thin pig sticker to ensure that i get them straighter. since they were my first for a long time, i had not really sorted my stance etc.

in future when i do hand made mortices, i will stand in line with them, not to one side, and use a point light nearby to ensure that i am always there.

paul :wink:
 
paul - I've been having the very same problem (of lighting). I was chopping out some mortices today and it was quite tricky to always gauge where I was in the cut. I've since ordered a light and will add some doweling to the base so that I can seat it into one of my dog holes.
 
sadly i am not as speedy as some of the others, but trying to ensure i made fewer errors i had to wait for some help to complete the frame glue up.

th_coffeetabletop2.jpg
[/url]

[/img]

these two show the final frame glue up, and the shape and size of the top.

happily the glue up went well, with help, since i had to hold the four rails, plus the two shelves, which fitted perfectly, and the rails only need a little force with my white rubber mallet :roll:

every thing has gone together square and level which is reassuring, since i won't need to cut the legs at all.

i need to finish the frame in two ways, firstly i have cut some moulding for around the top of the shelves, to hide any small errors, and then wax, before i install the top.

the top has of course moved a little, so i shall relief cut it, and then fill those kerfs, then cut the mortices and arrange the cross wedges.
that should be fun.

with any luck will be finished by the end of the month :twisted: :?

paul :wink:
 

Latest posts

Back
Top