Say Hello to Alex....

UKworkshop.co.uk

Help Support UKworkshop.co.uk:

This site may earn a commission from merchant affiliate links, including eBay, Amazon, and others.
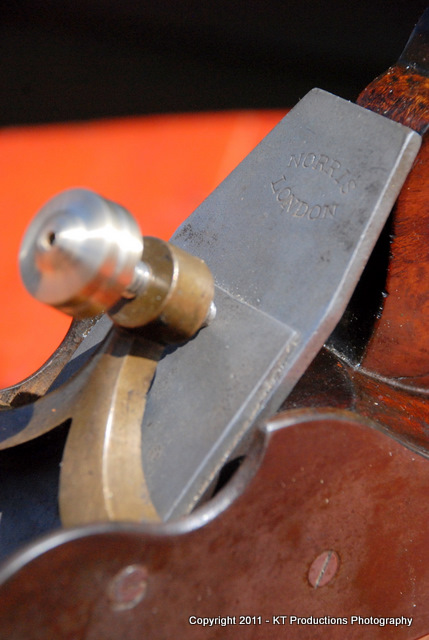
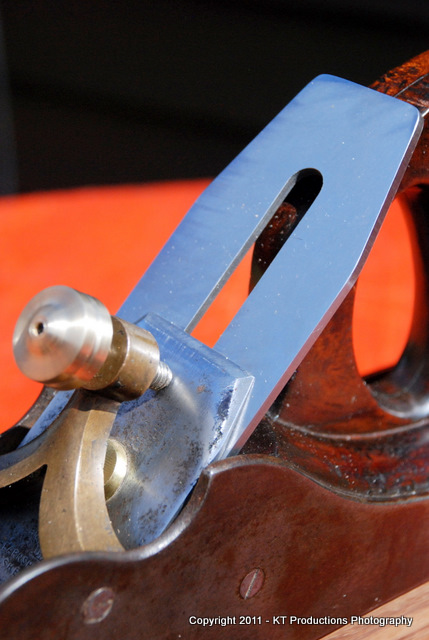
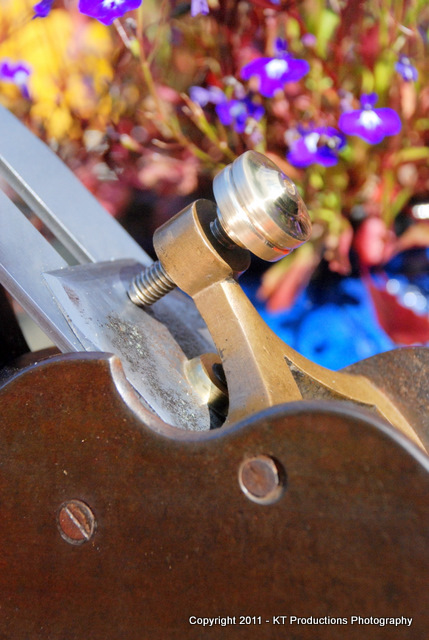
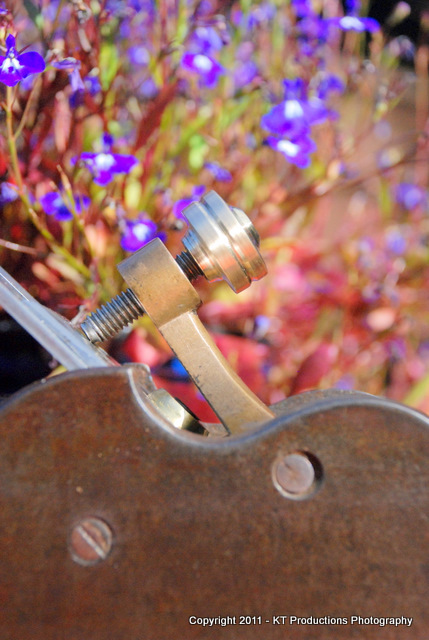
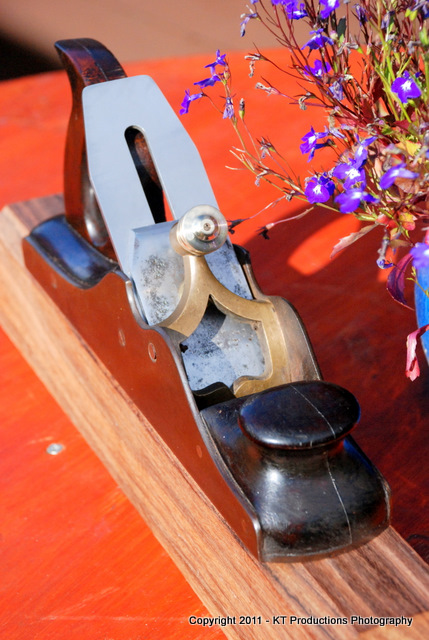
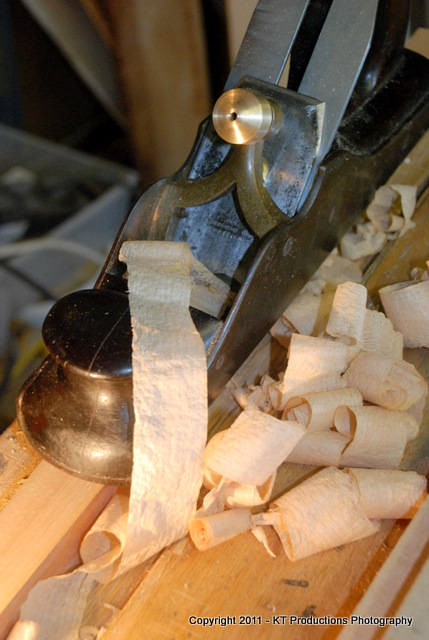
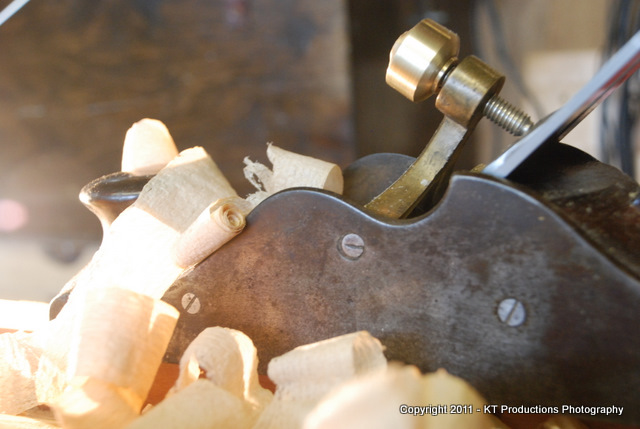
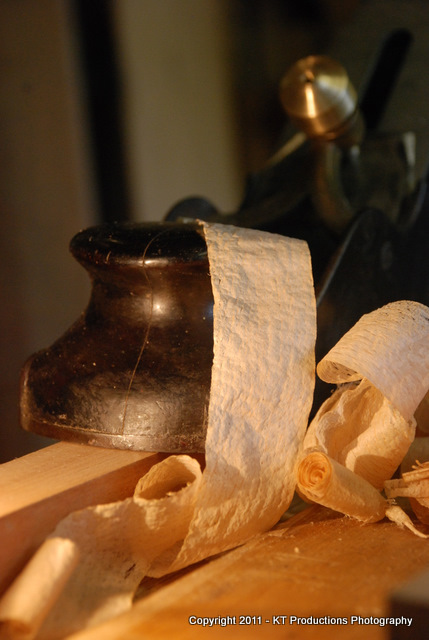
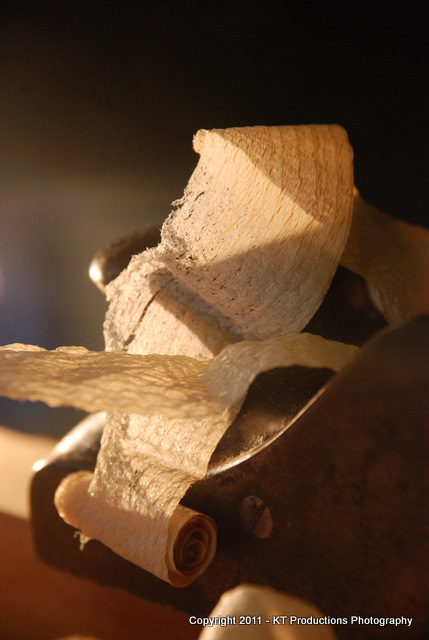
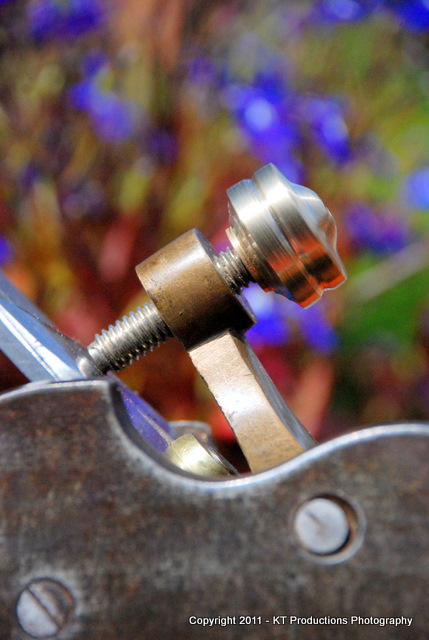
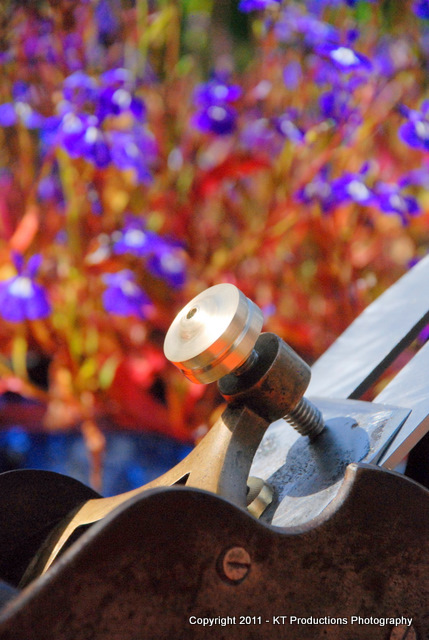
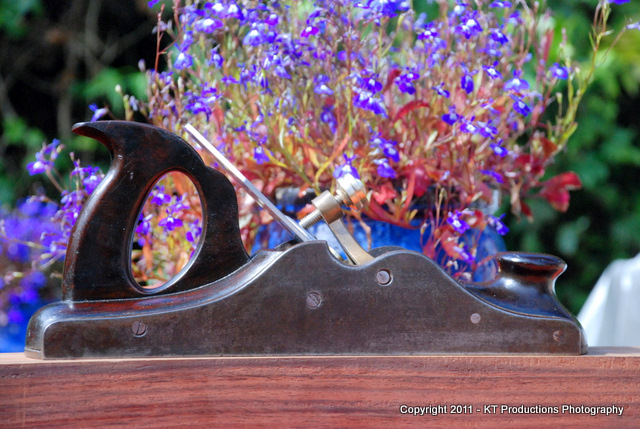
Jim! - what a cracker. Tried it today. First, it is beautifully patinated and feels right in the hands. Ergonomically it is really good, and very well balanced. Must say the QS blade is extremely impressive. I need to get used to taking pressure off, and let the plane do the work... I'm used to 'factory' planes and applying pressure downward. This one just glides through the cut, and confirms a suspicion that a tight mouth is not necessarily the solution to tear-out. I can't explain to myself how or why this is the case - Ok it has a really stiff blade, well supported, but not a super-high angle.
And the handle repair is effectively invisible. A truly fine plane.
(P.S. - if you follow the rounded bevel debate, Jim has a Sorby mortice chisel that has every angle known to man, is convex and concave in places too, all on one blade - it gets very technical and has a fancy old-world name. It could catch on. Jacob will love it.)
 
Hi Douglas

It was great meeting again today...I didn't think you could resist it long before you had to have a go with it.

I am currently refining the bed slightly...years of neglect have meant that there is a very slight angle variation which is amplified by a superb straight iron from Workshop Heaven. It's nothing that can't be sorted but that last few thou of projection on one side is annoying...because I know it's there.

I know it has no effect on the cut as we proved with a completely seamless shaving.

The technique of using less pressure is something that is strange at first...I actually cut some of the above shavings without actually holding the front bun...just pushing it across the stock under its own weight.

For anyone considering getting a QS iron....don't even hesitate...I did and I missed out on months of procrastination using the skinny irons in my Bailey planes. One word of warning...and perhaps Matthew can confirm this...the mouth on my No. 5 1/2 would need a tiny slither taken off the mouth for it to fit. It's only a fraction but it doesn't fit otherwise.

I didn't try it on the No.7 and since it is now back on Alex...I guess that will have to wait until tomorrow.

I was expecting this harder steel to be difficult to hone but quite the contrary...it was a dream...using Scary Sharp. Only took a few swipes up the grades....blue to white. Far easier than A2.

One downside of this iron...I am running out of stock! One upside...I have some wonderful kindling for the winter...tons of it! :mrgreen:

Has anyone got any wild grained untameable wood I can try...I want to see what this can do?

Jim
 
Jim - wild grain??! - i have some pieces of branch-oak that treat any of my planes with utter contempt. Will get you a few bits. (Actually, the LN block almost tames it).
 
Hi Douglas

I will test the iron on the branch-oak next time I see you.

The bias on the iron has now been sorted...I probably have to take a bit more off the righthand side of the bed but it adjusts now...

Today, I decided that old bolt had to go...so I dusted off the ML1 and knocked up a few cutting tools...and fashioned the basic shape...

DSC_0396.JPG


The stock was an old plumb bob...hence the hole in the middle! I will fill it later...perhaps a bit of pearl or an ebony dot...how cool would that be!? 8)

I'm not sure whether to knurl it for which I will need to get hold of a three-wheel knurling tool....to ridge it...as some of the older plane knobs...or a combination of both...mmm

DSC_0408.JPG


Flattening and aligning the bed has improved the cutter stability even further...and now the shavings are very consistent...

DSC_0399.JPG


...and pretty darn thin...

DSC_0406.JPG


...so it's coming along just fine...

Cheers

Jim
 
Lovely stuff Jim.

If you ridged the bolt before knurling it would take less pressure to knurl I'm sure but if it were me I'd find someone with a huge lathe that wouldn't mind the pressure on the bearing.

I do like that front knob being an infill/non infill hi bred - it's along the same lines as the one I originally envisaged for the first plane I started and I'm certainly going to use one (revised) on the next plane which will be a bench plane and have room for it.
 
+1 for knurling.

In a mis-spent youth, I had a summer job working a capstan lathe. I don't remember knurling being all that tough in terms of sideways force, but I was making smaller-diameter things, and on something like a Colchester Student or Bantam (loooong time ago!), which are both fairly chunky items. Since I had an hourly (production) rate to keep to, I don't remember being too particular about how hard the lathe was working, but I do remember getting into trouble if I left a poor finish!

Anyway, in my more modest corner, I've got a war finish #4 tote with a similar chunk split off to sort out (eventually), and your write up is tantamount to a textbook!

Can I ask a couple of tyro infill questions?

On the subject of thicker irons, mouths, etc., I assume "Alex" was supposed to have a thick iron (by normal mainstream standards). Would that be right?

A quick one for the experts generally, I'm interested as to what mouth clearance similar infills usually had, too. You get used to setting up a Bailey frog for the job/shavings you want, but you don't have the luxury on an infill, I guess. So were they made/bought/fettled for specific woods and kept for the purpose, or is there some mystical trick involving shimming or similar?

As I'm now the proud owner of a very nice #5 1/2 I won't be going there anytime soon, but it all makes me very curious!
 
Hi Richard....

Agree with all the knurling comments...I do think that my little Myford should be able to cope with the backgear running and with a three wheel knurling tool...we shall see. The subject still intrigues me.

I did put some extra work on the knob this morning....I was getting fed up with "the blob"....

DSC_0437.JPG


I am doing this progressively as I am still uncertain as to the look I want...which will determine which manufacturer it leans towrds.

DSC_0436.JPG


So it's coming alone fine...I polished it up a bit too with beeswax.

DSC_0426.JPG


Simon..I would say it could take up to 4mm - there is a fair amount of mouth left...it's not tight by anyone's standard.

Because of the flat hardwood and steel bed...because of the thick chipbreaker and the fat iron...it doesn't appaer to affect the performance.

Good luck with the tote!

Cheers guys

Jim
 
I think, (I've no hands on experience with old ones) that they used the same irons that can be found in woodies of the same age; 3 - 1/6" when new and tapering back to less. So the more blade is used the wider the mouth gets. Also, the more the sole is worn the wider the mouth gets.
I guess this is why infills start with such tight mouths as things can only get worse. But as Jim says, the very solidity of the thing solves a lot of problems.
No mystical tricks that I am aware of ... only wish there were. :)
 
Richard T":11c6cpjg said:
I think, (I've no hands on experience with old ones) that they used the same irons that can be found in woodies of the same age; 3 - 1/6" when new and tapering back to less. So the more blade is used the wider the mouth gets. Also, the more the sole is worn the wider the mouth gets.
I guess this is why infills start with such tight mouths as things can only get worse. But as Jim says, the very solidity of the thing solves a lot of problems.
No mystical tricks that I am aware of ... only wish there were. :)

Hi Richard.....

I think that most infill planes use parallel irons...all the ones I have certainly are. I thought I might be wrong there so I checked with Norris and he says..."YUP...meees parallel boss!"

However....Norris' iron is thicker than the QS...the QS being 3.40mm and Norris...a manly 4.54mm :shock:

As you of all people will appreciate Richard, this means a hell of a difference at the dangerous end....

To test...I fitted Norris to Alex...

DSC_0444.JPG


....my LORD! that looks good...and it fits to a tight mouth too!

DSC_0443.JPG


...whereas the rather non-descript QS iron with it's thin (ha!) profile...

DSC_0446.JPG


...leaves a huge gap....

DSC_0445.JPG


How does this affect performance?

It doesn't...nada...if anything the QS shaves cleaner and keener!!!

Only this fact...and this fact alone prevents me from doing something really stupid like going in search of a genuine 2 3/8" Norris iron...now there's ANOTHER slope!

:mrgreen: :mrgreen: :mrgreen:

Trust this clears the matter up. :wink:

Jim
 
very fine work Jim - the turned brass looks very nice. Personally I like rounded grooves for look, but I'm outvoted and also wouldn't know what would be most 'correct' on this. That QS blade was very impressive - need to try one, I'll get an old Stanley to attack with a file... why not :) Busy with a bench at the mo' - but that will all stop very soon as I have a big piece missing (tail vice).
 
condeesteso":262ao9gt said:
...........Personally I like rounded grooves for look..........

So do I!

If it doesn't work out I can always turn another one...here goes...

DSC_0450.JPG


....space either side of radial grooves for knurling but the shape is nearly there...

DSC_0451.JPG


I need to patinate the brass with ammonia or potassium permanganate (I'm not sure which does what for now)....it's a bit shiny and new looking!

DSC_0454.JPG


Jim
 
jimi43":358dyav1 said:
Hi Richard....

Agree with all the knurling comments...I do think that my little Myford should be able to cope with the backgear running and with a three wheel knurling tool...we shall see. The subject still intrigues me.

Any reason why you are using a three wheel tool? Is it necessary to get the particular pattern you want?
One way to avoid the stress on the lathe spindle bearings is to use a "straddle knurling tool" (they are quite cheap from the usual suspects), which has two wheels on a pair of legs that can be squeezed together from opposite sides of the workpiece. (Hmmmmmmm.....) This way, there's no strain on the bearings.
(Sorry if this is a Grandmothers and eggs suggestion)
 
dickm":3tud2bt4 said:
jimi43":3tud2bt4 said:
Hi Richard....

Agree with all the knurling comments...I do think that my little Myford should be able to cope with the backgear running and with a three wheel knurling tool...we shall see. The subject still intrigues me.

Any reason why you are using a three wheel tool? Is it necessary to get the particular pattern you want?
One way to avoid the stress on the lathe spindle bearings is to use a "straddle knurling tool" (they are quite cheap from the usual suspects), which has two wheels on a pair of legs that can be squeezed together from opposite sides of the workpiece. (Hmmmmmmm.....) This way, there's no strain on the bearings.
(Sorry if this is a Grandmothers and eggs suggestion)

Not having used a knurling tool before...I was led to believe (can't remember where from)...that a three wheeled jobbie was even less strain as not only does it hit from both sides preventing side stress but it hits from the third, thus acting as a centering controllable grip.....

But like I say...I am no expert at all on these things. My experience is a whistle-stop tour of a Colchester in the 70s and an ML7 in the 80s to build transmitter parts.....nothing taxing!

My old little Myford is in dire need of proper restoration...

DSC_0182.JPG


...and a new drive assembly to replace the one Heath Robinson designed! :mrgreen:

But it does the job for now!

Cheers

Jim
 
Eric The Viking":2qupbqnx said:
...and a new drive assembly to replace the one Heath Robinson designed!
Rubbish - work of art, that!

:)

Try telling that to the missus...she wants to know where her exercise bike's gone...it is now forming the white part of the countershaft assembly.... :oops:

Far better use for that frame!

Women! I dunno...even the remark..."you don't need an exercise bike darling..." didn't really cut it! :mrgreen:

Jim
 
I'm disappointed that you didn't leave the pedals in place for a truly green power option - but maybe your wife would not have agreed with that either!
 
AndyT":3op6e5rh said:
I'm disappointed that you didn't leave the pedals in place for a truly green power option - but maybe your wife would not have agreed with that either!

It's camouflage Andy....

Had I left the pedals on...she would have recognised it... :twisted:

It's the missing dishwasher I'm having a hard time explaining! :mrgreen: :mrgreen:

Jim
 
jimi43":1zrl31ri said:
Not having used a knurling tool before...I was led to believe (can't remember where from)...that a three wheeled jobbie was even less strain as not only does it hit from both sides preventing side stress but it hits from the third, thus acting as a centering controllable grip.....

Ah... sorry.... mine was obviously a grannyegg posting. I've never seen a three wheel straddle knurling tool, so was assuming the three wheels were on a single stem to generate some specific pattern. But if visualising your's correctly, you're right and 3 should be even better than two.
 
dickm":124y2ekc said:
jimi43":124y2ekc said:
Not having used a knurling tool before...I was led to believe (can't remember where from)...that a three wheeled jobbie was even less strain as not only does it hit from both sides preventing side stress but it hits from the third, thus acting as a centering controllable grip.....

Ah... sorry.... mine was obviously a grannyegg posting. I've never seen a three wheel straddle knurling tool, so was assuming the three wheels were on a single stem to generate some specific pattern. But if visualising your's correctly, you're right and 3 should be even better than two.


I could very well have it completely wrong...as I say...I have not used one yet.

I did some searching on FleaBay and all the two and thee wheeled ones on there are as you say...different patterns....so the jury is still out and I certainly have a load of eggs to suck yet mate!

I had a discussion with Douglas this afternoon about it and he feels that the knob is ideal as it stands...without the knurling...like a lot of the older ones were. I may patinate it tomorrow and see how it looks then. It tightens up fine without the knurls so again...the jury is still out.

Cheers mate...any help is worthy...trust me on that one! :wink:

Jim
 
Hi Jim - absolutely, I think the knob looks great - but as you know I cannot possibly comment on period correctness, as I don't know. Aesthetically I like it a lot as is, and functionally you can get way enough torque as it is... but there are plane experts here who know what is right, and you are one of them! Just for the record, a modesty statement like :)
 

Latest posts

Back
Top