Hard time bowl turning

UKworkshop.co.uk

Help Support UKworkshop.co.uk:

This site may earn a commission from merchant affiliate links, including eBay, Amazon, and others.

loz

Established Member
Joined
3 Jan 2008
Messages
2,161
Reaction score
0
Location
Dublin
Hi all,

I have a couple of 8 inch x 4 in maple blocks for bowls.

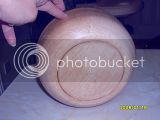
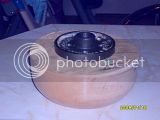
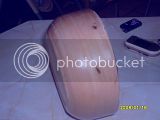
I started on one last night, and i took me and hour and a half to get the outer in a profile i liked.

I found it very difficult to get the squares edges rounded off for a start, the wood seems to shatter off in chunks, rather than sheer neatly for me, then my gauge seemed to only take off dust rather than shavings when profiling the bowl ( on the side portions was very hard ) profiling the base are was much easier !

Is it my technique ? the wood ?

I sanded the outer and base and still have rough bits on the end grain areas of the sides, started with a 40 grit, and finished on my finest - a 200 about 15 minutes and still rough areas !

Im fairly happy with what i have - although would like to know why it was so tough compared to the little bowl i did last week ?

Im assuming its my technique, although the wood seems so dense !

I'll try to put up a pic of where i am so far.


Thanks for reading my rant !


Loz
 
HI

Maple is a nice wood but most of it is a bit on the soft side and liable to end grain tear and as you say chunks tearing out of it.

Sharp tools and light cuts seems to be the best way to turn it.

The best way to get rid of the corners is with a band saw or if you havent got one try using a hand saw, it makes the turning much easier.

john
 
For starters on a hard wood (any wood for that matter) the removal of the 'square' corners is to be preferred before you start on the lathe.
1. To avoid the shattering you refer to.
2. The other more important, one of safety as the chances of a severe catch are considerably reduced and the loading on your lathe faceplate or chuck fixings is reduced.

The hardness of the Maple can vary considerably due to species, age of wood and dryness. It is not uncommon to get 'dust' production instead of shavings.

Try moistening the wood with water before you attempt to take finishing cuts, it sounds as if you may be tearing the fibres as opposed to cutting them and this can lead to deep damage within the surface.

Slow the blank right down for sanding, generating heat will only
'harden' it and may lead to cracking, be prepared to hand sand difficult bits whilst stationary.
 
Thanks guys,

I'll remove the corners with a saw on my next "blank".

I had the lateh on slow when sanding, as suggested by Keith Rowley, maybe its my cheap lidl sandpaper ?

Thanks

Loz
 
Make sure that your gouge is really sharp. I use a 1" roughing gouge for the general shaping on the outside and keep it cutting very thinly. Look for the ghost if you haven't trimmed the corners (I don't as my bandsaw is too small) and aim to decrease the ghost until you are cutting continually. Make sure that you have the bevel rubbing as well as if you don't you get grabbed and lumps fly.

Pete

P>S> Only use the roughing gouge on the outside, never on the inside. DAMHIK
 
Hi loz

A few thoughts on sandpaper/abrasive - not sure what if any brand your lidl paper might be, but I doubt it's much cop. Abrasives can be expensive, I would suggest using at least Mirka Aluminium Oxide (available from Screwfix)
or if you can run to it Silicon Carbide.

As for starting with 40g - I don't even possess any 40g, the coarsest I have is 80g and I'd only rub down paint with that. I appreciate you were having trouble getting a finish off the tool, but in my opinion - 120g, then 240g and finishing with 320g and possibly 0000 wire wool is more the way to go.

Hope this helps,

Chris
 
Hi Loz - I found similar problems with the end grains too.... Very similar to Chas's solution with the water - I put a wee bit of sanding sealer on the end grain areas to moisten, and thus soften the fibres... or a little of what you intend to finish the bowl with, leave it a few minutes to penetrate and then take the careful light finishing cuts ( or in my case.. usually 'scrapes' :wink: )

I don't know if this is a standard or accepted solution.. but it worked not too badly....

I found also too, that these areas wont sand smooth, if there's tearout.. I tried going 120/180/240/320/400/600/800/1000 Wet & Dry Paper ( used dry ), was at it for about an hour, and it made everything round about it like a mirror, but left the endgrain rough as the proverbial badger's posterior, and me with a burnt finger or two. :p

I'm pretty much new at it too.. and its true what people say.. the more you do, the better you get.... and although each improvement I'm getting is 'slight', the grin factor more than makes up for it :D
Have you had the 'bowl orbiting the shed' scenario yet ?... I managed to stop mine from travelling too far by careful, although accidental, placing of my face directly in its flightpath :oops:
Still -- every day's a school day :wink:
 
Hi Jenx,

Sorry but your post did make me smile, I had a goblet fly off at the weekend, that came loose from a screwchuck, but not a bowl. This is my first real bowl, i mean a decent size, and useable - ( hopefully after tonight ! )

My other bowl in a previous thread is only hand size - for peanuts etc !!

I start a night school turning course on the 28th so i will have a chance for someone who knows what they are doing look at my tool control etc, and hopefully put me right !!!

Loz
 
Hi Loz, not so happy turning just now eh!

Forget the sanding for a minute and look at the shape you have got on the outside of the bowl.

The sides are virtually vertical so as you are cutting you are hitting half the end grain and tearing it out. Exactly the same as trying to sharpen a pencil from the lead back to the wood. Vertical side do this.

What you need to do is:
1/ Get your gouge as sharp as possible, and keep it sharp. Don't leave it until it feels blunt, that's too late.

2/ Get your speed up as fast as you can / are confidant with, and take two fine cuts instead of one as you approach the final shape.

3/ Now the main reason for tear out, don't make the sides vertical, try and shape them similar to a small cereal bowl. Have the foot approx. 1/3rd to 1/2 the size of the full diameter so as the sides flare out to the rim. (Something like a ogee shape from foot to rim) Then you cut from the small diameter to the large, this way you are cutting with the grain all the time and you shouldn't have any tear out.

4/ If you have to use a scraper to finish, use it in a shear cut other wise you WILL get tear out.

Also you can us the other suggestions of hardening the surface with sanding sealer, or similar ideas.

Final point. sanding will never remove torn end grain, so don't sand until you have the surface ready for it.


PS: Of course cutting small diameter to large is only for the outside, when hollowing the inside you cut large to small diameter, again cutting with the grain. (As long as your blank is mounted with the grain running across the bed. If you are end grain turning, (grain lying with the bed) it's a whole different ball game.)
 
TEP":21srjyb0 said:
3/ Now the main reason for tear out, don't make the sides vertical, try and shape them similar to a small cereal bowl. Have the foot approx. 1/3rd to 1/2 the size of the full diameter so as the sides flare out to the rim. (Something like a ogee shape from foot to rim) Then you cut from the small diameter to the large, this way you are cutting with the grain all the time and you shouldn't have any tear out.

i had the bevel rubbing on the side of the bowl and running down towards the foot !!! i feel silly :oops:

TEP":21srjyb0 said:
4/ If you have to use a scraper to finish, use it in a shear cut other wise you WILL get tear out.

my vocab is limited so far - i dont know what this means ! :oops:
 
No need to feel 'silly' we've all been there. Or I certainly have. :lol:

Shear scraping: Instead of using the scraper flat on the rest and angled down slightly, you rest it on its side edge with the working tip approx. 45deg off the vertical and slightly trailing against the timber. Then slowly work it around the form, you don't need a lot of pressure. As this is a finishing cut for the surface you can go over it as often as necessary until you get the surface you want, just taking very fine cuts. You should only get a very fluffy shaving, almost like cotton wool.

Good luck.

Edit: No offence intended Pete, but I wouldn't use a roughing gouge on faceplate work. Even on the outside, it is just not designed for end grain stresses when cutting. Use the bowl gouge, that's where the name came from.
 
TEP":3evp9wsy said:
4/ If you have to use a scraper to finish, use it in a shear cut other wise you WILL get tear out.

loz":3evp9wsy said:
my vocab is limited so far - i dont know what this means ! :oops:

Think of how a pair of shears cut, the blade moves diagonally across the material not straight across, that way you slice the wood like a pair of scissors instead of chopping it. Hold the edge of the scraper at about 30-40 degrees to the direction of travel.

I see Tam types quicker than me :roll:
 
Sorry Chas, making up for lost time. :twisted:

And a belated happy New Year!
 
TEP":oggvfcv9 said:
No offence intended Pete, but I wouldn't use a roughing gouge on faceplate work. Even on the outside, it is just not designed for end grain stresses when cutting. Use the bowl gouge, that's where the name came from.

No - I wouldn't fancy it either! Much too risky for a beginner I would have thought.

At Yandles last September I was watching Julie Heryet turning a bowl from a horribly dry piece of spalted sycamore. She was having all sorts of problems with tear out on the end grain. She saw me having a quiet chuckle to myself, and we got chatting. She then showed me how she uses a skew chisel on the outside of a bowl with difficult timbers like this. It worked like a miracle, but I DEFINITELY will not be trying it - her tool control was about 1000% better than mine!

She is a wonderful turner, and a very, very nice lady as well, she even gave me a piece of the spalted sycamore to take home! (I have a sneaking suspicion she was glad to get rid of it!!) :? The trouble is, I am now depressed, as without having the nerve to use the skew like she did, my attempts at turning it look like I used a chainsaw!

Keep practising Loz - it does get easier - honestly! :D

Regards

Gary
 
Cheers from me too to Tam & Chas ... I did not know that the scrapers could be used in this manner.... so thats something else learned today !

For the little time I've been at it.. I'd used it 'flat on the toolrest' angled downwards slightly, and that was all .... i too will give this a try..... thanks again..... there just "aint no substitute" for you guy's experienced heads.....

A FLYING GOBLET eh Loz ? ... heh heh Sounds like the latest Harry Potter ! :p
 
TEP":2fryl3jv said:
Edit: No offence intended Pete, but I wouldn't use a roughing gouge on faceplate work. Even on the outside, it is just not designed for end grain stresses when cutting. Use the bowl gouge, that's where the name came from.

I learnt the hard way not to use it inside but have been using it to get rid of the edges on the outside mainly because it is bigger than my bowl gouges. Once I have it round I tend to use a bowl gouge or sometimes a scraper. However I read somewhere recently (perhaps on here) that the problem is not the blade but the tenon whicj is lwess able to cope with the stress. This would certainly tie in with the way mine bent when using it badly. I guess I had better invest in a bigger bowl gouge :cry:


Pete
 
Hi Loz
It sounds as is you are trying to round the outside as if you are spindle turning you need to grip the blank firmly preferably on a faceplate or a face plate ring then with the tool rest close and parallel across the bottom of the wood take a light cut with the 3/8 bowl gouge from the centre right out to the edge sliding along the rest and keeping the handle at the same angle all the way. Repeat the cut until you have a flat base large enough to make a mounting for the chuck then start the cuts slightly further out each time and start to swing the handle of the gouge out very slowly, this will give you a curve and start to take off the corners from the side with no drama, you make the shape you want by swinging the handle out more or less with each cut all the time taking the corners of further up the blank.
don't try and take the corners of head on and definitely not with a roughing gouge it's not strong enough.
For finishing the outside try using the gouge nearly horizontal with a slicing push cut as Peter Child shows in his book "The Craftsman Woodturner"
it can give a really good finish but like everything else takes practise.
Cheers Ken
 
Ken Furminger":gymy8vjw said:
Hi Loz
It sounds as is you are trying to round the outside as if you are spindle turning

Thats exactly what i was doing, even though the blank was faceplate mounted.

I am away this weekend on my stag do, but hope to get back to the bowl on sunday eve, with everyones advice.
Thanks

Loz
 

Latest posts

Back
Top