


Eric The Viking
Established Member
- Joined
- 19 Jan 2010
- Messages
- 6,599
- Reaction score
- 74
I finally collected my Axminster grinding jig yesterday morning from the post office, having had one of those phantom bellringer notes through the door on Friday ('You were out when we called.' Yeah? Four people who were in the house at the time disagree with you!). Royal Mail seem determined to put themselves out of business...
... but I digress. It looks nice; it will be rigid in use (with a bit of fettling with coarse sandpaper); it wasn't expensive. There were, however, no setup instructions supplied, but then it's not exactly a complex tool. I thought about it for a bit before deciding it might be worth making an alignment jig of my own, to get a tidy 25 degree or 30 degree bevel, prior to honing the final edge.
It's really a one-off setup, at least until the stone wears down a bit (and I don't have that many tools to grind!), so I want something obvious in use, as I'll pick it up only very occasionally, and it needs to be something with the minimum of precision required in construction, as I don't have the important tools set up and fettled yet.
So I came up with this, which I humbly offer up for criticism, etc.:
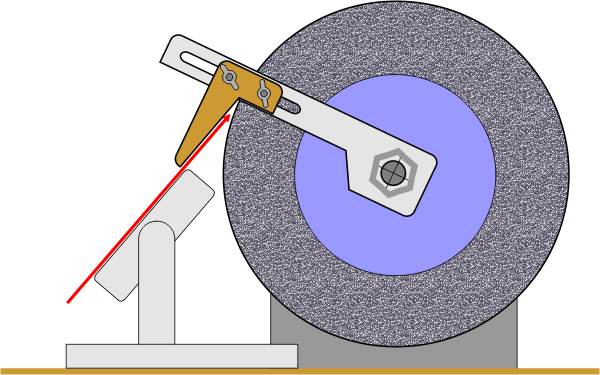
It fits over the spindle of the wheel (you need to take the cover off to do this, but it's only an occasional job). You slide the runner down till the angled edge just catches the circumference of the wheel (by eye), then pop a chisel or bit of flat plate into the Axminster jig, and adjust it until the plate (and the jig) is parallel to the angled edge, along the red line.
The result should approximate to either 25 or 30 degrees. It doesn't really take the blade thickness into account (you get the specified angle at the tool's edge, not in the middle of the ground surface), but it's most likely near enough for practicality, and should be quick to make.
Here's the parts:
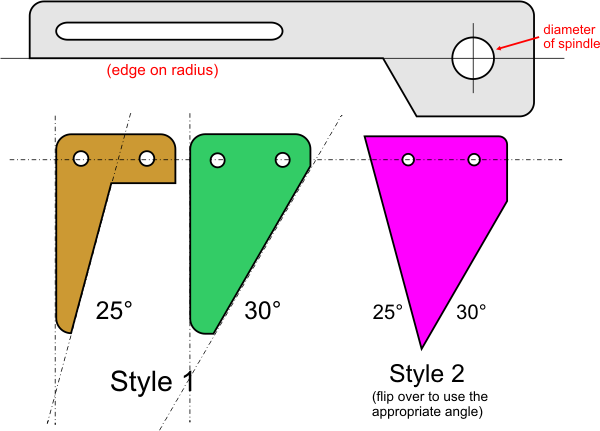
Sorry about the Lurex colouring - slight oddity in output from Corel Draw.
It's supposed to be in 1/4"MDF or possibly even partly in hardboard(!), as it needs to be thin.
There are only two 'precision' elements:
- on the main bar, the lower edge needs to be cut on a radius from the spindle hole (and the slot needs to be parallel with it),
- on the sliders, the bevel angle needs to accurate WRT the two bolt holes.
I'm undecided about the slider design, but will probably do style 2 as (a) it's easy, and (b) it's one part less to lose.
I intend to use M6 domed, square ended coachbolts to hold the two parts together with wing-nuts (or spiked tee nuts as substitutes -- I'm a cheapskate!). Obviously, dismantling the grinder guard to fit it is a nuisance, but I can live with that.
What do the team think? Any good? Waste of time/rubbish? Is there a better, cheap alternative?
Thoughts appreciated...
... but I digress. It looks nice; it will be rigid in use (with a bit of fettling with coarse sandpaper); it wasn't expensive. There were, however, no setup instructions supplied, but then it's not exactly a complex tool. I thought about it for a bit before deciding it might be worth making an alignment jig of my own, to get a tidy 25 degree or 30 degree bevel, prior to honing the final edge.
It's really a one-off setup, at least until the stone wears down a bit (and I don't have that many tools to grind!), so I want something obvious in use, as I'll pick it up only very occasionally, and it needs to be something with the minimum of precision required in construction, as I don't have the important tools set up and fettled yet.
So I came up with this, which I humbly offer up for criticism, etc.:
It fits over the spindle of the wheel (you need to take the cover off to do this, but it's only an occasional job). You slide the runner down till the angled edge just catches the circumference of the wheel (by eye), then pop a chisel or bit of flat plate into the Axminster jig, and adjust it until the plate (and the jig) is parallel to the angled edge, along the red line.
The result should approximate to either 25 or 30 degrees. It doesn't really take the blade thickness into account (you get the specified angle at the tool's edge, not in the middle of the ground surface), but it's most likely near enough for practicality, and should be quick to make.
Here's the parts:
Sorry about the Lurex colouring - slight oddity in output from Corel Draw.
It's supposed to be in 1/4"MDF or possibly even partly in hardboard(!), as it needs to be thin.
There are only two 'precision' elements:
- on the main bar, the lower edge needs to be cut on a radius from the spindle hole (and the slot needs to be parallel with it),
- on the sliders, the bevel angle needs to accurate WRT the two bolt holes.
I'm undecided about the slider design, but will probably do style 2 as (a) it's easy, and (b) it's one part less to lose.
I intend to use M6 domed, square ended coachbolts to hold the two parts together with wing-nuts (or spiked tee nuts as substitutes -- I'm a cheapskate!). Obviously, dismantling the grinder guard to fit it is a nuisance, but I can live with that.
What do the team think? Any good? Waste of time/rubbish? Is there a better, cheap alternative?
Thoughts appreciated...

