Fitted cabinet construction

UKworkshop.co.uk

Help Support UKworkshop.co.uk:

This site may earn a commission from merchant affiliate links, including eBay, Amazon, and others.
wizer":3nyt2brc said:
I forgot to say, this was the first big woodworking project I did. The Hook, you might say. It was a long low unit for the conservatory. I built it in three units with double doors and 18mm throughout. The top was 25mm Ply with 6mm veneered top, trimmed with solid beech. The cabinet was painted with Dulux Trade Eggshell. I was dead chuffed with it, probably my best work to date.

What, you actually finished it?
 
TheTiddles":1nhu0j5m said:
wizer":1nhu0j5m said:
I forgot to say, this was the first big woodworking project I did. The Hook, you might say. It was a long low unit for the conservatory. I built it in three units with double doors and 18mm throughout. The top was 25mm Ply with 6mm veneered top, trimmed with solid beech. The cabinet was painted with Dulux Trade Eggshell. I was dead chuffed with it, probably my best work to date.

What, you actually finished it?

erm, no. Not quite... I wonder how long the new owners waited before they ripped it out .....
 
Won't option 2 use much more material, cost more and be much heavier?

I sort of like it except for the above.

With built in cupboards, a little gap to the back wall won't be an issue if you have doors and if it is a problem, then scribe them in
 
TheTiddles":13kt3mbk said:
I don't have a biscuit jointer (I use a cutter in the router which won't do on this job) and obviously not a domino so it's pocket screws and more screws for me here
Forget the pocket hole screws - they're quite weak especially with MDF. Go instead for black carcass screws - cheap and work well and are used in a heck of a lot of shop fitting work. They'll be hidden at the backs of units and by the face frame in any case. The idea of pre-making carcasses is how we do it for fit outs. It's much easier to get a carcass square on the bench and a lot easier to fit the shelves (a pet peeve of mine at the moment is having to scribe shelves because someone didn't do the job right in the first place)

To the poster who asked about what happens behind the units - if you are at all concerned about moisture (such as in a cold attic or a cellar) it's best to allow air gaps at the top of the frame and to incorporate some form of grille at the bottom to allow air circulation. Works a treat and prevents black mould if the building is prone to that
 
Uneven floors?
I built a break front cabinet in oak for our lounge, at five and half feet wide the floor dropped over two inches!
After that exercise everything else was built and then leveled using the plastic wedges sold for aligning door frames.

Roy.
 
wizer":2dzcbser said:
TheTiddles":2dzcbser said:
the garage, my garage, let me say that again MY garage... still getting used to that!


What on earth is wrong with you man? Garage? Garage? What's one of those? Garages are for storing Junk....

:roll:

too right - i dont have a garage - i have a workshop in what used to be a garage but that aint the same thing :D
 
FatFreddysCat":3mr2u9ne said:
TheTiddles":3mr2u9ne said:
I don't have a biscuit jointer (I use a cutter in the router which won't do on this job) and obviously not a domino so it's pocket screws and more screws for me here
Forget the pocket hole screws - they're quite weak especially with MDF. Go instead for black carcass screws -

The pocket screws are only for the face frames, the carcase would be assembled with carcase screws.
 
Top tip there Paul, I try to screw through wherever I can (just ask the wife, HA! HA! BOOM! BOOM!) I had been using MDF-tite screws which look very similar but the carcase screws look cheaper still

Aidan
 
I was given this tip by a retired kitchen fitter years ago.

When you get your carcase / s in position and your ready to adjust the legs, slip an old scissor jack underneath, raise it to the desired height, and then unscrew the feet !

It's worked great for me anyway
 
jasonB":386rwhxk said:
I'd go for making it as a set of carcases and then fitting a FF to it.

Quite often on builtins I make a base from 38x63 CLS, one length back & front and a short one front to back under each vertical. This can then be shimmed level before fixing to the floor. Its also easier to slide large carcases about on a base like this than trying to move on adj legs. If you do go with adj legs you can get shorter (100mm) ones which may suit your skirting height better.

Jason

Hi Jason,

Can you explain this method slightly (or better still with pictures) as it sounds very slightly, like you're describing a raft for a shed!

Does anyone have a source for the 100mm legs as I can only find the 150s at a reasonable price

thanks

Aidan
 
I usually build a base as Jason does, but sometimes just fit a load of adjustable legs to a single sheet of MDF and adjust that level to make a base, then put units onto that. Either way, it makes it so much easier to move the carcases about. I usually work by myself and trying to move tall units about on plastic legs is a recipe for .... much fun.
Also, though I can get the shorter legs if I try, I often just end up cutting down the 150 screwfix legs to whatever plinth height fits the bill. This place sells them at around 100mm I think: http://www.daro.co.uk/ - ignore website catalogue and prices and just give them a call.
 
I'll explain this evening but woodfit do the "Big Foot" legs down to 100mm and they are far more solid that the shed bought ones.

Jason
 
Aidan, I have a bunch of the 100mm legs that I'll probably never use. I'll see if I can dig them out for you.
 
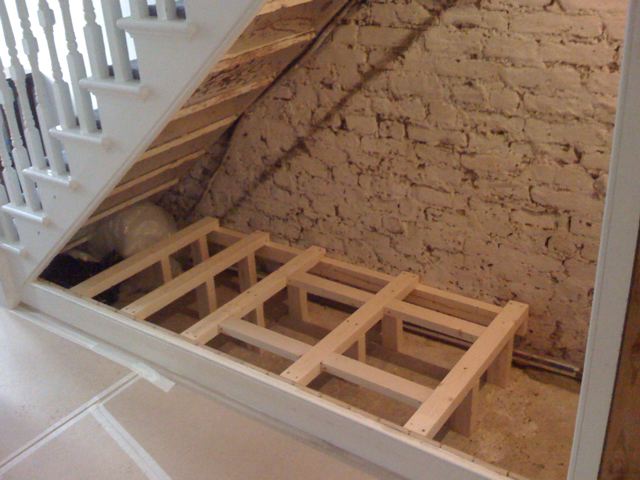
I did something similar when I did an under-stair storage thing:-

4250729082_e9e27532e0_o.jpg


It's just a matter of giving yourself a flat and level platform to work from; if you get that done then everything else is easy to true up - just like a raft when putting up a shed.

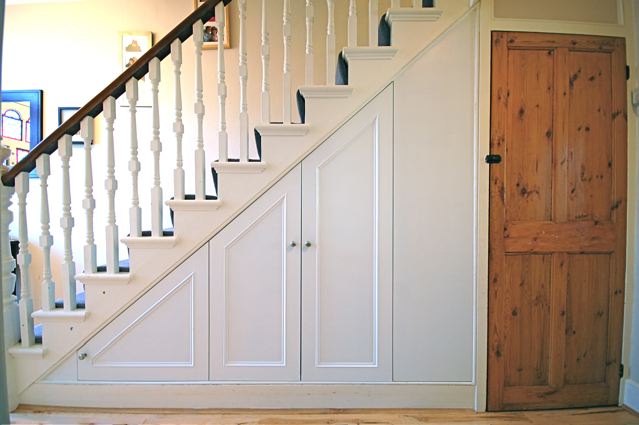
Worked out OK:-

4250729024_9df140d9af_o.jpg


HTH, Pete.

PS I usually get the cheap 150mm legs in bulk and cut them down as needed.

edited for images
 
Can you explain this method slightly (or better still with pictures) as it sounds very slightly, like you're describing a raft for a shed!

I have not got any photos of a base but have done the following sketch. The 3x2 or CLS frame is leveled up with packers(I like the screwfix plastic ones) and when its all level is fixed to the floor with a few angle brackets.

If you want a recessed plinth then do as the sketch, if fitting a faceframe the base can come flush with the carcase fronts.

PICT0120.jpg


If you can hang on 10-14 days I've got a small 10ft wide one to do and will take a load of WIP pictures, shame you didn't ask sooner as I just did one before xmas. I'll also show an alternative for aligning the faceframe and how I make scribing to the wall easier.

Jason
 
sounds good jason, i for one will look forward to having a look at that

luke
 
I'll hopefully be starting in around that time so it'll will be well timed thanks

Sounds like CLS route will do it just as well as any other.

Aidan
 
petermillard":yieuwm5u said:
Worked out OK:-

4250729024_9df140d9af_o.jpg

What type of hinges were used for these cupboards?

I take it they were overlayed on the frame?


I've got a project in mind to make 'funny' sized cupboards to go around a boiler and incorporate 4 failry standard doors.The space I have in mind is fairly limited and I could do with getting the most usable space possible.

thanks
 
Back
Top