Faceframe storage unit - advice needed

UKworkshop.co.uk

Help Support UKworkshop.co.uk:

This site may earn a commission from merchant affiliate links, including eBay, Amazon, and others.

TheTiddles

Established Member
Joined
14 Oct 2007
Messages
3,024
Reaction score
842
Location
Wiltshire
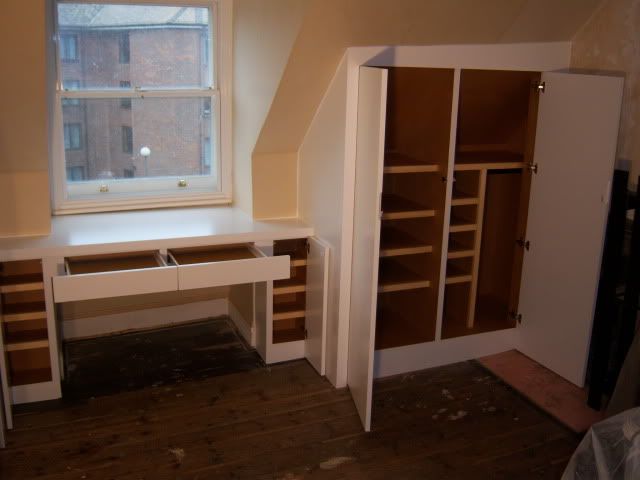
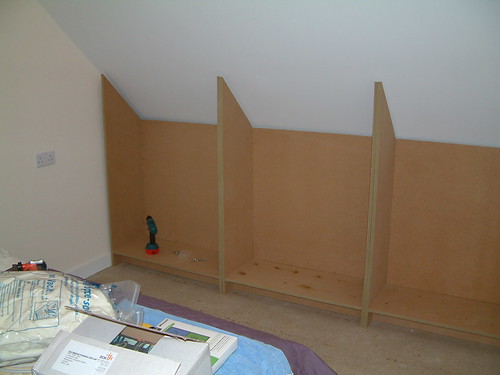
Here's progress so far,

all rather crude, the units will have a "roof" added yet and then deconstructed and taken back to the garage to paint white. The face frame will either be white beech or white painted something else, question is, how do I attach the frame? Current options are...
1- Pocket screw from the inside, then fill and paint over
2- Dowels and glue, not sure how well I'll get them clamped up to get a good finish on this
3- Something else suggested by you lot, any ideas?

Aidan
4448802052_0e3a55aa3c.jpg
 
Chems":2hiotbnv said:

Thanks for your valued input!

The question with dowels is how to glue a 9' long by 4' tall frame in place and clamp it up tight without 50 clamps?

Aidan
 
hi aidan

the front frame if it's hefty enough fix it to the wall ceiling and floor and possible use biscuits or other devises to any intermittent uprights. hc
 
Make the uprights of the face frame thicker, front to back, than the horizontals. Groove the rear face to wrap around the carcasses and use a screw through the uprights and the carcasses. This could also be done by forming, or fitting, a long tenon on the back face of the face frame. This let into slots in the edge of the carcasses, and again screwed.

HTH

xy
 
Make the faceframes as normal. Use 20mm wide stock for the adjoining verticals. Once the glue has set, trim each one back to the carcase side, but with a slight backward angle. Then when you re-install the units the face frames will close up nice and tight to each other. Run a bead of glue down each frame and screw the carcases together. Sand the face frames down as one to finish off.
Hope that makes sense.
That's how I do it and I make and fit around 20 kitchens/bedrooms per year.

Cheers.
Adam.

EDIT: reading this back, I realise I've made it sound very complicated.
Basically what I'm saying is:
Once you have your carcases complete, you can treat them as individual units.
Glue face frames to each (Pocket holes can then be used on the OUTSIDE to fix the frames on. Trim the face frames flush where they meet (but with a slight back bevel)) Slide the units into place, and fix together.
Don't forget to allow an extra wide stile on the outside edges and top for scribing into the walls/ceiling.

I really do hope I'm making sense cause this sounds so complicated when written down!

Adam.
 
Right. I wasn't happy with that description, so I've knocked up a quick drawing...
General view (central units omitted for speed)
Tiddlesmockup1.jpg


Close up join between angled stiles (angle exaggerated for clarity)
Tiddlesmockupangleddetail.jpg


Tiddles, if you want the file to examine more closely, drop me a p.m with your e-mail address and I'll forward it on.

Cheers.
Adam.
 
That's kinda what I do, Riley. Except I use full width face frames with a 10mm fillet set back from the face by 5mm (i.e. the join is deliberately not flush but is a feature). Not really possible in this example unlike your solution. Either way the joining method for face frame to carcass is completely hidden.
 
Are the doors solid or panel doors? If the face frame's to be painted, and the doors paneled then what's wrong with 10 minute PVA and 21-gauge veneer pins to hold it in place while the glue sets? Or as JasonB suggested a while back, a 6mm spline sandwiched between the carcasses and a corresponding groove in the face-frame to locate it; or pocket-screws from the inside of the carcass, or lots of glue and edge clamps, or dowels, dominos etc...

Plenty of ways to skin this particular cat, I think??

Cheers, Pete
 
RILEY":1rjpw5rv said:
Make the faceframes as normal. Use 20mm wide stock for the adjoining verticals. Once the glue has set, trim each one back to the carcase side, but with a slight backward angle. Then when you re-install the units the face frames will close up nice and tight to each other. Run a bead of glue down each frame and screw the carcases together. Sand the face frames down as one to finish off.
Hope that makes sense.
That's how I do it and I make and fit around 20 kitchens/bedrooms per year.

Cheers.
Adam.

EDIT: reading this back, I realise I've made it sound very complicated.
Basically what I'm saying is:
Once you have your carcases complete, you can treat them as individual units.
Glue face frames to each (Pocket holes can then be used on the OUTSIDE to fix the frames on. Trim the face frames flush where they meet (but with a slight back bevel)) Slide the units into place, and fix together.
Don't forget to allow an extra wide stile on the outside edges and top for scribing into the walls/ceiling.

I really do hope I'm making sense cause this sounds so complicated when written down!

Adam.

How does that work with exposed wood? Would that not look extremely obvious if I didn't get a really good match on the two edging strips?

Aidan
 
A few biscuits or a full length loose tongue will keep things alined and as its going to be painted hold with some 1 1/2" lost heads or a few 3.5mm screws (I usually screw)

You don't even have to make the faceframe as one, leave the two central horizontals loose and fit after the two side FFs have been scribed to the wall. Look back at the pics I posted when you were designing this, all the FF timbers are separate straight lengths.

Jason
 
Here's my two penneth....

In the absence of any cramping solutions then a mechanical fixing is required until the glue goes off.

If the face frames are to be painted, then simply pva and some well placed brads are all that's needed. If the face frames need to be 'pulled up tight' in certain areas then tongue-tite flooring screws are great due to the small head that needs filling afterwards.

If the face frames are to be a natural finish that can't be marred in any way, then fixing from behind, like pocket screws are the way to go.

Dowels/dominoes/biscuits would help from a locating point of view but still need pulling up tight....

My own personal fave at the moment for painted face frames are dominos and 16 guage brads. Before I got the domino, then 16 guage brads were all I used for 18-22mm mdf face frames. For chunkier 28mm pine face frames I'd use tongue-tite screws and pva.
 
As Jason says, I would treat the stiles and rails as separate components. Scribe the wall stiles and fix first, making sure the inside edge is plumb. Then the top rail that meets the ceiling. For an eaves slant, I would bevel the top edge to coincide with the ceiling angle......also, makes scribing easier as there's less material to remove, and a narrower edge in contact with the wall / ceiling lessens your margin for error with your scribing.....well it does in my case anyway.... :lol:
 
Glued and pinned. Your ceiling and floor looks more sober than this one :lol: :

000_0304.jpg
  
 
Ok, so if we go for a white finish then I can use lots of screws, filler and general bodgery. If the face frame is MDF then it's cheap, however the doors need hinges and that's a bit of an buttocks in MDF. Would it be worth making at least the verticals in something like beech or poplar (both of which I have on hand) to save the fuss on hingesor can I get away with 18mm MR-MDF? I'm tempted to use the MDF as it means I can make a mistake or three getting it to fit, not made a face frame before...

Aidan
 
You wouldn't need lots of screws, they're merely a way of exerting pressure until the glue has gone off. In the absence of cramps, a mechanical fixing's the only alternative. I can't see where there's any bodgery involved in that ?

Re: hinges, I would use butt hinges for a traditional feel, in which case a poplar face frame would be more suitable, but if using mdf for the face frame I tend to line the edge with timber parting bead creating a beaded face frame and giving a better fixing for butt hinges.

For your project I'd say blum euro hinges would be better. Easy to fit and easy to adjust. Then your face frame can be made of whatever you wish.
 
Back
Top