


oddsocks
Established Member
My new spindle moulder was delivered back in Nov but I only finished assembling it a few weeks ago (illness , weather etc) so after work I eagerly set about unboxing it (i'd bought the W030P2 package with the extras such as wheelkit, rebate block and cutter set).
First impressions on the SM (as far as I have got in the assembly)...
1. very well protected (useful 10mm ply case) and bolted to the ply base
2. Sliding table fitted easily on the guide and slides really smoothly with no play
3. The fences are aluminium and are flat and true except that one has a blister on it - will be simple to sand flat. The fence extrusion has two hollows so lends itself to having wooden inserts lengthways so that false fences can screw into it.
4. The charnwood universal wheel kit is the best one I have used - the big levers and wheels make it easy to move the SM and when positioned is stays put.
5. It took me 15mins to work out how to fit the fence faces to the main fence...the locking screw thread had seized and needed me to be sure it should undo before I put enough pressure to prove it (I then removed the fitting and greased it)
6. The sliding table fence has a wooden spelch block fitted at one end but this was 180degrees out (the fence has centre grooves on 3 of the 4 sides so until I realised the issue I couldn't work out how to fit the length stop as the top groove was too wide (which in fact was the bottom groove)
7. The sliding table fence has an angle stop that should attach to the fence and slide in a slot in the table...but the angle stop is so poorly machined it won't fit the table slot (again a quick job with a file will solve that).
8. All the important components look to be well made and finished.. I've only powered up without the block fitted, just to confirm it actually ran and it was smooth and quiet.
Pics and comments from the build...
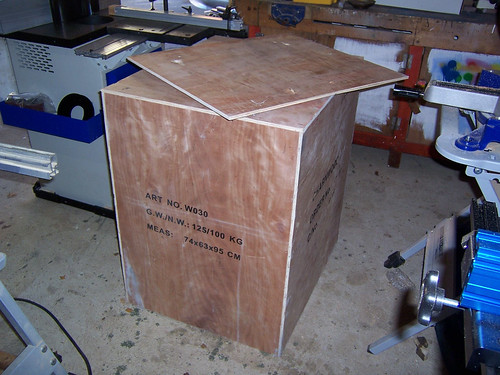
First the delivery box – it came on a pallet and bolted to the ply base and covered by the solid ply box
Assembling the main alu fence – I have shown the fitting dismantled as mine was rusted and took a lot of effort to undo enough to allow the fence to be fitted. The silver knob locks to alu fence (to/from the block) and the black knob then controls forward /back fine adjustment. I undid both sides and greased the threaded rod. From the books and DVD I have seen it looks like a wooden fence is more useful than an alu one.
The assembled fence – easy enough but don't forget the sprung plates on the shaw guard locks. These are not the smoothest to adjust but they work well enough.
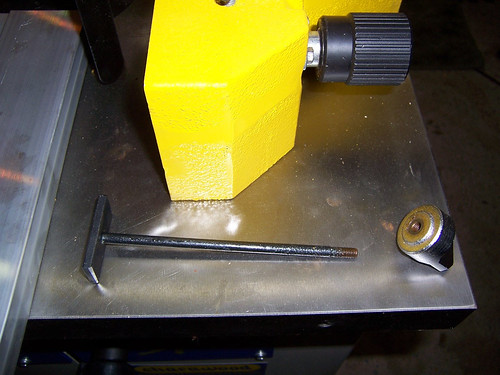
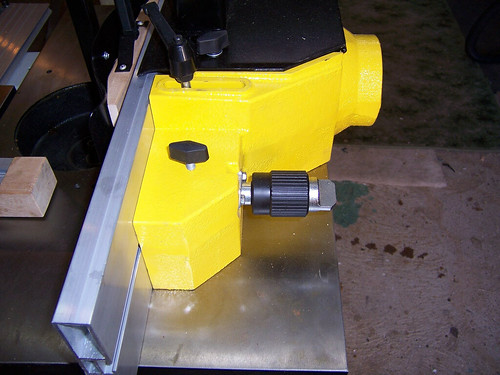
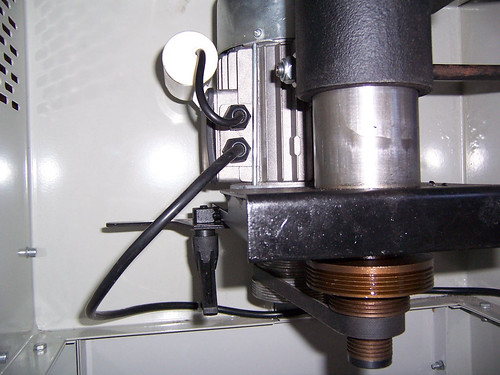
Motor assembly – the door is microswitched. And there are 4 speeds
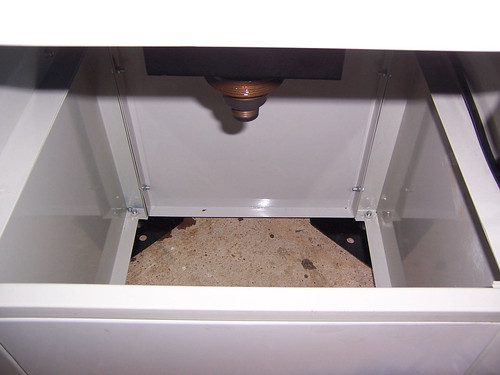
plenty of wasted space waiting for some of that ply to make a base so that the blown moulded tools can be stored
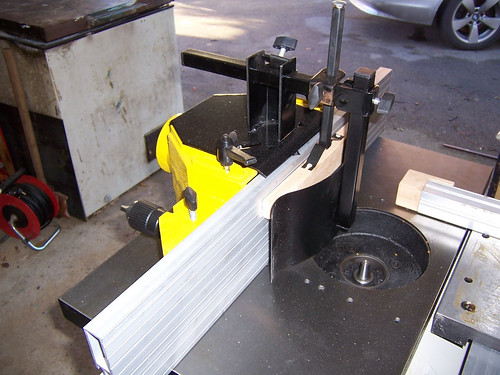
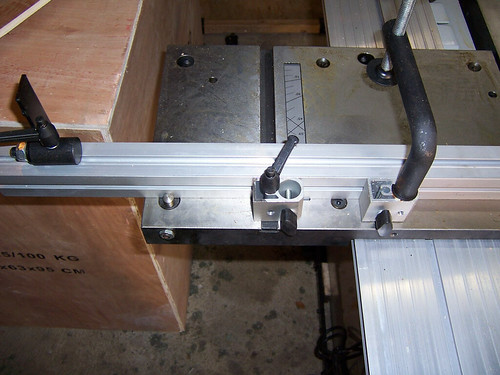
The sliding table and fence that look the same as that on the Axi TS200? The sliding table is really smooth yet the fence fittings were appalling and took a lot of fettling. Note the 90 stop bottom left of the table – this isn’t mentioned in the docs and was missing - I found it inside the packaging, it is (or should have been) retained by a grub screw from the front. The pin housing is cam'd so an exact 90 can be set and locked. Once set, the pin can be pushed below the surface to allow beyond 90. Not in the picture the wooden block on the end of the fence was fitted to the wrong side which meant when I first fitted the fence it was upside down and the top groove was then too small for the length stop. All sorted once it was worked out why!
Excellent wheelbase (part of the package)

Tool storage on the side showing the included bobbin sanders and some inserts
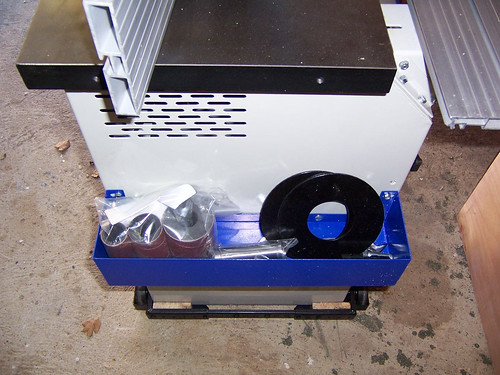
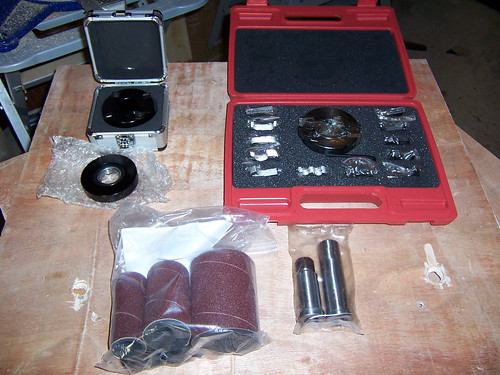
The other items in the charnwood bundle – block with six cutter sets, tenon block, sanding bobbins and 1/2” router spindle (the smaller one in the bag).
Hopefully that helps. I realised I don't have a pic of the height adjuster wheel and power switch but that is in any website that sells these – I'll try and resist using the spindle tooling until I've done the training, but am confident to use the bobbins and router collet as needed. All in all it looks like a good tool for the price paid.
Dave
First impressions on the SM (as far as I have got in the assembly)...
1. very well protected (useful 10mm ply case) and bolted to the ply base
2. Sliding table fitted easily on the guide and slides really smoothly with no play
3. The fences are aluminium and are flat and true except that one has a blister on it - will be simple to sand flat. The fence extrusion has two hollows so lends itself to having wooden inserts lengthways so that false fences can screw into it.
4. The charnwood universal wheel kit is the best one I have used - the big levers and wheels make it easy to move the SM and when positioned is stays put.
5. It took me 15mins to work out how to fit the fence faces to the main fence...the locking screw thread had seized and needed me to be sure it should undo before I put enough pressure to prove it (I then removed the fitting and greased it)
6. The sliding table fence has a wooden spelch block fitted at one end but this was 180degrees out (the fence has centre grooves on 3 of the 4 sides so until I realised the issue I couldn't work out how to fit the length stop as the top groove was too wide (which in fact was the bottom groove)
7. The sliding table fence has an angle stop that should attach to the fence and slide in a slot in the table...but the angle stop is so poorly machined it won't fit the table slot (again a quick job with a file will solve that).
8. All the important components look to be well made and finished.. I've only powered up without the block fitted, just to confirm it actually ran and it was smooth and quiet.
Pics and comments from the build...
First the delivery box – it came on a pallet and bolted to the ply base and covered by the solid ply box
Assembling the main alu fence – I have shown the fitting dismantled as mine was rusted and took a lot of effort to undo enough to allow the fence to be fitted. The silver knob locks to alu fence (to/from the block) and the black knob then controls forward /back fine adjustment. I undid both sides and greased the threaded rod. From the books and DVD I have seen it looks like a wooden fence is more useful than an alu one.
The assembled fence – easy enough but don't forget the sprung plates on the shaw guard locks. These are not the smoothest to adjust but they work well enough.
Motor assembly – the door is microswitched. And there are 4 speeds
plenty of wasted space waiting for some of that ply to make a base so that the blown moulded tools can be stored
The sliding table and fence that look the same as that on the Axi TS200? The sliding table is really smooth yet the fence fittings were appalling and took a lot of fettling. Note the 90 stop bottom left of the table – this isn’t mentioned in the docs and was missing - I found it inside the packaging, it is (or should have been) retained by a grub screw from the front. The pin housing is cam'd so an exact 90 can be set and locked. Once set, the pin can be pushed below the surface to allow beyond 90. Not in the picture the wooden block on the end of the fence was fitted to the wrong side which meant when I first fitted the fence it was upside down and the top groove was then too small for the length stop. All sorted once it was worked out why!
Excellent wheelbase (part of the package)
Tool storage on the side showing the included bobbin sanders and some inserts
The other items in the charnwood bundle – block with six cutter sets, tenon block, sanding bobbins and 1/2” router spindle (the smaller one in the bag).
Hopefully that helps. I realised I don't have a pic of the height adjuster wheel and power switch but that is in any website that sells these – I'll try and resist using the spindle tooling until I've done the training, but am confident to use the bobbins and router collet as needed. All in all it looks like a good tool for the price paid.
Dave