Welsh loving spoon - WIP

UKworkshop.co.uk

Help Support UKworkshop.co.uk:

This site may earn a commission from merchant affiliate links, including eBay, Amazon, and others.

SawdustMaker

Established Member
Joined
28 Aug 2009
Messages
29
Reaction score
0
Location
Egham, Surrey
Hi
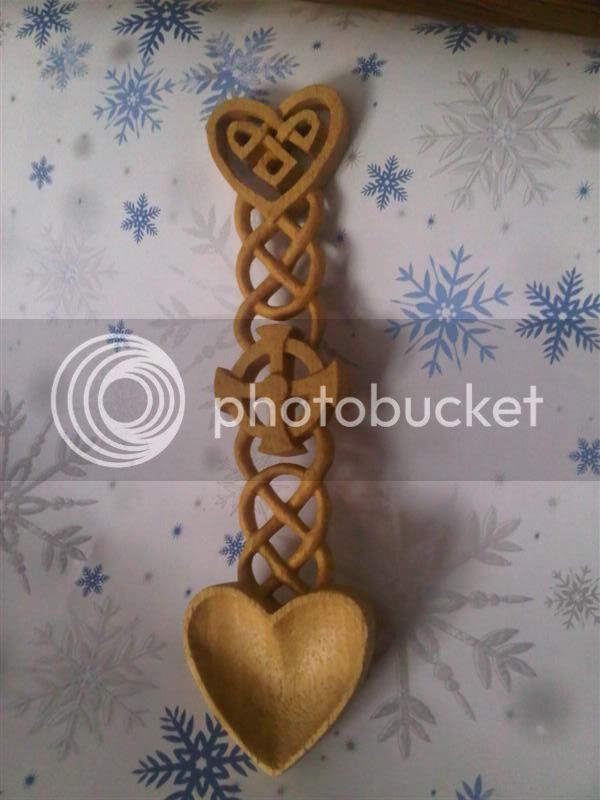
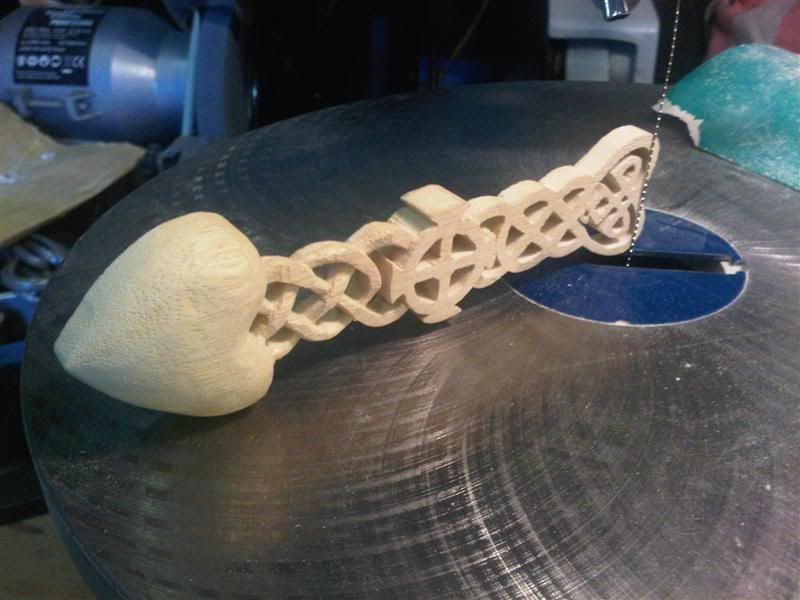
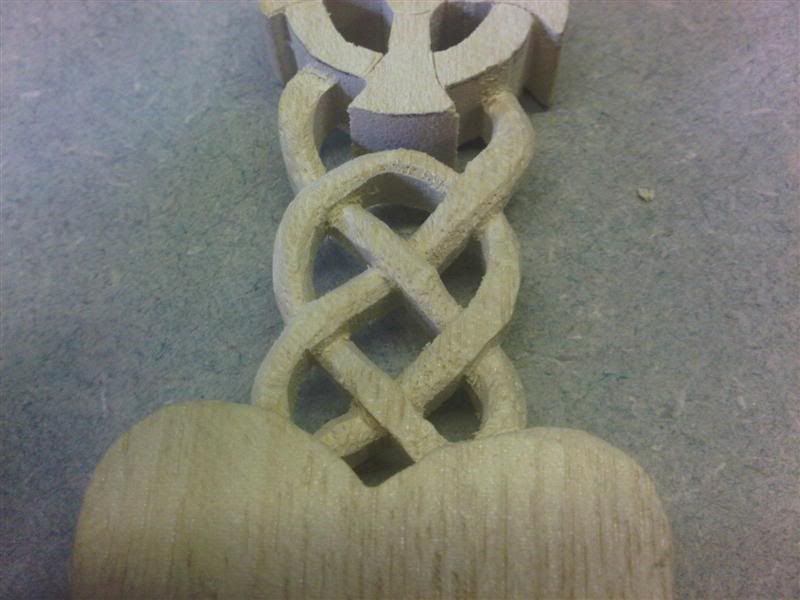
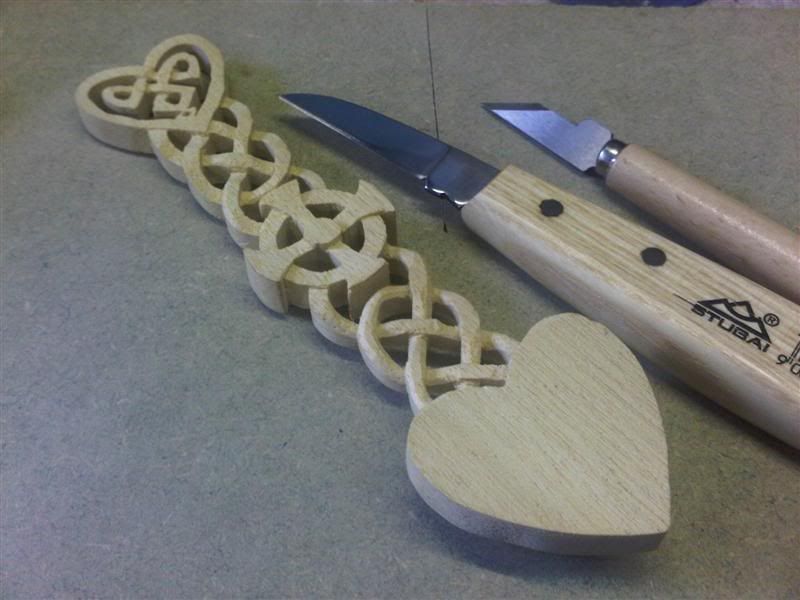
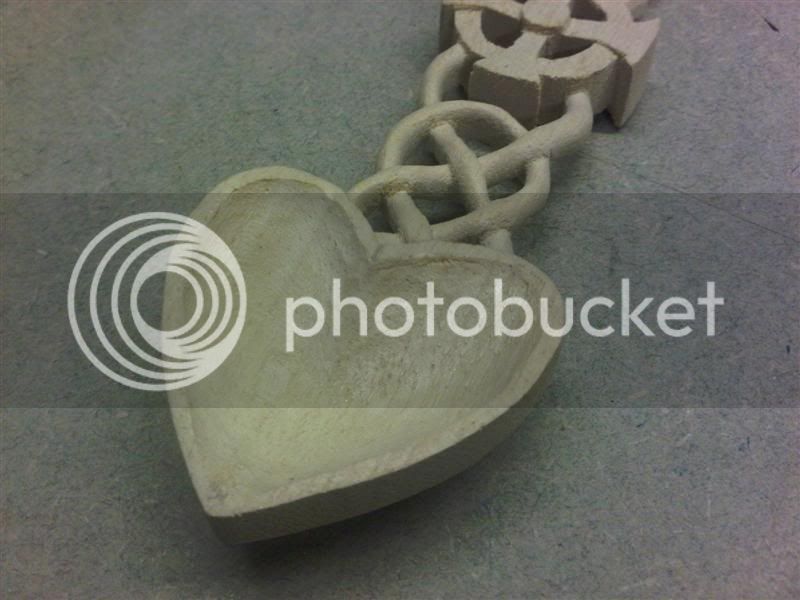
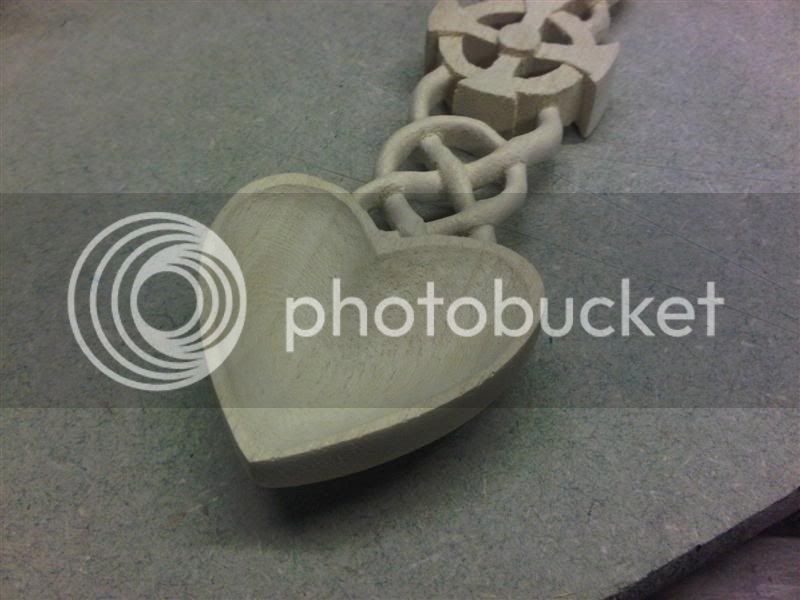
For xmas this year I decided to make a loving spoon for my wife. This was to be my 1st introduction to the scroll saw and to carving so no pressure especially as I announced to my wife I was making something for xmas.

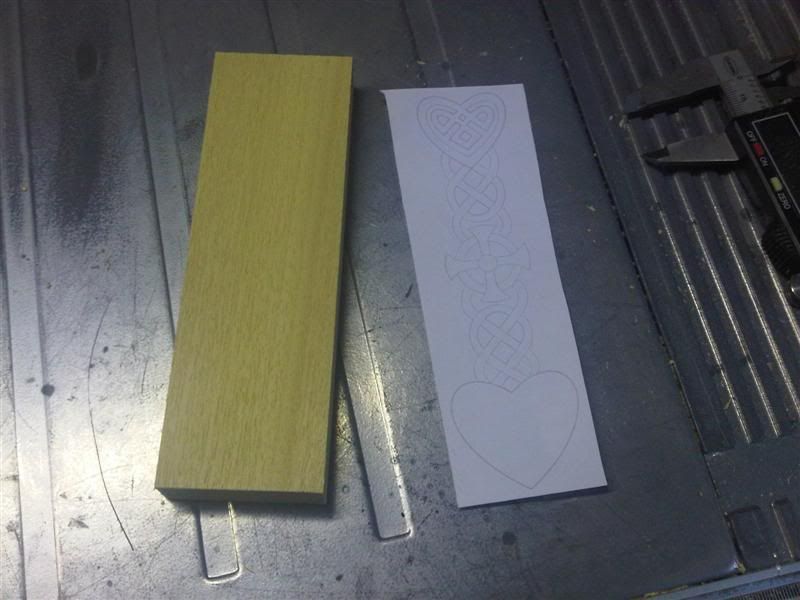
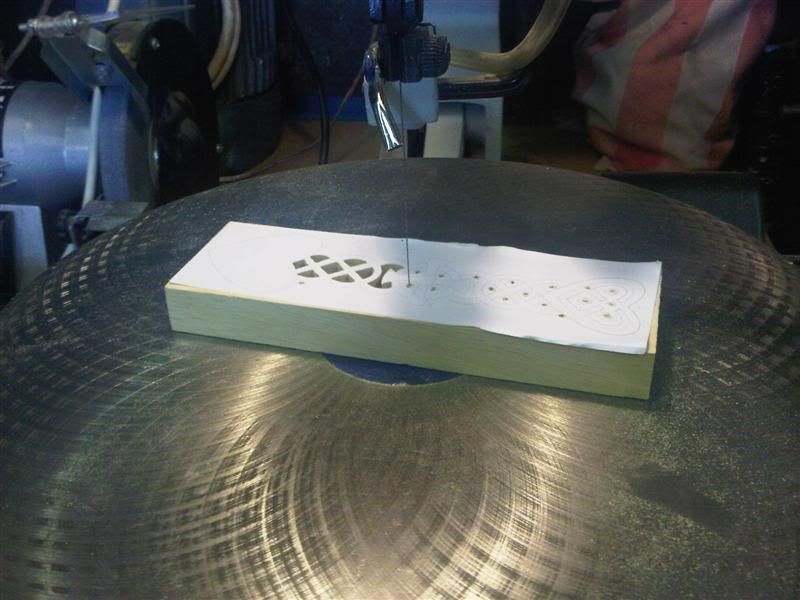
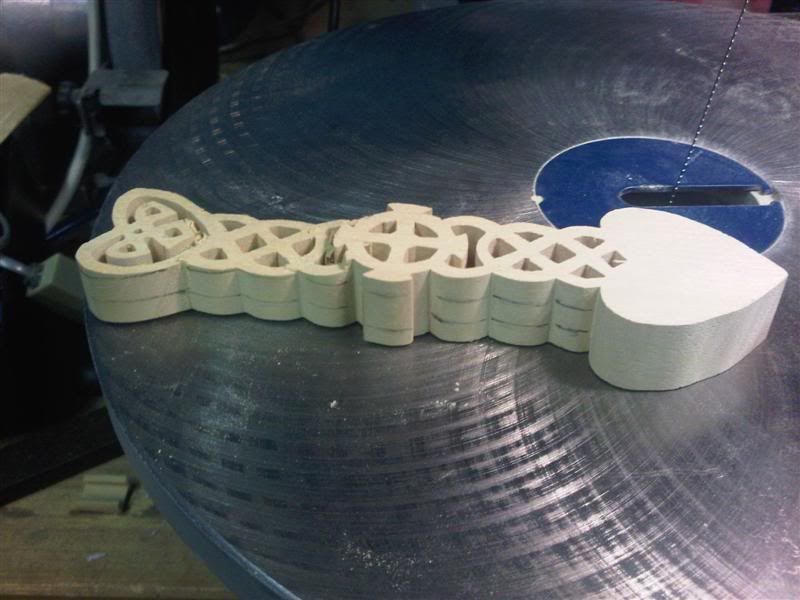
I thought you may like to see some photos showing progress which I will update as I finish the spoon. This also happens to be my 1st time doing a WIP so also no pressure.

Any hints/advice on finish would be welcome I have used Obeche as the wood. Also I have not worked out how to carve the spoon bowl without buying one of those round spoon carving knives things. Any hints on this would be welcome too.

anyhow onto the pictures.
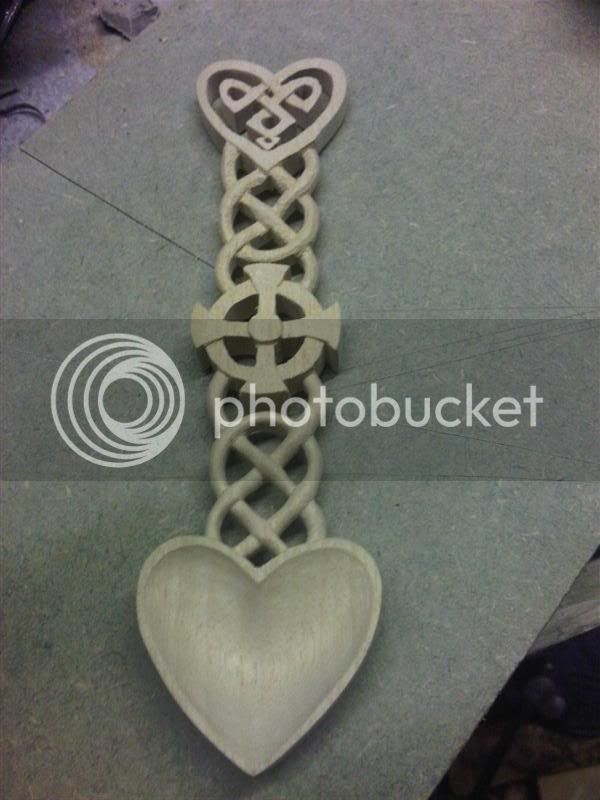
IMG00157-20100921-1450Medium.jpg


IMG00160-20100921-1521Medium.jpg


IMG00183-20100926-2126Medium.jpg


IMG00195-20101002-1420Medium.jpg


IMG00197-20101002-1421Medium.jpg


IMG00198-20101002-1534Medium.jpg
 
Bloody hell, that's brilliant so far! Nothing like a challenge for your first attempt!

I've made a few lovespoons. Carving out the spoon bowl was always a bit tricky. I found that a combination of a curved chisel and a dremmel with a sanding drum lets you get in there. Finish off with lots of one finger sanding. If it's a fragile design then I tend to dig out the bowl before before cutting the main outline on the scroll and bandsaws.

I finish my spoons with danish oil followed by a bit of wax.
 
Thanks guys for your comments,

Bryn thanks for the hints on finishing. I managed to grab some time last night and started the clean up process.

IMG00208-20101006-2149Medium.jpg


In hindsight it would have been better to completely finish the spoon bowl before moving onto the handle. oh well lesson learnt and will do that next time.

Will post more pictures as things progress
 
Did more on the Spoon. Starting to see that I will get there.

On the advice of Bryn (Thanks Again) I got a dremmel burr and had a go at the spoon bowl. Was very good and only took 10mins or so for the rough out.

IMG00213-20101011-1959Medium.jpg


After a bit of clean up, it looks good me thinks.

IMG00216-20101011-2102Medium.jpg


Overall the spoon is progressing quite well. Still lots of sanding to do.

IMG00218-20101011-2102Medium.jpg
 
That's looking pretty damn good! Have to say, I find the 'bowl' the trickiest part. It's so easy to take too much out, leaving either a really thin 'lip' around the edge or to leave an uneven one. Looks like you've got it just right.

The sanding phase can either be a nightmare of tedium or really satisfying, depending on the type of person you are. Remember, these spoons would be being made for a special 'cariad' once the sun had gone down and the young man had time to kill. Spending time carefully sanding was considered an investment in his future as the better the spoon, the more likely the young lady would be to succumb to his advances.

We Welsh are simple folk.... :lol:
 
.
.
Great job - looks really good so far.

"I announced to my wife I was making something for xmas."

BIG MISTAKE though IMO :lol: :lol: :lol:

cheers

Bob
 
Thanks all for your kind words. This is my 1st attempt at any sort of carving. Most of my previous projects are more biased to the home DIY type stuff. That said I found I like the carving so will have a go at something else in the near future.

As for finish I don't know. Bryn recommended Danish Oil with a after coat of wax. I would like to keep the wood color light but that's as far as my thinking has gone.

I'll post more pictures as I progress.
 
In my experience, a brush-on finish is best for lovespoons on account of all the nooks and crannies you have to get into.

Danish oil gets itself into all the gaps really easily with the help of a small artists brush. Just need to wipe it off as much as you can after its gone on or it'll go sticky and look uneven.

I tend to give them one coat of oil, followed by a quick rub with some 0000 wire wool then 2 really light goings over with clear wax. Let them both dry before giving a quick buff with some more wool. The more wax you use and the more rubbing with wool, the smoother the finish. I tend to concentrate on the bowl part and the outside edges of the body.

I do find that the wax can clog in the knots and small gaps which also collect small bits of the wirewool. You can pick them out with a small artist brush.
 
looks brilliant, really pleased you did this as a WIP, you should post this in the scroll section too.
what scroll saw do you use.
 
Steve, I will put a post in the scroll saw section refereing them to this WIP. The Scroll Saw I have is a simple Delta 40-540 that I got from Ebay a few weeks back. I am still learning but it seems a capable saw for basic stuff.

I aim to get some danish oil (clear) and some wax on order this week will post up some pictures.

Cheers all and have a great weekend in them workshops.
 
Been busy for the last month or so on work etc.. Just finished the spoon before the big Ho Ho Ho...

IMG00336-20101224-1442Medium.jpg


In all I am pleased with the result. Doing this project has increased my woodworking horizon and I will certainly be up for more scroll work with carving.

Merry Christmas one and all.
 
I was about to say that for a first attempt, that looks bloody good. On second thoughts, I'd say that someone with a lot of experience of lovespoon carving would be pretty pleased with that!

Definitely not a beginners design you went for there. You should be justifiably pleased with your work. What finish did you go for in the end? It looks like wax to me.

Top stuff!
 
Bryn,
You are right with the wax finish, I took your advice and applied 2 coats of Danish oil followed by 2 coats of clear wax. I applied it all with a small paintbrush.

Thanks for the comments and advice.
 
Nice one.

The oil's great for getting into all the nooks and crannies, isn't it? Gives the same colouring as the wax but in a much more even way. I find the wax mainly gets to just the 'open' areas and gives a nice, overall sheen.

Glad I could help! Keep up the great work, mate! :)
 

Latest posts

Back
Top