Charles, I didn't mean to thank you for your post - I can't make sense of it! Is there some project in your head that you are not telling us about? And had you noticed that this thread is about the capabilities of tools, not how to go about a project?
You are using an out of date browser. It may not display this or other websites correctly.
You should upgrade or use an alternative browser.
You should upgrade or use an alternative browser.
Rebating with a combination plane
- Thread starter AndyT
- Start date


Help Support UKworkshop.co.uk:
This site may earn a commission from merchant affiliate
links, including eBay, Amazon, and others.
Thank him again - it gets removed. 
AndyT":3gpdw8gi said:Charles, I didn't mean to thank you for your post - I can't make sense of it! Is there some project in your head that you are not telling us about? And had you noticed that this thread is about the capabilities of tools, not how to go about a project?
Well, you've confirmed what I've written. You don't need to sweat "nickers" or really even knifed lines other than the ones you use to mark where the cuts need to go. The blown out ends and ragged sides are simply trimmed away with saw or plane as long as one hasn't done the work on a component that is already at finished width, length, and thickness. It's great that Lee Valley has provided this facility, but if you ever need it then you've designed yourself into a corner or the order of work is out of kilter.
If running housings, trim the exit end to planned width after they're run -- voila, no need for worry. Same for the housing sides -- no need to knife, cut, and knife, just leave it a bit over thickness and plane to thickness after the housings are run. Same with rebates - trim the exit end to length after they're run.
I'm sure somebody understands what I'm saying, otherwise maybe this post belongs in the dual thread on the same topic.
Most people's order of work with hand planes is the same as they would use if using machinery. Again, this is a fundamental misunderstanding of how to do the work efficiently with hand tools. Joinery cuts with planes are not run on workpieces that are at finished length, width, or thickness if you can avoid it, and you almost always can. Final trimming and planing rectifies almost all ills, which of course is the entire point.
You have to make stock first before you can make a demi-glace, if you get my drift...
Cheers.
woodbrains
Established Member
custard":1hf4d79x said:AndyT":1hf4d79x said:But I was hoping to keep this thread focussed on combination planes...
Just establishing a reference point Andy!
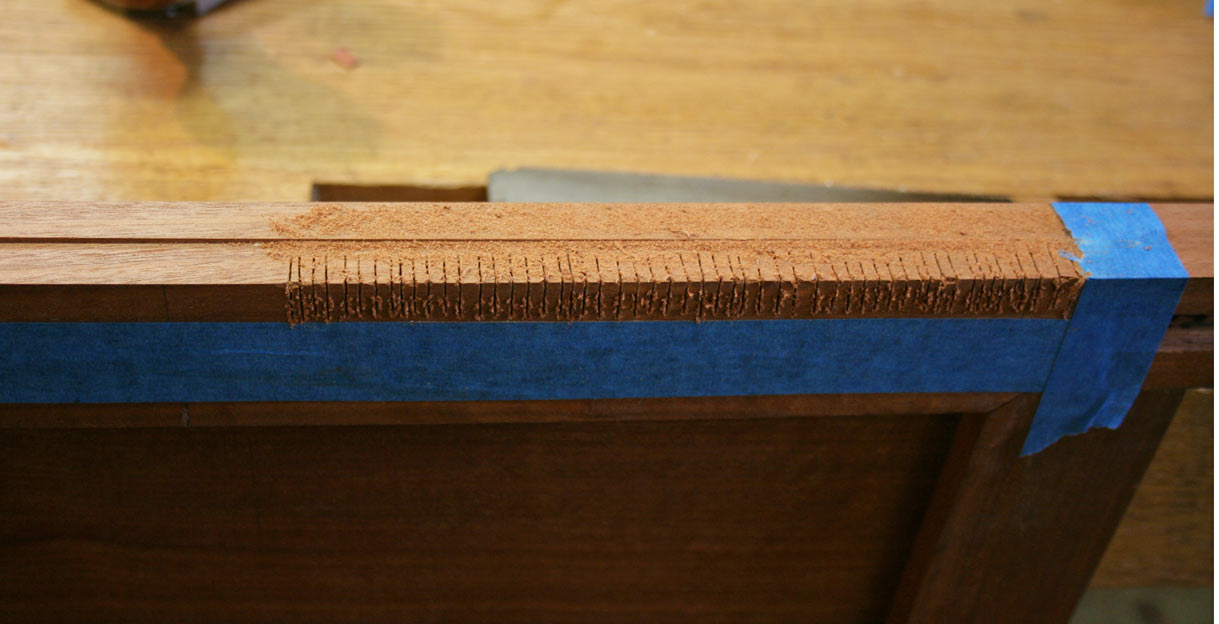
Because this is the result with a Stanley 55. So, exactly the same board of timber (except this time the grain is contrary for the first half, then fair thereafter), and the same person sharpening and setting the tool.
What a mess! Let's leave it there, I know from experience with this tool that cross grain planing will be even uglier.
I'm pretty sure this would have worked out okay-ish on some sweet grained softwood, but as soon as figured hardwoods with contrary grain enters the equation, the Stanley 55 (and maybe some other combi ploughs?) will really struggle. So I guess it's always worth planning your tool buying around the timbers you plan on using.
Hello,
Custard, I've not been in the workshop to do some experimenting myself, I'll give my 405 a go tomorrow. But your Philly fillister ( nice plane BTW) has its cutter at a high bedding angle. Your combination does not. Is the difference in results mainly or entirely down to this. I'm sure the Philly is much nicer to use, but wouldn't putting a 10 degree back bevel on the Stanley even the results up a bit. The Philly has only a slight skew, how much difference do you think that makes? I've a Veritas rabbet plane, as they call it, (should be called a moving fillister) with a 30 degree skew. It makes planing a dream compared to the 78 Jacob bangs on about. Lovely helical, self ejecting shavings, no mouth clogging. But I can't say if it does much with ornery grain. But it doesn't have a high EP like your Philly and would need a back bevel to achieve that. I'm sure the Veritas could be made to perform as well, and I'm with you about dedicated planes for specific tasks. Could a multi plane be made to perform as well, and save multiple tool ownership?
Mike.
Cheshirechappie
Established Member
Well - that answers my question; and very comprehensively! Thanks to AndyT for the initial experiments, and to others for chipping in with thoughts and experience.
It does seem that if conditions are good, combination planes can cut rebates - after a fashion. However, when conditions are not so ideal (which seems to me to be most of the time, for one reason or another!) you're better off with a dedicated rebate plane (or a powered router or spindle moulder).
It does seem that if conditions are good, combination planes can cut rebates - after a fashion. However, when conditions are not so ideal (which seems to me to be most of the time, for one reason or another!) you're better off with a dedicated rebate plane (or a powered router or spindle moulder).
custard
Established Member
woodbrains":2qccxqhk said:I've a Veritas rabbet plane, as they call it, (should be called a moving fillister) with a 30 degree skew.
Funny you mention that. I took the rebate that had been massacred by the Stanley 55, and tried cleaning it up with that self same Veritas plane, you can see after just a couple of strokes that the edges are so much sharper, and even though there's hardly any support for the iron from the workpiece it's still tracking straight and true,

The Veritas couldn't quite take such thick tear out free shavings as the Philly Moving Fillister, but it was pretty close, so still got the job done to a very high standard and in a reasonable amount of time,

Moving on to an end grain cut, the Veritas nicker is the best I've seen, sharp as a knife gauge,

And the depth stop is very accurate and easy to set, look at the way the rebate turns the corner and remains flush and identical,

If I was recommending a hand tool for hardwood rebating I'd say get the Veritas. It's easy to set (unlike a wooden bodied moving fillister where you have to set the fence from underneath and need a screwdriver), the skew pulls the plane into the workpiece for super clean arrises and it makes short work of tricky grain, the nicker is on a different level to most alternatives, the fence locks down tight with finger pressure only, it's quite a bit cheaper than the Philly plane, and it will probably give a much longer service life. One criticism might be that it doesn't have a forward iron position for stopped rebates, but in all honesty a powered plunge router is such a superior choice for stopped work why would you bother with a hand plane?
As you suggested, a 10 degree back bevel of the Stanley 55 may well improve things, but I doubt it's the full solution. One of the key reasons is that on a rebate plane you want really heavy shavings, otherwise the typical rebate could easily take a hundred strokes or more, and I'm not convinced that the skates on a combi-plane can provide the support and rigidity to the iron that are needed for tear out free shavings that might be in the range 0.5-1.0mm thick. You might get away with it in softwood, but I just don't see it with hardwoods. The other thing is once you've put a back bevel on the iron it would then degrade the performance on softwood. Hey, I'm no expert, and if someone can furnish photos of them delivering clean, accurate rebates, both with and across the grain, with ultra thick shavings in hardwood, then I'd be happy to change my mind.
Attachments
Derek Cohen (Perth Oz)
Established Member
.... One criticism might be that it doesn't have a forward iron position for stopped rebates, but in all honesty a powered plunge router is such a superior choice for stopped work why would you bother with a hand plane?
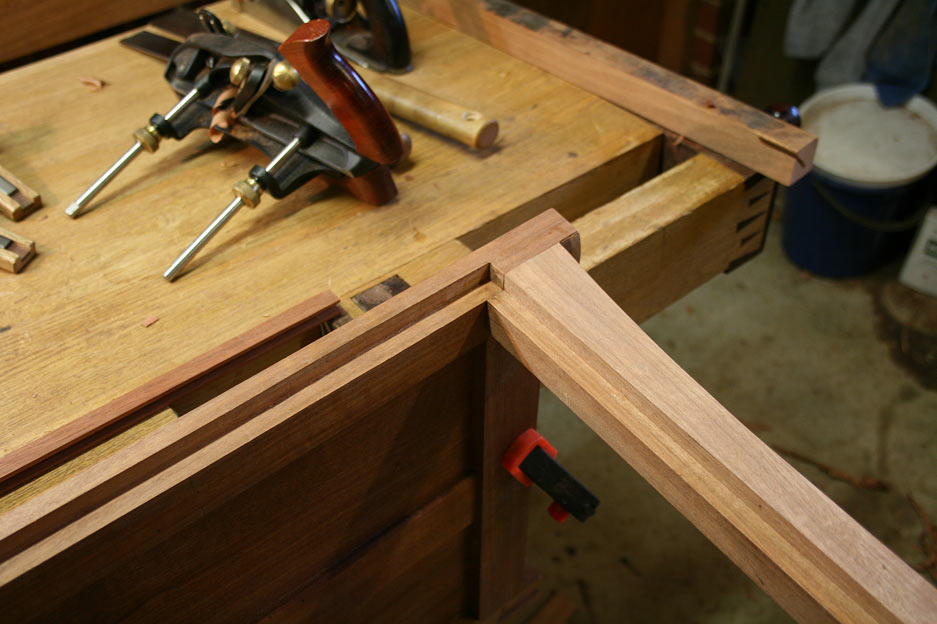
I needed stopped rebates on a frame-and-panel chest. First remove the ends ...
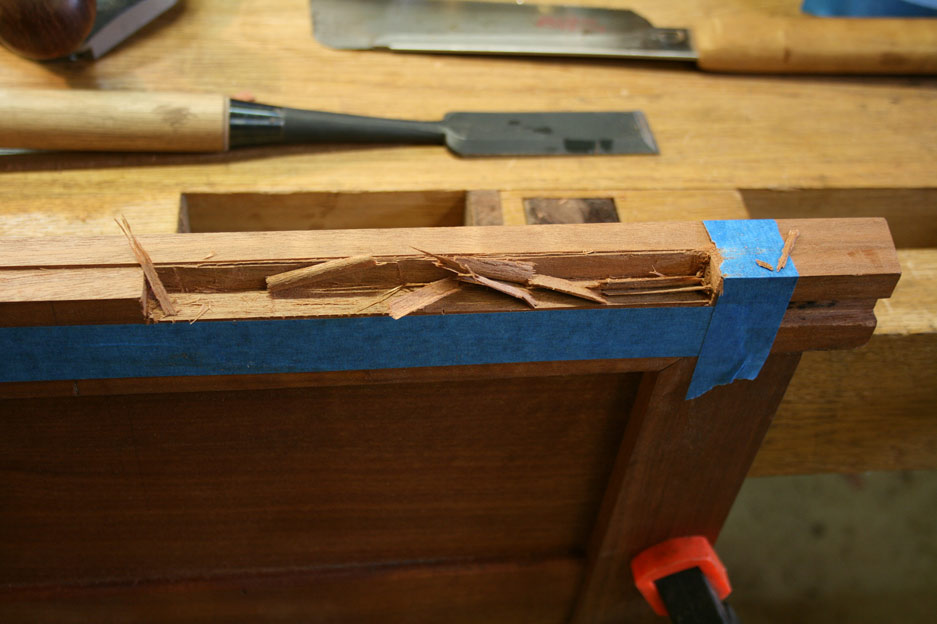
Same at other end ...
I removed the front knob of my plane. The knob seems superfluous to me since I cannot find a reason to use it. There is far more control pushing the plane into the rebate, that is from the side.
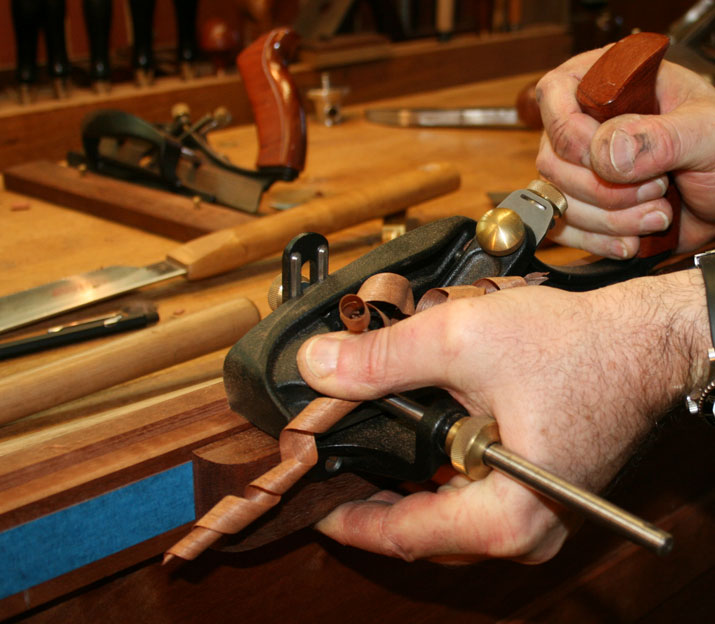
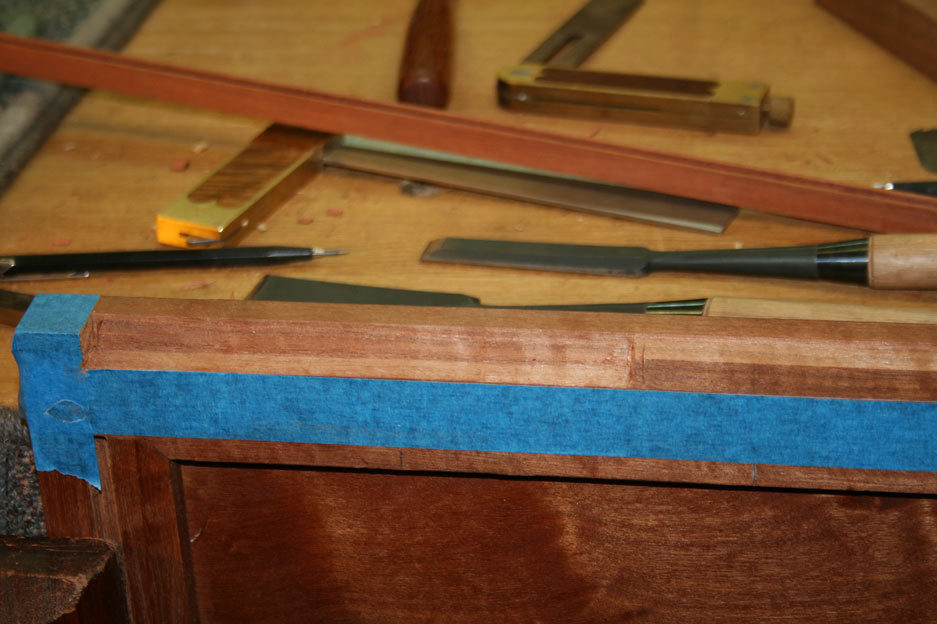
The completed rebate and adjoining stretcher ...
Regards from Perth
Derek
Derek Cohen (Perth Oz)
Established Member
custard":3ogu4d83 said:Proves my point Derek, with a plunge router I'd be done and onto the glue-up while you were still busy making all those saw kerfs!
Don't get girlie on us, Custard, be a man! :lol:
Regards from Perth
Derek (with a couple of Elu routers)
CStanford":1fyeto5h said:AndyT":1fyeto5h said:Charles, I didn't mean to thank you for your post - I can't make sense of it! Is there some project in your head that you are not telling us about? And had you noticed that this thread is about the capabilities of tools, not how to go about a project?
Well, you've confirmed what I've written. You don't need to sweat "nickers" or really even knifed lines other than the ones you use to mark where the cuts need to go. The blown out ends and ragged sides are simply trimmed away with saw or plane as long as one hasn't done the work on a component that is already at finished width, length, and thickness. It's great that Lee Valley has provided this facility, but if you ever need it then you've designed yourself into a corner or the order of work is out of kilter.
If running housings, trim the exit end to planned width after they're run -- voila, no need for worry. Same for the housing sides -- no need to knife, cut, and knife, just leave it a bit over thickness and plane to thickness after the housings are run. Same with rebates - trim the exit end to length after they're run.
I'm sure somebody understands what I'm saying, otherwise maybe this post belongs in the dual thread on the same topic.
Most people's order of work with hand planes is the same as they would use if using machinery. Again, this is a fundamental misunderstanding of how to do the work efficiently with hand tools. Joinery cuts with planes are not run on workpieces that are at finished length, width, or thickness if you can avoid it, and you almost always can. Final trimming and planing rectifies almost all ills, which of course is the entire point.
You have to make stock first before you can make a demi-glace, if you get my drift...
Cheers.
I understand what you're saying. I think you come to it over time - if there is a problem area that you can remove with another method, you move it first. It's essential for just about anything where you will have to do a less than perfect maneuver.
This is another reason that I think it's useful for people to learn to dimension stock by hand. You get an instant look at the parts of a board that blow out, and a desire to avoid pushing a tool blindly through those areas in later operations.
I am more familiar with it making tools than furniture, though, but I do like to cut dadoes by hand. First thing, cut the ends off and taper the wood down from the center with a couple of cuts so that it's not getting cut right at the entrance and exit.
(it isn't really a horrible idea with an electric router, either - if there is some situation where you want the exit of the cut to be an area that may show - but there are probably solutions for that that someone who uses a router all the time would know).
CStanford":2h0gvalp said:AndyT":2h0gvalp said:Charles, I didn't mean to thank you for your post - I can't make sense of it! Is there some project in your head that you are not telling us about? And had you noticed that this thread is about the capabilities of tools, not how to go about a project?
Well, you've confirmed what I've written. You don't need to sweat "nickers" or really even knifed lines other than the ones you use to mark where the cuts need to go. The blown out ends and ragged sides are simply trimmed away with saw or plane as long as one hasn't done the work on a component that is already at finished width, length, and thickness. It's great that Lee Valley has provided this facility, but if you ever need it then you've designed yourself into a corner or the order of work is out of kilter.
If running housings, trim the exit end to planned width after they're run -- voila, no need for worry. Same for the housing sides -- no need to knife, cut, and knife, just leave it a bit over thickness and plane to thickness after the housings are run. Same with rebates - trim the exit end to length after they're run.
I'm sure somebody understands what I'm saying, otherwise maybe this post belongs in the dual thread on the same topic.
Most people's order of work with hand planes is the same as they would use if using machinery. Again, this is a fundamental misunderstanding of how to do the work efficiently with hand tools. Joinery cuts with planes are not run on workpieces that are at finished length, width, or thickness if you can avoid it, and you almost always can. Final trimming and planing rectifies almost all ills, which of course is the entire point.
You have to make stock first before you can make a demi-glace, if you get my drift...
Cheers.
After re-reading your original post, I see you're advocating blowing out the back of the cut and then just ripping it off, which is also fine. I see I do it backwards from you. No big deal. I'll defer to your experience on this one - but your original point is what struck me first, if there is a critical cut that blows out a lot with a certain operation, remove the part that's causing it (I do it before, you do it after).
Custard is right that he could go up one side of the case and down the other on a case and be done FAR before I would be (though I will actually enjoy it), but I can't remember the last time I had to scrap a piece of anything that was made from start to finish with hand tools - well, that's not true. I had to make a couple of test wedges in the first skewed plane because it was easier to do that to zero in on the compound angles on the wedge than it would've been for me to learn software to draw up the wedge (and later decide something was wrong in the design, anyway). I drew some of the angles out on a piece of paper and tried to use my dilapidated general math skills to get the angles and measurements, but somewhere in the operations, I missed something critical.
custard":1szrehov said:If I was recommending a hand tool for hardwood rebating I'd say get the Veritas. It's easy to set (unlike a wooden bodied moving fillister where you have to set the fence from underneath and need a screwdriver), the skew pulls the plane into the workpiece for super clean arrises and it makes short work of tricky grain, the nicker is on a different level to most alternatives, the fence locks down tight with finger pressure only, it's quite a bit cheaper than the Philly plane, and it will probably give a much longer service life. One criticism might be that it doesn't have a forward iron position for stopped rebates, but in all honesty a powered plunge router is such a superior choice for stopped work why would you bother with a hand plane?
As you suggested, a 10 degree back bevel of the Stanley 55 may well improve things, but I doubt it's the full solution. One of the key reasons is that on a rebate plane you want really heavy shavings, otherwise the typical rebate could easily take a hundred strokes or more, and I'm not convinced that the skates on a combi-plane can provide the support and rigidity to the iron that are needed for tear out free shavings that might be in the range 0.5-1.0mm thick. You might get away with it in softwood, but I just don't see it with hardwoods. The other thing is once you've put a back bevel on the iron it would then degrade the performance on softwood. Hey, I'm no expert, and if someone can furnish photos of them delivering clean, accurate rebates, both with and across the grain, with ultra thick shavings in hardwood, then I'd be happy to change my mind.
The 55 is just a terrible tool for curly maple, no way around it. I still like wooden fillister planes better than the veritas, but the issue for me is friction. The veritas is so neatly manufactured that it's got multiples of friction compared to a wooden moving fillister. But it sets predictably and you don't have to recondition it and fit it like you do with almost every used moving fillister plane (even those that have just sat unused for 100+ years). Maybe getting one set up is beyond the abilities of most people reading magazines, but most on this forum could do it, I'm sure.
If I had to use a 55 for the operation you're showing, I think I'd put a batten up and saw it instead and leave the 55 sitting next to the piece of wood being worked. Maybe on the outside edge, there'd be a reason to use a narrow plow blade to establish the bottom of the rabbet, but even that I'd leave short and just clean up later with a rabbet plane.
(a moving fillister properly set could just do it all at once, though, and with less effort than anything else that doesn't get plugged in - I still always clean up even my moving fillister rabbet with a rabbet plane so that I don't have to reset the MF depth while planing. For ultra low risk work, ulmia made a nice double iron rabbet plane, but it's straight ironed and not that great for heavy work - clogs - the pair work well together).
When running rebates, leave the workpiece a little over length and crosscut the exit end to planned length.
When running dadoes, leave the workpiece a little over width and rip the exit edge to width after the dadoes are run. You can also leave it a touch over thickness and make a couple of passes which tends to clean up any little blips of wood created when making the first passes across grain with the combo plane.
A 55 or 45 will cut a perfectly smooth rebate on almost any species, but the shavings will have to be vapor thin coming off a cutter that is brutally sharp. It's slow. There are much better tools for this work, as many have pointed out. If using a combo plane, a wide-ish rebate is best cut in stages with a narrower cutter than the rebate. Narrow is better when using a combo plane.
woodbrains
Established Member
CStanford":3iddeley said:When running rebates, leave the workpiece a little over length and crosscut the exit end to planned length.
When running dadoes, leave the workpiece a little over width and rip the exit edge to width after the dadoes are run. You can also leave it a touch over thickness and make a couple of passes which tends to clean up any little blips of wood created when making the first passes across grain with the combo plane.
A 55 or 45 will cut a perfectly smooth rebate on almost any species, but the shavings will have to be vapor thin coming off a cutter that is brutally sharp. It's slow. There are much better tools for this work, as many have pointed out. If using a combo plane, a wide-ish rebate is best cut in stages with a narrower cutter than the rebate. Narrow is better when using a combo plane.
Hello,
I had a casual thought a while ago, but did nothing to prove it one way or another, and this thread just reminded me. Could a biggish rebate be cut with a combination plane used as a plough. Narrowest blade the better to reduce the effort, and keep both skates on the work for stability. Cut down the edge to a set depth, cut down the face until the waste falls out. The fence will always be in contact with the edge that is left beneath. Should give a better finish to the rebate walls than the plane used as a rebate plane.
Had a quick try with my 405 today as a fillister. Just a bit of softwood at hand, so no critical test on surface finish, but good thick shavings worked quickly and I can't help smiling when I use that plane. (Which I don't as often as I should considering the effect it has on my mood, but I'm obviously easily amused) if I get time, I'm going to regrind the fillister cutter to 25 degrees and back bevel at 10 to give an included angle of the standard cutter as supplied, but an EP of 55. I bet that will plane ornery stuff well enough. I hope so, because the weight and ergonomics of that plane suit me well. It is almost as nice to use as my Veritas fillister, and might do almost as well. Don't no about cross grain, the nicker might not be as good.
Mike.
If you must use a combination plane to cut a rebate then cut a 1/4 by the depth of the rebate groove to form one edge. Then take your jack plane and let the edge fall into the groove and hog out the waste. Finish to line and the bottom of the groove with a well set plane. You can even prepare your stock to width and thickness before you cut the rebate.
Sheffield Tony
Ghost of the disenchanted
I'm sure I recall the 050C manual showed making rebates by ploughing two narrow grooves at right angles so that the grooves meet and the rest of the waste is parted off ?
Sheffield Tony":mc1ml9uy said:I'm sure I recall the 050C manual showed making rebates by ploughing two narrow grooves at right angles so that the grooves meet and the rest of the waste is parted off ?
That's how I'd do it, but there is a practical limit to depth with a very narrow iron.
woodbrains":2zkzcb9g said:CStanford":2zkzcb9g said:When running rebates, leave the workpiece a little over length and crosscut the exit end to planned length.
When running dadoes, leave the workpiece a little over width and rip the exit edge to width after the dadoes are run. You can also leave it a touch over thickness and make a couple of passes which tends to clean up any little blips of wood created when making the first passes across grain with the combo plane.
A 55 or 45 will cut a perfectly smooth rebate on almost any species, but the shavings will have to be vapor thin coming off a cutter that is brutally sharp. It's slow. There are much better tools for this work, as many have pointed out. If using a combo plane, a wide-ish rebate is best cut in stages with a narrower cutter than the rebate. Narrow is better when using a combo plane.
Hello,
I had a casual thought a while ago, but did nothing to prove it one way or another, and this thread just reminded me. Could a biggish rebate be cut with a combination plane used as a plough. Narrowest blade the better to reduce the effort, and keep both skates on the work for stability. Cut down the edge to a set depth, cut down the face until the waste falls out. The fence will always be in contact with the edge that is left beneath. Should give a better finish to the rebate walls than the plane used as a rebate plane.
Had a quick try with my 405 today as a fillister. Just a bit of softwood at hand, so no critical test on surface finish, but good thick shavings worked quickly and I can't help smiling when I use that plane. (Which I don't as often as I should considering the effect it has on my mood, but I'm obviously easily amused) if I get time, I'm going to regrind the fillister cutter to 25 degrees and back bevel at 10 to give an included angle of the standard cutter as supplied, but an EP of 55. I bet that will plane ornery stuff well enough. I hope so, because the weight and ergonomics of that plane suit me well. It is almost as nice to use as my Veritas fillister, and might do almost as well. Don't no about cross grain, the nicker might not be as good.
Mike.
Yes, cut what amounts to a shoulder to depth and do the rest of the clean up with a No. 10 or an unfenced 78. Doable, but sort of hokey.
I use an ECE wedged rebate plane that has an adjustable mouth and a cap iron so I don't have any real problems to speak of. I sometimes tack on a guide with the tacks in the waste (you can clamp it, too) -- the rebate being run on a slightly over-length part. The ECE does a better job than a skewed rebate plane that has no cap iron, though ones with cap irons, I assume these exist, would be the cat's pajamas. I don't own one. Otherwise, Germans are not stupid people generally speaking.
Combo planes are not really substitutes for rebate planes. If you've spent that much money already, why stop?
woodbrains
Established Member
Hello,
I understand how cap ironed rebate planes and ones with a high EP help control tearout. Fine mouthed ones less so, if making rebates in a sensible time frame is desirable. But, excepting a few instances, how important are clean inner surfaces to a rebate anyway? I can see that heinous tearout can show on an edge, that might matter a lot on a finished piece, but the actual inner faces, with sporadic tearout that does not impact the outer arrises does not matter, in almost all instances. And tearout generally only occurs on one rebate face, the floor, rather than the wall, so picking the direction in which the rebate is planed might just solve any real problem. Don't get me wrong, I like tear free planing operation as much as the next person, and the initial disappointment of seeing a less satisfactory result would always make me try to improve the situation. But ultimate!y, it might not matter!
It is always an option to make super fine passes towards the end of the rebate if tearout is a problem, we do not have to take full thickness shavings right to the bitter end. Didn't some moulding planes come in pairs, perhaps because light finishing strokes were expected ( one set thick and one fine for finishing) and planes with an adjuster negates 2 planes if we bother to use it.
Mike.
The covered tearout is only a problem in so much as it can make planing really abusive to your hands and because a surprise chunk can end up being visible. Agree the there's no reason that the bulk work has to be absolutely tearout free, but less of it makes the planing a lot more controllable.
Similar threads
- Replies
- 11
- Views
- 986
- Replies
- 90
- Views
- 8K