Question to the hive-mind re: Norris A5

UKworkshop.co.uk

Help Support UKworkshop.co.uk:

This site may earn a commission from merchant affiliate links, including eBay, Amazon, and others.

liamscanlan

Established Member
UKW Supporter
Joined
12 Apr 2010
Messages
160
Reaction score
0
Location
Poole, Dorset
I was recently very fortunate to win an A5 (post war) on an EBay auction...

From the outset I should say that I want to use this and not 'collect' it. Looks are secondary but...
Previous owners have already sanded the engine-machining off 80% of the sides (shame but I think it may have been quite severely rusted at some point (still stains on the sides). Would you complete the job and bring it back to bright metal now that the damage is done?
RHS A5.jpg

Note the engine turning to front of plane - the last vestiges! It looks like the plane has been heavily sanded at some stage...
LHS A5.jpg

Anyway, my question (and I admit my ignorance here - so be gentle...)
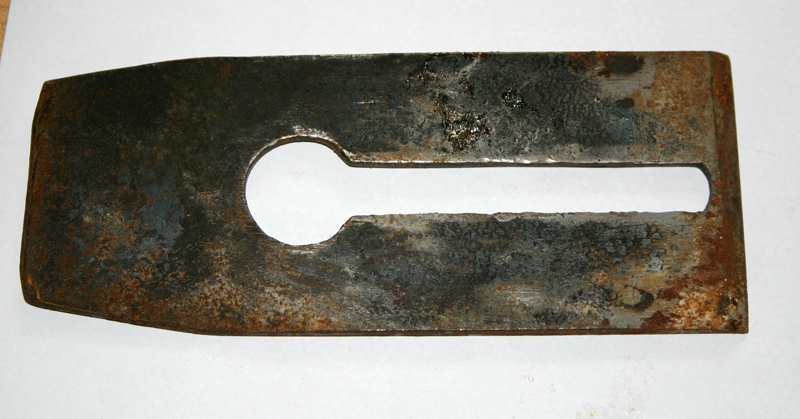
The plane iron is stamped Norris and is 182mm long (it looks to have plenty of length(?))
blade length.jpg

The (unmarked) cap iron has a distance of 58mm from centre of screw to tip (I think this is the relevant dimension to my question)
capiron length.jpg

When inserted in the plane, I have to have 4mm of blade protruding past the cap iron - or I run out of adjustment (inwards)
At some point in the past, the blade has been filed to elongate the slot, and the cap iron is mounted towards the end of the slot (i.e. own towards the cutting edge)
My failing logic tells me that either he blade is too long or the cap iron too short - although I have pondered if the converse is true and the blade is at end of life....

However, it still produces very fine shavings....

shavings.jpg


All advice (or measurements of another A5) or any help gratefully received.

Liam

PS I blame Jimi and gasman (Mark) and the rest of you for collectively sending me down the infill path... I was quite happy with my Cliftons up until now.... and having tried one (an infill), it feels like a one-way very steeply sloping street.... I have even started making one...
 

Attachments

  • LHS A5.jpg
    LHS A5.jpg
    203.6 KB · Views: 1,466
  • RHS A5.jpg
    RHS A5.jpg
    216.6 KB · Views: 1,466
  • blade length.jpg
    blade length.jpg
    184.9 KB · Views: 1,466
  • capiron length.jpg
    capiron length.jpg
    133.1 KB · Views: 1,466
  • shavings.jpg
    shavings.jpg
    208.4 KB · Views: 1,466
Have two of these, which probably requires some explanation. FWIW, neither has the engine turning that yours has. Could it be a later, owner addition?

Will measure the blades and cap irons, but neither has the problem you have. Perhaps the blade has been replaced? As the slot has already been lengthened, it sounds like it.
Mike
 
Bedrock":3vwvxoqp said:
Have two of these, which probably requires some explanation. FWIW, neither has the engine turning that yours has. Could it be a later, owner addition?

Will measure the blades and cap irons, but neither has the problem you have. Perhaps the blade has been replaced? As the slot has already been lengthened, it sounds like it.
Mike

Hi Mike,

I'd appreciate it greatly if you could supply dimensions. I think you are correct about something being replaced, but I suspect the cap iron.
I believe the engine turning was an original option... but whether this example is original is anybody's guess although what remains looks to have been done extremely well.
Liam
 
Is it not acceptable to 'repair' the finish ? After all the item has already experienced the ravages of a working life, you would not hesitate to refurbish and refinish a classic machine tool back to as near original presentation.

Not difficult to do, maybe a little time consuming if you don't have a cross-slide table to control the spacing.

Ironical that tools look good finished so, when in the early years of instrument maker training you were banned from doing such a finish as it may hide minor surface blemishes.
If you made your own additional tools to the prescribed set and did so, they were always subjected to additional scrutiny to make sure you were not taking short cuts.
 
Good thought Chas,

If I take that path, what would you use to do the scoring? I have read about using dowelling, brass brushes etc. but I have no experience of doing this whatsoever.

I must admit I have never heard a classic motorcycle restorer bemoaning the loss of 'patina'! (Authenticity/Originality - yes, patina - no!)

Perhaps I should wait until the CNC conversion of my mill is complete?
It will still be quite a challenge given the height variation of the sides.
Liam
 
Best to do some experiments, I've seen dowels with a bit of abrasive on the ends, hard plastic, paxolin, tufnol with grinding paste whatever.
Well your mill has the cross slide facility to make the spacing perfect, do you have a vertical head with quick hand feed?
Last I did was on a pillar drill.
Best thing is as long as you start with a polished surface you can always start a line again if you slip off line or don't like the look of it.
 
I'm pretty sure that I have read that the finish on Norris planes was done with an abrasive laden dowel, but can't remember where.
I'm sure they didn't use a CNC mill though! I suggest you put a bit of dowel in a hand drill, dip it in oil and emery, and do some experiments on some less precious bits of steel.

Edit: This isn't where I read it but it does describe the technique

http://zhurnalko.net/=woodworking/shopnotes/88--num30
 
Liam
Just checked on dimensions. Neither of the blades is marked "Norris" but one I replaced as the original was getting very short, but did.
Dims. as follows:
No.1 Blade length from business end of slot to the top (ie the dimension that won't change with sharpening) 129mm.
Slot length 70mm but possibly been extended as it is squared off.
Cap iron total length 113mm.
Cap iron distance between centre of screw and blade end 58mm.
No.2 Blade length from business end of slot 125mm
Slot length 79mm. to nicely round end of slot.
Cap iron total length 114mm.
Cap iron distance between centre of screw and blade end 58mm.

It doesn't look as though your cap iron is unusual or non-original. No.1 has 50mm. left between the screw and the current blade edge, No.2 55mm.
Both are cast rather than dovetailed, and what I call the No. 1, simply as I bought it first, has a possible rosewood infill, a banjo without the tightening screw, and at the current setting has 5 turns on the larger thread, below the banjo. The other I can't identify the infill - it has a coarser grain - has the banjo tightening screw and a crisper "Norris" stamp to the lever cap. 3 turns to the larger thread below the banjo.
Both therefore have a lot of adjustment left.
Hope this helps.
Mike
 
Thank you very much for this Mike - it is extremely helpful!
Interesting in that the majority of my blade's dimensions are very similar (I have condensed your measurements below):
No.1 /No. 2 Blade length from business end of slot to the top 129mm/125mm. Mine 135mm but extended approx 5 -10mm
Slot length 70mm/79mm but blade 1 has possibly been extended as it is squared off. Mine is extended to 75mm
Cap iron total length 113m/114mm. Mine 115mm
Cap iron distance between centre of screw and blade end 58mm/58mm. Same...

So it seems everything I have is within production tolerances so that is very reassuring. Thank you for taking the time to measure your planes.

I have removed the adjuster, cleaned it and can now 'just about' get things to work as designed. The adjuster is still right at the end of its travel.There does seem to be some backlash in the adjuster (and the adjustment screw in the 'banjo' seems to make no difference). As the blade appears to be relatively unused (screw towards end of slot), I guess it is little used - perhaps things will settle in more as the blade gets shorter... unless anyone knows better? I hope that I am correct in thinking that a screw towards the end of the slot means plenty of wear left in the blade... am I?

I really appreciate all the help and advice received so far. It has both informed and helped me.

Liam
 
AndyT":2jrcezkv said:
I don't know if it's relevant or not but there's an article with lots of technical detail about the shortcomings of the Norris adjuster and suggestions for modifying it here: http://www.antiquetools.co.uk/articles/norris.htm

Thanks very much for the link, Andy. I had read this some time ago - and forgotten where some of the information came from. Thanks for pointing me in the right direction. I have read it twice now, established that mine is a later model (screw on front bun, screw under adjuster... seems to be a dark wood - mahogany or rosewood) and I have a single threaded adjuster on this (I have a panel plane with the double adjuster for comparison). I will probably have to read the 'repairs' section several times to fully understand it - but it chiefly refers to the double-threaded adjuster. I may try to make a new adjuster (single thread) if I can't get the original to work satisfactorily, but think this may be unnecessary. I think that if I make a slightly shorter chipbreaker, that would ensure the screw would be closer to the sole and therefore the adjuster ring would be further down the thread and not at the very extreme of retraction. I won't cannibalise any of the original parts... just try replacements for now. I can't understand the problem yet -it doesn't seem to make sense as I have what appear to be a set of original parts, verified by comparison with 'bedrock's' units, assembled correctly (I believe), that don't quite fit as I would expect... I will attempt an empirical solution and ponder further....

Liam
 
Thanks for that MrP - my adjuster is most like the later one (single thread) but has 4 screws... I've not seen another illustrated that is exactly the same as mine.... I'll remove it and photograph it later.
Liam
 
liamscanlan":2zz4nvig said:
.....I hope that I am correct in thinking that a screw towards the end of the slot means plenty of wear left in the blade... am I?
....
"Wear left in the blade" is the amount of blade between the edge and the start of the slot. You can find old scrap blades where the bevel has finally reached the slot and it can't be sharpened any further.
 
Jacob":25lj944x said:
liamscanlan":25lj944x said:
.....I hope that I am correct in thinking that a screw towards the end of the slot means plenty of wear left in the blade... am I?
....
"Wear left in the blade" is the amount of blade between the edge and the start of the slot. You can find old scrap blades where the bevel has finally reached the slot and it can't be sharpened any further.
Thanks for the confirmation, Jacob.

Liam
 
In case of doubt - here is a blade which is nearing the end of its useful life

blade1.jpg
 
Back
Top