You are using an out of date browser. It may not display this or other websites correctly.
You should upgrade or use an alternative browser.
You should upgrade or use an alternative browser.
Inghamish box...DUN...and Re-visited
- Thread starter woodbloke
- Start date


Help Support UKworkshop.co.uk:
This site may earn a commission from merchant affiliate
links, including eBay, Amazon, and others.
HeathRobinson
Established Member
TheTiddles":2em5yx6r said:Are you going to keep tissues in it?
Aidan
:lol: That comment had me in stitches. Excellent work, Rob.
Simon
Mr T
Established Member
Hi Rob
I haven't really thought this through properly, but would it have been possible to have veneered the sides with the elm burr then route grooves into it to take the ebony strips.
Chris
I haven't really thought this through properly, but would it have been possible to have veneered the sides with the elm burr then route grooves into it to take the ebony strips.
Chris
woodbloke
Established Member
Probably, maybe, Chris :duno: The problem is that RI gives scant instruction in the article in F&C on just how to go about doing this sort of thing and as it's the first time I've done this type of project I did give an awful lot of thought into the best way to do it. I read the piece very carefully and adopted much of his methodology, but a lot of it is 'by guess and by God'. Hopefully it'll turn out looking not too shabby...whether or not it's the way that RI would have done it remains to be seen. Today I've cut the thing in half (not through the bandsawMr T":2485z1ak said:Hi Rob
I haven't really thought this through properly, but would it have been possible to have veneered the sides with the elm burr then route grooves into it to take the ebony strips.
Chris
 ) and have started to glue on the last of the ebony to the joining surfaces, after which it'll be hinging it with some of Andrew Crawford's Smarthinges which are definitely the way forward [-o< [-o< for hinging boxes like this - Rob
mtt.tr
Established Member
Dont google ebony strips if you are after strips off ebony i learnt from my mistakes
Ian
Established Member
Starting to take shape - look forward to seeing the finished article.
Will you be making the lock yourself?
Ian
Will you be making the lock yourself?
Ian
woodbloke
Established Member
No lock, just a knob or handle of some sort - RobIan":23rm2s6i said:Will you be making the lock yourself?
Ian
woodbloke
Established Member
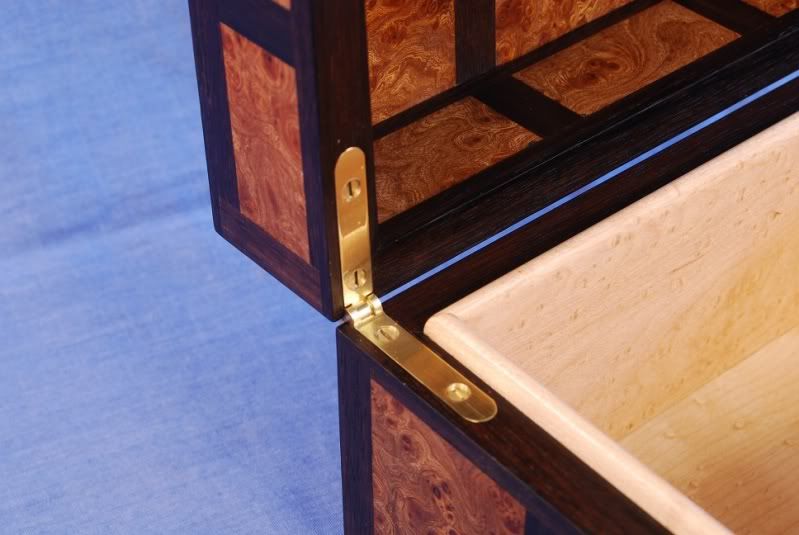
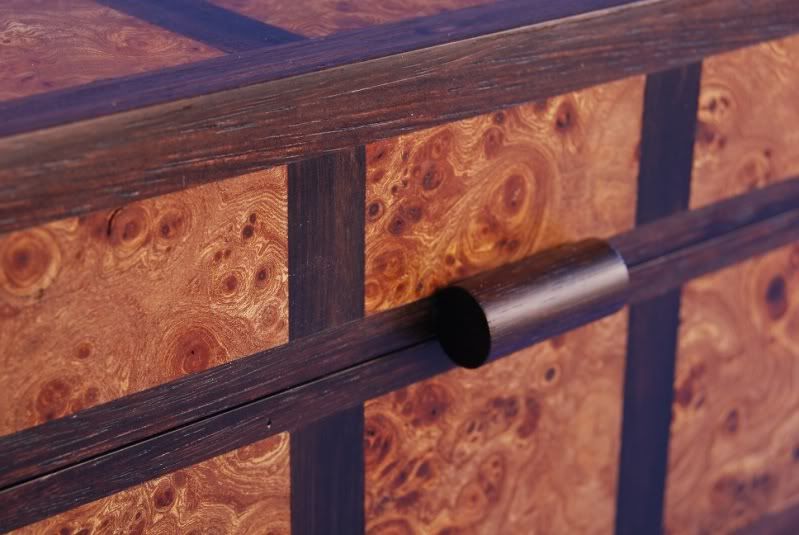
For hinges, I opted for a set of the very excellent and beautifully made smartHinge's from Andrew Crawford. These were now done in around an hour and are so easy to install that the mitres on the front corners were no more than .25mm off...easily sanded out in around twenty minutes.

It's critical that the hinges are set dead level. Mine aren't and so have been shimmed to bring them level with the inside surface of the box. Andrew does in fact say this in the blurb but my machining of the recesses wasn't quite accurate enough...as with all these sorts of things it's a learning curve the first time it's done. The only major criticism that I would offer is that no No3 steel screws are supplied to cut the initial thread although plenty of brass screws are included...not much good though, when you need to drive them through ebony! Fortunately, I had several boxes of steel screws that were exactly the right size, so that wasn't an issue.
All told, I'm very impressed with these as they cut out a lot of time and stress in the fitting process...forget Brusso, go smart! Shown here with the steel screws in place, to be replaced later with brass - Rob
It's critical that the hinges are set dead level. Mine aren't and so have been shimmed to bring them level with the inside surface of the box. Andrew does in fact say this in the blurb but my machining of the recesses wasn't quite accurate enough...as with all these sorts of things it's a learning curve the first time it's done. The only major criticism that I would offer is that no No3 steel screws are supplied to cut the initial thread although plenty of brass screws are included...not much good though, when you need to drive them through ebony! Fortunately, I had several boxes of steel screws that were exactly the right size, so that wasn't an issue.
All told, I'm very impressed with these as they cut out a lot of time and stress in the fitting process...forget Brusso, go smart!
Shown here with the steel screws in place, to be replaced later with brass - RobIan
Established Member
Looking good.
Ironballs
Established Member
Looks very good Rob, glad to see you trying out those hinges, I'll be tempted to give them a whirl next time I'm doing a box. Will be very nice once you get a coat of finish on it
woodbloke
Established Member
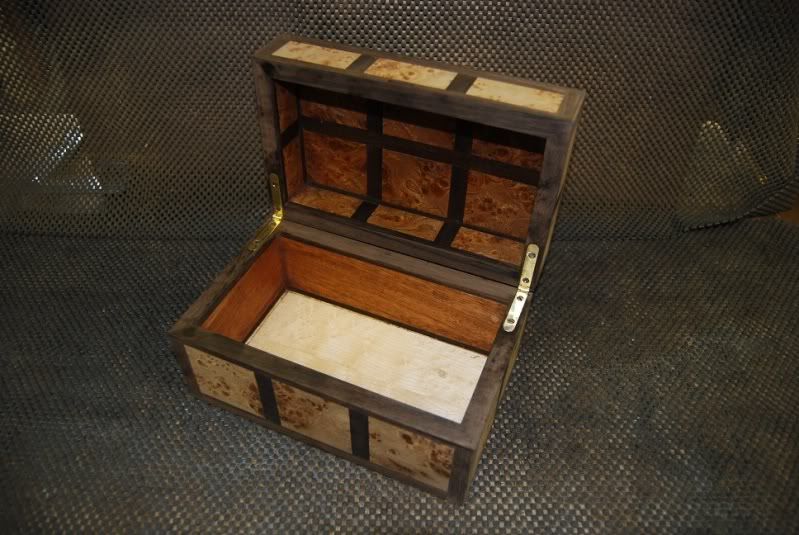
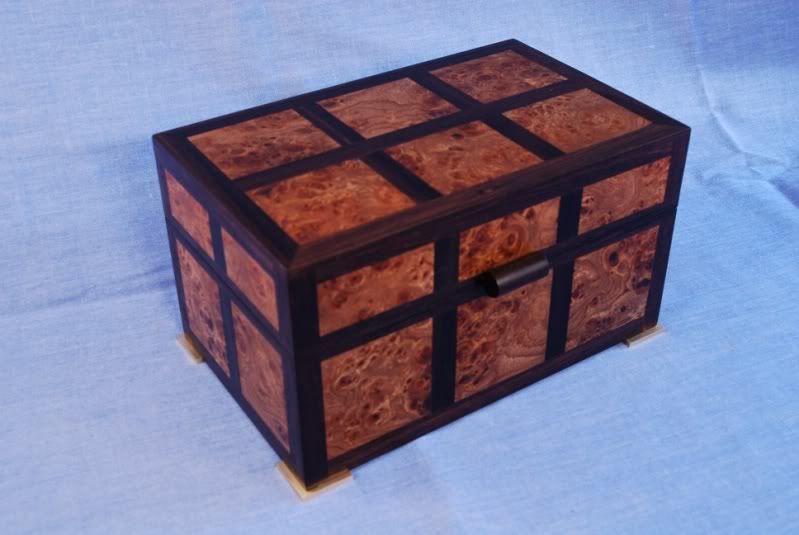
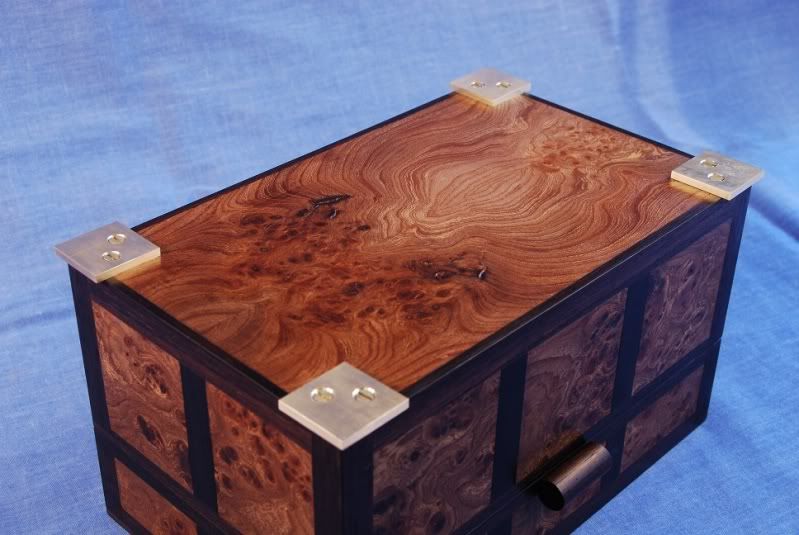
The box has been finally sorted out this morning, first pic shown closed:
and now open with the lining scribed and mitred in Wakansian birds eye maple :mrgreen:
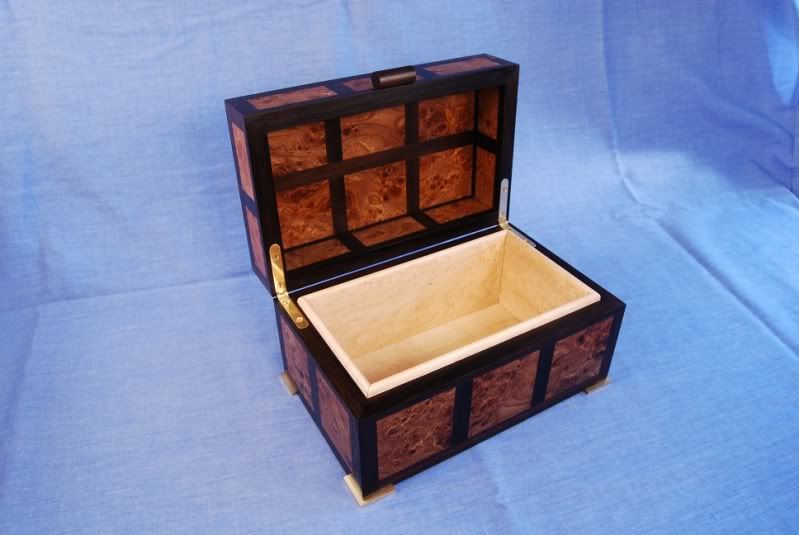
with the hinges again:
and the simple turned knob:
The finish is a couple of coats of satin hard-wax oil with teak wax over the top,
with the final shot showing the brass feet and the underside:
As ever, constructive comments appreciated - Rob
and now open with the lining scribed and mitred in Wakansian birds eye maple :mrgreen:
with the hinges again:
and the simple turned knob:
The finish is a couple of coats of satin hard-wax oil with teak wax over the top,
with the final shot showing the brass feet and the underside:
As ever, constructive comments appreciated - Rob
mtr1
Established Member
Overall its a lovely box, I'm not keen on the plainness of the feet, and I think it could benefit from a pull out tray.
I think you over complicated the build, but I guess how you build it is up to you and your time. Nonetheless a very well made box, and very attractive.
I think you over complicated the build, but I guess how you build it is up to you and your time. Nonetheless a very well made box, and very attractive.
I love the box Rob. The overall design is lovely and the finish and skill in making is very high. I also think it needs a tray inside.
The feet on the other hand... they are just odd. i really dont understand them, and seeing the screws just cheapens the whole piece in my eyes. I would make them in a similar style to the handle, which i think would tie into the overall theme better.
Thanks for sharing the process.
The feet on the other hand... they are just odd. i really dont understand them, and seeing the screws just cheapens the whole piece in my eyes. I would make them in a similar style to the handle, which i think would tie into the overall theme better.
Thanks for sharing the process.
woodbloke
Established Member
mtr1":23dq67sa said:Overall its a lovely box, I'm not keen on the plainness of the feet, and I think it could benefit from a pull out tray.
I think you over complicated the build, but I guess how you build it is up to you and your time. Nonetheless a very well made box, and very attractive.
Mark, what I was after with the feet was a simplified version of:

of this box, where the feet are turned brass. I don't like this and wanted something more simple and rectilinear which is why I decided for the square brass feet. RI doesn't do boxes (as far as I'm aware) with pull-out drawers and as this is an RI inspired box...neither did I. The construction is dead simple...there isn't any! All the jointing at the corners is just butted, no tongues, biscuits or whatever :lol: the theory being that these sorts of items aren't going to get a hammering and that some considerable strength is added to it by the lid and base glued into wide rebates - Rob
mtr1
Established Member
There seems to be two pull out trays in the original Rob? The feet still look like a afterthought to me, but if you like them its all that matters, still a beautiful box despite the carbuncles you've screwed to the bottom :lol:
Chems
Established Member
Looks fantastic rob. I was following it on your blog as well, balls of steal required to cut it in half after all that work!
With that type of brass you could make a lovely replica of the lie-nielsen dovetail marker.
With that type of brass you could make a lovely replica of the lie-nielsen dovetail marker.
woodbloke
Established Member
Sorry Mark, misunderstanding. Yep, there are what I would term 'lift-out' trays in the pic posted above...I thought you meant pull out drawersmtr1":1tn99aq7 said:There seems to be two pull out trays in the original Rob?
It was an option to do a tray, but I only had a very limited amount of Waka's birds eye maple and I 'fubared' :wink: :lol: one of the short scribed inside pieces at it was which had to be replaced. Last time I saw Waka he let me have a couple of oddments that were left over from his tool cabinet build and there was just enough to do the lining (and veneer the base) but not much elseThe feet actually look better when it's seen in the 'wood'...I agree it's a bit 'clumpy' when it's turned over, but there wasn't really alternative way of fixing them, apart from a blob of epoxy - Rob
Paul Chapman
Established Member
A lovely job, Rob =D>
I think I would have gone for Ebony feet.
Cheers :wink:
Paul
I think I would have gone for Ebony feet.
Cheers :wink:
Paul
woodbloke
Established Member
That's an easily doable possibility Paul, but I wanted to get the authentic Inghamish look which is why I went for brass. They're only screwed on, so could be replaced if I get fed up with the brass look. I did think about getting some round feet from CHT but I thought that thin bits of 3mm brass would look better. I also um'd and err'd about placing them flush, but went for the 3mm overhang...again in keeping with the RI theme - RobPaul Chapman":1419g1fk said:A lovely job, Rob =D>
I think I would have gone for Ebony feet.
Cheers :wink:
Paul