How Not to Make a Japanese Tool Box!

UKworkshop.co.uk

Help Support UKworkshop.co.uk:

This site may earn a commission from merchant affiliate links, including eBay, Amazon, and others.
No skills":1lfllslc said:
Should you be a white slaver but too embarrassed to admit it consider one of these - the kerf should be wide enough to sort the problem.

Skip to about 1.50

http://www.youtube.com/watch?v=1W1wzrUbHgM

I'll go away now.

No, no, no, you'll get me going back to ogling the Mafell web-site next. Don't you just love those german builders/framers waist-coats! We should have something like that over here, like bowler hats or Morris-Dancer-wear for traditional craftsmen.
 
Thanks for the commentary very entertaining and honest.

Tip: When ripping down a long side like you were, instead of sawing up and down, Once the cut is started at a corner, rather than cut down through the wood cut across it. Lie the saw along the line more so that it cuts along it and creates a kerf for the main cut to follow. This will make it easy to be accurate and also cure the juddering problem. Hold the saw almost loosely in your hand and let the teeth do the work rather than gripping tightly and trying to force it.

Ten out of ten for effort, don't even think of giving up, you're doing great.
 
Grayorm":2x1gpmx8 said:
Thanks for the commentary very entertaining and honest.

Tip: When ripping down a long side like you were, instead of sawing up and down, Once the cut is started at a corner, rather than cut down through the wood cut across it. Lie the saw along the line more so that it cuts along it and creates a kerf for the main cut to follow. This will make it easy to be accurate and also cure the juddering problem. Hold the saw almost loosely in your hand and let the teeth do the work rather than gripping tightly and trying to force it.

Ten out of ten for effort, don't even think of giving up, you're doing great.

Thanks for the advice Grayorm :D

Never really done much ripping before by hand, plus still trying to get the hang of the pull saw. I think the board being quite thin isn't helping either. I need much more practice at this.

I'm thinking the action of ripping here is a bit like using a western saw by cutting into a plank from the end nearest you, with the handle held below it, pushing(pulling) into the grain, not cutting along it away from you (out the end). In a way putting the fibres into compression, not tension. (I know, it sounds like the worker's blaming his tools, but I think there may be something in this. I've seen that some westerners use the Japanese rip saw with the handle below the wood, replicating the western way of cutting along the fibres. The traditional Japanese manner, I think, actually utilises a different angle of attack.)
 
I made it about 30 minutes in the “workshop” before “rain stopped play”. So I’ve come in to chat to you lot and tried a bit of applied thinking, in the hope that the thinking brain has come back.

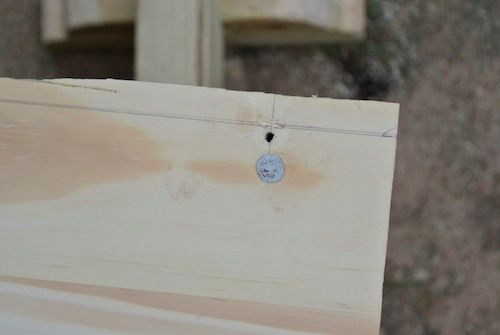
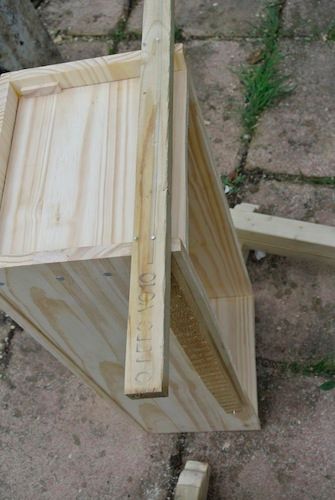
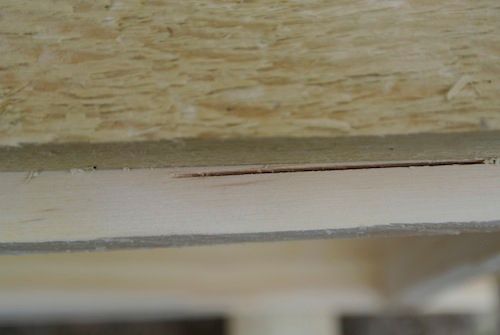
I measured how much of the top of the box had been Mullered, 3/8” and marked a line around to cut/plane to, I also thought I'd better move a nail!;


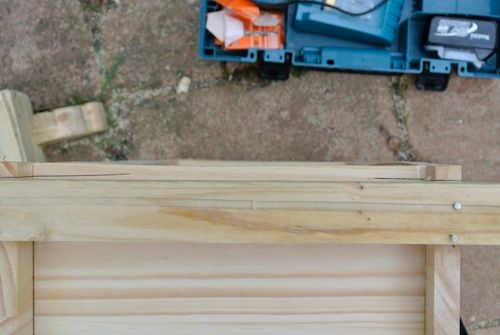
I’d been thinking over suggestions on how to do this and decided as it was quite a lot of wood that I’d need to remove at the corners, so I thunked that I’d cut them with the saw, as I wasn’t quite so rubbish at that. Then I put some battens on to act as a guide;


Then I started cutting, the first corner I angled the saw down and cut, reasonably smoothly;


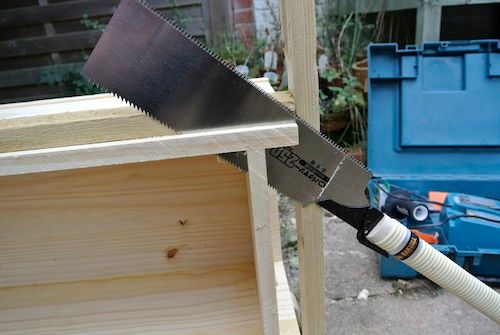
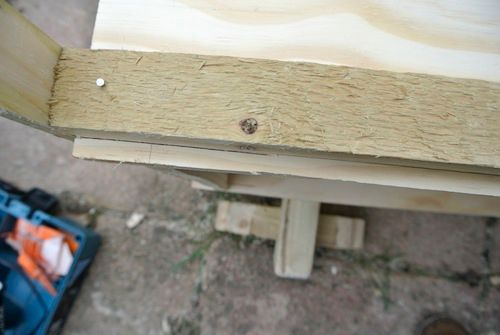
….and the next corner I cut up, trying to vary the angle, but generally using a low angle (30-45ish degrees); this went juddery or smoothly depending, I think I started realising why (we’ll come to that later);


I noticed afterward, that even with the guide, I still wasn’t getting a straight/square cut;


There’s a lot more to using these saws than I’d thought!!
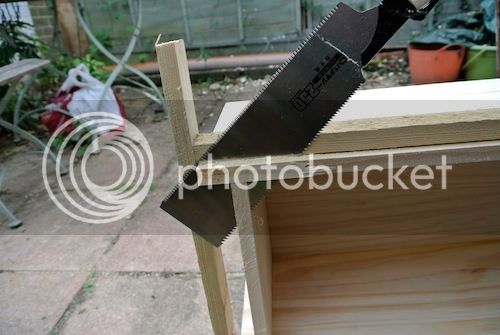
One side was fine;


but the corresponding end was still a bit on the p**s. Luckily, the guide battens meant the cut went into the bit I didn’t want this time. This was when rain occurred, so I came in to drink my tea on the sofa instead of the garden chair (need to get some Hob-nobs). I then tried some thinking, which has started to induce a head-ache.

I was thinking about the difference between a Japanese saw and a Western saw, following yesterdays revelation. It’s not just that the blade is thinner, and being tensioned/pulled, instead of compressed/pushed. The way of hitting the grain is different too, this is regarding Rip Sawing anyway, the brain is not capable of thinking about cross-cut yet;


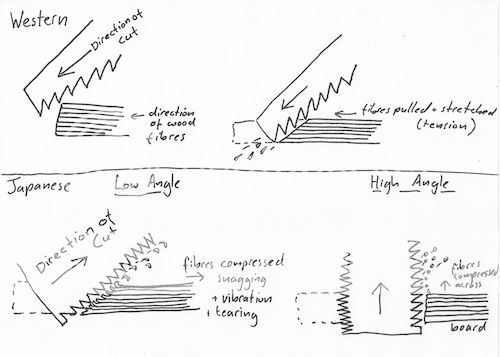
..not sure how clear the diagram is, but hopefully you get the drift. The angle of attack on the fibres is different, which is why I think they need to be used with a very high angle, approaching 90 degrees. The instructions I’ve read from older Japanese types is to have the board low, effectively you stand on it, and you rip upwards, with the blade slightly angled toward you. You need to cut the fibres at nearly 90 degrees to the direction they go in. With Western saws, the fibres are stretched, so you can use a lower angle.

I also noticed that as I ripped, the saw could judder or be fairly smooth, I think this was to do with the angle at which I started each cut and this may have been affected by holding the saw at a lower angle (trying to get the cut as straight as I could). Once I started cutting, depending on the angle of the saw, I was starting each cut either on the lower side or the higher side of the board;


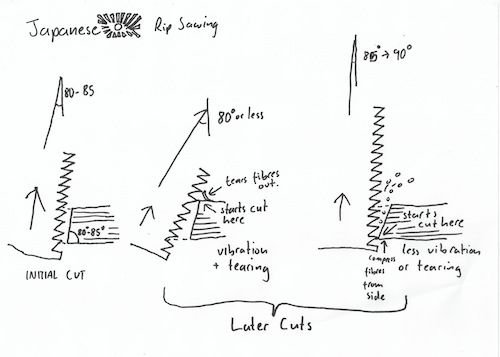
Not sure how clear the diagram is, but it’s trying to show what I think was happening. If correct, I need to “lift” the saw a little at the start of each cut stroke to ensure the teeth start on the lower fibres/face and then lower the angle a tad each stroke. Hopefully an elderly Japanese Shokunin will chip in to advise.
 
You're over thinking it. Just lie the saw down flat along the wood instead of trying to cut straight down. Create a kerf along your cut line and the saw will follow it.
 
I think using Japanese tools requires a totally different technique compared with western tools. The Japanese tend to sit on the floor when doing much of their woodwork so it stands to reason that the way you hold the tools and the angles at which you use them will be different. The Japanese way of working has never appealed to me so I stick with western-style tools.

Cheers :wink:

Paul
 
Grayorm":1y2ulqg1 said:
You're over thinking it. Just lie the saw down flat along the wood instead of trying to cut straight down. Create a kerf along your cut line and the saw will follow it.

Grayorm, you are 100% right, I got the saw as low as it could go and there was a grand improvement. The main problem is the angle I am working at. Due to the paucity of work surfaces in the "workshop" I'm doing this on the saw stools, 6" off the floor or so, so am kneeling down etc. Back-ache, hand-ache and brain-ache in spades!
 
RossJarvis":1crtcvz2 said:
Grayorm":1crtcvz2 said:
You're over thinking it. Just lie the saw down flat along the wood instead of trying to cut straight down. Create a kerf along your cut line and the saw will follow it.

Grayorm, you are 100% right, I got the saw as low as it could go and there was a grand improvement. The main problem is the angle I am working at. Due to the paucity of work surfaces in the "workshop" I'm doing this on the saw stools, 6" off the floor or so, so am kneeling down etc. Back-ache, hand-ache and brain-ache in spades!

Welcome to my world, I fit kitchens and bathrooms :wink:
 
Hennyway, the rain, rain went away (to Spain?) and I wandered back outside and put everything back out and trimmed the waste from the corners;


….jammed the end against a carefully positioned nail;


…and planed the wobbly bits off;


….surprisingly enough the results were pretty square and straight;


…apart from one little bit where I’d still managed to undercut;


Next job was to start ripping the top end-cappy wotsits, following Grayorms sage advice, I laid the saw down;


…to the angle above and lower, this resolved a lot of vibration issues. Hey Ho Nonny, a fairly straight cut;


I then discovered that the box was perfect to lay a plane upside-down in to trim the bits of wood straight and square;


…and made an excellent receptacle for the shavings;


…and before long one end wotsit bashed home;


…then another;


..and then a check to see if the saw fits;


…woopsie, another cock-up on the measuring front. I’d forgotten to allow for the end recess when miscalculating the size. However with a bit of bendification;


VOILA!

Nextly I ripped the edge off another bit of board, cut it to length and worked out how to hold it upright to plane the edge to size;


…and howzat, it fits;


A bit more ripping (note the nail wedged in to stop the wood binding on the blade which it was doing verily much);


and a couple of batten doo-dahs to hold the lid up;


..and hey ho, most of the major structure done;


…..a little bit of tartification on the corners to relieve the arris’s


….and that’s the end of a good days work. Tomorrow off and Monday may see the arrival of handles, plus a chisel tray and other odds and sods.
 
No skills":35sdk56n said:
No rain here, bit windy tho.

Good progress. I must get a new ryoba (sp?), this thread reminds me how useful they are.

Hows the box to be finished?

Cheers No skills :D

Generally speaking, it's going to be a deliberate rough and ready state and left as is. I've got to put some wooden "handles" on the end, I'm thinking of rope handles as well and put some kind of dividers and chisel tray in it. I've found a set of brass corners which I've had for ages, but they just don't look rough'n'ready enough. I'm thinking of pinning some brass sheet strip on the corners for protection. However, in the spirit of the thing, any unnecessary adornment or non practical tartification is out. Plus the cheaper looking it is the less nickable I think it might be.

Having Googled a bit more into these, there appear to be two approaches to these things, the done in 10 minutes, bashed together from scraps and then those with through tenons, finger joints etc, showing some of the carpenter/joiners art. Mine is a 10 minute job (though taking considerably longer time and effort). I'm mainly using it for hand-skills practice, particularly on Japanese saws, which I currently appear to be fairly poor at. I have an inkling that the 7 year Japanese apprenticeship may be how long it takes to learn how to use the b****y things! :shock:
 
Well, a new week and I managed to do no-where near what I intended today, but one step forward is always further along than none. I had thought that I probably wasn’t properly equipped for using the Japanese saws so;


Ta Da! Japanese Ninja Carpenter Boots. If these don’t get me sawing like a pro, nothing will.

Today I was going to make the end wotsits that are used as handles for carrying the box. All I needed was to make some bits of wood to fit in the recesses at the end of the box, with some spacers and job done. Can’t be difficult can it? I was going to cut an off-cut of board in half for this and thought that instead of ripping it, I could use the Japanese technique for cutting thin boards. If dividing the board along the grain, they use something very like a marking gauge with a knife in it. They slit down one side then slit the other and snap it. So I tried slicing/knifing both sides of the board;


…and then leant on it to simply snap along the line. Lean, LEAN, LEEEAAAANN, nope, no breaking. So I had to b****y well rip it. Not noticing any great improvement from the boots yet. Plane the edges neat and square;


Trim the edges to make the hand holds nice and smooth;


put some spacers in the end of the box;


and all I need to do is pop the handles in, simples;


B******s, another miscockulation. I’m thinking I measured the gap at the end with two bits of thin board and am trying to fill the gap with two bits of thick board. So, bang a couple of nails in the “workbench”, jam the boards up to them, shhhh, shhh, shhh, with the No 5 ½ bam, bam, bam and Hey Presto;


Two nice flush end wotsits. That was it for today so now one finished outer box (sans rope handles and internals);

 
Back
Top