First kitchen build and I have a few questions!

UKworkshop.co.uk

Help Support UKworkshop.co.uk:

This site may earn a commission from merchant affiliate links, including eBay, Amazon, and others.

scubadoo

Established Member
Joined
4 May 2009
Messages
301
Reaction score
45
Location
Bristol
Hello,

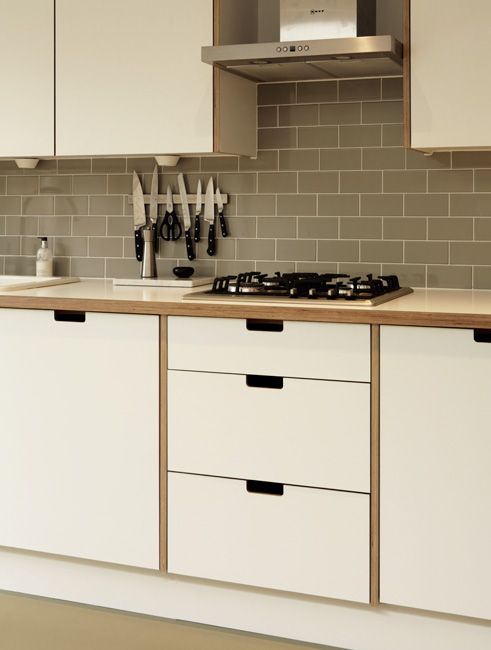
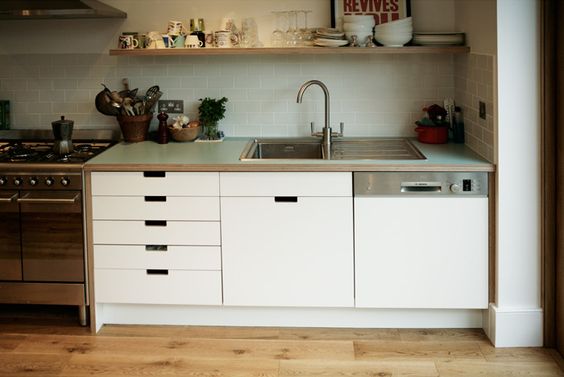
I'm just about to start on a cutting list for my first proper kitchen build. I'm planning on using a Festool Domino and Kreg pocket screws. The materials will be 18mm BB grade Birch ply for the carcasses with the edges on show at the front. The draw fronts will be 18mm melamine laminated birch ply using Blum tandembox (or similar). The front top ledger and base panel will be set back 18mm so that drawer fronts sits flush with the visible ply edge of the side panel.
My cabinets will probably be 590mm deep, 800mm high and 300/600/900mm wide.

My questions are:

Is it sensible to use 18mm ply for the rear panel rather than a thinner panel in a dado, fixed with pins? I want them to be rock solid.

Is there a best practice in terms of order of assembly? What I mean is, should i fix the first gable to the base, then the second gable and should the rear then be fitted inside those 3? - although as i type that i realise that that would be impossible to assemble with dominos?? so would i just screw the back panel or sit it in an 18mm dado? or rabbet them? Or first side to base then rear then 2nd side? Or do i just butt the back panel up to the rest of the assembled carcass and fix with screws and maybe a few dominos as well?

I'm just getting a bit confused on how to assemble if i'm not using a back panel in a dado like the IKEA cabinets that I've built in the past. But then those cabinets are a bit wobbly until they're fixed to the wall and another cabinet.

Any guidance would be appreciated.

I think I'll save my questions about fitting the Blum runners for later! :wink:

Cheers

Dave
 
Personally I've never bothered making cabinets with anything other than butt joints screwed up. I use Spax M-Cut MDF screws (pre-drilled and c/sunk holes) and it's always worked just fine for me. If you're not planning to use end cover panels then obviously that won't work for the last unit in a run. I make up a 'u' shape first - both sides with the base in between. Then fit the front rail. Then either slide in a back panel (9mm max) or pin/screw one on. It's worked fine for me for many years.
 
Just a word of warning regarding pocket screws, don't be too aggressive with tightening or you risk splitting either component (this caused me much bother at the weekend!!). Also make sure you clamp them tightly before screwing as they do tend to pull the joint out of flush a wee bit.
I think I'd go for the same method as Zeddedhed said (providing the screws aren't exposed). You could just glue and domino the last end if it is exposed.
Regarding assembly, try to keep it simple and methodical, if one way doesn't work for you then try another. You'll soon figure out what works best for you
 
From the other perspective, I just built some using just Dominos (for lining up) and glue, solid as you like.
 
The main reason for the back panel on kitchen units being set in a groove is to create space for the services to be run unseen behind the units. This also allows the units to be secured to the wall normally with metal angle brackets. If you aren't running any services (water waste pipes etc) then fixing the back panel to the units directly isn't a problem. If you are running services you need to decide how you are going to either hide them of feature them when you open cupboards if you don't use the groove method.

A back panel in 18mm ply is an expensive solution, a panel made of say 9mm or 6mm ply, MDF, 4mm hardboard will be more than adequate. The cabinets will be completely rigid if you either recess it into a groove or glue and nail to the outside or glue and screw. The thing to consider on the thickness of the back panel is not that one thickness will give greater rigidity than another to the structure of the cabinet, rather it's the resistance it will have to things being pushed into it from within a cupboard. So, for instance, a set of draws doesn't need anything with any real thickness, however a cupboard for say pans will benefit from a thicker panel that won't bulge or get pushed out of a groove. Before you commit to lots of material I would make (or mock up up using say 18mm cheap MDF) your largest cupboard and try different thicknesses of back until you have the stiffness you want when pushed from the inside. A £9 sheet of 18mm MDF will allow you to test out and try your proposed assembly technique as well as work out any other issues for a minimal outlay.
 
Zeddedhed":thgur8ws said:
I make up a 'u' shape first - both sides with the base in between. Then fit the front rail. Then either slide in a back panel (9mm max) or pin/screw one on. It's worked fine for me for many years.
Thanks, that seems to make sense.

Adam9453":thgur8ws said:
Just a word of warning regarding pocket screws, don't be too aggressive with tightening or you risk splitting either component (this caused me much bother at the weekend!!). Also make sure you clamp them tightly before screwing as they do tend to pull the joint out of flush a wee bit.
Thanks for the advice. I was planning to put glue on the tenons (do i need to put any on the panel edge as well?) clamp with some Bessey parallel clamps and sash clamps, then fix with the pocket screws.

deema":thgur8ws said:
The main reason for the back panel on kitchen units being set in a groove is to create space for the services to be run unseen behind the units.
I have a water pipe and a waste pipe to run behind. We're having slightly deeper work surfaces; 650-700mm deep so with the cupboards 590mm deep and was then planning on fixing a 2" thick spacer/batten along the wall for the worktop to sit on that the cupboards can be directly fixed to at the top and give me the service void. Is that enough just to fix at the top? They'll be plenty heavy and all fixed together.

deema":thgur8ws said:
A back panel in 18mm ply is an expensive solution, a panel made of say 9mm or 6mm ply, MDF, 4mm hardboard will be more than adequate. The cabinets will be completely rigid if you either recess it into a groove or glue and nail to the outside or glue and screw. The thing to consider on the thickness of the back panel is not that one thickness will give greater rigidity than another to the structure of the cabinet, rather it's the resistance it will have to things being pushed into it from within a cupboard.
That's really helpful, thanks deema. If i recess into a dado channel, what kind of depth of channel is sufficient?

Thanks guys.
 
You could use a batten like you say or have a look at space plugs. They sell them online or in toolstation and screwfix

Sent from my ALE-L21 using Tapatalk
 
chippy1970":30f3mw4v said:
You could use a batten like you say or have a look at space plugs. They sell them online or in toolstation and screwfix

Sent from my ALE-L21 using Tapatalk

They look interesting. I'd have to see how it would work in my situation. Our wall construction is lightweight Celcon solar blocks with dot and dab and I'm using Rigifix drywall fixings so I need to fix through the back of the unit with a longer M6 machine screw.
 
do you normally try and get the side panels of the cabinets up against the wall or is it ok to have battens as spacers to bring them out a bit if having a deeper worksurface?
 
Yeah you can bring them out but any end of run panels would need to be wide enough to scribe back to the wall

Sent from my ALE-L21 using Tapatalk
 
chippy1970":1ux85tic said:
Yeah you can bring them out but any end of run panels would need to be wide enough to scribe back to the wall

Sent from my ALE-L21 using Tapatalk

Thanks Chippy.
 
I'd glue the edges as well as the tenons, but I do tend to "over glue" everything. I think for the minimal cost of adding a smear of glue to every mating surface (both faces) is worth it when compared to the cost or implications of fixing a failed joint.
 
deema":3b8s62ih said:
The main reason for the back panel on kitchen units being set in a groove is to create space for the services to be run unseen behind the units. This also allows the units to be secured to the wall normally with metal angle brackets. If you aren't running any services (water waste pipes etc) then fixing the back panel to the units directly isn't a problem. If you are running services you need to decide how you are going to either hide them of feature them when you open cupboards if you don't use the groove method.

A back panel in 18mm ply is an expensive solution.......

Our worktop (50mm thick concrete) is going to be 650mm deep with a 30mm overhang, then a 570 deep cabinet, leaving us with 50mm between the back of the cabinet and the wall. I'll run a 50mm batten along the wall to sit the worktop on and fix the cabinets to. Is anything wrong with that?

So i will have a service void for the mains water pipe created behind the cabinet. In which case am i better just to glue and screw a 9mm ply panel to the back? It would save the extra effort of routing the dado. Presumably i would just drill a pilot hole and screw rather than use the pocket hole jig? Normal Reisser screws into ends of ply OK?

Out of interest, how deep would a dado usually be cut in an 18mm ply panel? And does it get nailed/screwed/glued at all or is it sized such that it is held tight by the base and sides?

Sorry for all the questions and I promise to do a WIP when I finally get started. I'm just doing some drawings at the moment and working out my cutting list.
 
If you are setting the top rail and carcase bottom back so you drawers are inset to the sides, does that mean that between each drawer or door you will have 36mm of carcase showing. Ie 2 carcase sides butted up together. If so, then why not finish each run with a side cheek so they are also 36mm.

That makes construction easy, all carcases can be screwed together. I would then make cabinets shallower as youve suggested and screw on 9mm or 6mm ply backs. I do a sink unit differently, make it 20mm less deep than the others, then screw on some 45 x 20 battens up the sides forming a reveal on the inside. The back for this carcase is made to fit from the front, screwed to the battens. Sometimes this back panel may in 2 pieces. Its much easier to cut, drill etc for plumbing services.

With a concrete top, id be tempted to make the carcases with the top and bottom running through and sides in between. The carcase joints are then not in shear from a heavy worktop load. This would need you to re think the way you want to set back the top rsil and bottom 18mm.

An alternative way to create the design detail you want is to make all the cafcases parts flush at the front. Make all drawers and doors to be overlay. If you want to see a vertcal between each drawer / door you could make a load of ply strips and screw then between each cabinet. You will have off cuts anyway and you will get a much better joint if you want to double them up as this can be done on the bench and sanded flush first.
 
You could look at this for assembly. http://www.mywoodworkmatters.com/buildi ... ress-free/

In my kitchen build, I didn't use pocket screws, just screwe using spax carcase screws from the side.

Made all cupboards at once to get same height and depth.

Backs from 4,6,8mm board.

I would not make a recessed ledger, rather make all cupboards doors etc, and then just put a panel on the end of the run to a) hide the screws and b) make everything flush along the front.

I also used Blum hinges and runners. So easy to install it was amazing.
 
You can see the flush aspect here: https://youtu.be/z_9Y6ffEyLE (excuse the rather boring opening and closing)
That was taken 7 months ago when I was at the "nearly finished" stage.

This flickr album shows various stages, you can see the assembly, and that all carcasses were effectively the same build.

This was by far the easiest way I could find. Happy to send more pictures if it helps.

BTW: get some adjustable feet, it makes life a LOT simpler.
 
RobinBHM":16yzrmsz said:
If you are setting the top rail and carcase bottom back so you drawers are inset to the sides, does that mean that between each drawer or door you will have 36mm of carcase showing. Ie 2 carcase sides butted up together. If so, then why not finish each run with a side cheek so they are also 36mm.

Exactly what I was planning to do! This is the look I'm aiming for

9e836d451ac669b571ae707c68587dfb.jpg


RobinBHM":16yzrmsz said:
That makes construction easy, all carcases can be screwed together. I would then make cabinets shallower as youve suggested and screw on 9mm or 6mm ply backs. I do a sink unit differently, make it 20mm less deep than the others, then screw on some 45 x 20 battens up the sides forming a reveal on the inside. The back for this carcase is made to fit from the front, screwed to the battens. Sometimes this back panel may in 2 pieces. Its much easier to cut, drill etc for plumbing services.

That sounds perfect.

RobinBHM":16yzrmsz said:
With a concrete top, id be tempted to make the carcases with the top and bottom running through and sides in between. The carcase joints are then not in shear from a heavy worktop load. This would need you to re think the way you want to set back the top rsil and bottom 18mm.

I was planning to run cement board across all the units, screwed to the ledgers, as a base for the concrete to be laid in situ as seen on the Buddy Rhodes website. Maybe I'll change from 2 ledgers to one solid top but still sitting between the gables. Then offset the joints of the cement board which will be the base for the concrete top. Do you think that would be OK?

RobinBHM":16yzrmsz said:
An alternative way to create the design detail you want is to make all the cafcases parts flush at the front. Make all drawers and doors to be overlay. If you want to see a vertcal between each drawer / door you could make a load of ply strips and screw then between each cabinet. You will have off cuts anyway and you will get a much better joint if you want to double them up as this can be done on the bench and sanded flush first.

I'm tight on space so i'd have to reduce the cabinet widths to incorporate that detail and would lose 36mm width per cabinet.

wcndave":16yzrmsz said:
You could look at this for assembly. http://www.mywoodworkmatters.com/buildi ... ress-free/

I would not make a recessed ledger, rather make all cupboards doors etc, and then just put a panel on the end of the run to a) hide the screws and b) make everything flush along the front.

That's useful thanks. I'm confused by what you say about the recessed ledger. The point of setting the ledger back 18mm at the front was so that it would be hidden by the drawer front.

Do you mean like this?

71afa1a8e7daef7248272171393cab35.jpg
 
Yes, sort of. If you look at my video, you'll see I have overlay doors and drawer fronts. I basically don't want the carcase laminate seen anywhere, all you can see is solid wood or real wood veneer in my kitchen.

Looks like you're going for a different look.

Would defo put the sides outside the top / bottom, I recommend this book:

http://www.gregorypaolini.com/?page_id=98

I didn't want to embark on such an important one off project without knowing as much as I could. It was invaluable in the end.
 
So I'm trying to decide on what finish for the birch plywood - cupboard interiors, open shelves etc.. I've used Osmo Polyxoil in the past. Done lots of floors with it and some ply.

I'd like something that keeps the pale colour of the plywood as much as possible and gives a smooth durable finish.

edit: i should add that i mostly want a satin finish, but a couple of elements may need a gloss finish. I'm currently thinking that a quickish drying brushable lacquer or sealer/lacquer combo would be best? I'll also need to prime and paint some doors, no idea what finish to use there.

I don't have a spray gun at the moment but am considering getting a Fuji Q4 turbine unit at some point so could accelerate that if needed. Won't have a spray booth though.

What do you guys use/recommend?
 
scubadoo":2stexfvq said:
So I'm trying to decide on what finish for the birch plywood - cupboard interiors, open shelves etc.. I've used Osmo Polyxoil in the past. Done lots of floors with it and some ply.

I'd like something that keeps the pale colour of the plywood as much as possible and gives a smooth durable finish.

edit: i should add that i mostly want a satin finish, but a couple of elements may need a gloss finish. I'm currently thinking that a quickish drying brushable lacquer or sealer/lacquer combo would be best? I'll also need to prime and paint some doors, no idea what finish to use there.

I don't have a spray gun at the moment but am considering getting a Fuji Q4 turbine unit at some point so could accelerate that if needed. Won't have a spray booth though.

What do you guys use/recommend?

Acrylic varnish brushed on should be fine. Fast drying, pale finish and easy to apply if not to warm a workshop.
 
Back
Top