You are using an out of date browser. It may not display this or other websites correctly.
You should upgrade or use an alternative browser.
You should upgrade or use an alternative browser.
The UKW Infill Project
- Thread starter jimi43
- Start date


Help Support UKworkshop.co.uk:
This site may earn a commission from merchant affiliate
links, including eBay, Amazon, and others.
jimi43
Established Member
Racers":3d251cdc said:Nice adjusting hammer Jimi.
Pete
Thanks Pete.
Obviously...there's some finishing to do... the neck/head bit needs slimming and fixing....few bevels here and there....the bolt for the head and the LV insert....and maybe a matching steel insert.
Jimi
tobytools
Established Member
Beautiful work jim.
The persistence and dedication to this project is outstanding.
Keep it up.
All the best
TT
The persistence and dedication to this project is outstanding.
Keep it up.
All the best
TT
jimi43
Established Member
Cheers Toby...much appreciated!
I finished off the plane adjustment hammer design today....
Just needs a bit of spit and polish and gluing up and we're done.
Work stops play as usual at weekends but will tidy it up tomorrow.
Cheers
Jimi
I finished off the plane adjustment hammer design today....
Just needs a bit of spit and polish and gluing up and we're done.
Work stops play as usual at weekends but will tidy it up tomorrow.
Cheers
Jimi
Love the hammer, but just think how nice it would look with hand turned radiuses between the dimension changes!
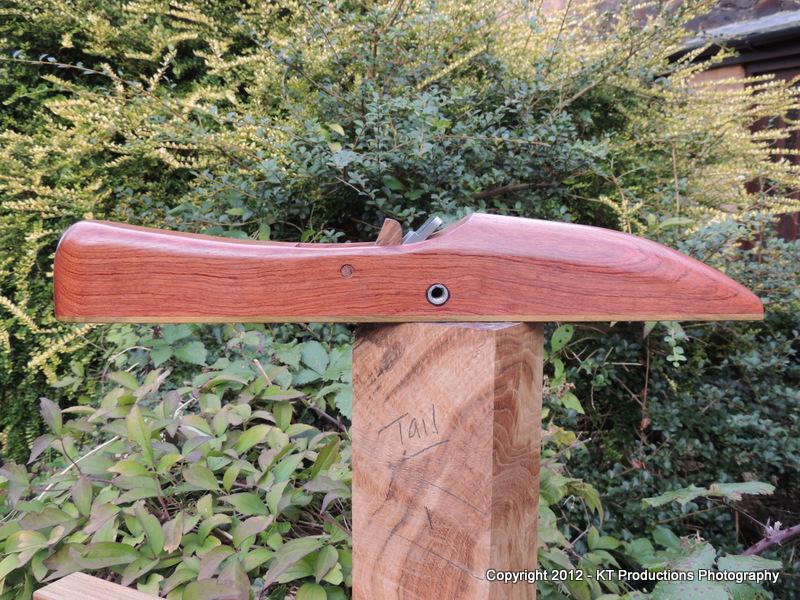
Here's a couple of photos of a small smoothing plane that I have been making for the last couple of years. Still WIP in that the blade was made from the closest O1 I could buy at the time, but needs to be a couple of mm wider.
The Norris type adjuster has a 1/4" ME thread. The lever cap was made with Holtey type hand made steel bolts. The slots in the sides of the cap were made by drilling in the bench drill cross slide, then machining the slots with Dremel bits, again using the cross slide. First time I had tried this but it was necessary to be able to remove the lever cap in order to remove and replace the blade.
The result is not as tidy as I would like, but is accurate and does the job.
All the screws and rivets were turned up from hex brass and steel, apart from the two which hold the adjuster cross bar. I think I will replace the rear adjuster knob, as it was a quick fill in from another project. It needs to be bulkier to match the lever cap screw, and with a radius to the rear to fit in the palm of the hand.
A small milling machine is a distant gleam at the moment.
.JPG")


Regards Mike
Here's a couple of photos of a small smoothing plane that I have been making for the last couple of years. Still WIP in that the blade was made from the closest O1 I could buy at the time, but needs to be a couple of mm wider.
The Norris type adjuster has a 1/4" ME thread. The lever cap was made with Holtey type hand made steel bolts. The slots in the sides of the cap were made by drilling in the bench drill cross slide, then machining the slots with Dremel bits, again using the cross slide. First time I had tried this but it was necessary to be able to remove the lever cap in order to remove and replace the blade.
The result is not as tidy as I would like, but is accurate and does the job.
All the screws and rivets were turned up from hex brass and steel, apart from the two which hold the adjuster cross bar. I think I will replace the rear adjuster knob, as it was a quick fill in from another project. It needs to be bulkier to match the lever cap screw, and with a radius to the rear to fit in the palm of the hand.
A small milling machine is a distant gleam at the moment.
Regards Mike
Attachments
While you are showing off your Ward and Payne axe, I've had this Ward paring chisel for some years. ! 1/2" wide and blade length 10". Realise that this may need it's own thread, but does anyone have any idea how old it might be?
The primary bevel seems to be the original. It doesn't get a lot of use but when it does, it's perfect.


Mike
The primary bevel seems to be the original. It doesn't get a lot of use but when it does, it's perfect.
Mike
Attachments
jimi43
Established Member
Hi Mike
Sorry for the delay replying..I work weekends and didn't finish until 2am today so just getting to the messages.
First...your plane.
Nice job mate..particularly with limited hand tools.....and rather you than me trying to make that Holtey mechanism for the lever cap!
I'm afraid I wasn't that brave when it came to that part of my project...and to be honest...without a CNC controlling the shape it's always going to be better to just put the bolts in...particularly since I didn't have the need to remove the cap to access the iron set.
When I looked at the plane shape last night before retiring...I had a flashback to something and I couldn't for the life of me think what it was but then this morning it came to me....
Most things have a shape that symbolizes the period they were made and this shape seems to me to come from the 1930s....like the old Charabanc buses...I think it's the way the curves flow and the back cuts off suddenly. I had the same feeling when I bought this Barron...
...which reminds me of the 30s speedboats you saw on Italian lakes and those speed record cars of the period.
Regarding the adjustment knob...I actually don't agree at all that it's too small...in fact..I would say it's too big...surely it would be more balanced to have a smaller adjustment knob than the lever cap?
Do you need a milling machine to turn the radius on the knob? I would say stick the shaft in the lathe and turn the radius...by hand if that's the way you are comfortable with?
The steps on the plane adjustment hammer I made were deliberate. It's a design I prefer actually...but that's just a preference.
Thanks for posting the beautiful WARD shots...I have a Sorby one almost the same...that is my favourite paring chisel but only because I don't have a WARD (yet).
As you say...you might want to start a new thread yourself on that alone...as hidden amongst this thread, you possibly won't get the answers you need regarding the age....and it creates a very interesting thread too!
The Hand Tools forum can be a bit quiet of times and this is just the old tool stuff that sparks interest!
There have been a number of infill plane builds/restorations of late and if you have WIP shots of your plane build, I'm sure people starting out on this fascinating subject would be greatly helped by shots of how you did each bits....again...another thread would be superb!
Cheers
Jimi
Jimi
Thank you for your kind remarks.
Of course I don't really need a milling machine, but when has that been relevant! As my favourite mug says "he who dies with the most tools wins".
I am undecided as to the adjustment knob, in that it needs to sit in the palm of my hand for the lateral push, and ideally needs a more comfortable radius. If I radius this knob, it may make the knurled section a bit thin. It's all about the aesthetics, and I may play around with an alternative and see which I prefer.
Certainly I would do the radius by hand, but one of the reasons I keep banging on about hand turning, is that it is easy to cut all sorts of profiles without the complication of profile cutters on the metal lathe. You can change your mind part way through if it doesn't look right.
I didn't take any WIPs I am afraid as I wasn't aware of this forum when I started. I will bear it in mind however as I need to make a new handle for a file, and I have been using old brass plumbing fittings for ferrules, and have found that turning the handle on the w/w lathe, I leave a tight 12.5mm spigot for the ferrule fitting, then put the brass ferrule on, and hand machine in situ, so that instead of a parallel ferrule, I can turn a gentle hollow profile, narrowing to the business end.
Completely useless of course but I think it looks good.
I am not sure of the design inspiration for the plane. When I did it, I hadn't seen David Barron's elegant planes. With hindsight, I have decided it comes from my "Russian sleigh" period. I have Jim Kingshott's excellent book and like his mitre plane, which may have had some influence.
Regards Mike
jimi43
Established Member
Sleigh...yup...I see that now!
Also I just realized in the picture of "Biggles" I posted above...that he's sitting on the burr oak infill stock before it was installed!
How weird! :mrgreen:
Jim
Also I just realized in the picture of "Biggles" I posted above...that he's sitting on the burr oak infill stock before it was installed!
How weird! :mrgreen:
Jim
Mike,
Don't want to hijack Jim's thread but some thoughts on your adjuster knob. I'm inclined to agree with you about it because plane making should first and foremost be about function and if you reduce the diameter noticeably it will have a significant effect on the leverage you can get to drive the blade forward or pull it back under frictional load from the lever cap. This is a difficult balance, particularly on a small plane. As regards the aesthetics generally, I like your plane a lot.
Jim
Jim
Thanks for your thoughts. I will play around with alternatives, and post again, if Jimi doesn't mind me hijacking his beautiful work.
Jimi
I too have a 1" wide paring chisel Sorby which is my "go to". I'll post pictures when I get home, on the Ward thread. Like the Ward, it's a beautiful piece of work, but getting shorter!
Let me know if you would prefer our plane discussions to go separate.
Deliberate error in comment about plumbing fittings - should have been 15mm.
Regards
Mike
jimi43
Established Member
It doesn't bother me at all Mike...but it would be infinitely better for you on its own thread....as you have seen with the interest in the WARD thread.
Also...down the line...people looking to emulate your ideas will find it easily..not hidden in the depths of my ramblings! :mrgreen:
Just a thought.
Jimi
Also...down the line...people looking to emulate your ideas will find it easily..not hidden in the depths of my ramblings! :mrgreen:
Just a thought.
Jimi
Jimi - a few posts ago I questioned the length of the screw on the cap, and you were going to shorten it. I've just seen the S&S planes on the Damascus steel thread, and they've been left three or four threads too long. To me it just looks careless - I can't see why it's done?
jimi43
Established Member
phil.p":1mkbm5xj said:Jimi - a few posts ago I questioned the length of the screw on the cap, and you were going to shorten it. I've just seen the S&S planes on the Damascus steel thread, and they've been left three or four threads too long. To me it just looks careless - I can't see why it's done?
I think his doesn't look quite as obvious because he uses a larger diameter bolt...which in retrospect...I wish I had done. I'm going to cut it down to two threads above maximum tighten down...and see how it looks. At the extreme..I could bore out the hole and make a new knob if I think it looks wrong but you don't see most of it so we'll see. I see no mechanical reason for a larger diameter.
After a day off..(well real work!)...and having applied more Tru-Oil...I cut back the finish on the rear infill...(I have yet to do the handle and bun)...then satisfied that I can make the rear infill permanent...I bit the bullet and took the heads off the screws with the mill...the tape is there as an indicator to stop me going too far...
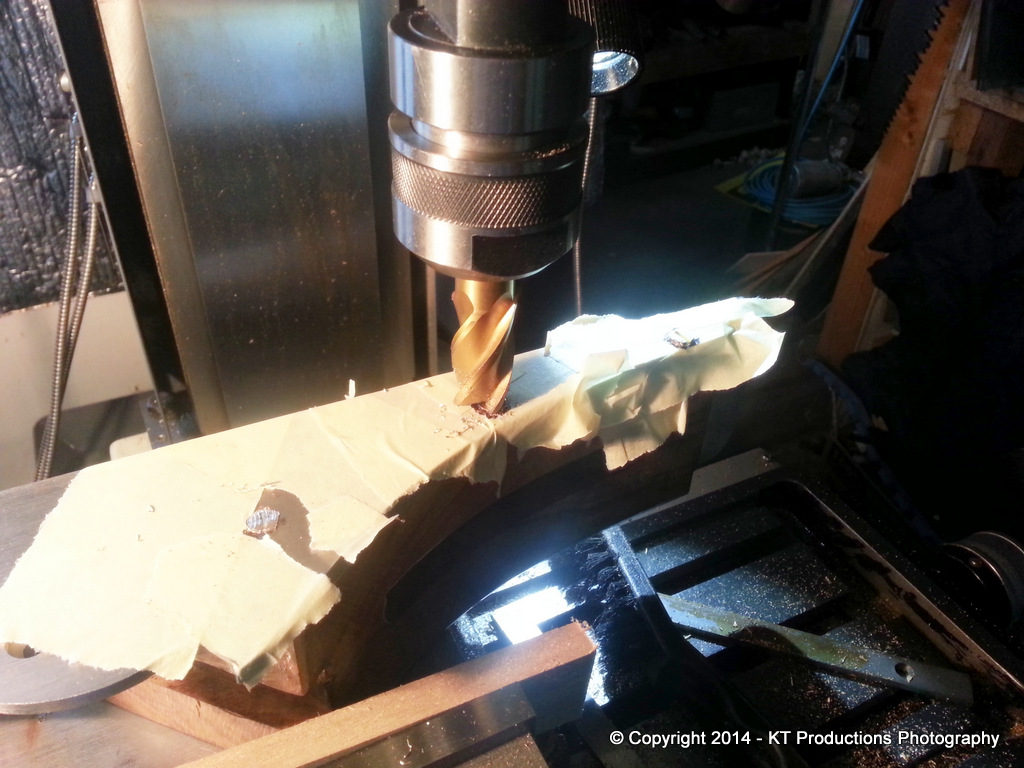
This being done as close as I dare...because any steel deep scratches would be a disaster....I set up the disc sander.
Now..before you all jump on the thread and say NOOOOO!!!! I didn't and don't intend to, switch it on. :shock:
The setting up involved ensuring there was a new 80G disc on it and it was flat. Then I made sure the disc was at exact right angles to the Corian bed...
Then I simply pushed the plane back and forth...and the rotated it a bit and repeated.
The following picture shows the results...
As can be seen there is a tiny dip at the very rear...forget the middle for the moment because that pushes out a thou with the lever cap inserted.
Now I could carry on and take the lot down by hand but I think I will investigate the possibility of getting the entire flat face area surface ground at precise angles....
I think it is worth it.
I used to have a buddy in the next village who made bike parts and I will see if he's still around and has one of those very useful machines.
The area that was proud has the screw right down flush and it looks great...so I am well chuffed about that aspect of the job.
Now to do the other side!!
Cheers
Jimi
jimi43
Established Member
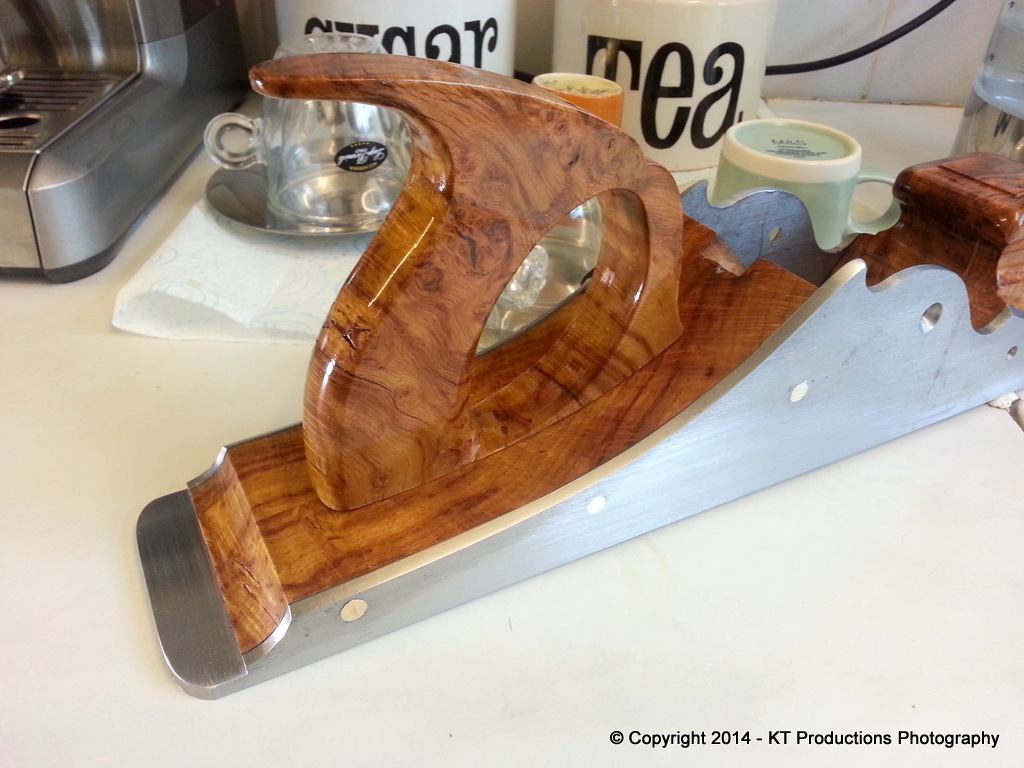
Just one before I hit the sack...better pictures in daylight...
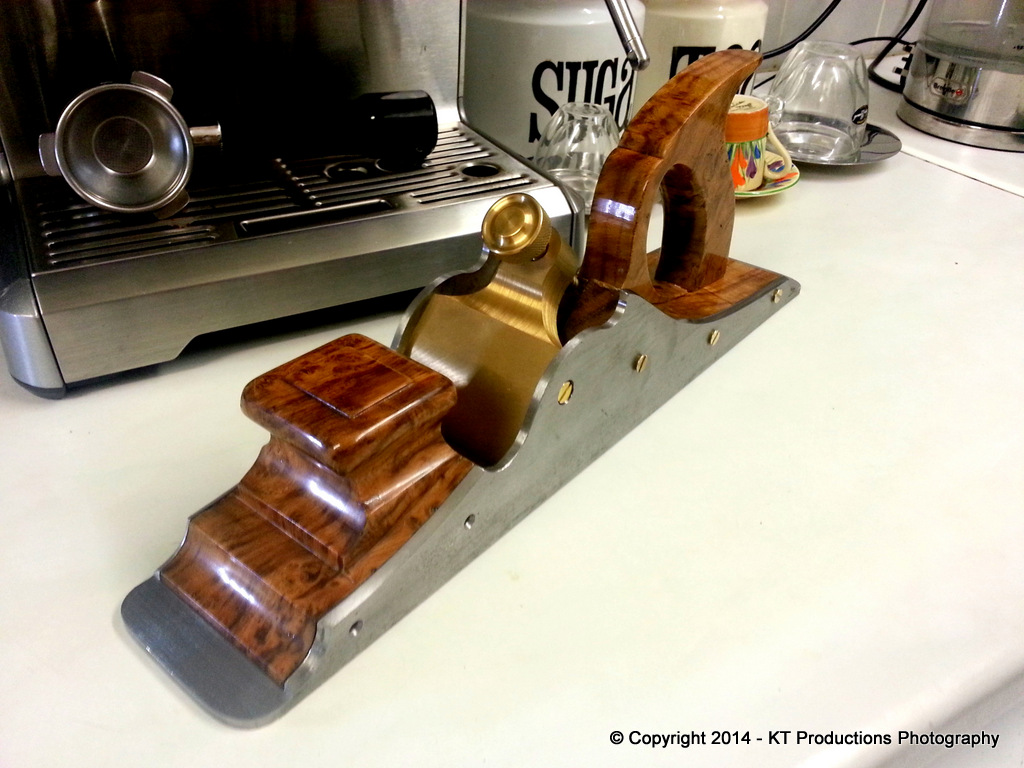
That bun was a nightmare to cut back....each time takes a few hours going through the mesh range but we're there for the last time. :wink:
Night all!
Jimi
That bun was a nightmare to cut back....each time takes a few hours going through the mesh range but we're there for the last time. :wink:
Night all!
Jimi
jimi43
Established Member
Thanks Noggsy!
Well...a rather traumatic incident happened today!
I had to leave the plane with someone else!!! :shock:
After trying to find someone with a surface grinder who could clamp something as big as this plane AND look after it...I settled on Rydal Precision Engineering of Swanley.
A quick chat with Ian Hall from their superb workshop (which is HUGE by the way!)....and lusting over a partition at a rather nice Bridgeport mill....I was confident I had chosen wisely.
The downside is it could take a while...a week was quoted...an a fair few shekels to boot! But it's worth it both to finish this job off and get a perfectly brushed finish to the sides.
I feel like I am cheating but at least I know it will be perfect when finished.
It was really traumatic leaving him with someone else though...rather like leaving a child!! :mrgreen:
Other news...Philly now has the other iron and will be hardening that in due course and once the plane comes back from surface finishing...the lever cap will go off to Ian at CHALCO for engraving.
It's all coming together nicely!
More in a few weeks (hopefully!)
Jimi
jimi43
Established Member
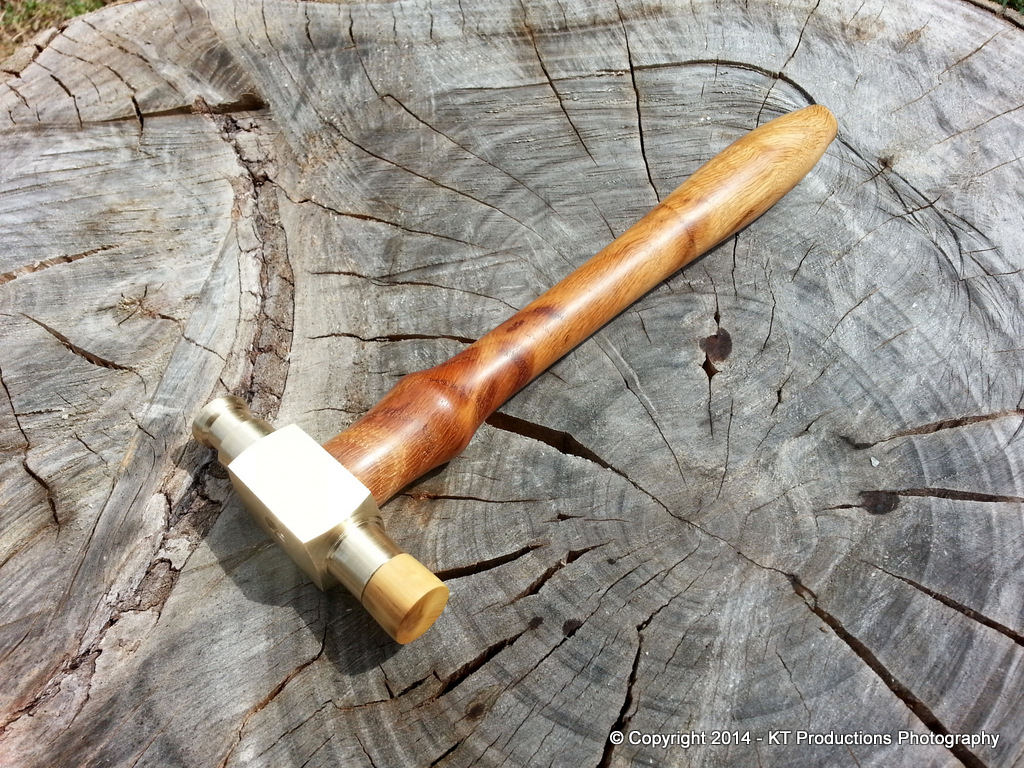
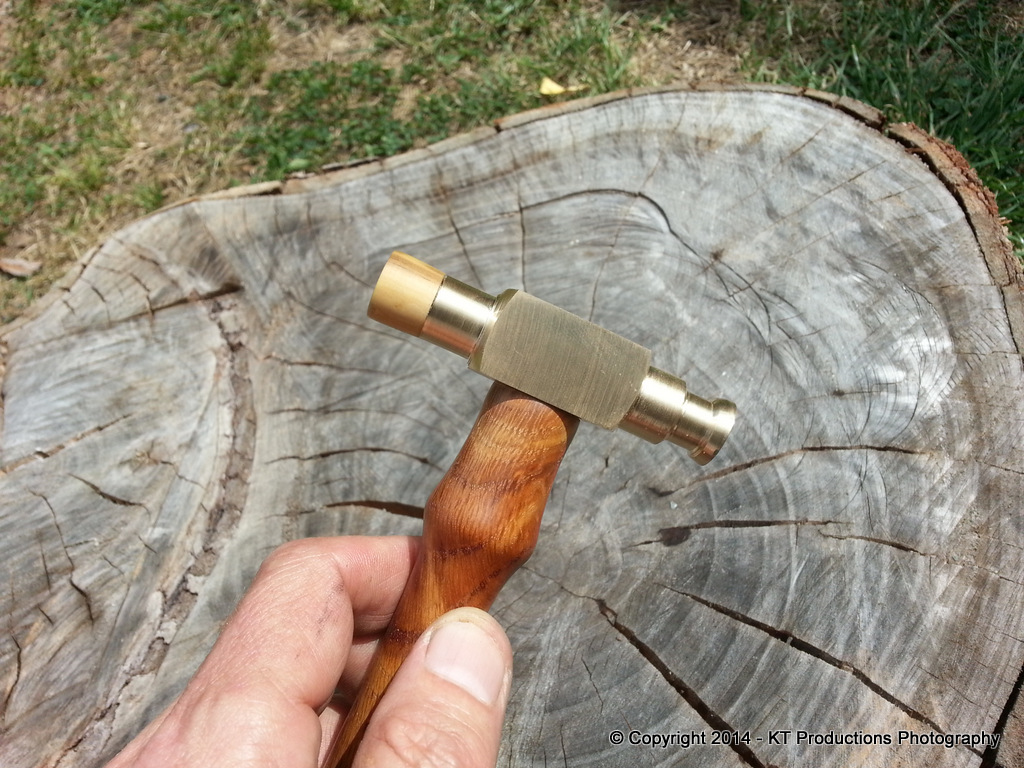
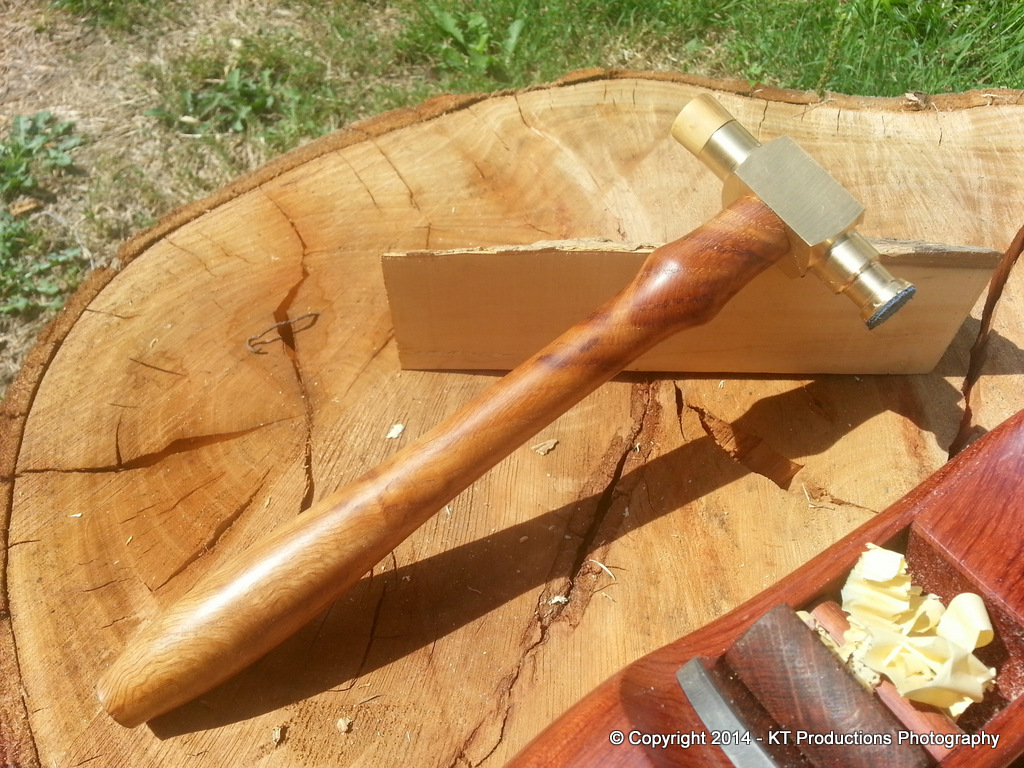
Moving along a bit with the first plane adjustment hammer prototype...
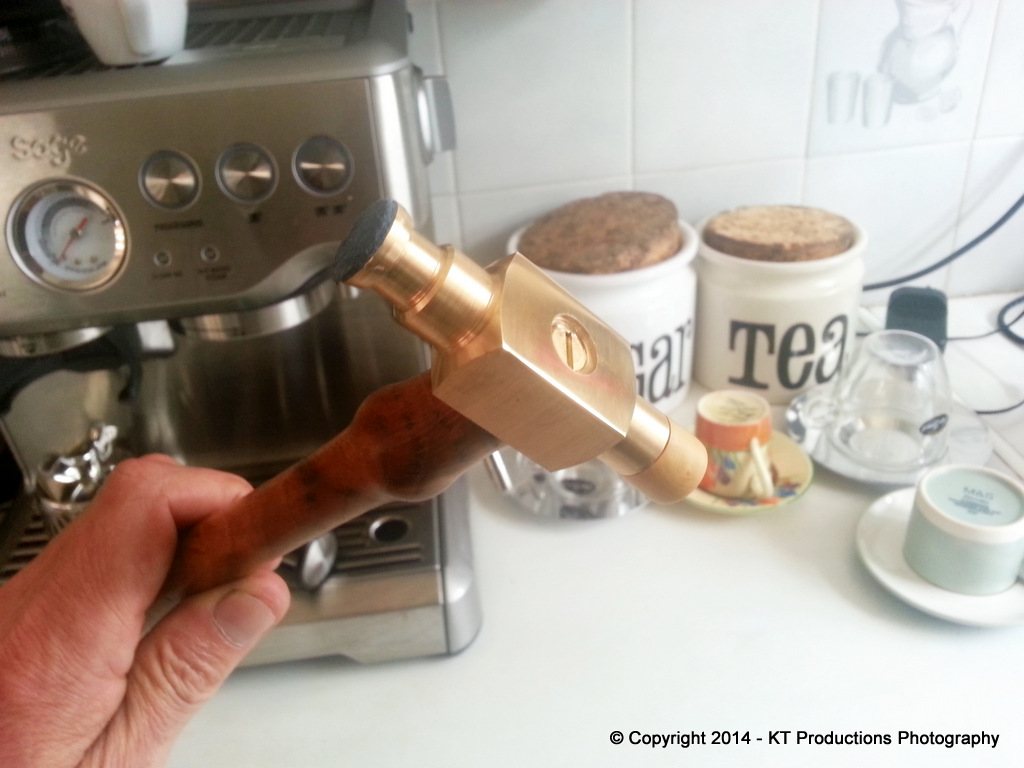
This is the one I will be keeping...but there are a number of things I want to change in the next one...
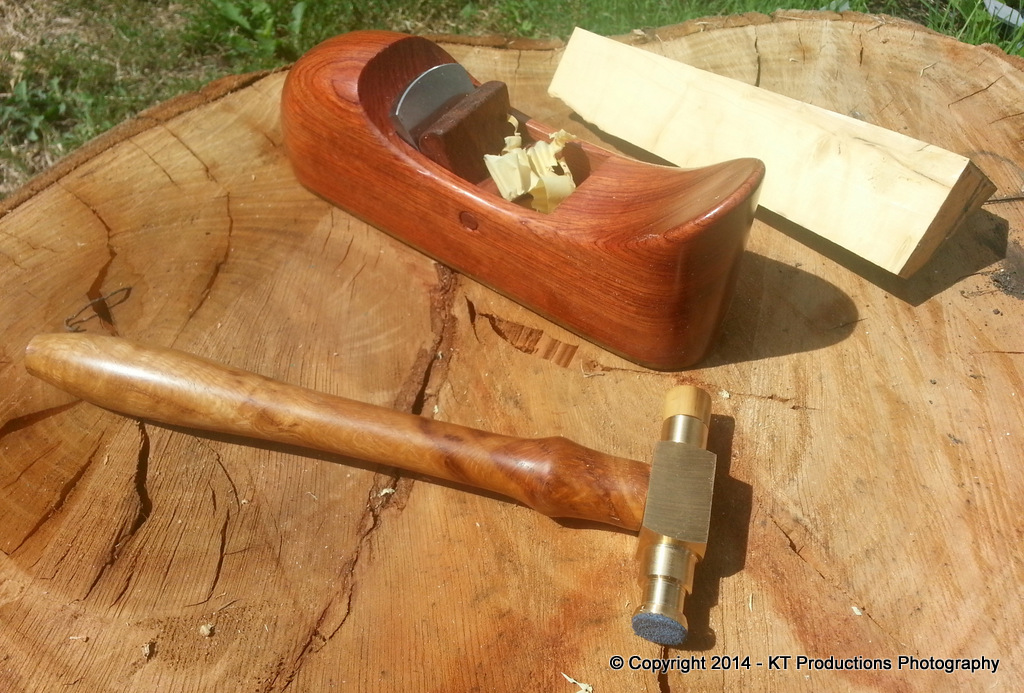
The first will be a more tapered shaft which will be about 3/4 as thick at the head...this is quite chunky I think..and I need it a bit more stylish.
Secondly...I intend to try this hand turning of the brass as suggested by others...that should be a laugh!!
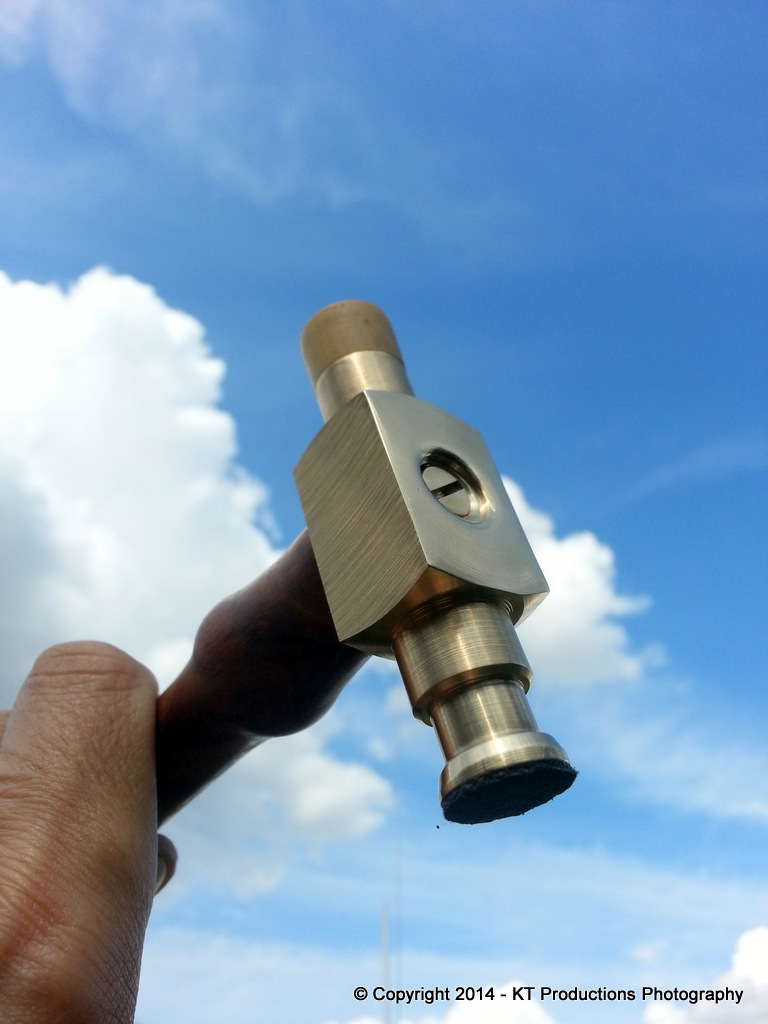
I am quite happy with the rather geometric profile though...it's more my taste.
Testing went well...it's very solid and adjusted the iron very well...
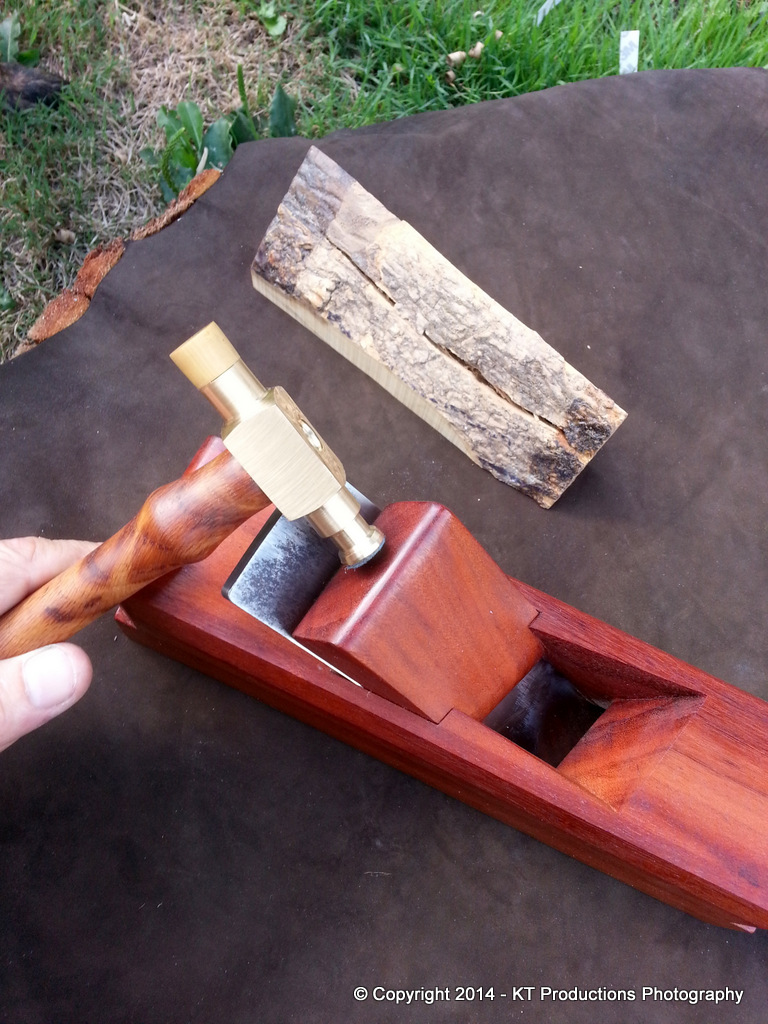
and the wedge tapped down firmly.
It weighs about 7 oz. which is just about right....
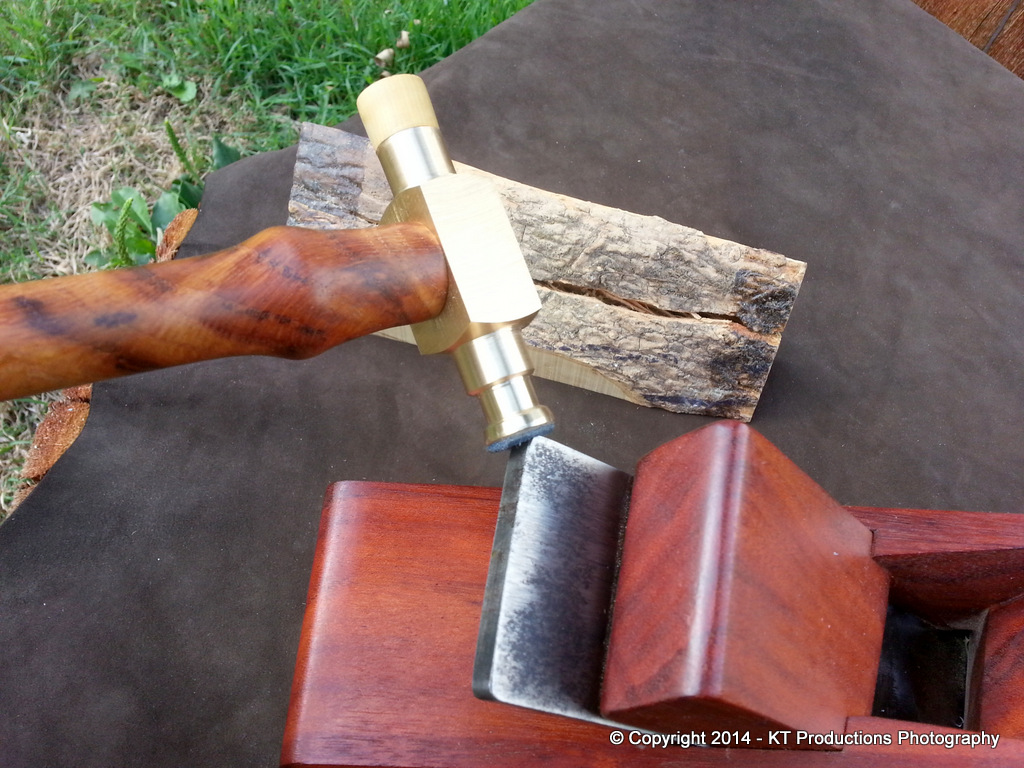
One thing I will have to look into is name stamping...
Stamping side grain burr oak is similar to smashing through a barn door with a marshmallow!! :mrgreen:
I got there in the end but it's nowhere near as crisp as I would have liked....
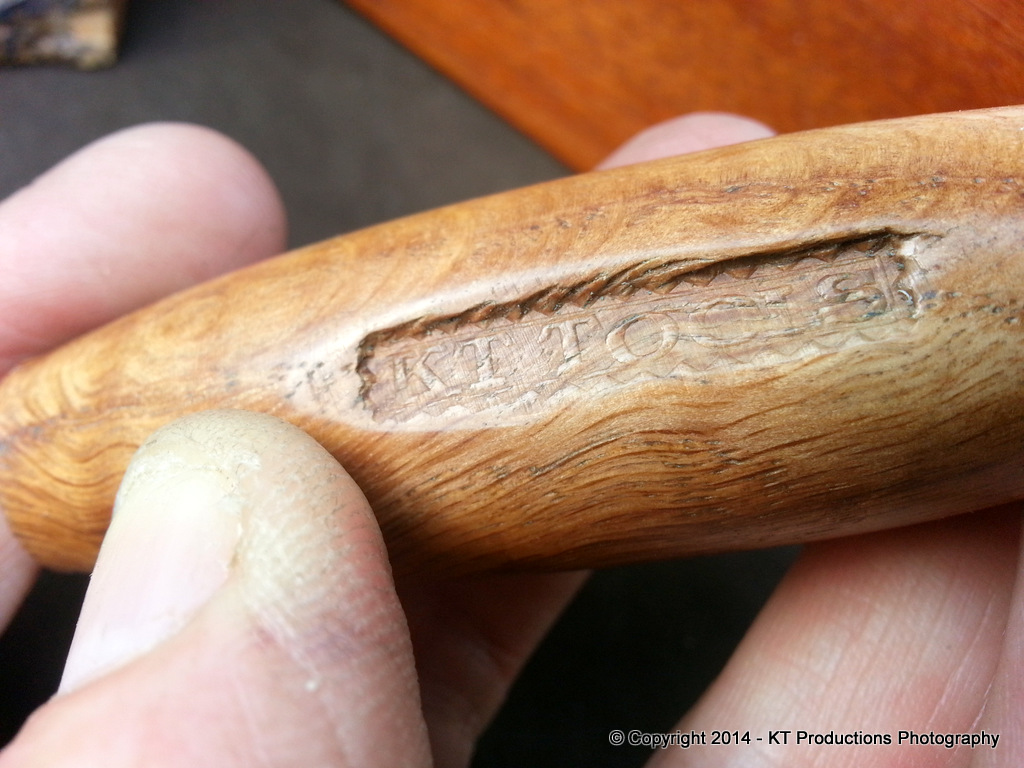
...so...I will probably be scratching my head for a while about that one.
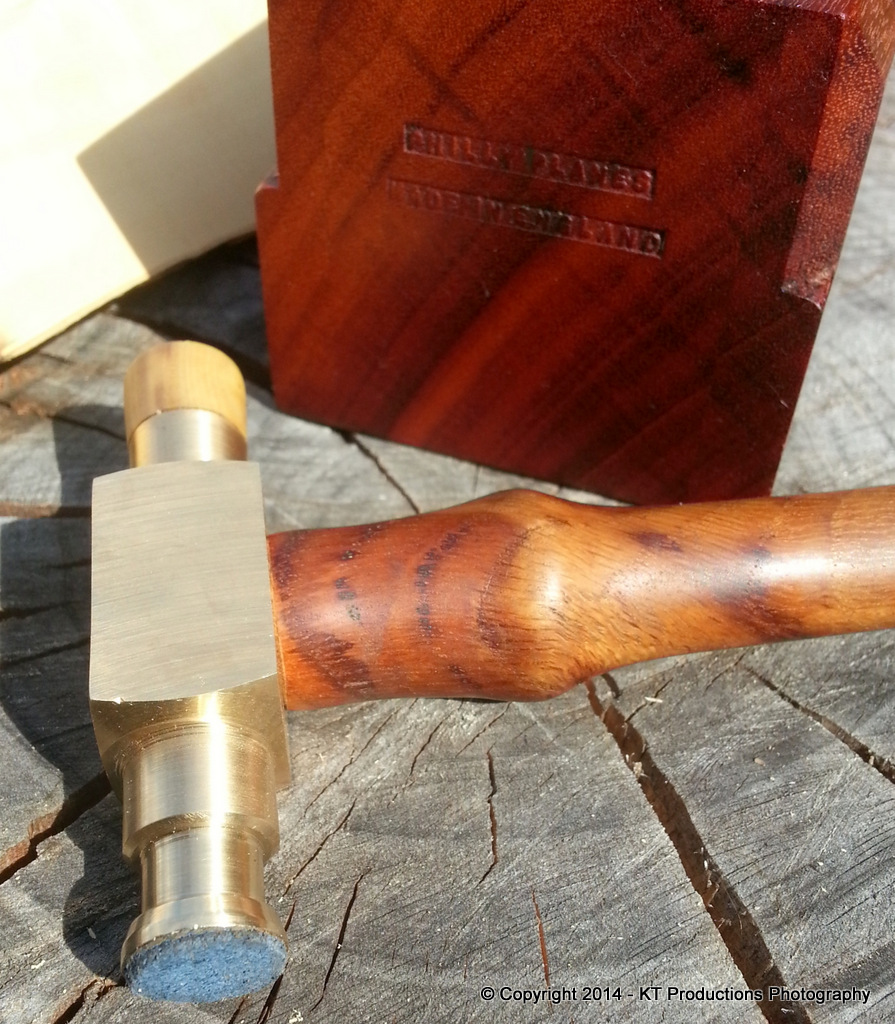
Watch out for version 2
Jimi
This is the one I will be keeping...but there are a number of things I want to change in the next one...
The first will be a more tapered shaft which will be about 3/4 as thick at the head...this is quite chunky I think..and I need it a bit more stylish.
Secondly...I intend to try this hand turning of the brass as suggested by others...that should be a laugh!!
I am quite happy with the rather geometric profile though...it's more my taste.
Testing went well...it's very solid and adjusted the iron very well...
and the wedge tapped down firmly.
It weighs about 7 oz. which is just about right....
One thing I will have to look into is name stamping...
Stamping side grain burr oak is similar to smashing through a barn door with a marshmallow!! :mrgreen:
I got there in the end but it's nowhere near as crisp as I would have liked....
...so...I will probably be scratching my head for a while about that one.
Watch out for version 2
Jimi
Similar threads
- Replies
- 12
- Views
- 616
- Replies
- 8
- Views
- 1K
- Replies
- 8
- Views
- 1K