upgrdding a stanley plane iron to lie neilson blade iron

UKworkshop.co.uk

Help Support UKworkshop.co.uk:

This site may earn a commission from merchant affiliate links, including eBay, Amazon, and others.
Hi all

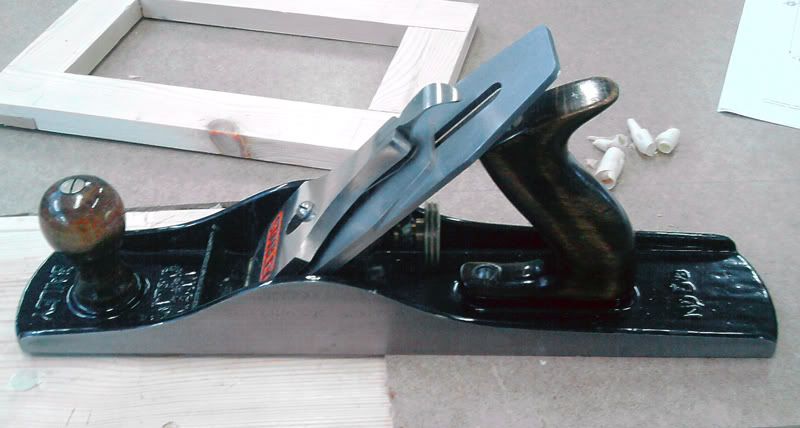
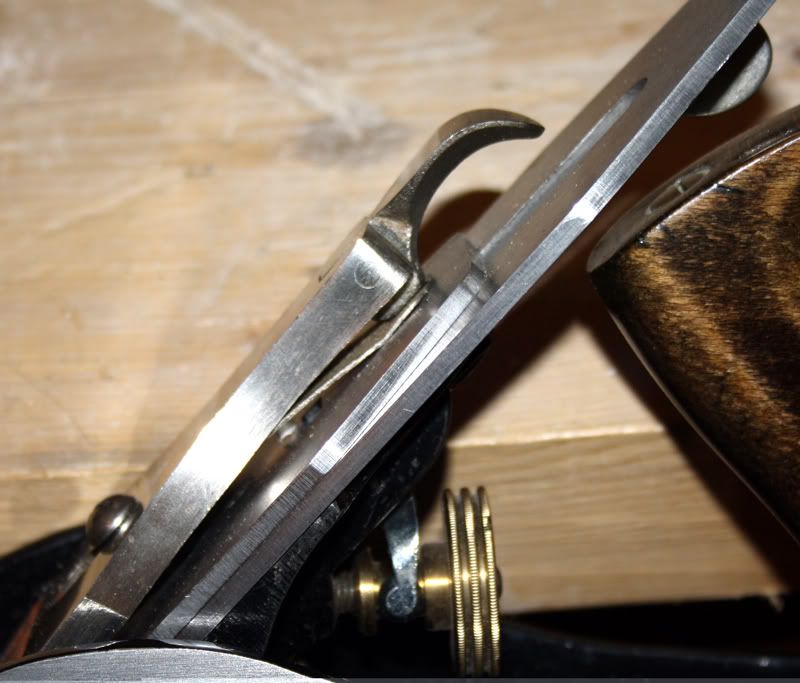
been working on the plane y lever today the lie nielsen plane blade fitted ok with just a slight adjustment to the mouth of plane sole to allow the blade to slip through unfortunatily the chip breaker is wrong , so i have to use for now the stanley one and i have allow for the extra thickness of the chip breaker when i get it , still need to take the measurement later tonight and get it ordered .

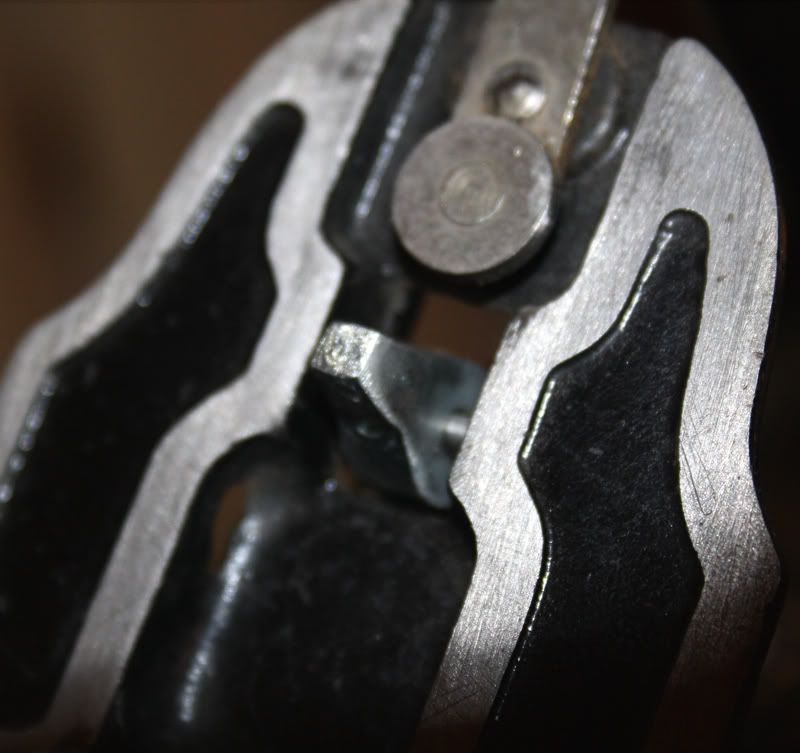
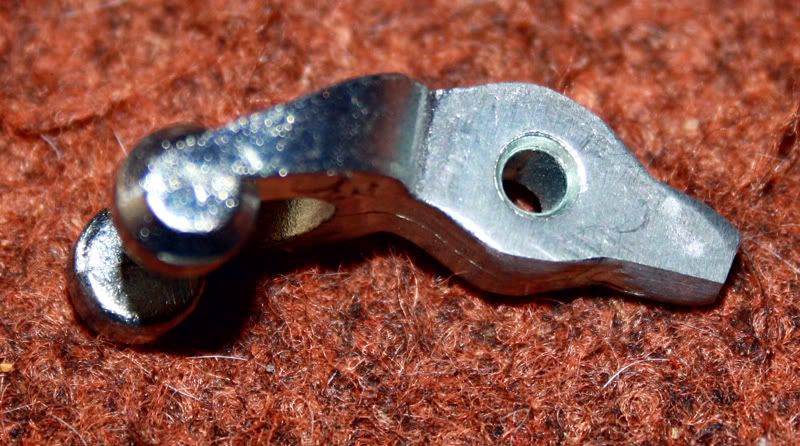
Y lever is made after several attemps , but got it right in the end , i ve fitted it temporarily, but i'm going to remove it again , one thing that surprised me is not the amount of any slackness in the blade slot that is easily allow for when forming the new y lever but the amount of slackness around the pin that hold the y lever in place . this pin seem' s to be made of copper or brass maybe which is very soft and has bent already , the hole in the y lever has to much play in it.

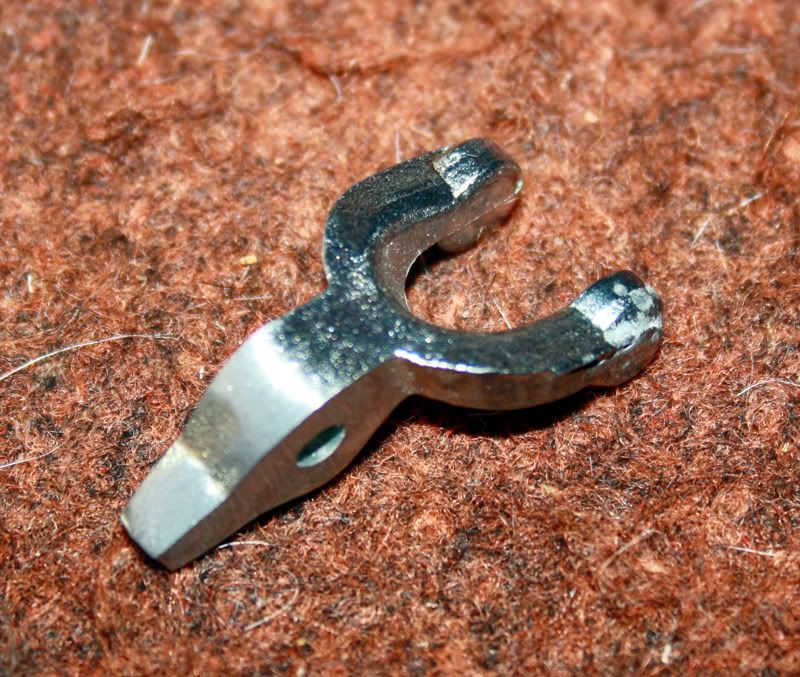
To take any back lash out of the plane first you can fix one end snugly into the slot of the blade by careful filing when making the adjustment to the y lever but next i feel you must anchor the y lever on the pin with a steel bar fitted snugly with minimal play in it , so next i have to source some new steel bar on the right dia meter to fit the hole in the y lever even if i have to re drill the pin hole in the frog before i can try it out , and to think this a relatively new plane which has had minimal use. .hc

ps i keep ypu posted once i got the steel bar and i'll post some pics as well
 
Hi all

As promised i would update you all with pics as well , well here go's instead of posting here i just open my blog page for the first attempt hope it works ok thought it better to do it there i can do more justice to it and take my time with it where as i would have to post all in one go here , it not completely finished as yet but will be hopefully in the next week so keep visiting.

hope you enjoy. hc
 
I wouldn't bother with all that farting around modifying the plane; just buy a laminated Japanese blade from Axminster. It will fit perfectly and provided the frog of your plane is good and flat and the chipbreaker is a nice snug fit to the blade at the sharp end (as should be the case for any blade) you will have no problem with chatter. What is more, you will have a blade which will take a better edge which will last longer than any A2 blade.

Jim
 
Hi

IMHO The case for farting around was to remove all the slackness on the pin , with a very poorly engineered y lever fitted to the pin , bent pin , pin not at 90 degrees to the gullet so yoke was out of line to the adjustment wheel .

As i said i have no doubt the extention to the nose will do the job ok but i felt it required more work to remove all slackness at the pin and the adjusted to get the best from my plane. the lie nielsen blade fitted ok with a very slight adjustment to the mouth , no point really in just doing the nose on the y lever and leaving all that slack on the pin and adjuster i wanted it to be able to adjust whilst using it with just a touch from your finger and not spinning the adjuster to take a load of slack . which is what i have acheived. hc
 
Yes, I can understand that. I have an old Record no5 that belonged to my father, so it is probably prewar. After fettling it works a treat with a Japanese blade and I would not part with it but it does suffer from quite a bit of backlash. Maybe one day I will get around to doing something about it.

Jim
 
I seem to recall a Charlesworth article that rated the laminated blades quite highly, but said they weren't very flat and therefore needed a lot of fettling to get the backs really flat.
 
Hi All

I can't pass any comments on japanese plane blades or indeed lie nielsen A2 grade blades as i have only just upgraded to lie nielsen , I have now altered three of my plane doing this to the NO 4, 5 AND 5/1/2.

Only been able to really try the no 4 and it work perfect , i have only just tried briefly the no 5 yesterday and all seem ok managed to get oak shaving down to 0.002 before i try any adjustment on the frog i'll post pics in the blog soon , so you can all see, hopefully this week end . at the mo i have to use the same blade in the no 4 & 5 I will order a second 2" blade for the no 5 and & a blade for the 5/1/2" plane but at nearly £45 a pop not cheap .hc
 
Hey there, this is my first post here from the other side of the pond ( Nova Scotia, Canada) and stumbled upon this discussion about LN irons in Stanleys. I have a type 7 (1893-1899) Stanley No4 that I have installed the LN full thickness iron and improved cap iron in (NOT the LN Stanley replacement). I filed the mouth just enough to smooth and square it up, and this was all that was required to fit the thick iron. The yoke was long enough to engage OK, but there is a fair amount of slack in the adjustment now, but it doesn't offend me much.
Most recently I have aquired a type 4 (1874-1884) Stanley No8. It required a bit of a restoration, and I could not resist the temptation to shoehorn LN's 3/16" No8 iron into it. It required a lot of filing to open the mouth to accomodate this massive iron, and I used a hardwood block clamped to the sole of the plane as a filing guide. The next challenge was that the yoke was nowhere near long enough to reach the adjustment slot in the cap iron. I had a piece of brass bar stock, and cut two tabs from it and epoxied these on either side of the cap iron slot to engage the yoke. I left them a bit tight, then filed them after the epoxy had cured to fit the yoke snugly. There is almost no slop in the adjustment. I am very impressed with the improved performance of these planes. I mostly plane hardwood, and have a 10 to 15 degree backbevel on the irons to discourage tearout in difficult grain. I used the Stanley cap iron for the No8 by the way, I was afraid I might run out of threads in the lever cap screw with the extra thickness.

Steve
 
head clansman":2xsrb330 said:
Hi all

As promised i would update you all with pics as well , well here go's instead of posting here i just open my blog page for the first attempt hope it works ok thought it better to do it there i can do more justice to it and take my time with it where as i would have to post all in one go here , it not completely finished as yet but will be hopefully in the next week so keep visiting.

hope you enjoy. hc

Our own Jarviser (in his shed) wrote up both approaches a while ago

https://www.ukworkshop.co.uk/forums/view ... ent#310814

BugBear
 
Hi bug bear

In my blog i do mention in the second para the other two post on this subject, and i also go on to mentioned i thought they hadn't gone far enough with either method to solve any of the slack around the securing pin and adjustment wheel, they had only solved the slack in the plane blade itself leaving the the pin and wheel still requiring adjustment, to be able to do the any real justice to the plane, which is what i feel i have achieved in the way that i did my planes. hc
 
I know its been some time since this topic had any updates since the last time I read it (months ago), after reading all the information that was to hand, I thought I'd do what was described to upgrade my own stanley planes to the Lie Neilson blades and cap iron, having read the specks of the Lie Neilson and after considering the cost of the said upgrade, desided to searching online to resolve the problem, I came across a comparison between Lie Neilson planes and Quangsheng planes, with this in mind decided for just a little more than the price of lie neilson blade/cap iron upgrades, I could afford a new Quangsheng plane! and haven't got to mess around with lengthening the yoke adjuster and solder, especialy if I sold my old stanley planes on Ebay,

This means to mess about upgrading my old Stanley planes is pointless from my own personal point of view, so what are we all trying to achieve by doing an upgrade on our old planes? performance improvements comparable to the Lie Neilson planes, at a lot less of the cost! with less effort, with more reliability than the solutions above, with no soldering that saves us money (saved money spent on more new tools if your anything like me)

(no disrespect intended to the other contributors already, you have all worked hard on this topic well done, I tip my hat in respect to you all)

So I've stated the obvious to you all, what's my solution, to the problem ? comment and ask if your interested and I'll let you know with pictures and information on how to
 
I was just going to say "welcome back HC" when I realised that this was from 2008

Interesting point in bring this back up now that we have the QS jobbies to choose from.....

I have been thinking of upgrading one of my Records for a while with a QS iron...will be interesting to see some of your pictures and some shavings....

Cheers my friend

Jim
 
I'm back with pictures at the bottom of the page of shavings and upgrades as asked for, and with the explanation of how to save time, money and make the job easier with the route I took striving for Lie Nielson Performance out of our humble Stanley plane, I have no statistics/thickness on shaving readings to give you, my first weapon of choice that I've given the upgrades to is my favourite trusty old.... Stanley 5 1/2.


Stage 1

I did the upgrade in two stages, I didn't opt for using Lie Neilson blade or cap iron/chip breaker as this is still over priced in my opinion for the said upgrade, I decided to use the Quangsheng chip breaker with the Stanley blade still in the plane only first, was there a noticeable difference?...... Yes definitely!..... I noticed a great improvement much better than the Stanley chip breaker, for the price of £14 from "Workshop Heaven" this is a very worth while upgrade that doesn't require any alteration what so ever to the plane body or Yoke lever at all, just fit the chip breaker to the blade and your good to go.


Stage two Final

Stage two was to address the yoke lever problem of adjustment and to fit the new thickness £18 Quangsheng blade, I wasn't happy to go through soldering or drilling the yoke to make the extension to then find out I have to re do over and over again if fails a couple of months or a year down the line, (that's an unreliable compromise) the solution for that problem is... Clifton do a replacement Yoke lever for £2.50 each so that Record planes are able to except Clifton's own thicker blades,

I spoke to the Clifton manufactures Clico Tooling in Sheffield and they were unsure and didn't know if they would fit the Stanley planes to except the thicker Quangsheng blade with chip breaker I wanted to fit, so I bought the Clifton/Record Yoke lever just on the off chance to find out for myself.......I can happily tell you they do fit are provided with a new fitting pin that's slightly shorter than the Stanley pin, (Now were are in business) sharpened Quangsheng blade fitted to the chip breaker now just the frog to set back slightly, and then file the Throat towards the Toe two millimetres, done!

The finished result, is in my opinion, sets the old Stanley and the newly upgraded Stanley worlds apart, REALLY WORLDS APART!!! with reliability, performance and saving money, objective complete.
all parts were supplied by Workshop Heaven

Was it worth it? OH YES!!!

cost: Quangsheng route
Blade: £18.00
Chip Breaker: £14.00
Yoke Lever: £02.50
Total: £34.50

cost: Lie Nielson route
Blade: £43.50
Chip Breaker: £26.10
Total: £69.60

No55.jpg


yokeinfrog.jpg


yoke2.jpg


yoke.jpg


sidefrog.jpg


shaving2.jpg


shaving1.jpg
 
uk woodman":fv7ahton said:
cost: Quangsheng route
Blade: £18.00
Chip Breaker: £14.00
Yoke Lever: £02.50
Total: £34.50

cost: Lie Nielson route
Blade: £43.50
Chip Breaker: £26.10
Total: £69.60
Don't forget to add the cost of a new yoke (£2.50) to the Lie-Nielsen 'route' as well (comparing apples with apples). Only the Rob Cosman cap-irons come adapted for the shorter (original) yokes.

Cheers, Vann.
 
Thanks for that Vann, I overlooked the yoke on the Lie Neilson route, even more of a saving on the Quangsheng Route then, I've seen the Rob Cosman,
IBC Pinnacle Chip Breaker & Blade set, the lever yoke top attachment for short yokes, still seems not quite what I want to throw into the mix, the Pinnacle set is very well made by all the reviews I've seen on them though, the Rob Cosman set without shipping from the US works out at $105 = £67.50 + shipping so still not so great at saving money.
 
uk woodman":3motyoxe said:
The finished result, is in my opinion, sets the old Stanley and the newly upgraded Stanley worlds apart, REALLY WORLDS APART!!! with reliability, performance and saving money, objective complete.
all parts were supplied by Workshop Heaven

Was it worth it? OH YES!!!

Glad to hear yet another blade upgrade having the desired effect.

Did you do any special fettling/tuning to other aspects of the plane?

BugBear
 
Glad to hear yet another blade upgrade having the desired effect.

Did you do any special fettling/tuning to other aspects of the plane?

Bugbear the only thing I can tell you I did to the blade was literally I spent two min's sharpening on a 6000 grit Japanese water stone just to show the planes new ability/shavings in the pictures above.

Information on Quangsheng Blades:

Quangsheng plane irons are made from T10 water-hardening carbon steel and tempered to RC60-63. Although more difficult to work with than oil hardening steel it has a slightly higher optimum hardness and takes a slightly finer edge.

The plane irons are fully surface ground (as opposed to just machined) including the primary bevel, so they will take an acceptable shaving straight from the packet and can be honed to a mirror finish in a few strokes
.
 
uk woodman":f77j9vtq said:
Glad to hear yet another blade upgrade having the desired effect.

Did you do any special fettling/tuning to other aspects of the plane?

Bugbear he only thing I can tell you I did to the blade...

I was asking about the (rest of the) plane - since the handles look smooth, the paint unusually thick, and the casting shiny.

BugBear
 
Sorry Bugbear lol didn't realise that you were asking about the general plane condition, my mistake, the plane was bought from a car boot sale for £10 some time ago and was in really poor condition so I thought id revive it, to the handles I gave just a bit of sanding and oil, the body was very rusty so quick sand blast and brushed on enamel paint I surfaced the sole on a granite block with various grades of paper 80 grit through to 400grit. I've gone through the same set-up on all my planes, I know it might not be correct form on vintage planes but, these are my tools and for using not to look like a historic relic in a show case.
 
Back
Top