WIP Saw Bench ala Schwartz

UKworkshop.co.uk

Help Support UKworkshop.co.uk:

This site may earn a commission from merchant affiliate links, including eBay, Amazon, and others.

morfa

Established Member
Joined
7 Sep 2012
Messages
823
Reaction score
3
Location
Bridgend
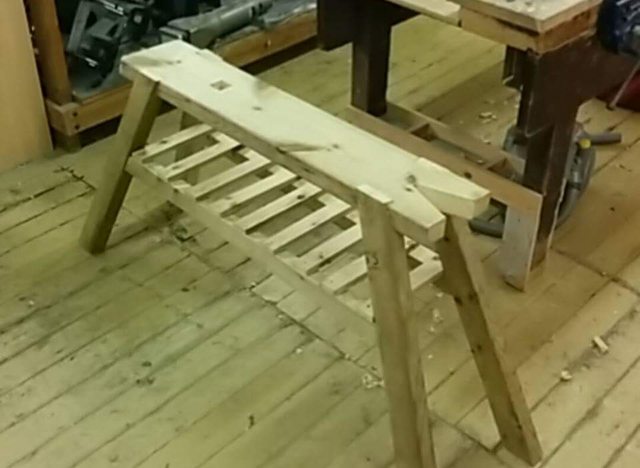
I've been meaning to make an extra saw horse for a while, but when I saw this 'sawbench' I thought it'd be more useful.

Plans are here - http://www.popularwoodworking.com/proje ... nal_sawben

I bought the wood this morning and I've been fixing the wall in the back garden so I've only got as far as cutting the lengths roughly to size so far. I'm just using pine from the local yard, nothing fancy. I'm gluing two 1x8s together to get a slightly thicker top. I hope to largely finish this off tomorrow after I've finished rebuilding the wall in the garden. Pics to come, but it's just piles of wood at this point.
 
This is slightly less "trad" version we use on site.
349bf5c294bfb07e666527ae61b9bee4.jpg


The notch also helps hold doors on edge for shooting in.


Sent from my iPhone using Tapatalk
 
Zed - Looks good. It does the job, that's all that matters. I doubt mine will look nice either, but it'll be a useful addition to the arsenal of shop built tools.
 
When I did my 'prenticship it was standard practice for all newbies on site to make one 'a la Schwarz'. Much more interesting to make with the angled leg joints and all that.

The modern version doesn't really say anything about ones skills as a carpenter but you can keep A LOT OF rubbish in the bottom box :D

Looking forward to seeing yours when done.

I may even get the 'prentice to knock one up.
 
I'm very much still at the 'apprentice' level, so this sort of thing is time well spent for me. I'm just heading out into the garden, but I hope to have some progress made on this later on.
 
So the top has been glued up. I used two 1x8s to make it a bit thicker. Then I planed them a bit to tidy them up and make the piece closer to 7". Then it was time to trim the top to length and mark the notches. I then decided to cut the 10 deg angles on the legs. That's about as far as I got this evening, but I only spent an hour on that.

sawbench5.jpg


Legs cut with 10 deg angles (but not trimmed to length).

sawbench6.jpg
 

Attachments

  • sawbench5.jpg
    sawbench5.jpg
    223 KB · Views: 1,856
  • sawbench6.jpg
    sawbench6.jpg
    234.9 KB · Views: 1,856
I've made a bit more progress on this. The tenons on the leg braces are now cut and I've also marked out the mortices ready to bash. I also managed to knacker my japanese rip saw when cutting the tenons. The tenons are pretty manky tbh, so I don't know how neat it'll look. I'm thinking of using some wedges to make it look tidier if needed. In the pic below the legs are on the left and the braces are on the right.

2015-10-07 20.50.00.jpg


Hope to finish the rest of it in one more evening.
 

Attachments

  • 2015-10-07 20.50.00.jpg
    2015-10-07 20.50.00.jpg
    168.2 KB · Views: 1,705
I knocked on of these up yesterday afternoon, whilst waiting for someone; It was perhaps a tad rushed in execution, as I always forget how quickly all of the angles can confuse the life out of you if you're not paying attention.

QA9Papzl.jpg


Its just made from a single 3.6m length of ex 200 x 50 c16 carcassing, and 4 oak pegs to draw-bore the legs in nice and tight.

The finished product is a bit "agricultural" in appearance, and the outside of the M&T joint between one of the legs and the stretcher is a bit gappy. I trusted a mitre saw to hold its settings and it didn't; the opposite side stretchers I cut by hand, no such issues.
 
Nearly done now. Still needs some kind of finish on it and the legs trimming properly, but otherwise finished. It's been as useful as expected and as I didn't build a shelf under my bench, it fits under it perfectly. I was quite happy with the mortices they were nice and tight. Bit too tight really, I had a small accident with one of them:

2015-10-10 15.05.12.jpg.smaller.jpg


But they went together eventually with a bit of coercing:

2015-10-10 16.35.01.jpg.smaller.jpg


The above isn't is gluing up, I used the cramps to push the legs and braces together. No glue involved, the fit was so tight. Then the notches were cut out. Amusingly, despite that side saying top, it ended up being the bottom. Whoops. The notches were cut with a carcass saw and then with a fret saw. I can't cut straight lines with a fret saw for toffee, so I then pared the last centimeter or so away with a chisel.

2015-10-10 20.44.07.jpg.smaller.jpg


First dry fitting. Again most of the joints here were tight enough that it was fairly sturdy without the glue.

2015-10-10 21.20.28.jpg.smaller.jpg


Finally one of it gluing up. The notches on the legs were a bit wonky, so I'm not sure that either side is at exactly the right angle, but they're close enough.

2015-10-11 17.01.32.jpg.smaller.jpg


When I was pushing the last leg in I broke off a section of the main top, which was annoying. So I glued that back on, the 'dribble' of glue is the line of the bit that I stuck back on. Time will tell if it lasts. Annoyingly, it's roughly where the V notch will be going. That's why there are extra clamps on one end in the above pic.

2015-10-11 17.01.47.jpg.smaller.jpg


This final pic might be useful to some to show how I clamped up using the offcuts from the cut to make the glue up square and give a better clamping surface.

2015-10-11 17.02.10.jpg.smaller.jpg


Since I took those pics, I've flush cut the ends of the tenon shoulders, cut the notch and put on a couple of bits of wood to stop the legs splaying out. I'll post them up some other time.
 

Attachments

  • 2015-10-10 15.05.12.jpg.smaller.jpg
    2015-10-10 15.05.12.jpg.smaller.jpg
    148 KB · Views: 1,408
  • 2015-10-10 16.35.01.jpg.smaller.jpg
    2015-10-10 16.35.01.jpg.smaller.jpg
    227.1 KB · Views: 1,408
  • 2015-10-10 20.44.07.jpg.smaller.jpg
    2015-10-10 20.44.07.jpg.smaller.jpg
    183.3 KB · Views: 1,408
  • 2015-10-10 21.20.28.jpg.smaller.jpg
    2015-10-10 21.20.28.jpg.smaller.jpg
    206.2 KB · Views: 1,408
  • 2015-10-11 17.01.32.jpg.smaller.jpg
    2015-10-11 17.01.32.jpg.smaller.jpg
    194.6 KB · Views: 1,408
  • 2015-10-11 17.01.47.jpg.smaller.jpg
    2015-10-11 17.01.47.jpg.smaller.jpg
    182.5 KB · Views: 1,408
  • 2015-10-11 17.02.10.jpg.smaller.jpg
    2015-10-11 17.02.10.jpg.smaller.jpg
    131.6 KB · Views: 1,408
Finished this a while back. Have to say it's excellent. Very useful. I never bothered to put the shelf on, I don't think it's really very useful. So here are a few pics of it finally done.

bench1.jpg


bench2.jpg


bench3.jpg


Fits perfectly under the bench.

bench4.jpg
 

Attachments

  • bench2.jpg
    bench2.jpg
    73.8 KB · Views: 948
  • bench3.jpg
    bench3.jpg
    69 KB · Views: 948
  • bench4.jpg
    bench4.jpg
    71.9 KB · Views: 948
  • bench1.jpg
    bench1.jpg
    67.6 KB · Views: 948
Back
Top