Workshop Design - well it's a build really.

UKworkshop.co.uk

Help Support UKworkshop.co.uk:

This site may earn a commission from merchant affiliate links, including eBay, Amazon, and others.
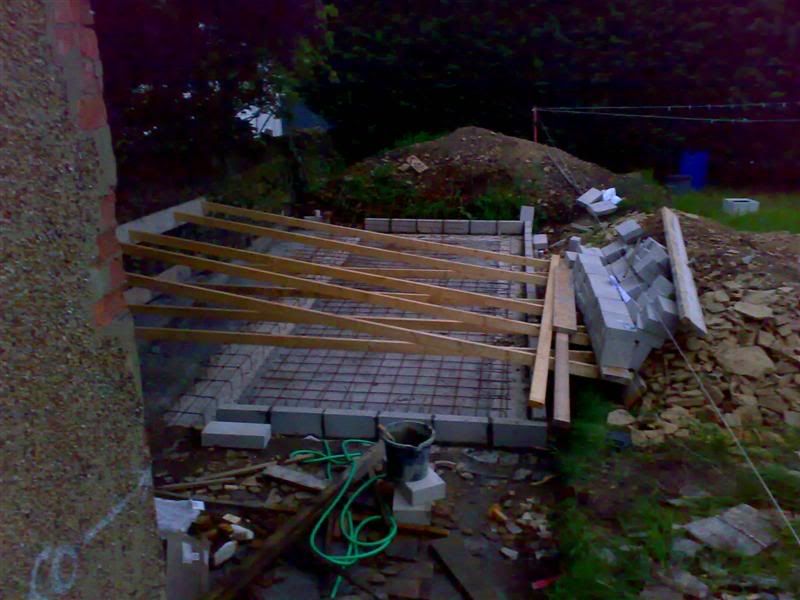
Update - replaced the engineering bricks with a combination of concrete paving blocks and the proper concrete spacers, as well a combination of eng bricks and the concrete spacers. Dug out slight too much in a few places. :oops:

B\C Inspector seemed happy with things.

Got the poker drive unit working and had it running for 30 mins or so on a few evenings - just to make sure I didn't have problems with it on the day.

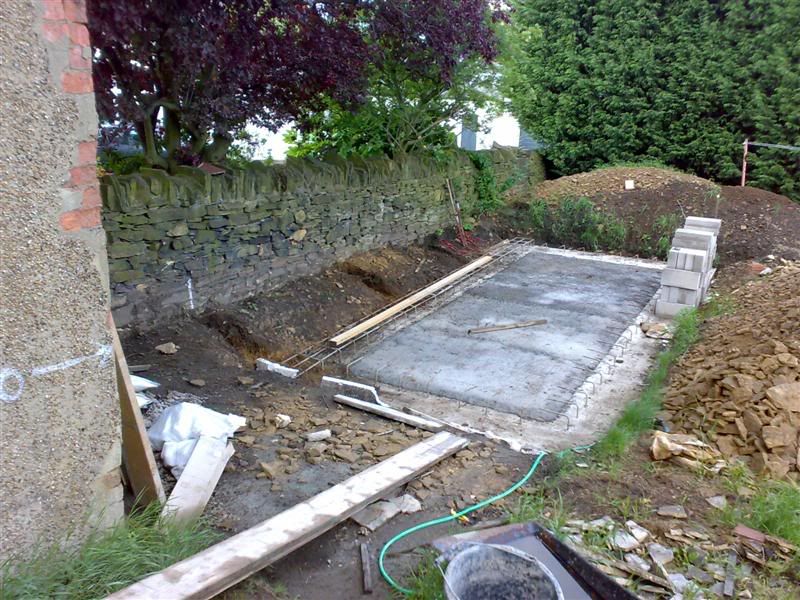
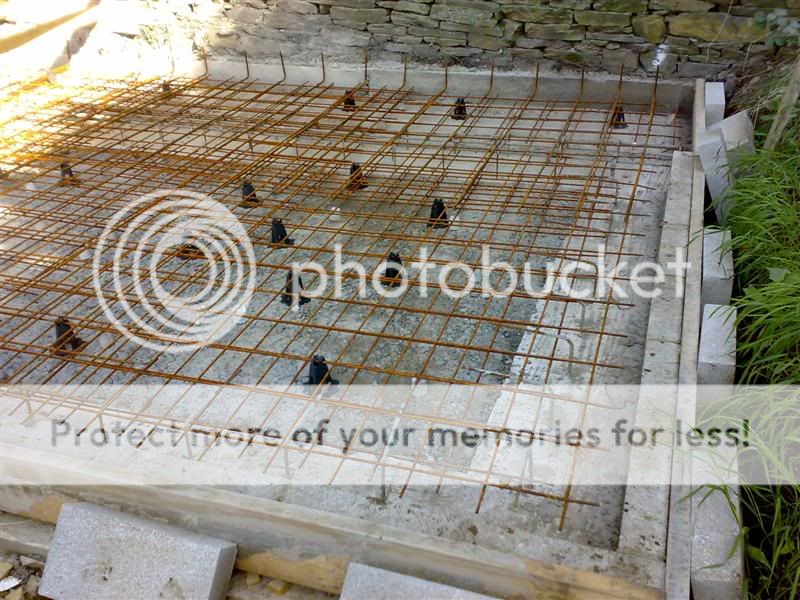
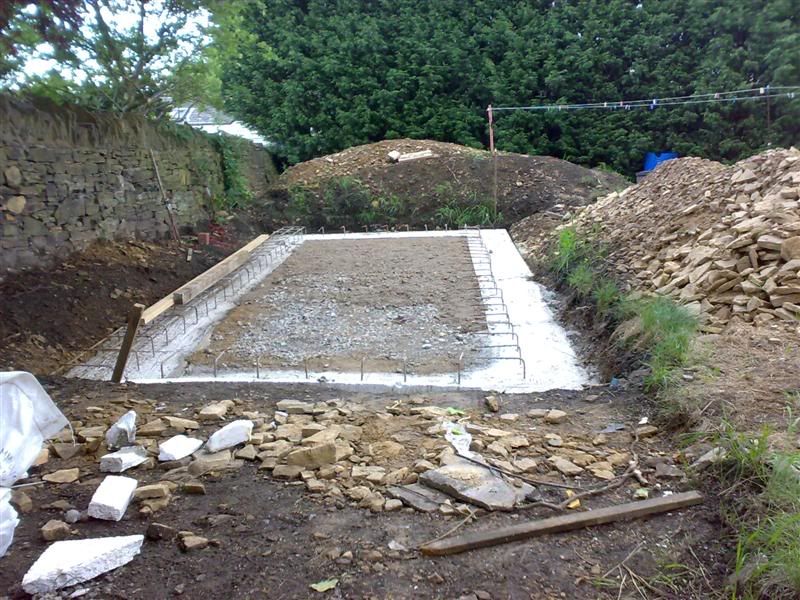
Measured the trenches multiple times in numerous places and the volume worked out to 5.8m3, at which point I ordered 6.5m3 - thinking that the trenches were hardly perfect and better to have a little over than too little.

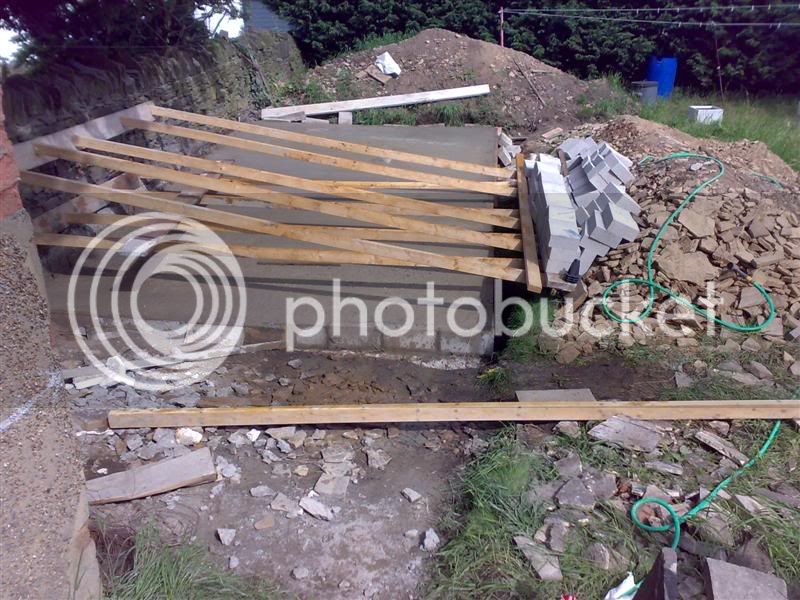
Booked the concrete pump for Sat 11am. They finished early at a previous job, so turned up at 10.30, with the concrete truck turning up 30 mins later.

All done in about 60 mins.

concrete_poured.jpg


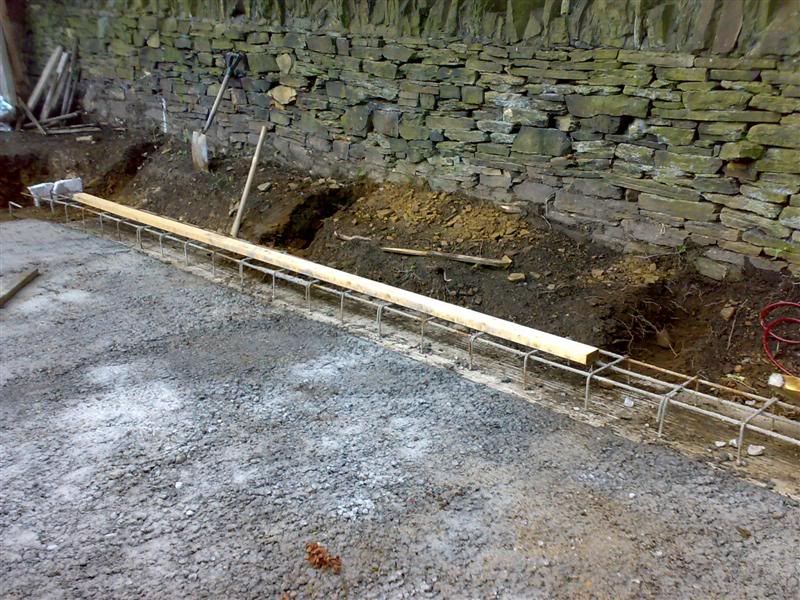
I then spent a little time vibrating the concrete and then just smoothed the surface down a little. As it was a very sunny day - sprayed it with a little water 2 or 3 times over the duration of the day.

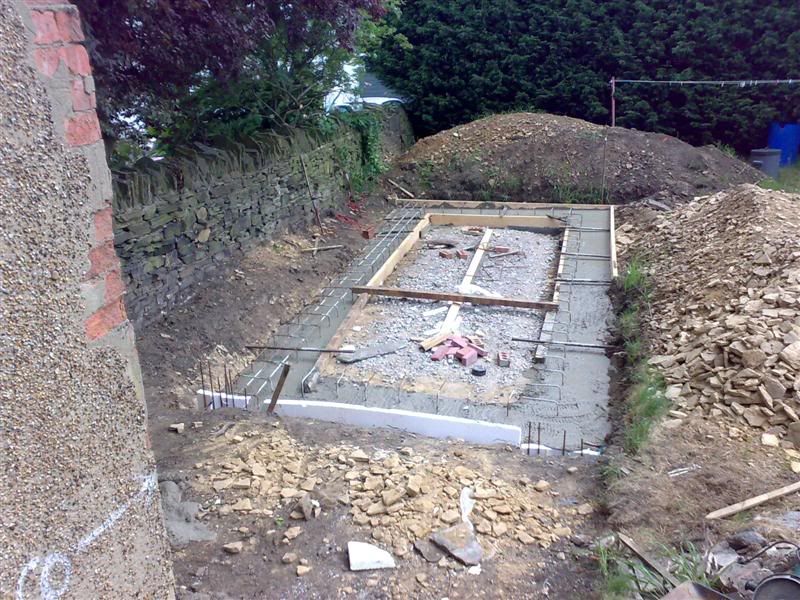
Sun - struck the shuttering. Thankfully it came away very easily - even though I hadn't applied anything to the timber.

shuttering_removed.jpg


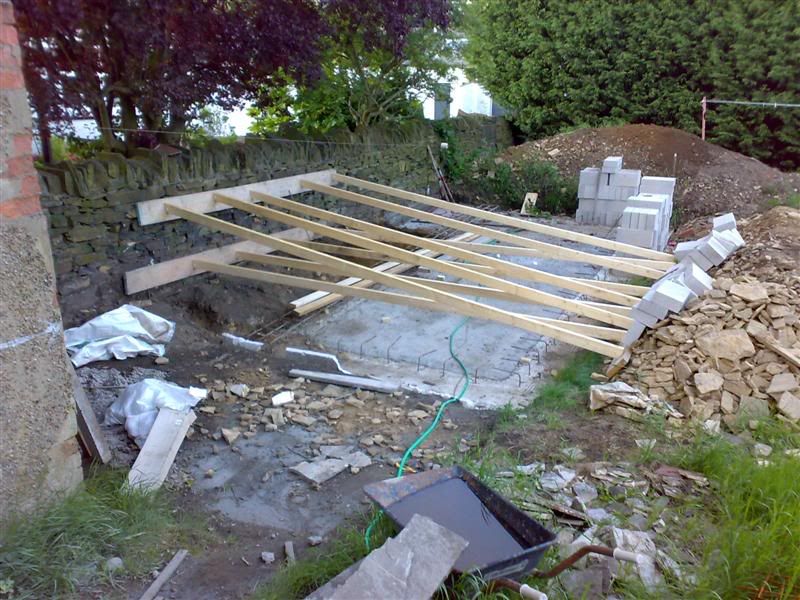
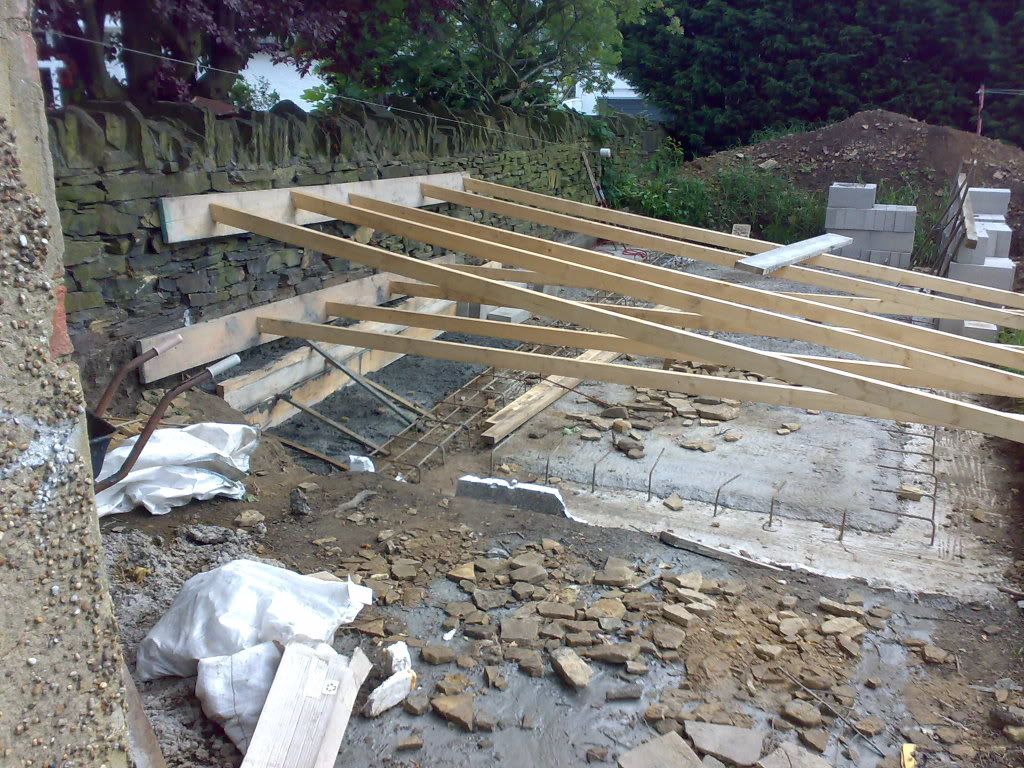
Then shifted the remaining 1m3 of type from around the front and levelled the base for the slab.

finished_beams.jpg


That's where I left it last night. Now it's just a case of digging out\down the strip between the boundary wall\ground beam for the cantilevered bit and install the mesh and lay the first course of blocks to shutter for the slab.
 
Progress - or some to be honest.

The SE wanted a layer of concrete putting down onto the hardcore - 2" was suggested and mixed on site would be fine.

Ended up laying it over a few days - just didn't have the time to do it in 1 go. Also made the mistake of taking the mixer down to the "site". It was fine getting it down there, getting it back up was something else.

Blinding.jpg


Now comes the interesting bit - effectively undermining the boundary wall as I dig right up against it. I've done a few test "digs" - at both ends and the middle of where I'll be undermining it.

Wall_test_digs.jpg


At the bottom the base of the ball is approx 6" higher than the groundbeam and at the top it's approx 18" - i.e. that's the amount by which it will be undermined.

Now the plan is to use 4"x2" as shoring back to the other "bank", 1 every metre top (i'sh) and bottom of the wall - using scaffolding boards at both ends to spread the loads.

The wall is mine, so although the neighbours might not be too impressed if it collapses and I'll have to spend money I don't want to, to have it rebuilt - but I suppose it's about measured risks.

Now the choice is to underpin the boundary wall completely - or to rely on the shoring until the slab is poured and then the return up, which will effectively be a retaining wall.

Any suggestions?

My gut feeling is to shore the wall and as I dig along the boundary, underpin it, but not necessarily in the traditional manner - but to use more drystone walling (or concrete blocks, eng bricks or whatever fits\works) to bridge the gap between the base of the wall and the subsoil.

I don't really want to underpin the full width of the drystone wall - it's almost 2 foot wide - I'm more inclined to underpin the skin on my side. Is this a goer or am I asking for trouble?
 
Dibs-h":361rgv71 said:
I don't really want to underpin the full width of the drystone wall - it's almost 2 foot wide - I'm more inclined to underpin the skin on my side. Is this a goer or am I asking for trouble?

God knows I am no expert but wouldn't that cause one side to be more solidly held in place than the other. Thus when the ground changes in moisture / moves for any reason the underpinned skin section would be held whilst the rest moved? Whilst it is a dry stone wall and thus, I guess, able to move a little within itself this would seem a bad thing from the utterly layman / silly person point of view??

Mind you digging under 2' of rubble could give it's own issues I guess - certainly the builders did everything possible to avoid digging under our foundations which are rubble unless it was absolutely necessary

Miles
 
miles_hot":2e7gb8gs said:
God knows I am no expert but wouldn't that cause one side to be more solidly held in place than the other. Thus when the ground changes in moisture / moves for any reason the underpinned skin section would be held whilst the rest moved? Whilst it is a dry stone wall and thus, I guess, able to move a little within itself this would seem a bad thing from the utterly layman / silly person point of view??

Mind you digging under 2' of rubble could give it's own issues I guess - certainly the builders did everything possible to avoid digging under our foundations which are rubble unless it was absolutely necessary

Miles

It wouldn't be a case of one skin being more rigidly held than the other. It would be a case of one skin starting lower down than the other, but still starting in the traditional manner, i.e. stone on soil.

If I don't underpin in the traditional manner (i.e. with shuttering and concrete - which would potentially make one more rigid) then the wall should still be able to move to cope with minor movements.

All advice more than welcome. BTW - I spoke in depth with the SE and after having checked the soil conditions in the 3 test holes - he was of the belief that we should haven't have any issues with the wall and any movement, but it was better to err on the side of caution - i.e. shoring and extending the base of the wall downwards.

Might do a test section - i.e. extend the wall downwards with stone as oposed to concrete - and see how it goes.
 
Did I miss it or how are you going to clear the spoil? Faced with a similar situation, we hired a tracked barrow, all the spoil went into that and it was power-barrowed out to the road, dumped, then we got the grabhire out. That meant we only manually handled the spoil the once ie from ground and into the barrow thingy.
 
RogerS":3c946yh7 said:
Did I miss it or how are you going to clear the spoil? Faced with a similar situation, we hired a tracked barrow, all the spoil went into that and it was power-barrowed out to the road, dumped, then we got the grabhire out. That meant we only manually handled the spoil the once ie from ground and into the barrow thingy.

Top soil - which is the big pile at the bottom of the site, that's staying. It'll just be spread around and should get rid of the undulations in the garden.

The rest - 2 choices. 1 keep them or gid rid of them.

The garden is unlevel - I suspect somewhere in the region of 0.5m lower at the bottom, so the likely plan will be to scrape the topsoil from the bottom half of the garden, spread the rest of the spoils around, compact it and then spread the topsoil back.

If for whatever reason the spoils have to go, then at the bottom of the garden, at the other corner, there is a 5-6 foot gap in the leylandii and a drop of 5 feet into the playground of the private primary school. I think the headmistress (& owner) would be ameniable to a skip or 5 being placed there and filled from my side. Would be easier than going up 5 steps and then along the drive.
 
Dibs
Do you have to undermine the wall at all?
You obviously have to dig away soil up to the wall to create the space for the cantilever, but why go excavating in under the wall?
The limited amount of soil thats left adjacent to the wall is doing little or nothing to support it now, so digging it away should present no problem, but you could brace the wall as suggested for peace of mind. If your trial digs and SE suggest the ground under the wall is well consolidated then in space of time it takes you to get the concrete in should not affect the wall.
Then prepare the site for the cantilever and pour the concrete right up against the wall.
No? Have I missed something?
 
trousers":33zvoccw said:
Dibs
Do you have to undermine the wall at all?
You obviously have to dig away soil up to the wall to create the space for the cantilever, but why go excavating in under the wall?
The limited amount of soil thats left adjacent to the wall is doing little or nothing to support it now, so digging it away should present no problem, but you could brace the wall as suggested for peace of mind. If your trial digs and SE suggest the ground under the wall is well consolidated then in space of time it takes you to get the concrete in should not affect the wall.
Then prepare the site for the cantilever and pour the concrete right up against the wall.
No? Have I missed something?

Bizarre just how exactly it turned out like your post.

I placed a scaffolding board at the top of the wall - just below the tops and length of 8"x2" at the base of the spoils (come in handy for something) and then rammed in lengths of 4"x2" every metre or so.

Spoils - That's the mixture of clay and stone out of the trences and not the topsoil. I also plan to place a load of concrete blocks at the base of the shoring.

Will do similar at the base of the wall this evening.

The bottom 1/3 of the wall, it's base appeared barely 6" inches above the level of the ground beams, so dug out the soil next to the wall and laid sown some Type 1.

bottom_section.jpg


Tamped it down with a tamping tool that Wickes sell - weight of a medium sledgehammer, but with a 6"x6" square base.. Didn't want to risk getting the trench rammer out and affecting the wall.

Laid a bed of 2" concrete down and then placed some shuttering against the wall and poured in about 2" thickness (8" high) of concrete. I doubt the 2" of concrete will do much from a structural perspective, but should give it some protection from the sun and rain. The slab and cantilever is likley to be poured on the 1st Sat of August, so almost 2 weeks.

I've got to get the mesh down "L" bars for the cantilever and the 1st course of blocks down (to also act as the shuttering for the slab).**

Assuming the weather is ok this eveing - looking to repeat the same on the middle third of the wall.

One decision I have arrived at - the drystone wall runs the full length of the garage\workshop - is that the 6m or so of wall alongside the garage basement will be dismantled prior to that bit being built.

It'll add a little time and expense to the build but the wall isn't straight and has been affected over the years by next door increasing the soil level on their side. This should also make life easier digging out for the basement under the garage.

I forgot to take some pictures of the shoring etc. I'll post some more up tomorrow, after this evening's exertions.

** - any tips\advice most welcome. Never laid a block in my life.
 
Dibs
I assume you are laying 1 course of 100mm conc blocks upright (ie 225 high)?
As it's below DPC your mortar should be 4 parts sand to one of cement. Mix with water and a plasticiser (from builders merchant) to a consistency that will almost stay on your trowel when you tip it up. Remember, when the mix is turning in the mixer, the longer you leave it turning, the runnier it will become. Don't mix too much more than you can sensibly use in a couple of hours.
Lay a block at each end of the concrete (assuming you've set out where your corners are going to be) and run a line between them. Fill in the rest of the row using the (tight) line as a guide for straight and level.
Easy innit :D
 
trousers":3tgv8mcr said:
Dibs
I assume you are laying 1 course of 100mm conc blocks upright (ie 225 high)?
As it's below DPC your mortar should be 4 parts sand to one of cement. Mix with water and a plasticiser (from builders merchant) to a consistency that will almost stay on your trowel when you tip it up. Remember, when the mix is turning in the mixer, the longer you leave it turning, the runnier it will become. Don't mix too much more than you can sensibly use in a couple of hours.
Lay a block at each end of the concrete (assuming you've set out where your corners are going to be) and run a line between them. Fill in the rest of the row using the (tight) line as a guide for straight and level.
Easy innit :D

Yes it will be 1 course of 100mm conc blocks upright.

Plasticiser - I think I've seen the stuff in Wickes, will get some. Is it just for below DPC or the lot?

Setting out - the ground beams are slightly oversized, so will probably set out the corners later in the week.

Mix - I have a Belle minimix 140, so the max amount one can mix is about 4 buckets of sand and 1 of OPC. How far do you think that would go and how long would it stay workable? Might start off with half a load and see how that goes.
 
Use plasticiser for all your blockwork. Use 6 sand/1 cement above DPC.
4 buckets of sand/1 bucket cement is about a barrowfull. I should start with half that and see how you get on. Less waste when it Zilch-Wedlock down just after you start :roll: The stronger the mix the faster it will go off.
Set out your corners first, as you say, and check everything is right for square (check diagonals, etc) and for level. Use pegs and string to help you see where the blockwork is to go.
If you start right you will carry on alright. Its all in the preparation.
 
trousers":2ri61iew said:
Use plasticiser for all your blockwork. Use 6 sand/1 cement above DPC.
4 buckets of sand/1 bucket cement is about a barrowfull. I should start with half that and see how you get on. Less waste when it Zilch-Wedlock down just after you start :roll: The stronger the mix the faster it will go off.
Set out your corners first, as you say, and check everything is right for square (check diagonals, etc) and for level. Use pegs and string to help you see where the blockwork is to go.
If you start right you will carry on alright. Its all in the preparation.

Your advice is much appreciated. I'll have a bit of a ponder on the setting out this evening as I'm digging out along the boundary wall (middle 1/3) and adding the extra bit of shoring.

Part of me is thinking that I should have done the 1st row of blocks prior to putting the shoring in place as it will slightly impede access to the gardenside wall.

However the shoring is at least 18" above the groundbeam and is only along 5m (out of 7.5m) of the length and there is reasonable space to move around - so might just leave it. Besides good weather might be in short supply and as it looks ok this evening will just carry on.

When I've set out (or attempted to) I'll post a few piccies - just to make sure things go to plan. :shock:
 
Update.

Shored up the wall as best as I could,

shoring.jpg


Perhaps a bit overboard or under board - but it seems to be holding. Lets just say the headphones stayed in the house whilst I dug upto the drystone wall.

Repeated the process on the remaining 2/3 of the wall - that was done to the bottom end, i.e. lay 2" of concrete down, shutter up against the exposed soil and pour 2-4" of concrete.

excavated.jpg


Will strike the shuttering tonight, move the piles of block sitting on the groundbeam, clean up and dry lay one course of blocks down to see the levels etc. Not to mention - try and set out. If all goes well - lay down the blocks Tues evening proper.

Then hoping to get the mesh in place Wed\Thurs evening and get the slab poured on Sat am. I am so looking forward to no more bleeding digging! For a while anyway.

I'll definitely post up some pictures after tonight's little exertions - better have any mistakes pointed out 1st rather than after the blocks go down proper.
 
Update: Got the 1st course of blockwork in place and mesh (some) roughly in situ.

The setting out took bloody ages - especially when you are on your own and have to walk round the whole lot - shoring gets in the way sometimes.

1stCourse_complete.jpg


I had string lines all over the place - running down the sides, tops - everywhere. The diagonals where about 5mm different to each on over 8m. I decided to leave them at that.

1st_course_1.jpg


The bits from the blockwork to the boundarywall - I'm going to shutter that.

You might notice - I had the lines around the corners - so the corners got done last. Bit unorthodox but seemed to work.

Now there is a slight little issue - the surface of the ground beams is not perfectly level. The bottom end of the site is approx 20mm lower than the top with the discontinuity occuring in the middle. Didn't spot that till half the long side of blocks were down.

I should be able to loose this in the next several courses. The concern is that if nothing is done now, when I pour the slab on Sat - this discontinuity will also be transferred to the slab as the blockwork will end up being used to level the slab.

Any suggestions?

My 1st idea is to mix some more mortar (4:1) and lay a bed (upto 20mm) where required and level it off. That should set by tomorrow (when the concrete is being poured) and then if I use the top of this to level the slab - there shouldn't be an issues. If I do this - when laying the next set of courses - will there being any issue with a bed of mortar between 2 adjacent courses being so thick, i.e. 20mm + 10mm?

Idea 2 was to lay something ontop of the blockwork where necessary - say some 3"-4" wide timber, having run it thru the bandsaw to give me that wedge shape (I suspect only 3m max should be req'd). Which will allow me to level the top of the slab but then remove this timber and then lose the "unlevel-ness" in the blockwork in the next 2-3 courses.

Timewise I suspect both approaches would take me the same length of time.

This evening - cut the mesh to length\width and fit. B\C is popping round this lunchtime. The steelwork isn't entirely complete, but the concrete is happening no matter he says - I'll take some pictures for him.
 
Dibs

Is the slab going to be the finished floor? If not, are you are going to put a sand and cement screed on it with a damp proof membrane between? You could achieve level when you screed it in that case, and not worry too much now, just adjust the blockwork level over the first 3 or 4 courses as you build.
Another suggestion, buy a set of brick pins and a line (cheap). When you do your blocklaying, you must get into the swing of building the corners up first, upright with a spirit level (and level across to the other corners). Use the line stretched between the top of the corner blocks to guide you when you fill in the rows.
Sorry if you already know this.
 
trousers":v7g3u82l said:
Dibs

Is the slab going to be the finished floor? If not, are you are going to put a sand and cement screed on it with a damp proof membrane between? You could achieve level when you screed it in that case, and not worry too much now, just adjust the blockwork level over the first 3 or 4 courses as you build.
Another suggestion, buy a set of brick pins and a line (cheap). When you do your blocklaying, you must get into the swing of building the corners up first, upright with a spirit level (and level across to the other corners). Use the line stretched between the top of the corner blocks to guide you when you fill in the rows.
Sorry if you already know this.

All advice is more than welcome!!

Yes an internal screed is going down over some insulation and membrane.

After having thought about it for a bit - the easiest solution is to place some timber (8"x2"), that I used previosuly as shuttering and will screw it to the outside of the long side from 1/2 waydown, to the bottom and along the bottom end - 1" or so higher than the blockwork.

This will give the me the correct level needed - so the concrete will breach the blockwork where the top of the blocks is about 1" too low. Then tamp down to that.

God - I'm shattered from laying all the mesh down. Had to trim the concrete that I shuttered against the base of the boundary wall - when I realised that there was nothing on that side to use as a reference when leveling the slab. Will be up at the crack of dawn to tie the mesh to the Z bars in the ground beams and tie the L bars for the return up (at the boundary wall). Not to mention the shuttering.

Concrete\pump is booked for 10:45.

Any advice for the slab interms of tamping\finishing off?
 
Dibs

Really think you're worrying about the concrete level too much.
You are only going to be able to move around 3 sides of the pour anyway, and with all that propping in place you are going to struggle to finish the concrete any sense before it starts going off, especially if you are on your own.
I would get it tamped up as best you can up to the height of the blockwork as it is.
As well as having to faff around screwing timber to your blockwork, remember that concrete contains 20mm aggregate (unless you've specified otherwise) and you will be attempting to finish over the top of the blockwork if you do it your way from 25mm down to nothing. Very difficult to do, as the larger stones won't go and you will be left with thin cement which will dry v quickly as the blocks suck the water out, and will therefore weaken it and it will easily crack away.
You can adjust the floor level with your screed later on.
 
trousers":2oo7oy00 said:
Dibs

Really think you're worrying about the concrete level too much.
You are only going to be able to move around 3 sides of the pour anyway, and with all that propping in place you are going to struggle to finish the concrete any sense before it starts going off, especially if you are on your own.
I would get it tamped up as best you can up to the height of the blockwork as it is.
As well as having to faff around screwing timber to your blockwork, remember that concrete contains 20mm aggregate (unless you've specified otherwise) and you will be attempting to finish over the top of the blockwork if you do it your way from 25mm down to nothing. Very difficult to do, as the larger stones won't go and you will be left with thin cement which will dry v quickly as the blocks suck the water out, and will therefore weaken it and it will easily crack away.
You can adjust the floor level with your screed later on.

I know what you mean - sometimes I have to stop and remind myself that it isn't an engineering project or woodwork. :oops:

I got up and out for 07:00 which is totally not me. In the end I didn't screw any timber to the block - it just kind of wedged in there nicely, along with a few blocks behind it to hold it there.

I'd worked out 5.6m3 of concrete yesterday, so when Lafarge rang up this morning to confirm I asked them to up it to 6m3. Everything was booked for 10.45am. Imagine my suprise when the truck turns up at 10.30 and no pump, but thankfully it turned up minutes later and they got going.

The initial look on the guys face indicated they weren't too happy about the shoring being in the way - but soon cracked on. I was raking the concrete about.

At the end almost came a cropper - last 1m2 to do and the truck driver says no more concrete. Bullocks!

Thankfully there was about 2 barrows worth in the pump hopper and after we had levelled the rest - actually ended up with 1 barrow left. Feel somewhat relieved that I'd increased the order to 6m3 - otherwise I would have run out.

A mate came round and between the 2 of us - tamped it relatively smooth.

I'll post some piccies on Monday - the USB cable for the phone is at work.

Now off to have a shower and have breakfast\lunch and tea in one and do all the weeks chores that I've been putting off and then enjoy the rest of the day. Especially as the wife & children are still in Brum at her folks. Well at least till I go down tomorrow to collect them.

I feel so relieved that the slab has been poured - I really was starting to get a bit disheartened thinking have I bit off more than I can chew and this will be like a prison sentence - bloody never end. But now that the slab is down - I can see the light at the end of the tunnel. Or at least until the garage\basement bit starts. :shock:

Really appreciate all the advice!!!
 
Below are some pictures. 1st one is of the steelwork all in place and wired together,

steel_in.jpg


That was finished at around 10:00 on Sat morning, and you can just see the shuttering wedged in place at the bottom of the site. The black spacers are for the top layer of mesh and concrete spacers were used for the bottom layer of mesh. Total slab depth is somewhere around 7" on average.

And here's the final one - all poured and tamped (to a reasonable level),

slab_poured.jpg


Word of advice - never work in the sun without drinking L's of water. Towards the tail end of the tamping the back of the thighs cramped a few times but I survived. At 10pm whilst out with some friends - both inner thighs cramped for over an hour - agony is putting it politely. So very little will be happening over the next couple of days.

Plan of action for the next bit is to lay down a course of 4" coursing blocks and then the DPC. I'm ultimately looking to lay 2" (or 40mm) of kingspan and then a 50mm screed - coming to just under the DPC. Then cary on with the normal sized blocks. Which matches nicely with a return up the boudnary wall of approx 13", which will not affect the subsequent courses.

As the return is about 1/3 of a m3 - probably mix that on site.

Edit - just realised that coursing blocks aren't 4" high. So slight re-think required.
 
Dibs

What are you going to use for a dpc over the slab, and where are you going to position it?
 
Back
Top