What did I do wrong? (Wood movement)

UKworkshop.co.uk

Help Support UKworkshop.co.uk:

This site may earn a commission from merchant affiliate links, including eBay, Amazon, and others.

lua

Member
Joined
4 Sep 2016
Messages
10
Reaction score
0
Location
Suffolk
I wanted to create a worktop from a number of glued boards, so purchased some PAR pine (44mm x 95mm). The piece would be 1.6m long, and made from 6 boards glued up. Having recieved the timber, it looked pretty straight, and there wasn't much cupping when I placed a straight edge against it's width. I then left it a week in my garage for it to settle with humidity (not sure if this was required as it only came from down the road :p).

After that week I came back to start work on it, I checked the wood again and it was still about the same as before in terms of squareness. Laying the pieces freely on a flat surface, I noticed there were large gaps along the length between boards (about 4mm in some cases), but they all came out with enough clamping pressure. After the glue up, I unclamped everything and was happy with the results, the piece as a whole was pretty flat, it wobbled a bit, but not much. As some boards were slightly thicker than others, there were steps, so then set about going over it with a belt sander to bring it all to the same thickness. At this point, I was happy with what I had, but unfortunately, it would be 6 weeks before I came back to this project and in that time it was left on a flat surface in the garage.

Having come back to it six weeks later, it's a mess :( ... Every board has cupped along the width, and the thing as a whole is all wonky. If I lay it on a flat surface, I can just about get my finger under it!!!!

It looks like this.

Untitled-2.png


What did I do wrong? If I hadn't of taken the six week break, I would have finsihed it and installed it thinking it was all ok only to find this six weeks later :(

I don't know what I'll do with what I have, can it be saved?
 

Attachments

  • Untitled-2.png
    Untitled-2.png
    186.7 KB · Views: 389
You don't have to have done anything wrong to experience a problem like this, it could easily be entirely the fault of the wood. Since you had 4mm gaps that needed to be closed up using clamp pressure that won't have helped though. Board edges should be jointed to make them mate as closely as possible, the goal being to have no gaps at all (unless you've deliberately planed a slight hollow).

lua":2xmvtsgs said:
I then left it a week in my garage for it to settle with humidity (not sure if this was required as it only came from down the road :p).
Yes it can be. It's not the climate that's the only factor, it's how dry or damp your garage or work area is compared to where the wood was stored.

It's possible the wood might have reacted better if you'd acclimated it for longer, two weeks or so, but with modern pine being so crappy there's no guarantee.

lua":2xmvtsgs said:
I don't know what I'll do with what I have, can it be saved?
I don't know if there's any other way than sawing it apart, jointing the edges and glueing back together.
 
You havent done anything wrong, the problem has been caused by the softwood having moisture content that is too high.

Timber shrinks mostly in a tangential direction, ie around the growth rings. The boards have shrunk as they attain equilibrium moisture content. Because the boards have shrunk mostly in a tangential direction, which shows itself as a cupped board, the angle at each glue line has altered significantly causing the extreme movement of your top.

The best solution is to saw, flatten, acclimatise in same room where the finished top will live, then reglue.

Weve had some quite hot days recently, does your garage get baked in the sun?
 
lua":3uvb6hry said:
in that time it was left on a flat surface in the garage.

Ideally it should have been left "in stick", i.e. propped up on sticks to allow air to circulate to all surfaces. Although judging from your excellent photos I suspect that probably wouldn't have helped much, it looks like your boards just weren't ready to be worked.

I guess this isn't what you want to hear, but the truth is it might be better to simply buy a ready made worktop.

Jointing up a top and doing it really well is quite a tricky operation, there are a lot of steps in the process and getting any of them wrong can ruin the job. Step one is to have good quality timber that you're confident is dry and straight enough for the task, to be honest many people won't clear this first hurdle.
 
Two things might have helped avoid the problem
1. As custard stated, raise it off the bench to allow air to circulate around it. The sticks should be out of the same material.
2. Don't let it get exposed to direct sun light or any heat source. Sun is terrible for getting boards to move!

There is an old trick that sometimes works. You need to make some cowels to clamp the work top flat. Lots of them and lots of clamps.

Now with a paint brush, brush water onto the inside of the cup of each board and then clamp. Every day re brush water onto the inside of the Chis and then leave for a further week. With luck it will flatten out enough to plane flat again
 
Another solution is to rip each piece again, so you have eight lengths. It means jointing all over again and twice as many joints, but it sometimes works. Narrower pieces make planing out cupping much easier, if you don't mind the narrow board pattern afterwards.

The best solution, next time you do a job like that, is to examine the boards when you buy them. Choose boards that have (as near as dammit) centerboard or 'quarter sawn' growth rings (I.e. Short and lying as near vertical as possible, across the end grain, rather than displaying the rings as you have there. Even with inexpensive pine you can find boards like that. You can still invert the boards as you did. Flattening then would be a comparative breeze.

HTH

John
 
Thank you for the replies.

It wasn't left in direct sunlight, it was left in a garage with no windows. As for it getting hot in there, I've never really sensed it to be any hotter than outside, and as there are no windows and the door was shut the whole time, I don't think it would have been baking like in a car for example, but not sure really, I'll have to check that.

I'll definately try to pick out straight grain boards next time, although I got this delivered as I don't have suitable transport. Do most timber yards allow you to pick a specific set of boards and then store them away for delivery?

I want to try again though, as I want this to be a hobby. I think I'll scrap the current mess. Based on the results I got this time, and assuming that next time the grain still isn't straight, should I instead glue them all up the same way (cups facing same way I mean)? I know the recommend way is as I did it, but looking at the results, if I do it the other way, surely I would get more thickness after planing flat? and of course less material to remove?

Untitled-2.png
 

Attachments

  • Untitled-2.png
    Untitled-2.png
    90.6 KB · Views: 304
No, you still flatten each piece so the waste would be the same, but with alternating the heartwood side it helps one piece to counter the other. If the heart is on the same side of all of them, any future movement is likely to be all in the same direction, so you end up with a shallow curve rather than a slightly wavy edge.
 
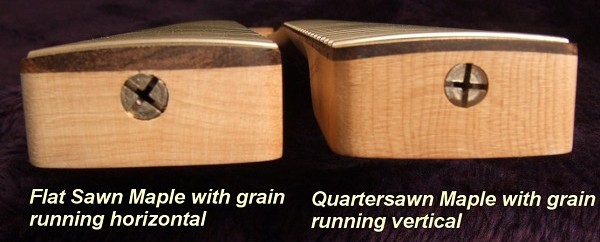
As someone just getting acquainted with all the terminology, and in reply to John (benchwayze) - does the image below illustrate what you mean by the best sort of end grain for laminating boards together like this? As I will one day be making myself one of the Paul Sellers workbenches, I hope!

maple%2Bneck.jpg
 
NickN":usez26ux said:
As someone just getting acquainted with all the terminology, and in reply to John (benchwayze) - does the image below illustrate what you mean by the best sort of end grain for laminating boards together like this? As I will one day be making myself one of the Paul Sellers workbenches, I hope!

maple%2Bneck.jpg

Not that well tbh, here's a better example of grain directions and how they move:

harmoniousgrain_illustration1.jpg


3119cd19c0f33f5a436504782746f020.jpg


Having said that, here's a photo of one of three flat boards I have just recently made with basic pine that was sticked and stored for several months outside, but sheltered from weather.

IMG_20160904_210655-400.jpg


You can see they are all flatsawn and orientated the same way - this was because I visually preferred each of the topsides, had I preferred one of the other sides I would have alternated them. The eagle eyed among you might spot they have been through a thicknesser, but that was purely to make them uniform thickness for ease of glue up and barely took off a couple of mm.

However to ensure stability this is how they were glued up and left for a week indoors before removal from the cauls. (they did have clamps on, only removed moments before photo)

IMG_20160821_191133-400.jpg


Since removal a week later, they have stayed uniformly flat. Even with a liquid finish being applied.

So as long as certain precautions are taken it is possible to use wood with grain other than quartersawn and still get good results, and shouldn't be a reason to disregard what's available.
 

Attachments

  • harmoniousgrain_illustration1.jpg
    harmoniousgrain_illustration1.jpg
    26.3 KB · Views: 246
  • 3119cd19c0f33f5a436504782746f020.jpg
    3119cd19c0f33f5a436504782746f020.jpg
    16.2 KB · Views: 246
  • IMG_20160904_210655-400.jpg
    IMG_20160904_210655-400.jpg
    9.2 KB · Views: 240
  • IMG_20160821_191133-400.jpg
    IMG_20160821_191133-400.jpg
    8.8 KB · Views: 239
I assume that the whole thing can still twist even with cauls though? So I guess keep an eye on it using winding sticks, and if the clamped setup does begin to twist, clamp the whole thing down to a flat surface?

Also, is it a good idea to keep the whole thing clamped up until you actually to need install? to alleviate chance of it warping before installation?
 
PAR is only for bodging where it won't be noticed much. It always moves. For a table top you need definitely dry sawn stuff which you leave a bit to acclimatise and only then plane square.

Do most timber yards allow you to pick a specific set of boards and then store them away for delivery?
Not necessarily a good idea. A good yard will supply stuff to known specification and not allow you to sort through stuff, though you can of course reject it if it isn't up to spec.
If you can select from the pile then the best bits may have already been taken.
 
Jacob":1agk8ohn said:
PAR is only for bodging where it won't be noticed much. It always moves. For a table top you need definitely dry sawn stuff which you leave a bit to acclimatise and only then plane square.

Do most timber yards allow you to pick a specific set of boards and then store them away for delivery?
Not necessarily a good idea. A good yard will supply stuff to known specification and not allow you to sort through stuff, though you can of course reject it if it isn't up to spec.
If you can select from the pile then the best bits may have already been taken.

I don't have a planer, but this would be a good excuse to pick one up. Considering the boards are 1.6m in length, what kind of planer bed length would I need (or get away with)?
 
Hi Lua - (apologies for taking awhile to respond) - rather than just a planer, if you can stretch to it or wait it out a bit longer a planer thicknesser will give you much more for your money - a good older secondhand one (maybe even from a seller here) ideally.

As for bed length it should be irrelevent in theory, because there are techniques to remove issues like cup, twist and bow. It's also possible to make up infeed / outfeed tables to deal with the sort of lengths you might anticipate.

If you buy a planer thicknesser, you can always make a sled for the thicknesser (as I have for mine) to take longer lengths, and to add support for issues, so the only limitation then is making sure the wood isn't so long it has a chance to tip and catch the blades while going through if you work alone.

The only main concern for either a planer or planer thicknesser - apart from budget - is how WIDE you wish the blades, and I would personally recommend getting the widest you can afford, because a decent one won't be that cheap several hundred at least but not that much cheaper than a model with wider blades. Ignore the 6 inch breadbox versions, from what I've read unless you get a top of the line model they are only good for rough site work and not much more, and you'll be knocking on the door of the cost of a more traditional style one by then anyway.

Edit - this one in the "for sale" section would be a very good way to start - record-pt260-planer-thicknesser-t100048.html

And you might be able to use a transport website like Shipley to get it to you.
 

Latest posts

Back
Top