Say Hello to Alex....

UKworkshop.co.uk

Help Support UKworkshop.co.uk:

This site may earn a commission from merchant affiliate links, including eBay, Amazon, and others.

jimi43

Established Member
Joined
12 Mar 2009
Messages
6,921
Reaction score
13
Location
Kent - the Garden of England
I've been on the slopes again.... :oops:

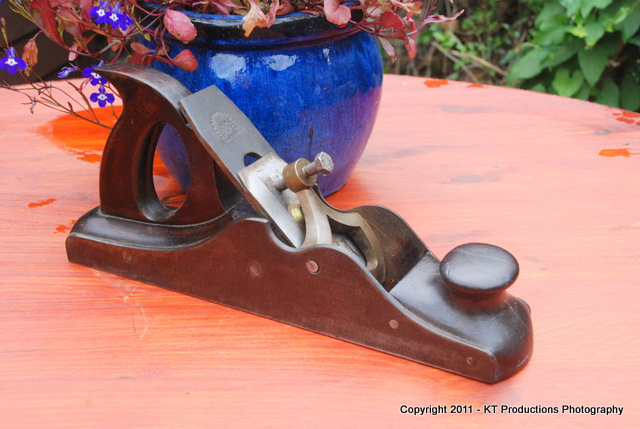
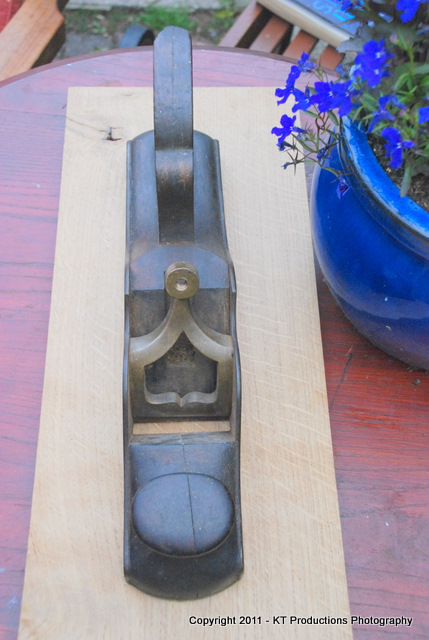
Let me introduce you to Alexander....

DSC_0317.JPG


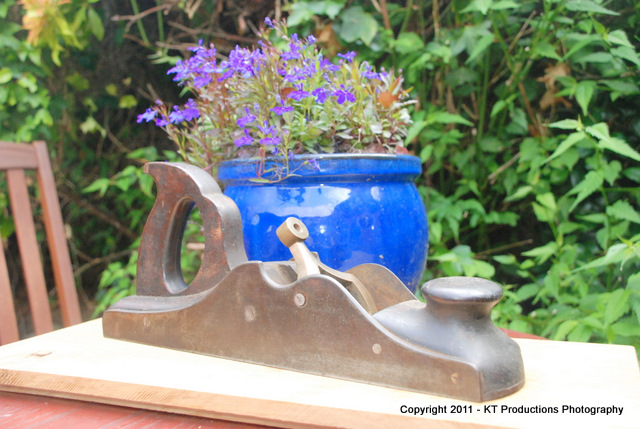
Following along from my traditions of naming my little infills...this one is named in honour of one of the finest master planemakers of the infill generation...Alexander Mathieson (Glasgow and Edinburgh).

Also my wont....is to get basket cases for a tad less than market value and sort them out...I hate to see a fine piece of history disappear in a pile of rust!

DSC_0318.JPG


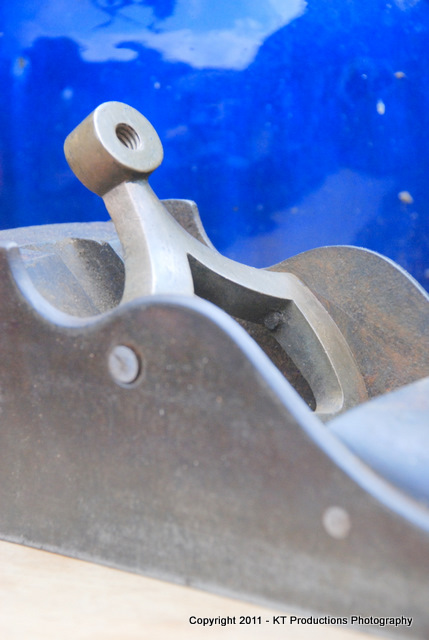
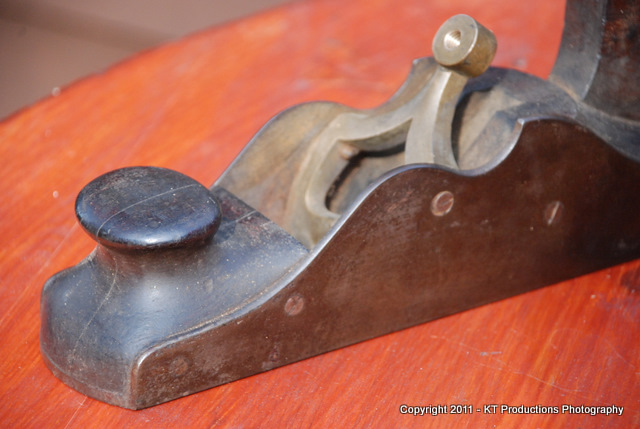
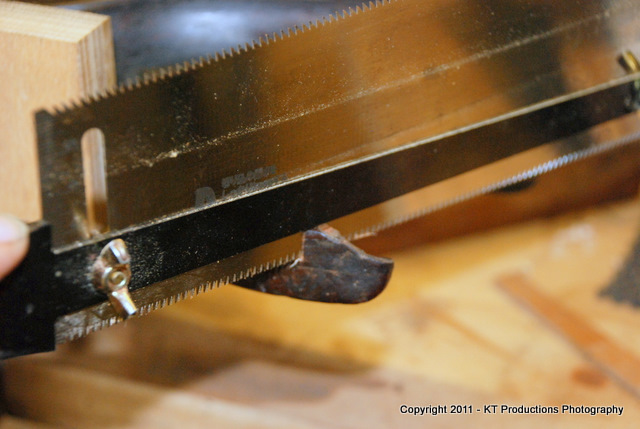
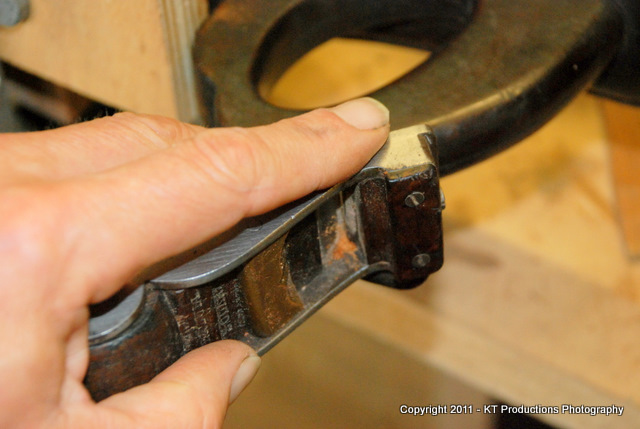
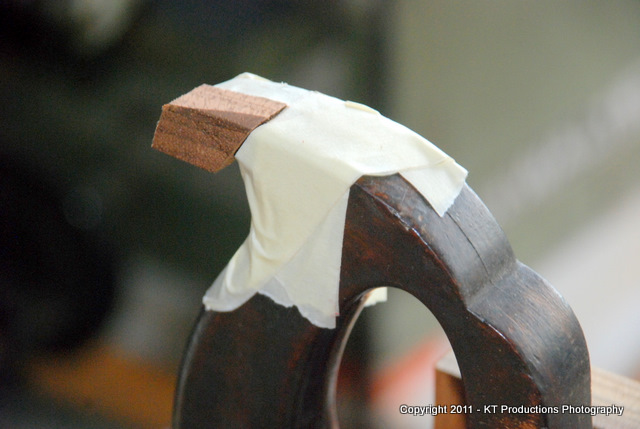
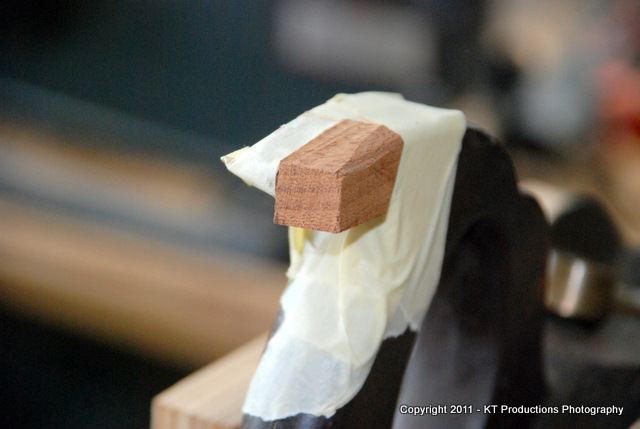
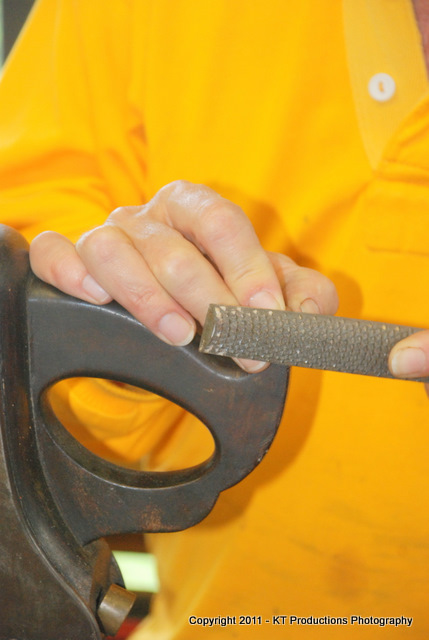
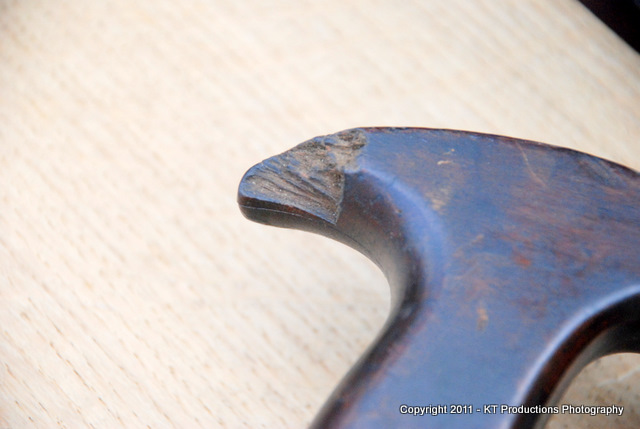
I seem to be plagued with missing lever cap bolts...here we go again!

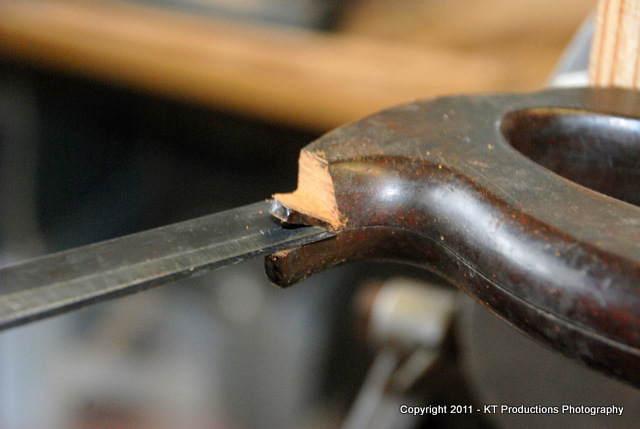
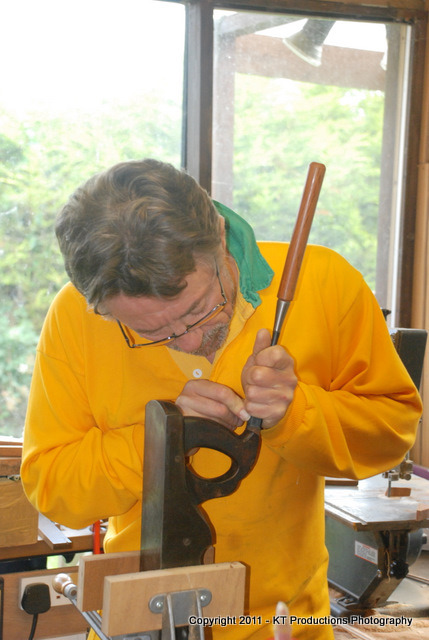
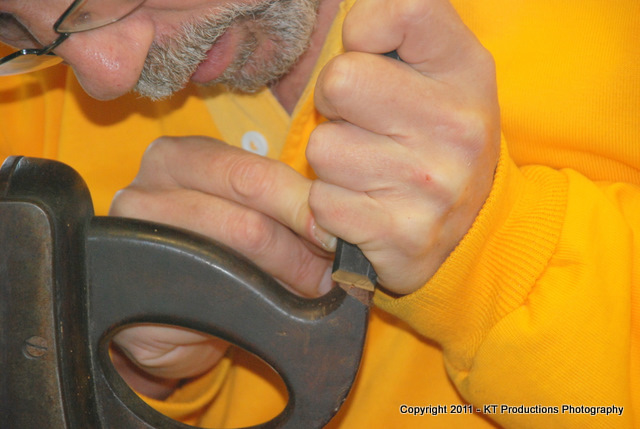
And remember that little Robert Sorby saw with the nick out of the handle...

DSC_0323.JPG


...yup...you guessed it...same old problem! Well...at lest this time I've had some practice!

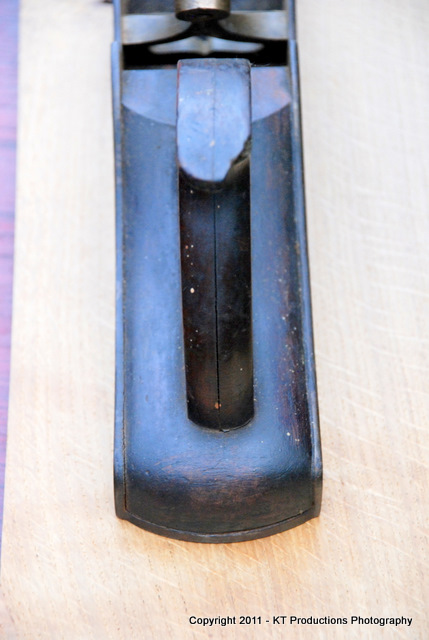
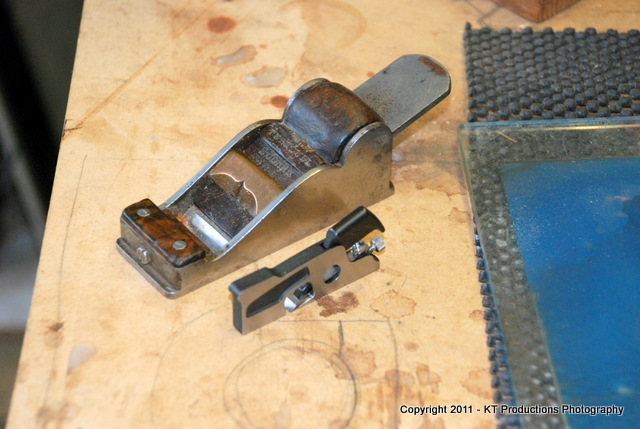
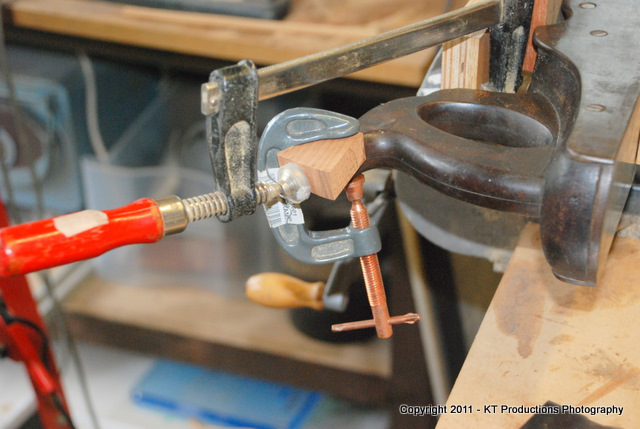
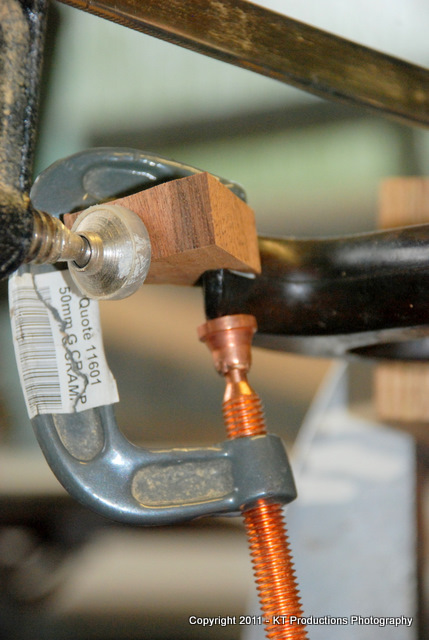
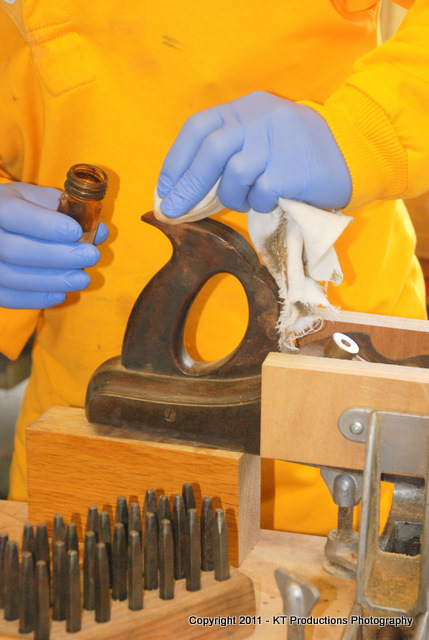
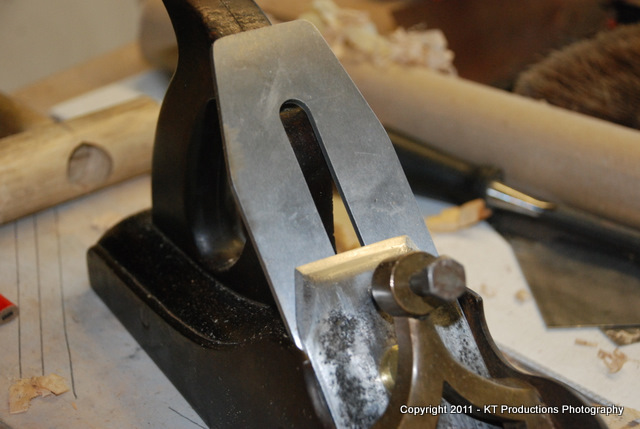
The iron is missing...so that means another visit to the kiln...I might hit this one with a 4mm 01 job...it's a bit meatier this old boy...being 13" 1/2" from tip to elbow...a panel plane.

DSC_0320.JPG


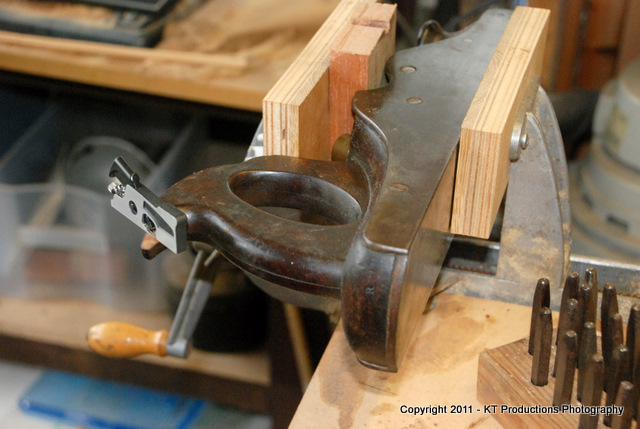
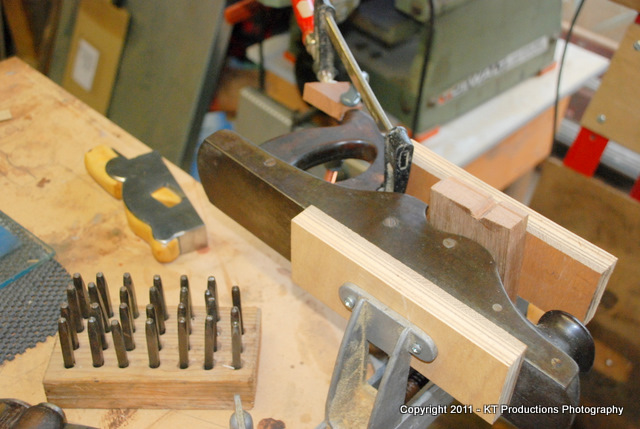
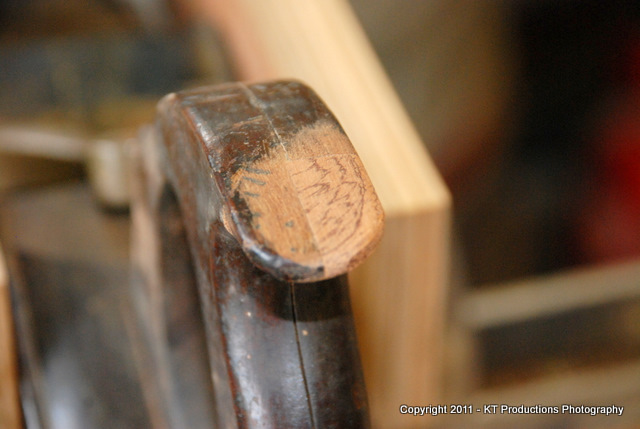
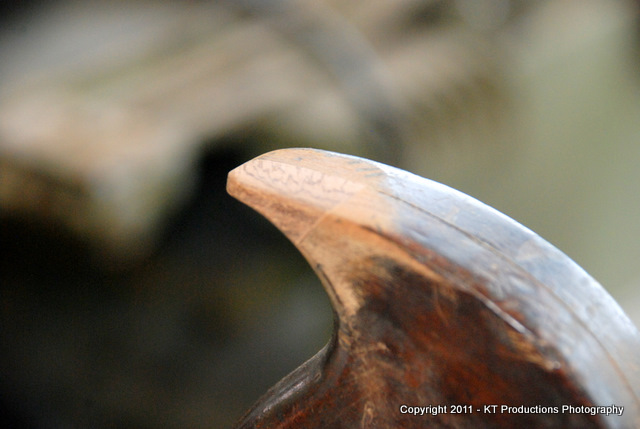
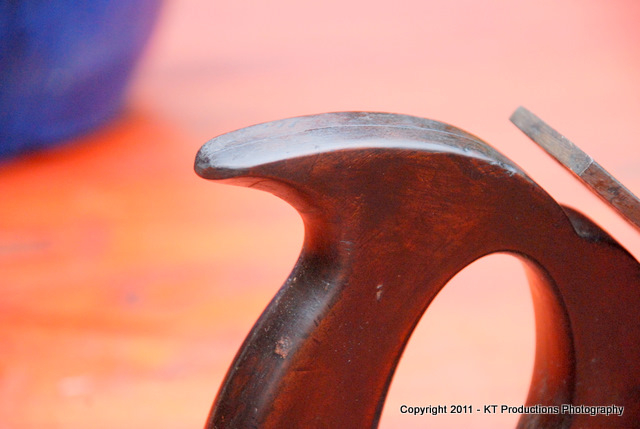
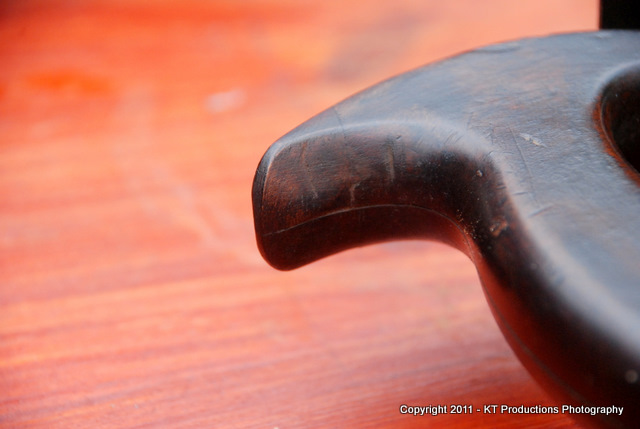
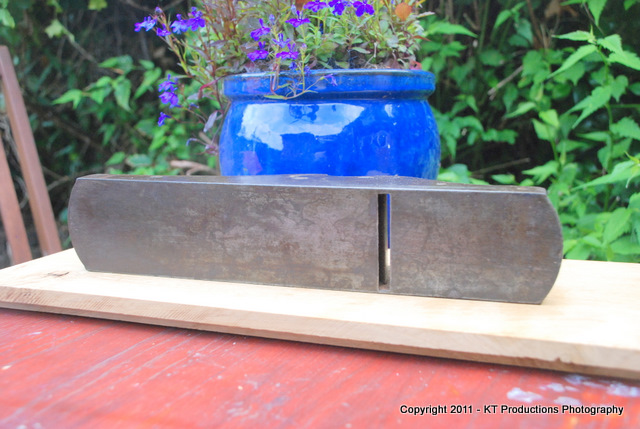
It would appear to have a very strange old split down the infills...both of them as you can see from the shot above! I think this was made in two halves...or at least the stock was doubled up before being cut up...this would explain the deviation at the bun....

It has the frequently encountered, heart and shield lever cap design...which I have seen often...but not in this configuration. Thankfully it has not cracked!

DSC_0319.JPG


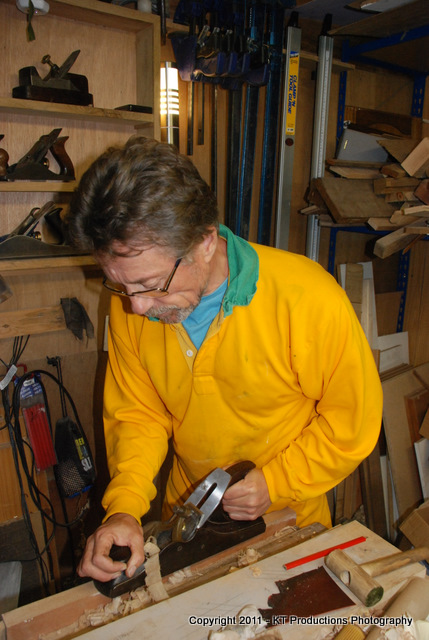
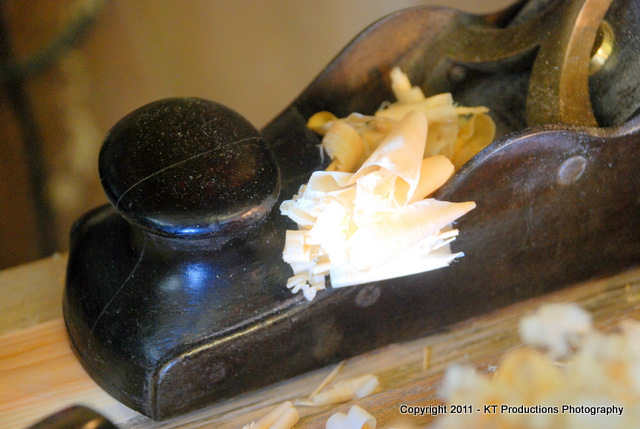
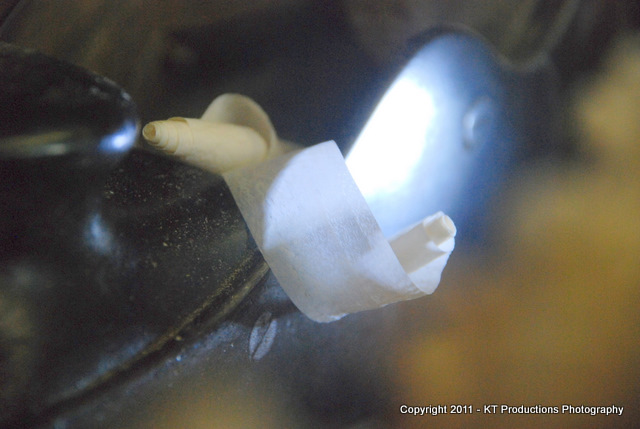
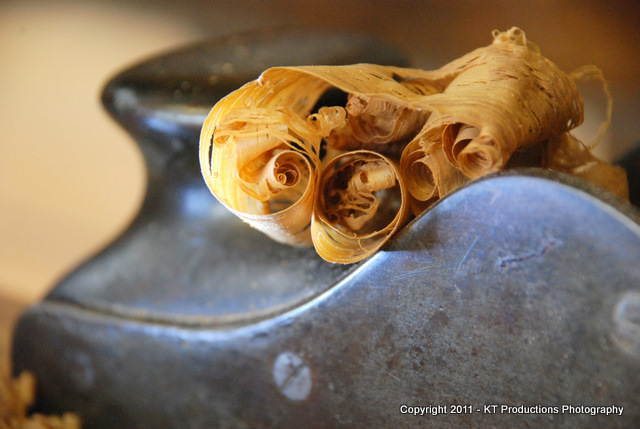
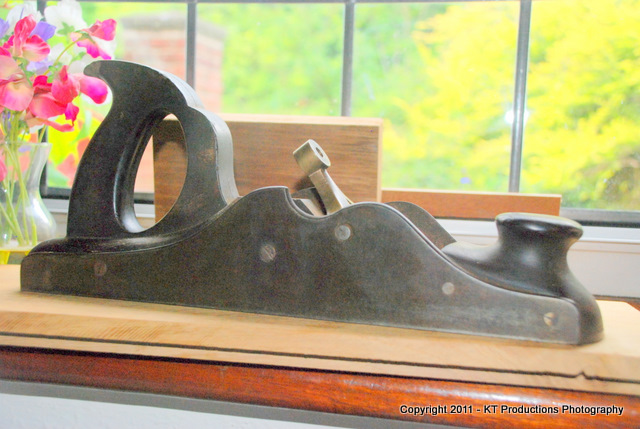
The sole and mouth are the best bits...and the most important...they are near as damn, perfect! I have tried another iron in this already and it whizzes along...leading me to believe I shall be leaving the sole alone....something I would prefer to do to preserve the patina where possible.

DSC_0324.JPG


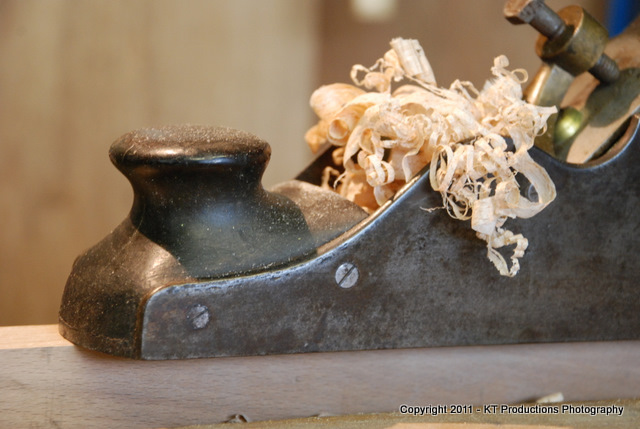
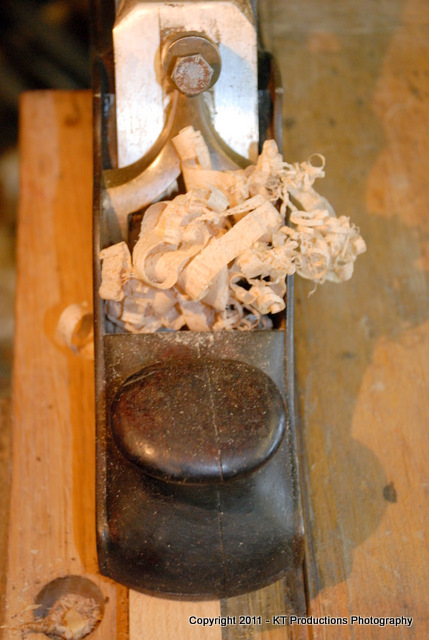
So....another family picture is on the way...we are getting there slowly...but I have a feeling this one will take the place of my No. 5 1/2 in the not to distant future!

More later when I get some shavings going!

Jim
 
Nice plane Jim, I'm slowly coming round to the idea of infills having seen a few of yours, Richard's and that S&S... not sure if the 'Bank of Her' will be so keen though!

jimi43":9rsexenr said:
Also my wont....is to get basket cases for a tad less than market value and sort them out...I hate to see a fine piece of history disappear in a pile of rust!

I'm right there with you on this one, there's little I like more than fixing up an old tool which would otherwise have gone for scrap, and left little evidence of it's history and existence. I tend to move in a less exalted company of tools, though! :mrgreen: I'm in the process of photographing the basket cases I've rescued from the car-boot over the past couple of months, now they have been cleaned up and put to work, to put in a post on here, a sort of before and after type thing; nothing on the level of your plane though!

El.
 
Not, I confess, an infill fan, but I do like the open lever cap on this one. The rear tote strikes me as quite upright and blocky though, although the front knob is quite shapely. How's it feel?
 
Hi Scouse

Being more from an engineering than woody background, it has always been my experience that machines of a more meaty dimension perform jobs better than their more flimsy cousins.

Taking that view with respect to infill planes which are inherently more substantial...have massive metal soles...hardwood infills, thick, stable irons held in place by considerable leverage....all adds up to a winning formula.

Having only the funds to get "charity cases"....I have learned quite a lot about how they function and how to get the best from them.

"Little" Alex has a weighty feel....about twice that of a similar Bailey design...

The cutter...when I get it sorted...will be over twice the thickness and chatter should be inconceivable. I fully expect the shavings to float away.....all my other infills perform this well...

We shall see...and it is actually not that expensive a slope. This is way and above the most expensive one I have ever bought...at £65...cheap at half the price! :wink:

Hi ALF

I find it hard to believe you are not an infill fan...all your other tools are of that ilk....

Perhaps it is just a case of playing with a few... :wink:

I think this plane was a casting finished by the owner. A number of things point this way...

Firstly...the infill wood is stained hardwood of some kind...probably beech...

The screws holding the infill are not as professionally done as one would expect from say...a Mathieson or a Norris...and particualarly a Spiers like THIS ONE

I would have expected a pro made plane of this vintage to have been made using single pieces of stock...not joined...almost as if the finisher had no suitable thickness stock available....and had to make do.

DSC_0327.JPG


There is no way that this is a crack...it follows all the way down the back...

DSC_0322.JPG


Now...the question is...with all the "issues"...do I just smile..use it as it started out life...add the missing bits and be done with it...or do I make some new infills...replacing these with some gloriously exotic hardwood...new through rivets...super iron....new cap screw...

Mmmm....choices...choices... #-o

Jim
 
done it again Jim... very resourceful in the hunting down of nice tools. Once it has the 4mm 01 in it, and sorted, allow me to to 'test' it, pleasy!!
 
Very interesting that Jim - I would take a guess that the maker made the handle fit the back infill by cutting it down the middle then shaving the inside of each half till a good fit, same with the bun, then finished when in situ'.
Seems like an odd way to go about it to us but then we have the internet and can summon a solution in seconds. This bloke probably saw one somewhere, decided to make one then couldn't think for the life of him how all the bits went in.

Don't know if I'd change it if t'were mine - don't know if the screws would shift and all of them would need to...
I think I'd shove an iron in it (and a bolt :) ) and see how it feels.

Nice buy.
 
£65 would seem a lot for a plane without an iron to me!

but then I don't have the skills to sort it out like you do and we all know how good it's going to look

I can't wait and it's not even mine!

makes my woden w78 I got today from a mate look a bit 'dowdy'!

Cheers - thanks for sharing
 
I missed your question ALF..."How does it feel"....

The answer is very stable...

It feels just right..far more balanced than any other comparable sized panel type plane.

Ironically, I received a Matheison iron in the post this morning.....a 2" parallel iron which was intended for my "Sorby" plane, which at the moment is sporting a woody taper.

I tried it in Alex...all be it a tad narrow...it performed very well on beech...which I happened to have knocking about.

DSC_0329.JPG


I haven't actually sharpened this...it is "as supplied" and although it is sharp...it is not scary sharp so I would anticipate the results to be far better once I get an iron fabricated. This is the thickness I want however...so it tells me the mouth is going to cope with a 4mm iron...once I get the 01 stock.

DSC_0330.JPG


Bolt looks good though...dunnit!?? :mrgreen:

Jimi

p.s. anyone want to say..."leave that chip alone Jimi" is too late!

More on the handle repair later...btw...it's mahogany!
 
OK....anyone who is a religious collector who wants to put these old workhorses in a cabinet covered in dust and rust...look away now...we are about to get the tools out!

Remember the chip...

DSC_0323.JPG


We need to get this sorted as it is most uncomfortable...and it shouldn't be...this is a comfortable handle in all other respects...

So...some modern and old tools will be used to fix this...interestingly....

First my Japanese saw...with the depth stop...an excellent invention...

DSC_0342.JPG


This prevents the cut being too deep but isn't foolproof to the micron so I left it a tad high...with the intention of cleaning it up afterwards...along with the saw marks...

So a quick tap with a supersharp Japanese chisel (God I love those things)....

DSC_0346.JPG


....and the waste was gone...

Now....to clean up the edge and corner...two wonderful planes...first...Isaac...who may be as old if not older than Alex...and the beautiful little piece of engineering that is the Veritas micro shoulder plane.

DSC_0349.JPG


The Veritas was a gift from my dear buddy..Pedder...thanks mate! You don't use it much but when you do...there is little else you can use in the situation!

DSC_0348.JPG


Once the corner was clean..the overhang was taken out by Isaac...

DSC_0350.JPG


Between the two of them...a very clean corner was created for the new stock to butt to.

So...a quick rummage through the offcut box to find the right colour of mahogany..with the right grain and cut it up to fit...

DSC_0351.JPG


Very Heath Robinson but critical to clamp in two directions to prevent slide and creep...(I hope!)

DSC_0355.JPG


Remember to check underneath! I have done something like this before and completely forgotten to check all around!

DSC_0353.JPG


So...the important bit with Titebond Original...leave it 24 hours!

See you all tomorrow!

Jim
 
jimi43":1dcg954w said:
Hi ALF

I find it hard to believe you are not an infill fan...all your other tools are of that ilk....

Perhaps it is just a case of playing with a few... :wink:
Oh, I have. Vastly over-rated compared to the manufacturing improvements provided by modern planes, imo. But I should probably post a pic of the front bun of mine, 'cos I think you'd probably be interested.

And yes, one dismisses that miniature shoulder plane as a novelty in error; which I initially did, but learnt the error of my ways. Nice job.
 
I have to (with great respect) disagree about the over-rated view...I may have been lucky but all of mine totally outshine all other planes I have used....

The problem is...infill is not equal to "always better"...you still have to get good ones and the vast majority..including most of the Norris planes are rubbish.

Today I had the chance to sharpen and hone my Spiers iron and test it on some angry grain...and the finish actually had a shine on it. It does the job and it does it very well. Mind you...it does have one of my irons in it! :mrgreen: :wink:

I would love to see your bun....(rumours start with words like that!!!) :mrgreen:

On the Veritas...it is so brilliantly engineered. And I have a feeling there are some stainless parts in there. The adjuster is particularly fascinating. How they engineer it so well is beyond me...

Cheers

Jim
 
jimi43":3ga4nrm3 said:
On the Veritas...it is so brilliantly engineered. And I have a feeling there are some stainless parts in there. The adjuster is particularly fascinating. How they engineer it so well is beyond me...

That's all well and good, but what have you called it? :mrgreen:
 
Scouse":11vkwqod said:
jimi43":11vkwqod said:
On the Veritas...it is so brilliantly engineered. And I have a feeling there are some stainless parts in there. The adjuster is particularly fascinating. How they engineer it so well is beyond me...

That's all well and good, but what have you called it? :mrgreen:

I haven't....it doesn't have a sole yet! :mrgreen:

I'll get me coat...eh?

Jim
 
Okie dokie...back to the hospital....

The patient recovered very well overnight with no rejection of the graft....

Now, before plastic surgery takes place...we must bandage the surrounding healthy wood...

DSC_0356.JPG


....this is required at the "hack off" stage....

DSC_0357.JPG


...where we have to remove large amounts of stock to get the rough shape...we don't want to slip and make matters worse.

A Japanese saw removed the big corners and then the protection can be taken off....to contour the shape close to the original.

The tools of choice for the next stage are...paring with the Japanese chisel...

DSC_0358.JPG


....a slightly unorthodox holding stance...but note...the guiding finger is behind that sharp mother!

DSC_0360.JPG


I leaned back slightly so that when the paring cuts through...it doesn't dig into the wood behind....

I then switched to a good quality rasp....

DSC_0362.JPG


This is followed carefully by paring again and then the whole area is feathered with 80 grit to blend in the woods...

DSC_0365.JPG


Don't go too far...we just need to leave a jagged edge which would not leave a stark line when stain is applied...

DSC_0366.JPG


Now for the staining. I use leather powder stain mixed with meths...I find that this can easily be absorbed by most wood...dries fast and does not adversely affect the surrounding finishes if you are careful. It does however...burn in to the old finish...which is what you want.

DSC_0368.JPG


Apply stain to roughish wood...it takes far better. Think of painting a fence..the rough wood absorbs far better than the smooth!

A little button polish mixed with stain completes the blending....

DSC_0369.JPG


You can just see the join...but some hot wax of the right colour will sort that later...

DSC_0370.JPG


And there you have it...comfortable handle once more...

DSC_0372.JPG


Some Renaissance Wax over the whole plane and little Alex is looking far happier.

Now...the kiln.... :mrgreen:

Jimi
 
Good effort, I have taken detailed notes; blending stain in this way is something I have conscientiously failed at on a number of occasions in the past, but that handle is superb work.
 
Nice job. I specially like the way you got the Smurfs to help!

DSC_0368.JPG
 
a nice repair looks good as new. but needed to where my sunnies whenever your shirt was in the picture 8) :lol:

adidat
 
Scouse....I can give you the name of the dye people...that's the key. This stuff is super economical because you only need a tiny bit and some meths....and you can blend it to whatever shade of brown you want using red and yellow combinations.

I promise I won't wear the Smurf outfit again guys...promise! (Maybe! :mrgreen: )

Anyways....I guess you guys want to know how it shaves now?

Well...the brilliant Matthew from Workshop Heaven did his normal trick of zapping off my QS iron super swiftly so it arrived today...just in time for the test!

DSC_0379.JPG


So this is going to be a double test...how does the QS T10 steel work...and also...how good is it sitting in a holder 150 years older and two continents apart?

DSC_0380.JPG


It certainly doesn't look out of place with the QS iron being a meaty beast....really well finished. Nothing a bit of rust won't improve!

I honed it on some WSH scary sharp grits down to 0.3microns (the white one!)...added a cap so let's see how some ice cold steel works in Alex! (doh!) :oops:

Enter the Smurf for the test...

DSC_0378.JPG


OK...some beech....

DSC_0374.JPG


This cut was with no pressure at all....just the weight of the plane....

DSC_0377.JPG


I guess once I get the sole totally flat...nah! I think I will leave this just as it is!
 
Some more shaving tests today on various woods....

My local cherry tree....

DSC_0382.JPG


and the standard "TITEBOND" test for thickness....

DSC_0384.JPG


Yew....which worked really well as I usually get tearout in some areas...

DSC_0386.JPG


Beautifully even and thin too!

DSC_0387.JPG


Then to relax with some simple willow....

DSC_0389.JPG


Which also has a tendency to tear in places...

DSC_0390.JPG


....but not with this iron/plane configuration!

And for now...some teak....

DSC_0395.JPG


Again...pretty thin...

DSC_0392.JPG


The plane just feels right...really weighty...and easy to control with little yawl.

More tests later....and perhaps some confirmation from another member here... :mrgreen:

Jim
 
Back
Top