My TS-200 fettling and saw/RT bench build thread...

UKworkshop.co.uk

Help Support UKworkshop.co.uk:

This site may earn a commission from merchant affiliate links, including eBay, Amazon, and others.
I thought about either getting some bar made up which is the exact fit of the slot or making it out of wood and metal sheet. i.e The wider part could be sheet metal (alu) and then hard wood runners glued\screwed to it. This would be good for home made jiggery, but I also thought about taking the bar off an incra gauge and replacing it with a DIY version. I think someone here said it'd be possible.
 
Robert...just one point I may have missed but driven by your comment about not knowing about tablesaws....and just to check...

The riving knife must made so that its thickness is half way between the thickness of the kerf and the land (main bit) of the blade.

If too thin it will not work at all and if too thick the stock slot cut by the kerf will crash into it.

I guess you figured this out but just in case you didn't.....

Also if you bevel the leading edge the stock will easily slide either side of it....

Jim
 
Don't assume I know this stuff so please do comment :) The original knife was 2mm thick so I've made mine from 2mm too. I have 'sharpened' the leading edge and rounded/ polished all the edges to help it do its splitting thing.

Got a trip to the airport to do today so don't know how much I'll get done today but I'm sure I'll make some progress.
 
RobertMP":16vuf52n said:
Don't assume I know this stuff so please do comment :) The original knife was 2mm thick so I've made mine from 2mm too. I have 'sharpened' the leading edge and rounded/ polished all the edges to help it do its splitting thing.

Got a trip to the airport to do today so don't know how much I'll get done today but I'm sure I'll make some progress.

It's quite obvious when you have it described. Basically when you cut the stock...in ripping...the teeth are obviously creating the cut or kerf which is 2-4mm wide for most TS blades.

Once the cutting starts, certain strains within the wood may be released or obstacles may be met such as long fence maladjustments, which will cause the slot cut to close up while the remaining stock is still being cut.

This closure without the riving knife, or with a too thin knife will eventually close down on the blade body or land and, since this is rotating TOWARDS you....well....you can imagine now what kickback is!!!

The riving knife being correctly installed will be obviously thinner than the kerf slot so that the two pieces of stock are allowed to pass either side, aided by the bevels...and IF the stock closes its progress is halted by the knife BEFORE it is allowed to clamp on the blade. SIMPLES...

Other things to think about...obviously the short fence is advised...which will virtually eliminate one of the causes of kickback or use a subfence...which is clamped to the main fence and is a short fence.

Hope that helps.

Jim
 
Hi,

I have used the clear plastic from 3 liter coke bottles for shims, can't remember off hand how thick it is but you can allways double up.

Pete
 
Well I haven't had the call to 'pick me up from the airport' yet so I have done some more...

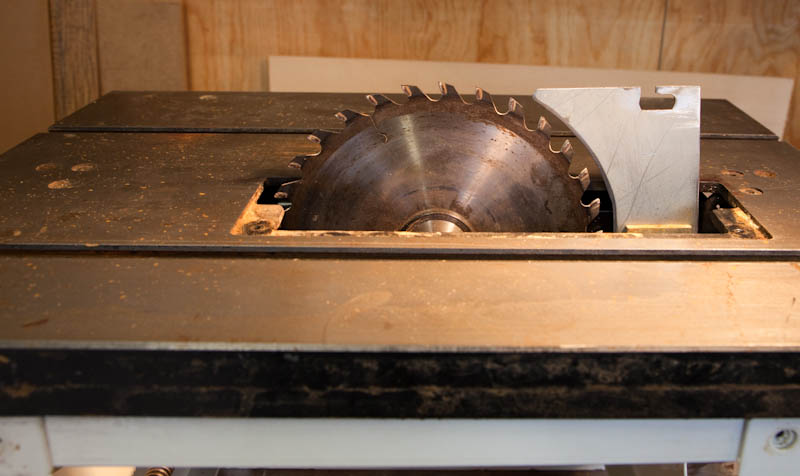
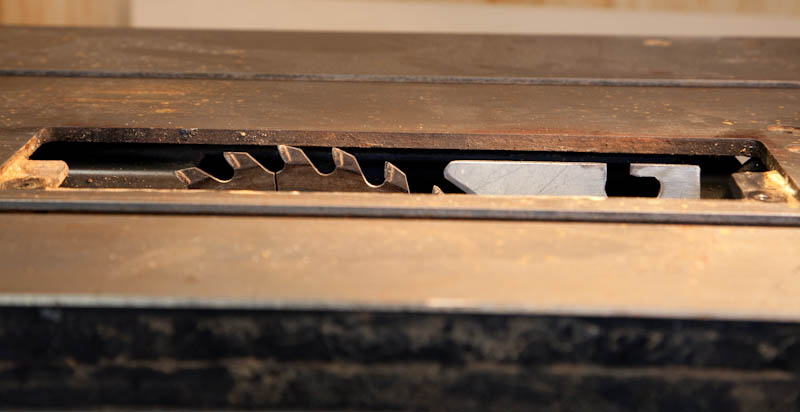
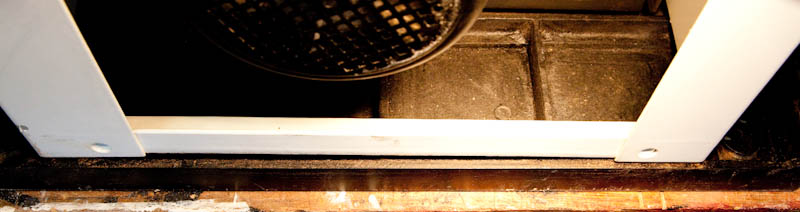
Made a 0.7 thick steel shim and fitted my riving knife. It lines up perfectly with the blade.
ts-19.jpg


Lowered position
ts-20.jpg


So moving on to blade alignment...

Now I thought this was going to be a bit of a pain but it turned out to be quite straightforward.

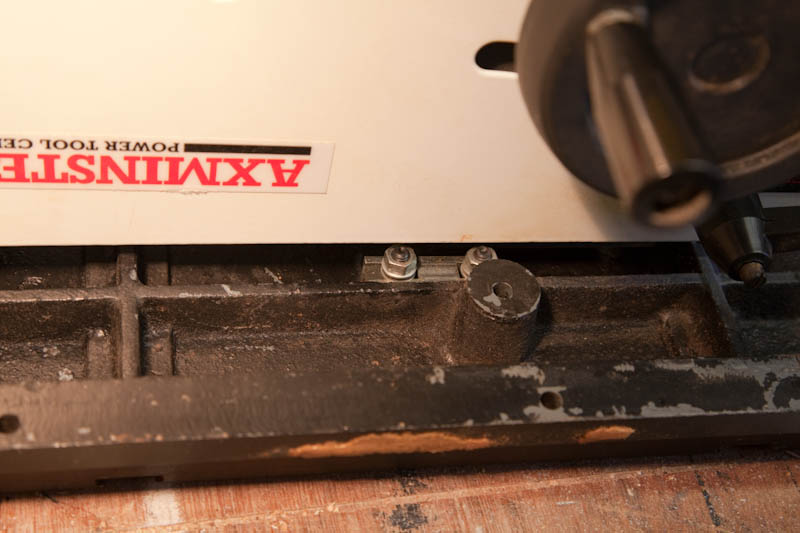
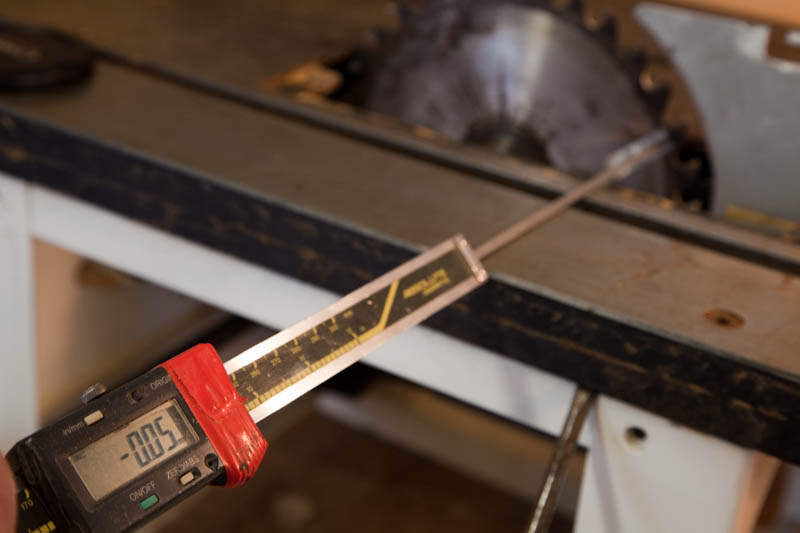
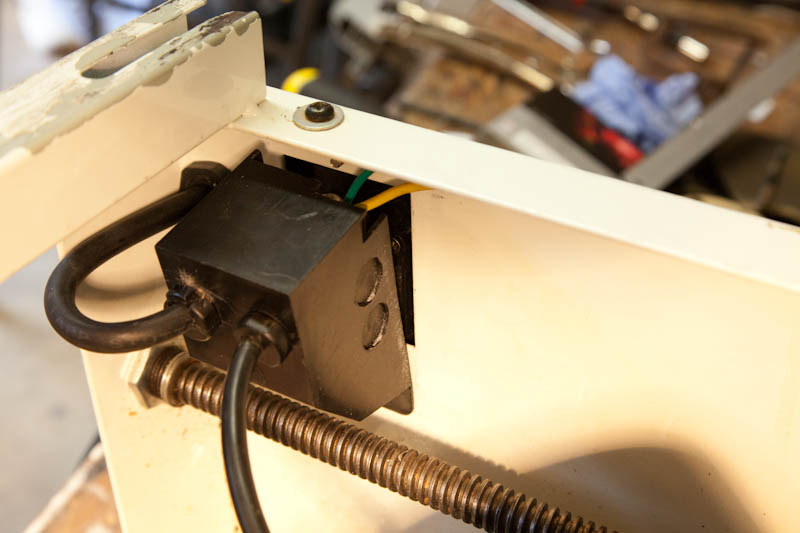
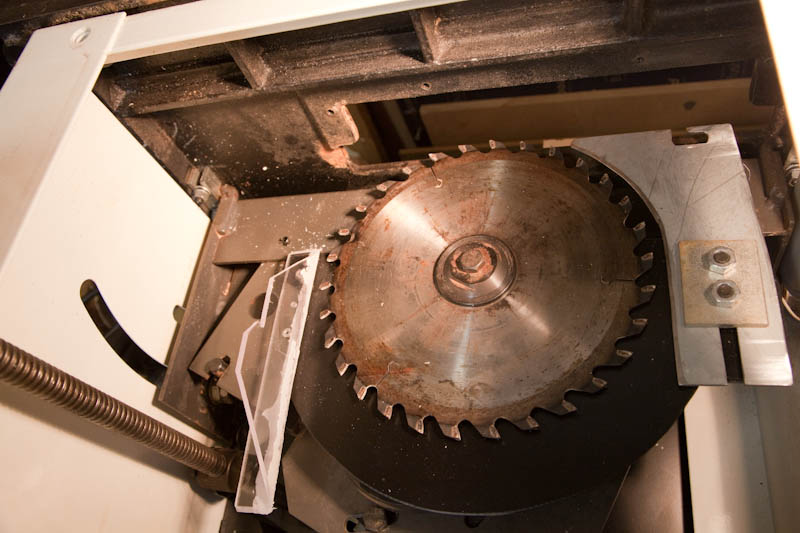
Putting a straight edge to the blade I could see it was out. Compare how much screw is showing at 80mm and 480mm on the rule -
ts-18.jpg


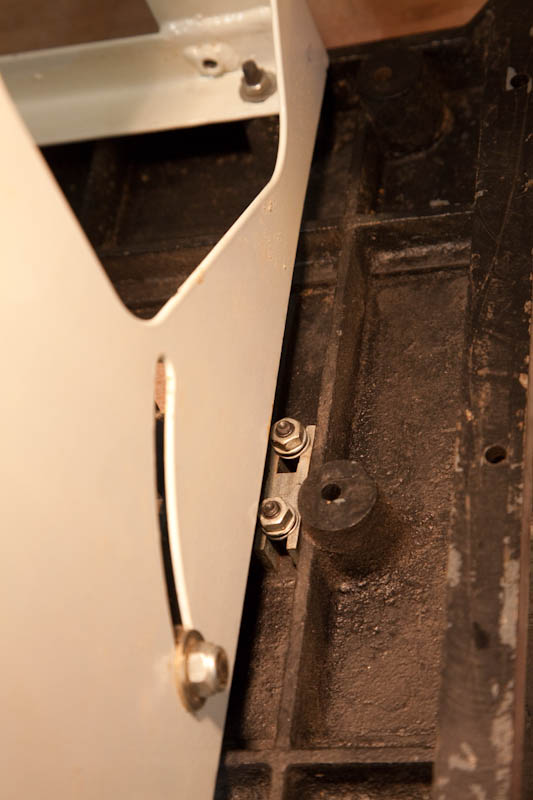
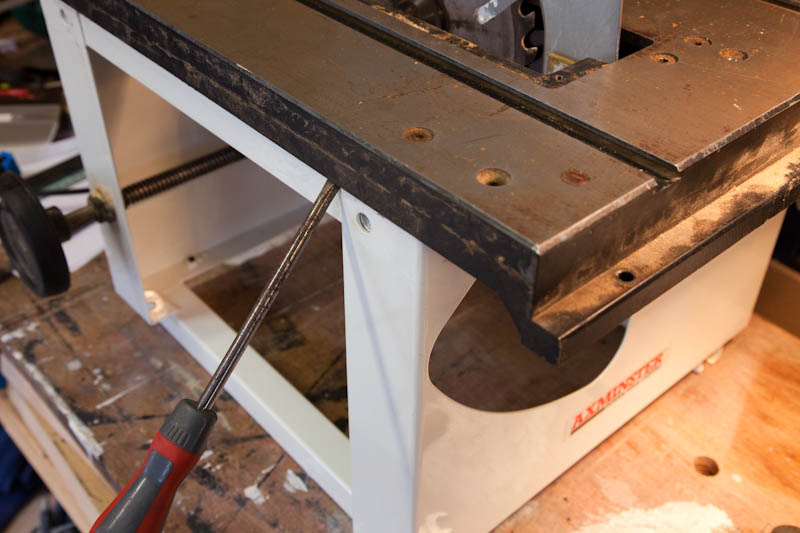
There are zinc plated steel hinge blocks that mount the saw carriage and 4 bolts in the corners of the white casing that hold the casing to the cast top.
ts-21.jpg


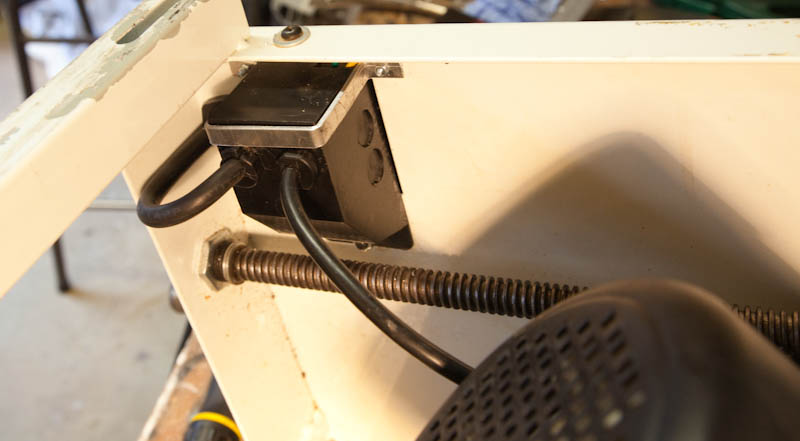
You can see by this hinge block compared to the other end in the above picture things are well out.
ts-22.jpg


just comparing the casing to the cast top it looks wrong too.
ts-23.jpg


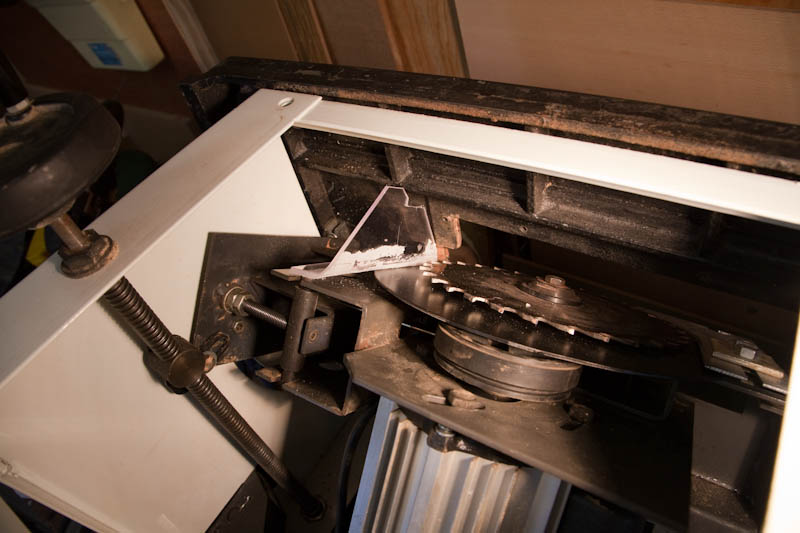
So using a combination of allen key in the screw head and spanner on the nuts I slackened off all the cast top fixings - except for the one hinge block that already looked nice and centrally mounted. I also left the saw bevel locking screw done up (the bristol lever thing above the depth adjuster handwheel) so the mechanism remained tied to the outer case.
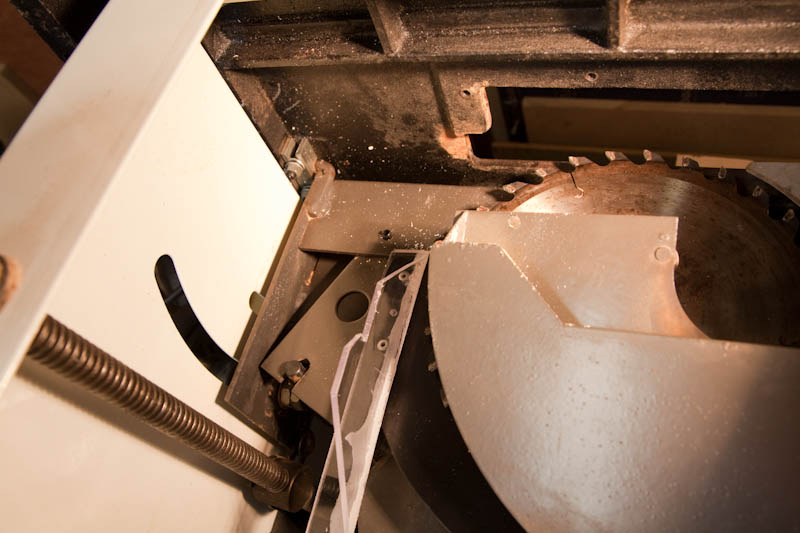
Then it was just a matter of levering the movable end with a screwdriver until the blade was parallel with the table edge. I did check and the table edge is 100% true to the table slots.
ts-24.jpg


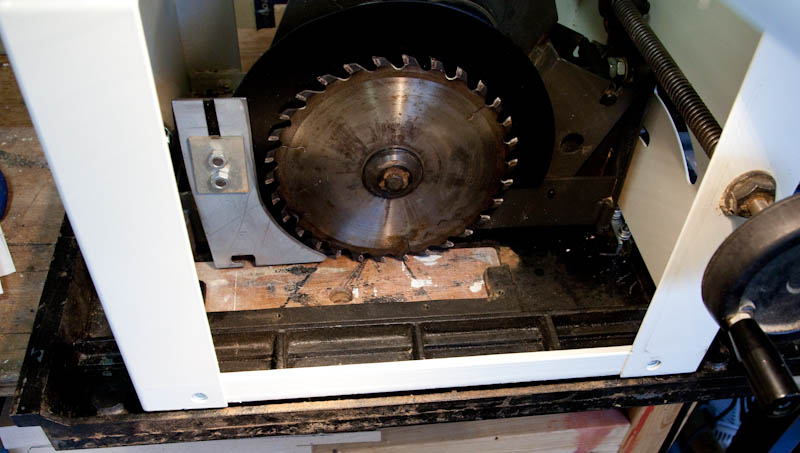
Stuck a bit of tape near one tooth and measured the same tooth when front and back of the saw. After a few shoves on the screwdriver it is pretty near perfect. Tightened all the screws up again and re checked and still OK.
ts-25.jpg


Case isn't 100% parallel to the table edge but is very close now... not that it matters really.
ts-26.jpg
 
hang on.
Blade alignment needs to be with the mitre slot (and/or fence) - I wouldn't trust that the screws are actually accurately positioned.
Tom's thread had a very good description of how to check (and adjust) the blade alignment. Admittedly I still need to get around to doing it on mine.
 
jlawrence":2w4f0hj5 said:
hang on.
Blade alignment needs to be with the mitre slot (and/or fence) .

:)

read it again..... it is. I did measure the slot and hole positions relative to the edge and they are precision machined so referencing off anything on the cast table is going to give an accurate result.
 
New blade is on the list :)

............

One other that was on the list was to replace the mains lead with a longer one. It had about 4 maybe 5 foot of wire on it. So I now have a new cable fitted and about 4m long.

I had noticed the rear cover on the switch was not covering very well. It has just a single screw fixing above the switch. Once I had fitted the new cable it all went back fitting nicely or at least it did after I made a new earth bolt position so the earth wire had a straight route.

Then I tried moving the motor to the 45deg cut position..... and the cover lifted away again.
ts-27.jpg


Now the cable to the motor is not too short but it is quite stiff and pulls the cover away allowing sawdust to get into the back of the switch.

So strip of aluminium. pair of long nose pliers and a couple of M3 nuts and bolts and another problem solved :)
ts-28.jpg
 
Think you should opt for a slightly more covering thread title:

"From Axi to Felder"
"How to make the most of your ebay bargain"
"Not longer run of the mill"

Or any other to that effect... :lol:

Impressive efforts, and i am sure you will have an absolutely fantastic tablesaw in the end!
 
big soft moose":3qvp6qsb said:
talking of which are you making a ZCI for yours - if you are i'd be interested in seeing your aproach - we are thinking mdf and just rise the saw through it under power

Coming back to this for a moment.. What happens about the riving knife? Take it off to make the cut then hand modify the insert to cut more away for the knife?

not thinking of doing it just yet but the thought crossed my mind :)

.............

edit.. Thread title could be better I guess. think the 1st suggestion above may be optimistic lol
 
RobertMP":2wldqyug said:
big soft moose":2wldqyug said:
talking of which are you making a ZCI for yours - if you are i'd be interested in seeing your aproach - we are thinking mdf and just rise the saw through it under power

Coming back to this for a moment.. What happens about the riving knife? Take it off to make the cut then hand modify the insert to cut more away for the knife?

not thinking of doing it just yet but the thought crossed my mind :)

.............

edit.. Thread title could be better I guess. think the 1st suggestion above may be optimistic lol

Yup! Spot on.

The more I watch these Axi mods...the more I am astounded by the poor design...and it isn't just Axi...the Scheppach is just as bad...

I wonder if any of the manufacturers or distributors will take heed?

Jim
 
i doubt the manufactueres themselves will - principally because they are in china - the TS200 is basically a clone of the original design for the kity 419 but built down to a price , hence the iffy design compromises and just branded axminster

what i would like to see tho is axminster themselves perform some of these mods, particularly the improved dusty extraction, after import and then sell the modded saws as an option at a slightly increased prices as the TS200X or similiar.

maybe Ian (or is it richard from axmister, i get confused) will see this thread and share their thinking
 
Not a lot to report today.

The blade cowl that I removed must have helped deflect some of the sawdust and looking at the bare blade some of that sawdust will now be directed at the bevel adjustment thread and the big banana slot for locking the angle.

So I heated up a bit of clear polycarbonate held in the vice with a paint stripper hairdryer thing and bent it to 90 deg. Then a few cuts on the bandsaw and some holes and poprivets later I had a deflector bracket.

It is going to work very well for full depth 45 deg cuts....

ts-29.jpg


No more effective than the cowl that came off though for shallow 90 deg cuts. I laid the old cowl on for comparison but it needs to be lower ....
ts-30.jpg


Clearer view. Shame I overheated the polycarb a bit and melted some of the protective polythene onto the surface :)
ts-31.jpg


The only other thing I did today was to fit rivet nuts into the bottom of the chassis so the side panels can be removed without having to have a hand inside the saw holding onto a loose nut. Makes getting access inside much easier. They welded nuts inside for the top fixings so why not the bottom ones??

Think that is about it for internal mods.

Things are going to slow down a bit now as I need to design the housing the saw and router are going to inhabit. Think that will influence dust collection too so not looking at hopper construction just yet.
 
nice - one point tho (excuse me pointing out the potentially obvious) - you are going to have to seal the banana slot up to maintain suction anyway (most of us use duct tape as it is easily applied and removed) so the deflector isnt really necessary.

also if i were you i'd look at sealing the big hole on the back of the saw (where the DE used to exit) with either a piece of perspex or steel plate and silicon sealant or similar - you will get a lot more suck thatway than if you rely on the housing to seal it up.
 
Yes I realise the major hole in the back needs a panel over it. that's a bit of tin and a few rivets from the outside job.

Not convinced about the banana slot. There is quite a gap between the top of the chassis and the underside of the cast table. I'm thinking it is more a collecting up what falls under gravity thing (and stopping dust floating out of openings) more than sucking out airborne dust situation?

minor edit added
 
RobertMP":306eu8q4 said:
Yes I realise the major hole in the back needs a panel over it. that's a bit of tin and a few rivets from the outside job.

Not convinced about the banana slot. There is quite a gap between the top of the chassis and the underside of the cast table. I'm thinking it is more a collecting up what falls under gravity thing (and stopping dust floating out of openings) more than sucking out airborne dust situation?

minor edit added

Ideally speaking you want as much suck as possible - not least to pick up dust from the cut itself andstop it winding up in the air in your 'shop (if you were going for just what falls by gravity you might as well not bother with a DE but just stick a bin under the saw)

therefore for it to work properly you need to seal up all the holes and gaps (except obviously the saw slot) - on our ts200 we have tape over the banana slot (and the others in the side and back), the big hole sealed up (with sealant as well as rivets for an air tight seal), and multiple layers of duct table all the way round the underside of the table sealing it to the body - and over the seams of the body and anywhere else that might not be air tight.
 
Guess that will come down to testing. Not doubting what you say - just thought the negative pressure of having extraction at the bottom somewhere would be enough to stop airborne dust drifting out of the holes.

Decided to use some more polycarbonate to block up the rear hole so I now have a viewing window in the back :)

maybe I should set it up on the original stand and try a few cuts to see what happens. Could use polythene and duct tape for the hose connection to the bottom for now.
 
RobertMP":26mtzv7w said:
Guess that will come down to testing. Not doubting what you say - just thought the negative pressure of having extraction at the bottom somewhere would be enough to stop airborne dust drifting out of the holes.

Decided to use some more polycarbonate to block up the rear hole so I now have a viewing window in the back :)

maybe I should set it up on the original stand and try a few cuts to see what happens. Could use polythene and duct tape for the hose connection to the bottom for now.

You are right about the negative pressure but we arent connecting - what I am saying is that if you leave the banana slot (etc) uncovered then the DE will suck air in through them (so there is no issue with dust floating out) - however the suction through these gaps is essentially wasted and will reduce the ammount of suck you get through the saw slot - which in turn will mean less pick up of dust at the point that matters most.

The importance of this also depends on your DE set up - If you were planning on having a dedicated HPHV extractor just for the saw then you probably have suck to spare - but if you are planning on plumbing it into a ducted system or using a LPHV extractor then you need to conserve your suck at every opotunity (chances are you are somewhere between these extremes)
 

Latest posts

Back
Top