How would you go about this?

UKworkshop.co.uk

Help Support UKworkshop.co.uk:

This site may earn a commission from merchant affiliate links, including eBay, Amazon, and others.

noddy67

Established Member
Joined
1 Feb 2006
Messages
253
Reaction score
5
Location
Nr. Tonbridge, Kent
I'm currently building a very simple TV stand for my father based on the model below:

TVStand1.jpg


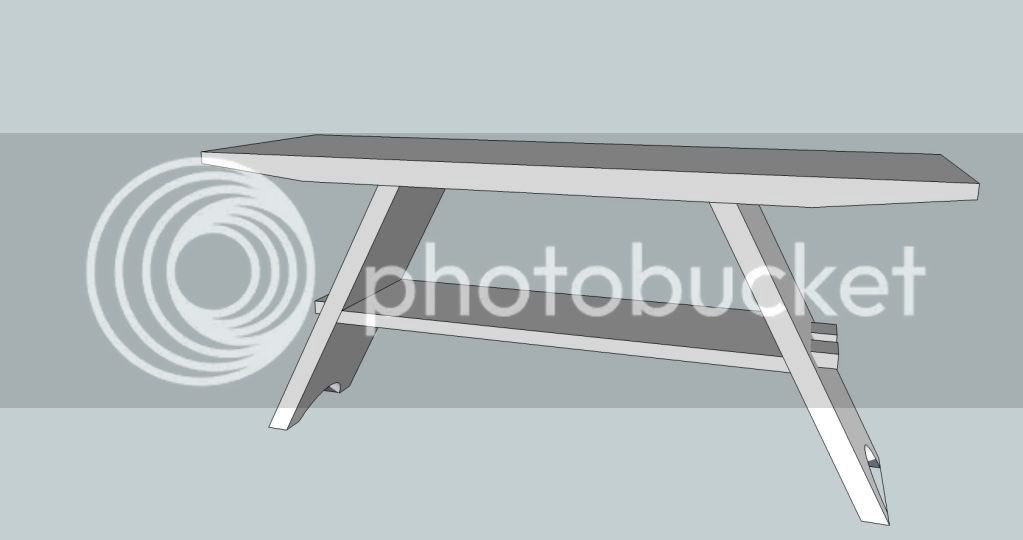
The top is 120cm long and about 40cm wide. How would you go about cutting the two angled ends of the top? Sadly my ceiling is too low over my table saw so thats not an option and I don't own a sufficiently good hand saw to do it by hand. I'm currently thinking of using the band saw to rough cut the two 20cm wide parts of the top and then hand planing it smooth and true after they've been glued up.

I was wondering if anyone had a better suggestion.

The wood is sycamore. Any finishing suggestions that don't involve spraying or subsequent yellowing of the wood would also be gratefully received.

Many thanks
 
I'd sharpen my No.7 plane to within an inch of its life and have good workout. It really won't take that long.
I think the angled M&T is much more challenging.
S
 
If you haven`t got a sufficiently good handsaw I would ask Why? Take whatever hand saw you have remove the bulk and as Steve says finish by plane. Or take out the meat with an electric plane and finish by hand. Even with a good handsaw it will still require a plane to finish. Buy a Bahco hard point from B and Q for a tenner Do the job for you no trouble at all.
All the best
Rob
 
Rob Platt":vbw3dd58 said:
If you haven`t got a sufficiently good handsaw I would ask Why? Take whatever hand saw you have remove the bulk and as Steve says finish by plane. Or take out the meat with an electric plane and finish by hand. Even with a good handsaw it will still require a plane to finish. Buy a Bahco hard point from B and Q for a tenner Do the job for you no trouble at all.
All the best
Rob

This is the way i'd do it for a one off.
 
Sycamore will yellow whatever finish you put on it but some will add less colour than others. A water borne finish will add the least colour but will definitely take away some of the lustre which is what really brings sycamore to life. Shellac has good clarity but will add some colour and is not the most durable finish. The best answer is really a pre-catalysed melamine lacquer. It adds the minimum of colour and brings out the warmth. Ideally you would spray it and it smalls horrible so best used outdoors. It can be successfully brushed with a white nylon "POLAR" brush (available from art supplies shops) but you must work fast and not attempt to brush it out. It dries very quickly and the finish will not be perfect. However it can be cut back easily with a lightly used cabinet scraper and burnished to a beautiful soft sheen.

If you really want to retain the pale colour spray the wood before finishing with a high factor non-greasy sun screen before applying finish. I use Ambre Solaire which comes in a spray bottle. It will make the piece smell like a tart's boudoir but the finish seals that in. This may sound unlikely but it really does work - I have done back to back trials . It is fine under pre-cat but don't use it under a water borne finish as it seems to affect its adhesion. The sun screen won't completely prevent yellowing but it will slow it down very substantially.

Jim
 
I like Mattty's suggestion of using a power plane to remove most of the material and then finishing off with a sharp hand plane. Don't try to bite off too much with either tool, since you're cutting across the grain. In fact, you may want to fit a sacrificial strip of scrap timber to the far edge, to prevent breakout while you're doing this.

For narrower bevels, you could build a router jig - either a disposable one-off or, an adjustable version [there's an idea for you, Steve!! ;-)] - but, for a one-time job like this, it's really not worth the hassle.

Best of luck with it. Hope we get to see some photos of the finished piece. :)
 
Chems":1gwf31aw said:
You can do that on the table saw, mark out your line then cross cut over an over raising the blade easy time to the height of your line. And when your done you will just need a little clean with a plane. Like its done here:

Watch this from 3.50mins in: http://www.thomasjmacdonald.com/media/v ... =201875465
But hopefully not leaning right over the spinning blade, even if it isn't a dado... :) :shock:

If you have an SCMS with a trenching facility multiple passes with that would remove the bulk.
Alternatively multiple passes with a router on a simple jig to mimic the SCMS action.

I've not tried either but I think they should work.
 
davin":1ox4k9od said:
I love the idea of sunscreen.
I am using sycamore at the moment - time to raid the bathroom cabinet.....

Make sure you use the clear non-greasy stuff.

Interestingly, it only worked on sycamore out of the woods included in my experiment. Others were American cherry, American black walnut and a very orange exotic whose name I can't recall. I've been meaning to try it out on other pale timbers such as maple and ash but have never got round to it.

Jim
 
yetloh":mgoiepzm said:
davin":mgoiepzm said:
I love the idea of sunscreen.
I am using sycamore at the moment - time to raid the bathroom cabinet.....

Make sure you use the clear non-greasy stuff.

Interestingly, it only worked on sycamore out of the woods included in my experiment. Others were American cherry, American black walnut and a very orange exotic whose name I can't recall. I've been meaning to try it out on other pale timbers such as maple and ash but have never got round to it.

Jim

Sunscreen, thats a new one on me! If it works that is a very good idea. Cheers.
 
I recently made a sideboard top with a fairly substantial underside bevel (you can see a photo here if you like). I roughed out the shape on the individual boards that made up the top using a bandsaw before gluing them up, then finished with a hand plane after the top was assembled.

Joel
 
Thanks Joel. I just looked at your sideboard piece on your website. Lovely piece. Do you have a smaller bevel on the front edge too? Any chance of posting a few more pictures of it? Do you also happen to recall the angles you used of the two bevels and what the thickness was of both the top piece and the thickness left at each end? Wondering whether I need to adjust my measurements slightly from an atheistic point of view. Thanks
 
Hi Noddy, thanks for your comments. The curved bevel on the front edge is at a 45 degree angle and was formed with a draw knife and cabinet scraper. The side bevel is at about 12 degrees.

Joel
 
Thanks Bugbear. Much appreciated. Actually I've rethought the design principally to avoid having to do this angled M&T. I only have a very little of the sycamore (planked from my father's garden which he wants it made out of) and given the test pieces I'v done I'm not sufficiently confident the joint would come out looking good enough. Might save that attempt for another time.
Cheers
 
Back
Top