Adventures in metalwork and machine restoration!

UKworkshop.co.uk

Help Support UKworkshop.co.uk:

This site may earn a commission from merchant affiliate links, including eBay, Amazon, and others.
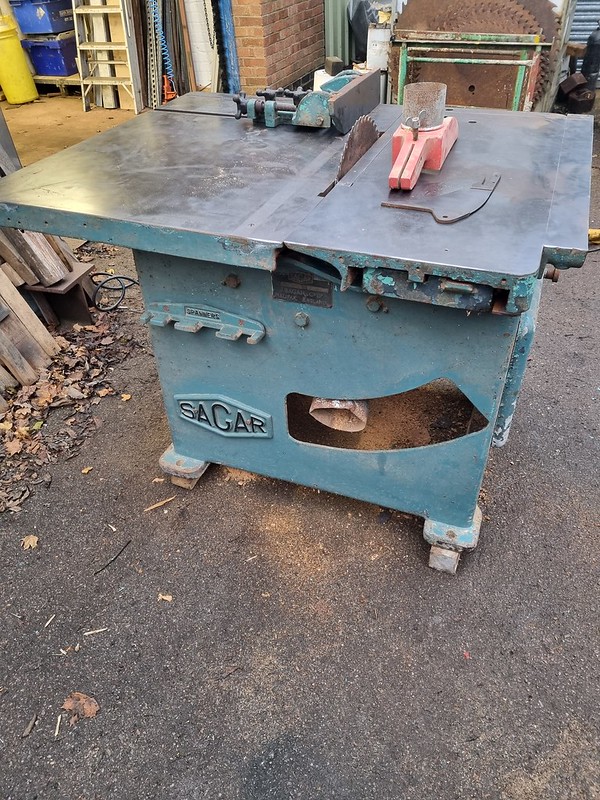
Been busy with lots of stuff recently, but thought this one was worth sharing. Right back at the start of this thread (2018) I posted about a workshop of a farmer friend I'd bought. I got most of the machines out with a tractor, but there were still two big table saws. Since then, we've had a pandemic, the owner's alzheimers deteriorated and he passed away and every time I've cleared a space at work to bring them back, something else came along to fill it. Last weekend I finally recovered the first, a Sagar LT. It's basically Sagars version of a wadkin PK - sliding table, 18" blade, heavier than depleted uranium, that sort of thing. Went very smoothly - pallet truck to the trailer, then winched it straight in. No drama.
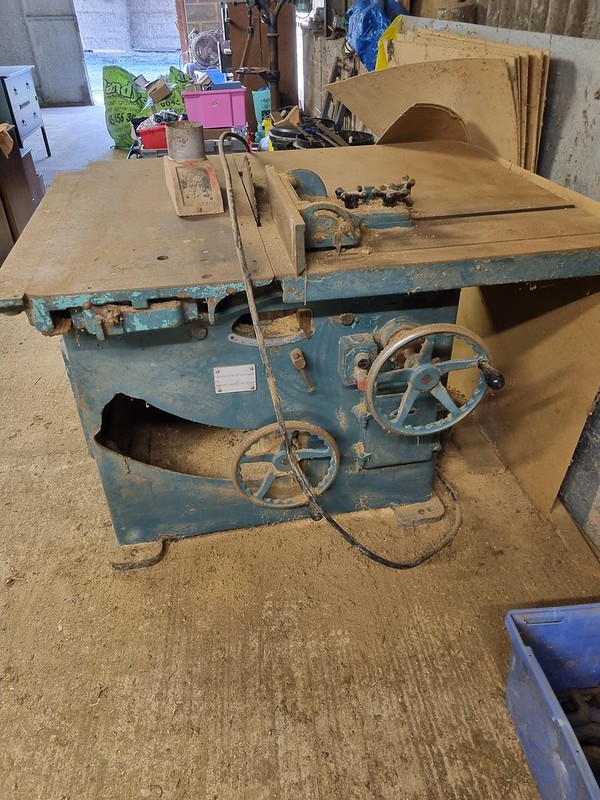
Sagar

Seeing it in the trailer gives some scale as to just how monstrous it is. The green T shaped casting is the outrigger leg for the sliding table extension.
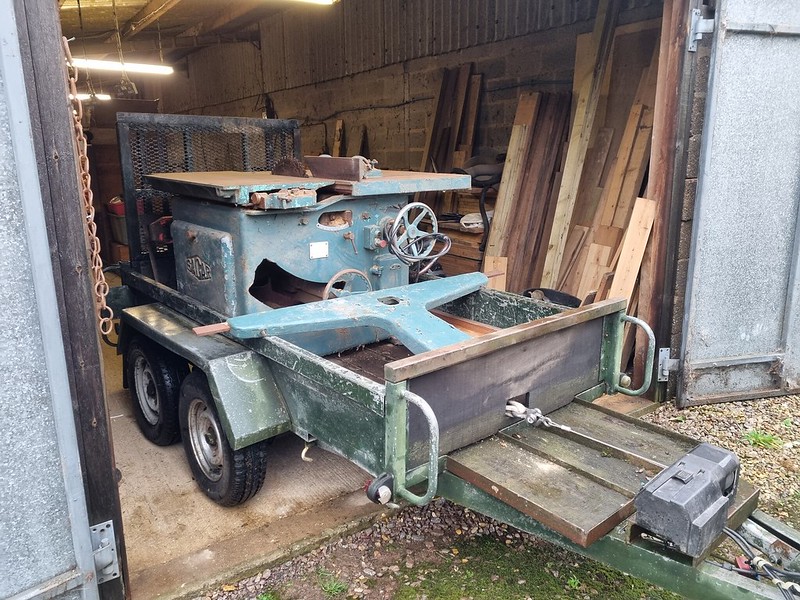
Sagar

A LOT of hooving, cleaning and wire wheeling and here we are:
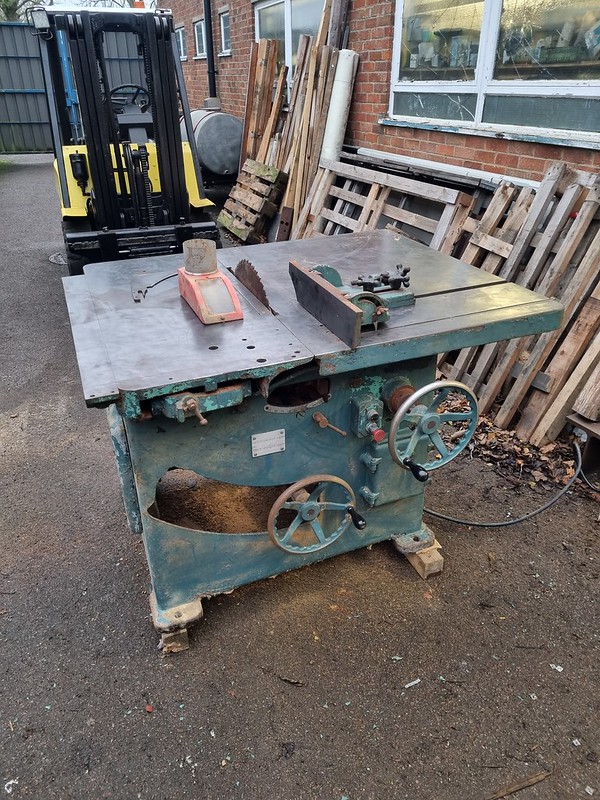
Sagar

Sagar
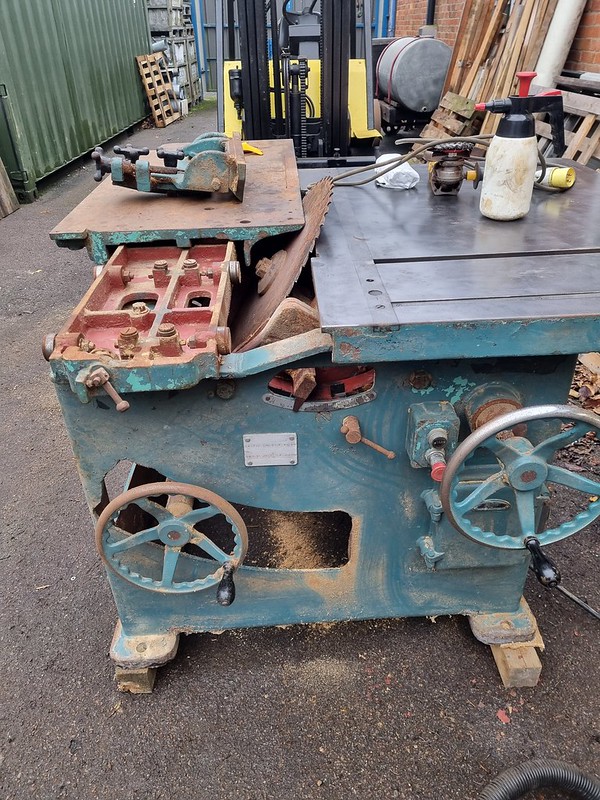
Sagar

Mechanically it all works - table slides, blade goes up and down and tilts, she spins up and runs forever when you turn it off - the bearings are amazing! Its actually in really good shape - even the original switchgear which is pretty unusual these days. I'm getting some copies cast of the sagar badge and spanner rack, which I thought was super cool, the moment I saw it. Nice to have saved it from the scrap man anyway. Next up is the wadkin BGP panel saw, which is probably an even heavier lump to get out.
 
As I mentioned in deema's Jones & Shipman 540 thread, I've just bought another new machine. I've wanted a 540 for ever as the little manual Herbert surface grinder we had was just a bit too small to do anything on. The footprint isn't much more and the capacity is nearly double - plus it's fully automatic. Bit of an eBay gamble, but it looked ok from the pictures (I know that doesn't mean much!) Took a trip down to Buckingham to collect it just before Christmas. Luckily I'd researched how to lift them, and taken my own lifting strops or I'd have struggled to get it in my van.
First picture is it coming out back at our yard. Don't look too closely at the rigging, it was only to get it out and sat on the floor!
2nd is once I'd got it screwed to some bearers so I can move it around easily with a pallet truck.
3rd pic is after a couple of hours spent cleaning it up. Clutch cleaner and fine scotchbrite are a pretty unbeatable combination, along with a Stanley blade scraper for the thick stuff and rusty bits.
4th is the pump chain - this is adjusted to maximum. Should be 5mm slack there. It was so loose I took it off the cogs without moving anything. I'm probably just going to take a couple of links out and put it back together.
Last pic is the motor and pump all cleaned up, ready to go back in.

The aim is just to get it serviced and back to working order, hopefully before we're back from the Christmas break. I've got too many machines in pieces already to start another full rebuild! I've had it running before I pulled the hydraulics and everything works. So far the obvious problems are the missing wheel guard, chain needs shortening a couple of links and I think the hydraulic cylinder will need new seals as it's leaking a bit. I can make up a dust extraction nozzle and connect it to the fine dust extraction I have on another grinding machine. Should save me some space.
 

Attachments

  • 20211222_115905.jpg
    20211222_115905.jpg
    155 KB
  • 20211222_131004.jpg
    20211222_131004.jpg
    157 KB
  • 20211223_121627.jpg
    20211223_121627.jpg
    143 KB
  • 20211223_144733.jpg
    20211223_144733.jpg
    206.6 KB
  • 20211223_151311.jpg
    20211223_151311.jpg
    238.7 KB
Second day on the grinder. Took 2 links out of the chain and it fits perfectly. Put the tank and cover back together and buttoned the bottom end up. I'll fill it with oil when I get it sited and levelled, no point sloshing oil all over the place when we move it. Then made a couple of t-nuts and lifted the table off while it was underneath the hoist. Gave everything a good clean and put back together. I've not dived into the saddle as it seems ok and I really want to run the machine to see how far I need to go with it.
Next I think I need to check the spindle oil and adjustment, but it's nearly ready to go.
 

Attachments

  • 20211229_121816.jpg
    20211229_121816.jpg
    155.2 KB
  • 20211229_133701.jpg
    20211229_133701.jpg
    171 KB
  • 20211229_134103.jpg
    20211229_134103.jpg
    244.3 KB
  • 20211229_151035.jpg
    20211229_151035.jpg
    137.1 KB
Thought this was worth sharing as a repair technique. I bought a meddings drill cheap on eBay. No idea why, but no one else bid. I knew it was the geared head version, so it was a really nice surprise to find it was a 2 speed motor as well - giving 20 speeds from 40 to 4000 rpm. The starter switch had the coil removed and jammed on with a piece of wood, which was a new one for me.
The table was pretty well drilled with an arc of shame, which is the point of this post. Lots of ways to repair it, but most of them involve heating/welding/brazing which lets face it aren't all that easy, and would need you to strip the table off the column, which isn't easy given the weight. My experimental way of doing it was to degrease it really well and apply several thin layers of JB weld. As it's an epoxy it shouldn't absorb oil and swell like a filler would. When the last layer had gone off I just filed it flat with the level of the table. It doesn't look perfect, but it's a lot better than the craters that were there before. Cheap and easy for anyone to do!
 

Attachments

  • 20220128_144710.jpg
    20220128_144710.jpg
    136.8 KB
  • 20220128_144714.jpg
    20220128_144714.jpg
    115.5 KB
  • 20220201_073937.jpg
    20220201_073937.jpg
    104.5 KB
  • 20220218_124134.jpg
    20220218_124134.jpg
    137.1 KB
  • 20220218_124140.jpg
    20220218_124140.jpg
    130.3 KB
As a "cheap & cheerful repair" TF, that doesn't look 'arf bad! As you say, easy & quicker than weld or braze.

But that lump of wood to hold the relay/s closed, that does take the biscuit (though I 'spose if someone was clumsy/uncaring enough to mark the table that much, we should be SO surprised)!
 
As a "cheap & cheerful repair" TF, that doesn't look 'arf bad! As you say, easy & quicker than weld or braze.

But that lump of wood to hold the relay/s closed, that does take the biscuit (though I 'spose if someone was clumsy/uncaring enough to mark the table that much, we should be SO surprised)!
I'm quite pleased with how it came out. Definitely one to keep in the mental toolbox!
The drill actually came from a proper dealer - if I'd paid good money for it I'd have been furious!
 
Yeah, agreed. Though I've heard of it often, I've never tried JB Weld myself. Must get a tube (s?) for "just in case". (NOT that you'll see marks like that on MY drill table I hasten to add). :)
 
Better to leave it on the shelf and buy fresh when you actually need it! Dad had trouble with some that he'd had in the garage for years, it took about a week to go off.
 
I had a really positive experience of JB weld type epoxy several months ago. I drove over what I think was a broken branch on a country lane and after landing home found that it had kicked up and punctured the plastic fuel tank.
Faced with a 1/4" hole and a stream of petrol pouring out, the only way I could think of stopping it was a JB weld equivalent bought several years before.
Knead it well, shape into a blunt cone and bung it straight into / over the hole while the petrol was still running. I kept pressure on for several minutes but amazingly is held - and for over 10 days more while I found a secondhand tank and lined up a garage to drain and swap the tanks.
Plastic welding isn't a reliable fix and if you've never priced up a new plastic fuel tank, you're in for a shock !
 
Apologies it's actually called Quiksteel, now I check the tube. It's basically an epoxy putty. Comes in a tube with the two elements one inside the other like a Swiss roll and separated by a thin film. You cut off a chunk and then knead it to Break down the film and mix the two parts together and make it workable. Sticks like the proverbial s**t to a blanket. Once cured it is very hard wearing, and actually looks quite like metal, so might give a better match on a job like yours, although it would still be visible. It can also be machined and tapped etc. I have used it a number of times on damaged castings, both Iron and Aluminium. It's particularly good where you need to shape it as when it's ready for use it has a consistency like plasticene and will hold a shape while it cures. Not to be confused with Quick metal by loctite which is for fitting bearings and keys etc in worn parts. Plastic Padding also do a metal filler, but I haven't personally used it.
 
Sounds like Sideways is probably referring to the same sort of stuff. I have never used it on plastic myself, but will certainly best it in mind for the future. Looking on the net I see that JB weld do their own version called steel stick, hadn't seen that before. I would imagine they are all very similar. I can certainly recommend the Quiksteel in a silver and black printed tube, that's the only one I have used and it is very good.
 
The running joke is that half the tractors in Kansas are held together with JB weld.:) The stuff works well. I repaired the tube on my washing machine with it and that’s been years now.

As for the arc of shame…. Never ceases to amaze me! If you ever do a proper fix, I drilled and then tapped the holes. That was easy. Then I used my lathe to machine some bolts out of cast iron which you buy in rod form. The bolts are counter sunk meaning they fit flush within a counter sunk hole. I back cut the bolts about 1.5 mm above the table line. Lock tire them in and the slowly torque them down till the bolt breaks off. Finish with dremel tool, scraper and sandpaper. You will not be able to see repair!!!!!!!!!
 
JB weld is fine for filling cosmetic holes and dents that are to be painted , but no good for structural repairs
 
Had a bit of time today and got the new switch on the meddings. Fired up perfectly. While I was at it I've made a pair of new knurled nuts to hold the pulley cover on. Ready to find its new home! Definitely one of the best featured "lighter" pillar drills I've had my grubby mitts on. Realistically you'd almost never need to move the belt off the middle pulley, it gives such a good range of speeds.
 

Attachments

  • 20220224_132236.jpg
    20220224_132236.jpg
    92.5 KB
  • 20220224_132351.jpg
    20220224_132351.jpg
    71.1 KB
I also did the old machinery shuffle and got the new surface grinder down into its new home the other day. After work today I fitted the levelling feet and got it rough levelled. The level is actually from a Jones & shipman wheel balancing machine, but it's great for rough leveling a machine as it works in both dimensions at the same time!
 

Attachments

  • 20220218_100059.jpg
    20220218_100059.jpg
    149.4 KB
  • 20220224_160950.jpg
    20220224_160950.jpg
    139.3 KB
  • 20220224_160133.jpg
    20220224_160133.jpg
    114.3 KB
Wow. Almost exactly 4 years since I started this thread because I'd bought the big Harrison lathe. I've made a lot of parts on it and learnt a **** of a lot since then! Don't think I ever realised how fascinated (obsessed) I'd get with precision engineering when I bought it. Today was the day I bought it's replacement home. Same trailer, same landrover but much better weather!
The new one is a graziano sag 14. Italian made, very well specced machine. Metric and imperial gearbox, 2" spindle bore, taper attachment, threading stops, instant forward/reverse with multi plate clutches. The dials are dual metric and imperial by some wizardry - turning the collar changes the gearing so they read correctly. I was blown away when the previous owner showed me! The ways are fully covered so there is minimal wear - everything feels really tight. I do have some light restoration work to do before I move it into place so it will be a while before it's making chips, but I'm really excited to use it in anger.
 

Attachments

  • 20220226_141235.jpg
    20220226_141235.jpg
    347.7 KB
  • 20220226_145904.jpg
    20220226_145904.jpg
    256.3 KB
  • 20220226_145911.jpg
    20220226_145911.jpg
    144 KB
  • 20220226_145916.jpg
    20220226_145916.jpg
    122.3 KB
  • 20220226_145951.jpg
    20220226_145951.jpg
    105.1 KB
  • 20220226_145959.jpg
    20220226_145959.jpg
    125.7 KB
Had some time today to start on operation cleanup. Lots of old chips, oil and general gunk. So far I haven't found anything untoward! There is a 4th rod that is quite hard to see in the pictures under the leadscrew that has 4 stops on it. They were seized with dried oil and rust, so I've got them freed off and sliding nicely. There is a lever on the apron that lets you select which stop you want to hit - handy if you're making a batch of parts.
I'm still really torn on whether to paint it - the paint is really flaky in places but masking it up will be a nightmare 🤣 also on the agenda is installing a DRO and fabricating a chip tray. The original design pulled out to the back which won't work in my workshop. Luckily someone has already binned it so I've got a clean slate for designing a new one!
There was a little end float in the leadscrew which I've adjusted up and the clutch drags slightly in neutral so I'll adjust that while I have good access as well.
 

Attachments

  • 20220228_154826.jpg
    20220228_154826.jpg
    144.6 KB
  • 20220228_112438.jpg
    20220228_112438.jpg
    268.5 KB

Latest posts

Back
Top