Workbench tops what material HDF?? MDF Ply

UKworkshop.co.uk

Help Support UKworkshop.co.uk:

This site may earn a commission from merchant affiliate links, including eBay, Amazon, and others.
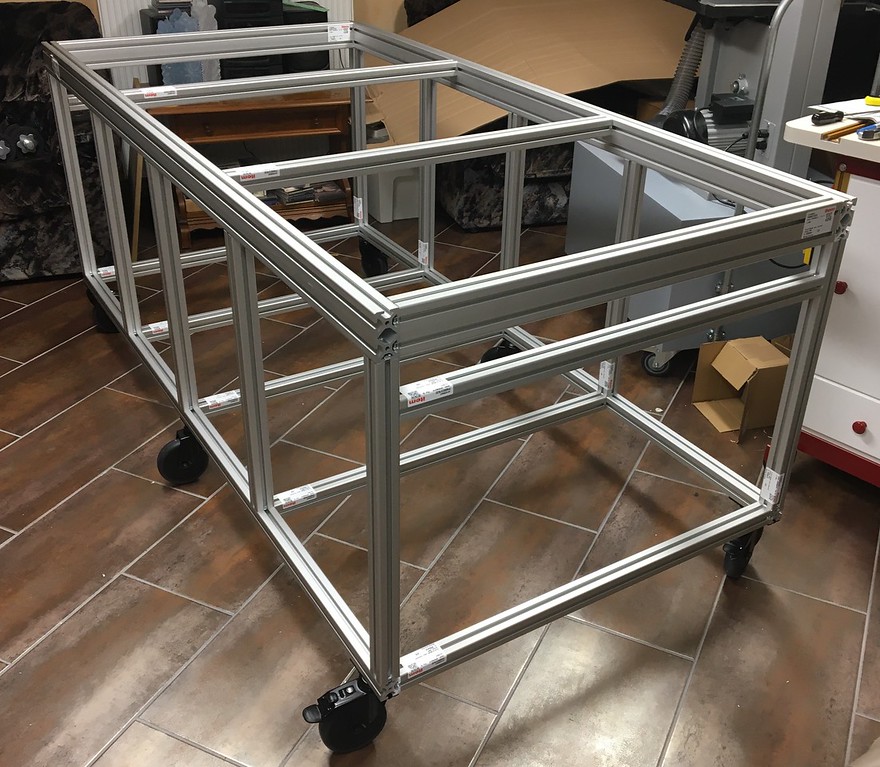
@MikeK what's the size of that top so I can get the perspective of what I was planning?

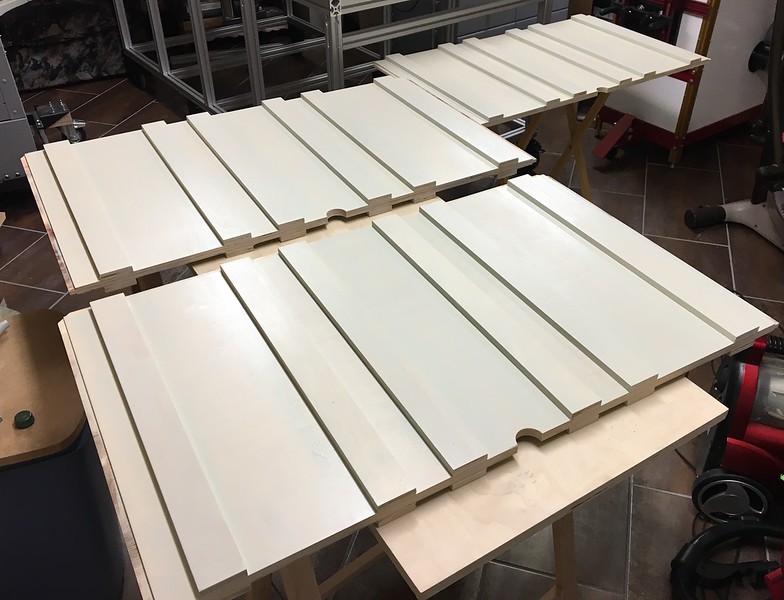
The exterior dimension for the aluminum frame is 1x2 meters. The Valchromat top was originally 1x2 meters, but I trimmed each edge of the top so it is inset 2mm on each side. This fixed an error I made when drilling the dog holes, and ensures the top does not interfere with anything clamped to the vertical rails.

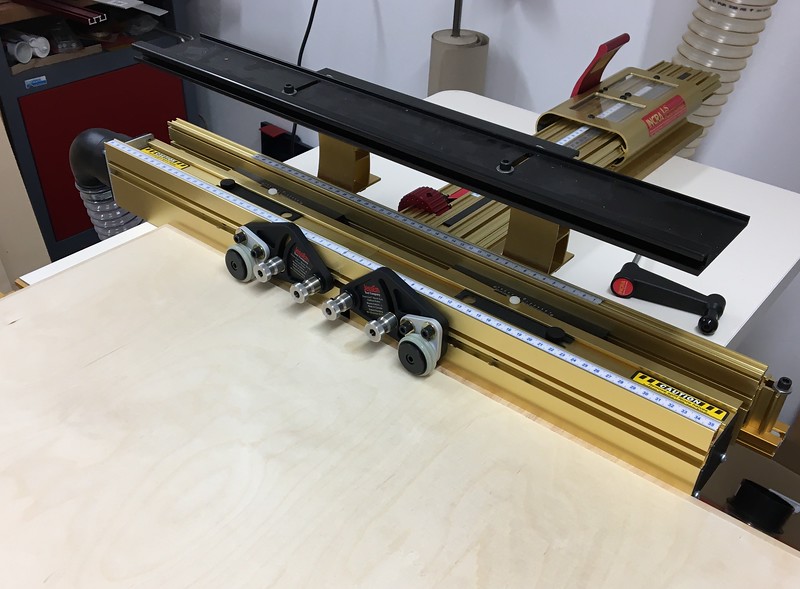
When I initially marked the reference line for the Parf MK2 rail along the 2-meter side, the width of the 0.5mm pencil line was accurate, but my placement of the guide on the line was not so good. The result was the perfect 10x20 grid of holes was skewed by about 1mm on the sheet. To fix this, I put a dog in each of the corner holes and centered the grid on the frame, with respect to the edges. This allowed me to see how much my guide error caused in the overall pattern, and determine how much to trim to make the sheet match the holes.

I used the FS 3000/2 guide rail and my tracksaw to square the sheet to the holes, and the overall change was a 4mm reduction on the width and length. This translated to a 2mm offset on each side, and I doubt I could have planned it better.

My lesson learned from this for the next workbench is to use a marking knife to make the reference marks for the Parf guide rail and not a pencil. However, I also think making the holes and then adjusting the sheet to fit is also a good plan.
 
I'll make a project thread for this bench when I'm finished, but here are some of the details now. I kept all of the receipts so far, and this is not an inexpensive table; however, I can't find a similar table for sale. I considered buying two of the Festool MFT/3 tables, but I would not have any storage or additional capability that I have with my workbench.

This is not my design, but one I adapted from AtomicRyan on the Festool Owners Group and his YouTube channel The Garage Journal. Ryan's workbench used a full 8x4 sheet of 19mm MDF, but my basement shop is too small to accommodate this size, so I reduced it to 1x2 meters.

Using angle aluminum for the frame should work well, as will the baltic birch top as long as you take your time boring the dog holes. If your goal is to make a work surface, any choice in a sturdy frame is good.

The aluminum extrusion is from a German company, item24, but it appears to be similar to the 8020 product in the U.S., and other extrusion products in the UK (item24 has a UK branch). I used Series 8 profile for my workbench, with 40x40mm for the main frame and 80x40 for the top rail on the four sides. I wanted dual T-track slots for the top rail. The T-slot is 8mm wide and the Festool clamps fit perfectly in the slot, as does an M8 carriage bolt head.

Here is the order I received from item24...

Item24-2-X2.jpg


...and here it is a few hours later completely assembled. I have since added two more top cross pieces and spaced them evenly to give more support to the 19mm top.

Item24-3-XL.jpg


The Festool guide rail is attached to the extrusion with the Dash-Board Guide Rail kit

Dashboard-2-M.jpg


Every piece of extrusion can be used with the Festool clamps or custom holders using the M8 carriage bolts. I milled these slots into each piece using a four-flute carbide cutter and my router. I made a template from scrap 12mm plywood to mill two pieces, end to end, at a time. The keyhole slot allows the M8 bolt head to fit into the slot and slide down the track. The Festool, or Bessey, clamps fit in the wider area and slide down the track.

Item24-10-L.jpg
that is a much sturdier version of this...

https://www.aluminium-profile.co.uk/ready-made-benches/mft-bench
I think i may have to make your version, do you have an order list? ;) (y)
 
I think i may have to make your version, do you have an order list? ;) (y)

I attached screen shots from the 26-page PDF that the item24 engineering application created that show the parts list and the exploded view. Position 3v is now 11 instead of 9, and the fastener 0.0.026.07 is 50 to account for the extra two support beams (Position 3v).

It took me a while to figure out how to use the engineering application on the item24 website, but once I did, building the workbench took about an hour. The output of the application is a PDF that shows the CNC operations on each piece, and exploded view, and assembly instructions unique to this workbench. I used the PDF to perform a quality check to make sure all of the components and parts counts were correct, and I discovered I had not joined a couple of horizontal pieces completely. As a result, the application did not add the joining hardware, identify the through holes, or the tapped holes at the joint. I went back into the application, nudged the extrusion so it made contact, and I immediately saw the holes appear at the joint.

When I was satisfied with the results, I submitted the project and waited. The next working day, I received an email confirmation of the order with a price quote. I accepted the order, and six days later the packages arrived. My cost for the original order, inclusive of VAT and shipping, was €1,214.


item24-View.png


item24-PL.png
 
I attached screen shots from the 26-page PDF that the item24 engineering application created that show the parts list and the exploded view. Position 3v is now 11 instead of 9, and the fastener 0.0.026.07 is 50 to account for the extra two support beams (Position 3v).

It took me a while to figure out how to use the engineering application on the item24 website, but once I did, building the workbench took about an hour. The output of the application is a PDF that shows the CNC operations on each piece, and exploded view, and assembly instructions unique to this workbench. I used the PDF to perform a quality check to make sure all of the components and parts counts were correct, and I discovered I had not joined a couple of horizontal pieces completely. As a result, the application did not add the joining hardware, identify the through holes, or the tapped holes at the joint. I went back into the application, nudged the extrusion so it made contact, and I immediately saw the holes appear at the joint.

When I was satisfied with the results, I submitted the project and waited. The next working day, I received an email confirmation of the order with a price quote. I accepted the order, and six days later the packages arrived. My cost for the original order, inclusive of VAT and shipping, was €1,214.


View attachment 96560

View attachment 96559
fantastic! thank you, i just plugged in the profile in aluminium-profile.co.uk and it only comes out 666 (work of the devil?) so im guesing with fasteners and castors it should come out a similar price.....saves me having to build a workbench :)
 
fantastic! thank you, i just plugged in the profile in aluminium-profile.co.uk and it only comes out 666 (work of the devil?) so im guesing with fasteners and castors it should come out a similar price.....saves me having to build a workbench :)

The IR line appears to be identical to the item24 products. The £666 sounds reasonable without the cost for the extra machining (drilling and tapping), hardware, and accessories. If you selected the IR line, make sure you use the standard connectors for the size of extrusion you selected.

Also, item24 makes a drill jig for each size of profile. While not required, the jig makes drilling the 7mm through holes in the extrusion easy and accurate. I couldn't find one on the KJN site, but here is the drilling jig from the item24 site. There are a bit pricey, at €115, but if you are going to be drilling all of the through holes yourself, this will save you a lot of frustration.

https://product.item24.de/en/produc...lling-jig-8-small-standard-connection-8-2609/
That £666 includes drilling, but possibly not tapping on the ends. It going to be a project after christmas at this rate, but at least i have everything i need to make the order when im ready, so thanks for sharing your parts list.
 
MikeK

That is almost the same construcion as my CNC machine. It is a brilliant construction method. Super solid and If you change your mind you can dismantle it and build something else. It is adult mechano.
I have noticed your drawers at the end, just wondering how you have affixed the plywood or whatever it is into the extrusion, have you used an angle bracket or a special fixing. I am now coveting drawers on my cnc machine, I never thought of it before.

Ollie
 
That looks excellent Mike 👏
I hadn’t thought of putting an oil finish on mine but having seen your post I think I will (y)
Smiling here :)
When I made mine, I wiped the valchromat top over with IKEA food safe mineral oil for chopping boards. I then stuck a heavy drill on top and used a thin sheet of cork in between to deal with pressure points.
The cork was drawing oil back out of that table top for weeks.
I think Valchromat is so resin dense that stuff really doesn't soak into it.
Let us know if you find the same thing Mike :)
It won't do much good, but it doesn't seem to do any harm either ....
 
I have noticed your drawers at the end, just wondering how you have affixed the plywood or whatever it is into the extrusion, have you used an angle bracket or a special fixing. I am now coveting drawers on my cnc machine, I never thought of it before.

Ollie

Ollie, I cut rabbets in the edges of the 15mm thick plywood so it would slide in the 8mm channel. The panels aren't fastened to the aluminum, but they are secure and don't move once the frame is tightened around them. I used my router table to cut the rabbets. In this photo, I've already cut the rabbet on one side and am now cutting the rabbet on the other side. The resulting tongue is 8mm thick and 10mm wide, and slides easily, in the channel without bottoming out in the channel.

Item24-5-L.jpg


Here's a photo of the inner panels while I was painting them. You can see the rabbet on both surfaces of the plywood around three of the edges. The catch tray below the Valchromat rests on the top of these panels, so there is no rabbet. The exterior panels that are surrounded by aluminum extrusion are rabbeted on all edges only on the inner surface. The corners of each rabbeted edges must be cut at a 45-degree angle because the joining hardware extends into the 8mm channel. The narrow boards attached to the plywood are the battens for the drawer slides.

Item24-11-L.jpg
 
Thanks MikeK

That is a good method, I might try it. My only concern is having to remove the leg in order to slide the panel in, I have some diagonal supports in there too.
I guess if I make the panel a nice tight fit I can remove the supports as it will replace them.
Your workshop is looking so neat and tidy it puts me to shame !

Ollie
 
Thanks MikeK

That is a good method, I might try it. My only concern is having to remove the leg in order to slide the panel in, I have some diagonal supports in there too.
I guess if I make the panel a nice tight fit I can remove the supports as it will replace them.

Ollie, I assembled and disassembled the workbench several times while fitting the various pieces. You get really good at it after a while. The internal spacing between the vertical uprights is 920mm. I cut the inner partitions in the photo above to 940mm wide, and then removed 10mm from each side for the rabbet. As I test fitted the panel, it fit perfectly as I tightened the hardware on the horizontal beams.

Your workshop is looking so neat and tidy it puts me to shame !

If you saw it now, you wouldn't say that. :confused:
 
Quick question @MikeK , there are lots of CNC cut MFT table jigs/tops sold on ebay, would buying one of those be a good way to ensure I get the layout of holes correct? I've not looked into this too closely yet so I'm not sure if the holes have to be a specified distance apart.
 
Billw

I have tried one of the CNC mft guides. It is like 2 rows of oversized holes and you use a guide bush in the router and it has alignment dogs for the edge which you use on the holes after you cut the first row.
I did get it to work but it was not a method I would repeat. The setup on the guide bush has to be VERY precise, they supplied an aluminium tape to take out any discrepancy but if everything is not perfectly centred in the router (with a mandrel to centre the bush first) then it is not really accurate enough.

I would say Peter Parfitts guide looks a better method. But for the price of the CNC made birch ply tops you would need to use it a lot to make it worthwhile.

Ollie
 
Quick question @MikeK , there are lots of CNC cut MFT table jigs/tops sold on ebay, would buying one of those be a good way to ensure I get the layout of holes correct? I've not looked into this too closely yet so I'm not sure if the holes have to be a specified distance apart.

Bill, I think the CNC cut tables from a reputable shop will likely have consistent results, but even then, there's no guarantee. The source of my workbench design, Ryan, had three 8x4 sheets of 19mm MDF cut at CNC shops before he found one that was accurate. I had considered using replacement Festool MFT/3 tops, at about €150 each, instead of making my own, but the replacement tops are 1102mm x 718mm. I would have to buy three tops for a table larger than what I wanted, or two tops for a table smaller than what I wanted. Each top was about twice the cost of the Valchromat sheet, but I would be spared the labor of cutting the holes.

If you're not tied to Festool products or any project that relies on the 96mm center to center spacing, then I don't think the spacing of the holes is important as long as they are accurate. I might never need to use each of the 200 holes in my table, but they are there just in case.
 
Smiling here :)
When I made mine, I wiped the valchromat top over with IKEA food safe mineral oil for chopping boards. I then stuck a heavy drill on top and used a thin sheet of cork in between to deal with pressure points.
The cork was drawing oil back out of that table top for weeks.
I think Valchromat is so resin dense that stuff really doesn't soak into it.
Let us know if you find the same thing Mike :)
It won't do much good, but it doesn't seem to do any harm either ....

I haven't seen any leaching out yet, but it's only been a couple of days for the test piece. If I had sensitive scales, I could have weighed the cloth I used to wipe off the excess from each coat, but you are correct...it is denser than MDF and didn't absorb as much as the small piece of MDF I tried at the same time. With the MDF, there wasn't much to wipe off after ten minutes.
 
If you're not tied to Festool products or any project that relies on the 96mm center to center spacing, then I don't think the spacing of the holes is important as long as they are accurate. I might never need to use each of the 200 holes in my table, but they are there just in case.

I can't say I've looked at anything Festool related! I've mainly looked at Veritas and Benchdogs stuff.
 
I can't say I've looked at anything Festool related! I've mainly looked at Veritas and Benchdogs stuff.
I have some dogs from Benchdogs, but don't have anything from Veritas. However, these product lines might focus more on the 20mm diameter dog hole diameter rather than the dog hole spacing. If so, then the hole spacing is whatever you want it to be.
 
hi guys , write that's an impressive bench.

so 4 locking wheels, any preference for where to get them. if rather not go to eBay
 
Back
Top