


joiner_sim
Established Member
You can get the latest updates first on my website: http://www.simonswoodwork.tk
Day One
I brought a new double bed a few months ago, and the headboad did not come with it. They wanted extra. Looking at the various designs & styles available, I liked the look of the wooden ones. However, at a cost of between £100-200 for something like this below, it really did not seem worth the money, especially when I knew I could make it cheaper instead! So here's the new project...... (based on a design of bedworld.net)

Here is my design with all dimensions and cutting list. Making it my own piece.

I got all the timber machined up before christmas, and it has been stored on bearers in the workshop til now. Here's what I've got to work with, its all softwood.

I haven't been in the workshop to work before christmas, because there's no heating and it's been really cold! Today's temperature in the shop reached 14 degrees at the most at one point. Here's what it was before I started work.

My first thing to do was get everything marked out, well the main framing marked out at least. Mortice & tennon joints, will be the only joint I use on this project. As you can see, the three rails, and two stiles are marked out.


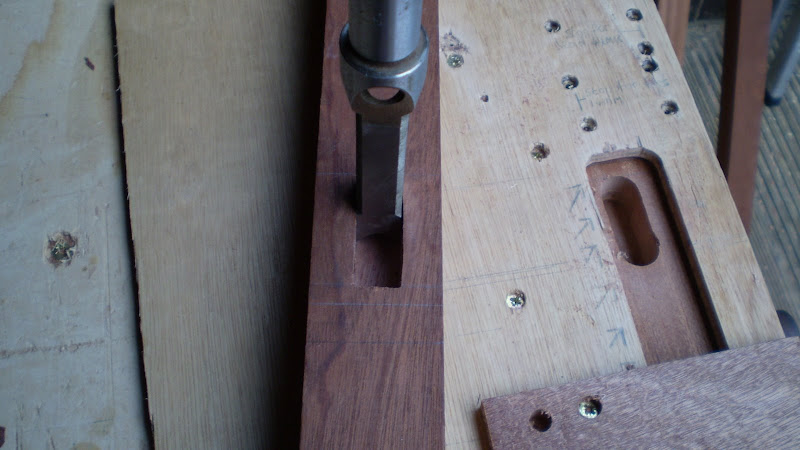
To do the mortices, I'm using a cordless drill with a 10mm flat bit in, that takes out most of the timber for me.

The I'm cleaning it out properly with a chisel. Using 10mm & 25mm Irwin/marples chisels.

The stiles are now both completley morticed. May I also point out, I using a new format of workbench today. I'm using a large offcut from a fire door apeture, with a vice I already have screwed on top of it. The worktop is sitting on top of two CLARKE folding trestles. At some point I hope I can incorporate a router into the table top.

With the tennons marked out, I am cutting the shoulders by hand with my tennon saw, as I found in the past my bandsaw, is just not accurate enough for a clean cut.

The thickness of the tennon is then cut on my bandsaw. A 10" Wickes, with a DRAGON SAW blade in it.

And now to cut the haunches, to save having to mark out the haunches on the 6 tennons, I setup a fence on the bandsaw and it was done quickly, thinking about it now, I wish I had cut the tennon thickness this way too!

As before, I cut the shoulders off with my tennon saw, as the bandsaw is not accurate enough in my opinion, here's the tennon finished.

And now for a dry assembly of the main frame.

Here's a close up of the joint on the face.
http://www.freewebs.com/simonswoodwork/ ... %20059.jpg
And one of the edge. I'm going to cut some wedge room, and wedge it. However I'm thinking about the wedge. Should I just do it plain softwood, or would it look effective as a hardwood wedge? What do you think?

With the dry assembly done, I thought I'd go and check it against the bed its for. I then realised that where my mullions are for attaching the the bed, I'd misread my drawing and marked them out wrong by 50mm! Good thing I checked it! You can see how far out I was.......

And here it is again, dry assembly with the attachment mullions in place. They are 18mm think and my rails are 22mm. Now yes shoulders are best for tennons anyways, but I was hoping to just mortice a hole and slide the whole timber piece in. This was not possible as there'd be nothing left in the rail! My mistake here in the cutting list, however the shoulders are better and hide the joint altogether. Unfortunatley though, I will have to adapt this approach for the slats above, because I got them out at 18x18mm! More work, but I think it'll be a better job because of it. Just wish, I'd thought it thru before!

The joints so far......

I probably be continuing with this project next weekend. All I have left to do before a glue up is, mark out the length of all the slats, there 22 in total. Then setup a fence on the bandsaw again and take off 4mm, both side of the tennon to fit into my 10mm mortices. Which have to be cut still, so thats 88 shoulders to be cut, 44 tennons cut to length and 44 10mm mortices to be done! I think that will probably be the longest part of the project time wise. I just hope that my patience will keep and every joint is done as well as the first one! Then before glueing up, comes the finishing of all the edges I won't be able to access after glue-up. I have now got a scraper set, but not sure how to use these & how to sharpen, advice would be appreciated please. My other alternative is getting out the orbital sander, although I've heard from others that the scrapers give a lovely finish. I'm thinking of staining in honey pine, antique pine or dark oak. Should I varnish it after the staining? All comments on the project so far, and advice on my problems that I have, are very much appreciated! Thankyou, for taking the time to look at this project so far!
Day One
I brought a new double bed a few months ago, and the headboad did not come with it. They wanted extra. Looking at the various designs & styles available, I liked the look of the wooden ones. However, at a cost of between £100-200 for something like this below, it really did not seem worth the money, especially when I knew I could make it cheaper instead! So here's the new project...... (based on a design of bedworld.net)
Here is my design with all dimensions and cutting list. Making it my own piece.
I got all the timber machined up before christmas, and it has been stored on bearers in the workshop til now. Here's what I've got to work with, its all softwood.
I haven't been in the workshop to work before christmas, because there's no heating and it's been really cold! Today's temperature in the shop reached 14 degrees at the most at one point. Here's what it was before I started work.
My first thing to do was get everything marked out, well the main framing marked out at least. Mortice & tennon joints, will be the only joint I use on this project. As you can see, the three rails, and two stiles are marked out.
To do the mortices, I'm using a cordless drill with a 10mm flat bit in, that takes out most of the timber for me.
The I'm cleaning it out properly with a chisel. Using 10mm & 25mm Irwin/marples chisels.
The stiles are now both completley morticed. May I also point out, I using a new format of workbench today. I'm using a large offcut from a fire door apeture, with a vice I already have screwed on top of it. The worktop is sitting on top of two CLARKE folding trestles. At some point I hope I can incorporate a router into the table top.
With the tennons marked out, I am cutting the shoulders by hand with my tennon saw, as I found in the past my bandsaw, is just not accurate enough for a clean cut.
The thickness of the tennon is then cut on my bandsaw. A 10" Wickes, with a DRAGON SAW blade in it.
And now to cut the haunches, to save having to mark out the haunches on the 6 tennons, I setup a fence on the bandsaw and it was done quickly, thinking about it now, I wish I had cut the tennon thickness this way too!
As before, I cut the shoulders off with my tennon saw, as the bandsaw is not accurate enough in my opinion, here's the tennon finished.
And now for a dry assembly of the main frame.
Here's a close up of the joint on the face.
http://www.freewebs.com/simonswoodwork/ ... %20059.jpg
And one of the edge. I'm going to cut some wedge room, and wedge it. However I'm thinking about the wedge. Should I just do it plain softwood, or would it look effective as a hardwood wedge? What do you think?
With the dry assembly done, I thought I'd go and check it against the bed its for. I then realised that where my mullions are for attaching the the bed, I'd misread my drawing and marked them out wrong by 50mm! Good thing I checked it! You can see how far out I was.......
And here it is again, dry assembly with the attachment mullions in place. They are 18mm think and my rails are 22mm. Now yes shoulders are best for tennons anyways, but I was hoping to just mortice a hole and slide the whole timber piece in. This was not possible as there'd be nothing left in the rail! My mistake here in the cutting list, however the shoulders are better and hide the joint altogether. Unfortunatley though, I will have to adapt this approach for the slats above, because I got them out at 18x18mm! More work, but I think it'll be a better job because of it. Just wish, I'd thought it thru before!
The joints so far......
I probably be continuing with this project next weekend. All I have left to do before a glue up is, mark out the length of all the slats, there 22 in total. Then setup a fence on the bandsaw again and take off 4mm, both side of the tennon to fit into my 10mm mortices. Which have to be cut still, so thats 88 shoulders to be cut, 44 tennons cut to length and 44 10mm mortices to be done! I think that will probably be the longest part of the project time wise. I just hope that my patience will keep and every joint is done as well as the first one! Then before glueing up, comes the finishing of all the edges I won't be able to access after glue-up. I have now got a scraper set, but not sure how to use these & how to sharpen, advice would be appreciated please. My other alternative is getting out the orbital sander, although I've heard from others that the scrapers give a lovely finish. I'm thinking of staining in honey pine, antique pine or dark oak. Should I varnish it after the staining? All comments on the project so far, and advice on my problems that I have, are very much appreciated! Thankyou, for taking the time to look at this project so far!
")


