Trying to learn the Art of Hand-Planing, Got a few questions

UKworkshop.co.uk

Help Support UKworkshop.co.uk:

This site may earn a commission from merchant affiliate links, including eBay, Amazon, and others.

MrDavidRoberts

Established Member
Joined
23 Dec 2016
Messages
388
Reaction score
2
Hello, I'm planing to make a few items which require a worktop (sideboard and a table) ,however I do not have a P/T ( I used to have but I don't have anywhere where to put one now + want to keep the noise down due to neighbors)

I have a No4 old Record marples plane which I bought on ebay few years ago, but I would be open to idea of buying a larger no 6-7 jointer plane as well as I understand it's necessary if you want to properly do larger pieces.

I will be making the tops from rather good quality Pine CLS
Being CLS it comes with eased-up edges which I just ran through a P/T in past to get everything nice and square , but now I'm a bit stuck since I do not have a P/T and need a way to remove some stock off so its with square edges and the boards can be joined/glued together to form a top.


So my questions are:
1-What kind of size plane I would need (would be the best) If I wanted to square up and finish off for example a board that is 20cm wide and 150cm long?

2- With a proper sharp plane how long do you think such task would take if the board would have minimal cupping/twisting (but still always there is some..)? - I guess It takes me about 10-15minutes to square up 2sides with planer and than run it through a thicknesser the normal way.

3-In past after I fed it through a P/T I was left with a finish that needed a lot of sanding to remove all planer marks and other imperfections behind, do you think there would be less marks left if you were to do it with a razor sharp hand plane? I have heard that in some cases you don't even need sanding after planing with handplanes? It took me about 60-80 minutes to properly sand a small 40x100cm worktop in past and still I was left with some sanding marks and the finish wasn't really that perfect, that's A LOT of effort/dust and noise pollution.

4- Can you suggest an easy to learn/not expensive system on how to properly sharpen handplane blades? I have tried to sharpen mine in past with just some regular dry sandpaper as I didn't had anything else but the results weren't really good and I wasn't really sure what I'm doing, I want to try to learn how to sharpen one so it's properly razor sharp - I have seen some articles where they suggest some crazy expensive £50 stones and you need few of them..there's gotta be a cheaper way to do that but without involving sandpaper? I have seen some cheap £10 honing guides/stone kits they sell but from the reviews those doesn't seem very good?


6- What make/model plane/s would you suggest to do such task? I have a budget of maybe £50-£70 (used) to get a larger jointer plane, however I'm not sure what's the best stuff you could get for such budget? Under no circumstances I want to buy cheap and buy twice, I want good quality stuff that would last a lifetime and be a pleasure to use - However my budget probably doesn't stretches to get something like lie nielsen planes as they cost like £400 new and I'm not sure what's the used market for them.


7- Let's be realistic , Is it possible to get rid of an super noisy P/T along with even noisier chip collector which takes up HUGE amounts of space in total and go do it the old-school way with just a handplane and get good results in reasonable time? There's gotta be an easier way than keeping a large/noisy/expensive Planer thickneser & chip extractor combo to use it only for maybe 1hour a month.


That's a lot of questions... If someone would have the time to chime in that would be really helpful for a total beginner in hand-planes like myself.
Thanks in advance.
 
so at least seven questions lol

I'd start with deciding on your sharpening system, do you want diamond stones? do you want water stones? and stick to only one system, I bought three eze lap stones, 250, 600 and 1200 grit, then made a simple piece of wood to hold the stones using a router plane, then bought a leather strop and stuck it to a piece of plywood and got the green aluminium oxide, I haven't changed this system and have found it's been really good and reliable once I got my bench set up and exactly how I wanted it.

also do you have a decent workbench? because without one, it's not going to be easy.

I'd recommend a no 5 1/2, it can flatten almost anything, longer planes are nice to have but not essential, although I have a nice no7, it doesn't get used as much as the 5 1/2.
 
Firstly buy a cheap awful No4 and convert it into a Scrub plane. This takes all the hard work out of roughly getting the stuff flat and true. A no 51/2 or 6 (I use a no 6 out of choice) is brilliant for flattening and for most applications will leave a satisfactory finish. For a super fine finish a No 4 or 41/2 can't be beaten. A planed surface is far smoother than what you will achieve with sand paper and you should never need it again!

I can get a 1" by 6" surface flat and 4 square in about 5 minutes if it's not too twisted. I wouldn't put it through a P/T it would take too long!

Any brand of plane can be into a good plane. An old record / Stanley are brilliant, but will probably need a bit of fettling. The only plane that IMO needs super setting up is a no4. / 4 1/2 where you want a whisper thick shaving.
 
MrDavidRoberts":2ufh4eom said:
3-In past after I fed it through a P/T I was left with a finish that needed a lot of sanding to remove all planer marks and other imperfections behind, do you think there would be less marks left if you were to do it with a razor sharp hand plane? I have heard that in some cases you don't even need sanding after planing with handplanes? It took me about 60-80 minutes to properly sand a small 40x100cm worktop in past and still I was left with some sanding marks and the finish wasn't really that perfect, that's A LOT of effort/dust and noise pollution.

I'm struggling to work out how you could have spent over an hour sanding something that size.
Was there anything left?!
 
cowfoot":24arrdfo said:
MrDavidRoberts":24arrdfo said:
3-In past after I fed it through a P/T I was left with a finish that needed a lot of sanding to remove all planer marks and other imperfections behind, do you think there would be less marks left if you were to do it with a razor sharp hand plane? I have heard that in some cases you don't even need sanding after planing with handplanes? It took me about 60-80 minutes to properly sand a small 40x100cm worktop in past and still I was left with some sanding marks and the finish wasn't really that perfect, that's A LOT of effort/dust and noise pollution.

I'm struggling to work out how you could have spent over an hour sanding something that size.
Was there anything left?!

6 sides to sand + have to ease up all edges (+have to sand out every blemish left by Planer as well with first grit) and you have to go through at least 3 different grits.. adds up..Start a timer for some tasks you do and you will be surprised how time flies ;)
 
you could always use a scraper, then sand after that, especially if there's tear out.
 
MrDavidRoberts":26c3aaro said:
3-In past after I fed it through a P/T I was left with a finish that needed a lot of sanding to remove all planer marks and other imperfections behind, do you think there would be less marks left if you were to do it with a razor sharp hand plane? I have heard that in some cases you don't even need sanding after planing with handplanes? It took me about 60-80 minutes to properly sand a small 40x100cm worktop in past and still I was left with some sanding marks and the finish wasn't really that perfect, that's A LOT of effort/dust and noise pollution.

4- Can you suggest an easy to learn/not expensive system on how to properly sharpen handplane blades? I have tried to sharpen mine in past with just some regular dry sandpaper as I didn't had anything else but the results weren't really good and I wasn't really sure what I'm doing, I want to try to learn how to sharpen one so it's properly razor sharp - I have seen some articles where they suggest some crazy expensive £50 stones and you need few of them..there's gotta be a cheaper way to do that but without involving sandpaper? I have seen some cheap £10 honing guides/stone kits they sell but from the reviews those doesn't seem very good?


6- What make/model plane/s would you suggest to do such task? I have a budget of maybe £50-£70 (used) to get a larger jointer plane, however I'm not sure what's the best stuff you could get for such budget? Under no circumstances I want to buy cheap and buy twice, I want good quality stuff that would last a lifetime and be a pleasure to use - However my budget probably doesn't stretches to get something like lie nielsen planes as they cost like £400 new and I'm not sure what's the used market for them.


.

My answers to questions 3, 4 and 6 based on my own experience:

3 - You should be able to achieve a shiny, glass like finish on CLS straight from the plane if you can consistently plane with the grain.

4 - Diamond stones and a strop - a double sided Axminster, Faithful stone will be good or the single sided ones from ITS - watch the Paul Sellers videos for a good technique.

6 - A Faithful No 7 for around £45 - A bit of time setting it up will yield beautiful results. And I didn't just get lucky with mine, a friend bought one too recently and can achieve identical results to me. It's cheap, it's a heavy lump of metal, it will last a lifetime.

In essence, you can get a good set up together for around £100 but the good results will come from understanding what it is that generates the results rather than just the equipment itself.
 
no idea":2j82nqpo said:
My answers to questions 3, 4 and 6 based on my own experience:

3 - You should be able to achieve a shiny, glass like finish on CLS straight from the plane if you can consistently plane with the grain.

4 - Diamond stones and a strop - a double sided Axminster, Faithful stone will be good or the single sided ones from ITS - watch the Paul Sellers videos for a good technique.

6 - A Faithful No 7 for around £45 - A bit of time setting it up will yield beautiful results. And I didn't just get lucky with mine, a friend bought one too recently and can achieve identical results to me. It's cheap, it's a heavy lump of metal, it will last a lifetime.

In essence, you can get a good set up together for around £100 but the good results will come from understanding what it is that generates the results rather than just the equipment itself.

can I have a link to the diamond stone? I have bought few faithful handtools in past and every time they have been very very very very far from being faithful , the plane looks very cheap indeed but surely that money would be better spent on an used old record/stanley plane? or I'm wrong and brand biased? Than again a plane really is a holder for a blade so not much engineering there, but with the cheap tools you never know...
 
many people (me included) have learned the basics by watching the various free videos on bench planes by Paul Sellers and doing what he says.

There are plenty of other approaches (c.f info the internet and books at nauseam), but he presents clear and easy to follow techniques that will allow you to achieve the work you have described with a relatively small investment of cash, so long as you are prepared to put in a bit of effort.

the videos answer all your questions in detail - here is a brief summary of what you will hear/see:
1. you can use your no 4. if you are planning on a lot of stock preparation you will benefit from a longer plane (no5 a good starting point)
2. a few minutes (obviously depending on how much you practice)
3. yes
4. sandpaper/strop if you are dabbling; fine/coarse diamond stone and strop if you are serious. (there are lots of other options - double sided norton works, <10 quid used. You can make the strop yourself).
6. old record/stanley - plenty available and reasonable prices
7 yes
 
MrDavidRoberts":1d8n4kqr said:
...I would be open to idea of buying a larger no 6-7 jointer plane as well as I understand it's necessary if you want to properly do larger pieces.
Not necessary no. You don't actually need a plane of the size of a 6 or 7 do to larger pieces of the size you indicate. The amount of larger-scale work you expect to do is a factor in how useful a longer plane would be but you can, in theory, plane a flat surface 100cm long with just a block plane. Nobody would if there were a larger plane available but it illustrates the point well that the plane can be much shorter than the wood being worked while still allowing you to produce a flat, level, surface. With a shorter plane the secret isn't so much in the plane but in constant checking of the surface for flat as you work, targeting the high spots and taking those down.

MrDavidRoberts":1d8n4kqr said:
...need a way to remove some stock off so its with square edges and the boards can be joined/glued together to form a top.
Once you get them glued together that's a lot of wood you're going to need to remove from the panel so you want either a jack set up for rough work or a roughing plane AKA scrub plane.

Regardless of the plane the used the iron will be prepared with a significant camber to the edge and you'll work across or diagonally and it'll hog the wood off like you won't believe. Then you smooth off with something else, then complete the prep as you prefer (smooth plane, smooth plane plus scraper, sanding).

1. You can do this with a no. 4 only but it's better to use a slightly longer plane for a couple of reasons. In the recent past in the UK the default recommendation here would be a Stanley or Record no. 5, but an old wooden jack in good condition would still be a decent choice not just for effectiveness but also for how cheaply you can acquire one in the UK.

2. No easy answer to this because there are too many other variables. Pine is obviously a soft wood but that doesn't always mean it's easy to plane, the number of knots the piece has and how varied the grain is will greatly affect how easily this is done. Call it 40 minutes as a very rough average?

3. There should be no marks left that need sanding if you do it right. That's not always possible straight from the plane but at minimum you aim for minimal afterwork once the planes are put aside. That'll usually amount to some scraping and/or sanding. If you'll be using sandpaper only at best you can expect to be done sanding one board face in under two minutes.

4. See any of the dozens (hundreds?) of previous threads on sharpening! I'll give you some highlights:

  • Pick a system and stick with it. If you struggle initially it's important to bear in mind they all work, and they can all work very well (certainly good enough for any reasonable use).
  • Oilstones are the cheapest in the grand scheme of things, especially if you can buy an old one at a car boot (often being sold for next to nothing, making them the bargain of the sharpening world). You'll never wear one out even if you tried. And they keep flat practically indefinitely if you spread the wear.
  • Abrasive paper is the most expensive in the long term because the sharpening media wears out. Can achieve very good results for little initial outlay and they're versatile since you can use dry, with various oily or watery honing liquids.
  • Waterstones tend to be the most expensive up front and they require regular (if not to say constant) maintenance to keep flat.
  • Diamonds are the most effective sharpening medium, period, but they're often felt to be a bit "soulless and lacking in feedback". Brand-name ones can be quite expensive, cheaper ones can work very well for a tiny fraction of the price – under a fiver each!
  • With a plane iron you don't need to strop to get the edge sharp enough for most of the work you'll do, but since you'll need to use the same sharpening system for any chisels you use you should have a strop. Don't buy one, make your own. No leather needed if you use a stropping compound of any type since it's the fine abrasive that's doing the work, not the strop material itself.

7. Yes or no. It's up to the individual rather than being a clear-cut yes/no proposition. You have to be realistic about the time you have available to spend doing stock prep and if you have the energy for the effort expenditure. Smaller parts and smaller project in general it's entirely within the grasp of anyone of reasonable fitness, but on large-scale projects and a larger amount of smaller stuff the time and effort can get old fast.

MrDavidRoberts":1d8n4kqr said:
I have bought few faithful handtools in past and every time they have been very very very very far from being faithful , the plane looks very cheap indeed but surely that money would be better spent on an used old record/stanley plane? or I'm wrong and brand biased?
Faithfull planes can be very good for the money. I have one and a mate has two and all three are very solid users that required minimal fettling to set up, i.e. no work to their soles.

That said, an older Record is arguably better looking and probably better made. This and any higher quality of materials isn't a significant factor though, as I say Faithfulls can be good users, but since you can likely get a good Record or Stanley UK plane for much less than a new Faithfull and they'll probably require about the same amount of time to set up then I think the choice is an easy one!

I'd happily make do with any of the three, but given the choice I'd want a Record for looks and sentimental reasons.
 
I've never owned a P/T as I (a) don't have the money for one and (b) don't have the right workshop to have one (lack of space + lack of soundproofing). So I've only ever used hand planes to flatten stuff. My general observations as follows:

1. I disagree entirely with the statement that a no 7 jointer isn't used much in the hand tool shop. It is absolutely critical for jointing the edge of boards. Sure, you can do it with a no 5 but a 7 will give you a much better joint - and that's what counts in the long run as there's less chance of it coming apart. A no 7 is also going to give a much better finish when flattening wide boards, as it's long sole allows it to avoid following the character of the timber and results in only high spots being reduced (which is what you want). Sure its a big and heavy plane but think of the massive gains your guns will get!!

2. I've recently started using a scrub plane. These things make very light work of rapid removal of material but you need to be careful with tear out. For example, it will quite literally tear chunks out around knots if you have the blade set for too deep a cut. However, on balance, I'd definitely recommend using one as it speeds the process up a great deal.

3. As well as having a good range of hand planes, a straight edge is also necessary to achieve a flat surface. Keep checking where the high and level spots are and whether you're getting it flat along as well as across the board.

4. Always leave laminated boards wider than their required finish dimensions before flattening - you will almost always get tear out on the back of the board and it is useful to have the extra width to be able to rip this edge off when you're done flattening.

5. A general approach to hand flattening is as follows: Begin by working 90 degrees across the grain. Start with a scrub (if you have it) or a jack plane (if you don't) if your board is really gnarly. Otherwise, use the no 7. It can help to rub chalk or a pencil on the board as this will highlight where the plane is cutting. Use your straight edge to get an idea of if the board face you're working on is concave or convex. Once you've mostly removed this concave/convex characteristic, if you started with a scrub/jack, move to the no 7 to finish off and get the board flat across the grain. Then, still using your no 7 and start working across the diagonals. This will begin to remove any high spots along the grain. Again, when you've happy your plane is beginning to get a full shaving, start to work (again with the no 7) along the grain. Keep checking with your straight edge (and actually winding sticks too - always good to avoid twist!). When you're happy it's mostly flat, you can use the smoothing plane to give the surface a quick plane. Mark this face with a witness mark, so you know it has been dressed. Congratulations! That's one side done - you can now use this a reference face to thickness the other side.

It takes a bit of practise and I wouldn't say I'm an expert but it is good fun and very rewarding when you get a flat board at the end of it. Good luck! (hammer)
 
MrDavidRoberts":3bqu7ng6 said:
cowfoot":3bqu7ng6 said:
MrDavidRoberts":3bqu7ng6 said:
3-In past after I fed it through a P/T I was left with a finish that needed a lot of sanding to remove all planer marks and other imperfections behind, do you think there would be less marks left if you were to do it with a razor sharp hand plane? I have heard that in some cases you don't even need sanding after planing with handplanes? It took me about 60-80 minutes to properly sand a small 40x100cm worktop in past and still I was left with some sanding marks and the finish wasn't really that perfect, that's A LOT of effort/dust and noise pollution.

I'm struggling to work out how you could have spent over an hour sanding something that size.
Was there anything left?!

6 sides to sand + have to ease up all edges (+have to sand out every blemish left by Planer as well with first grit) and you have to go through at least 3 different grits.. adds up..Start a timer for some tasks you do and you will be surprised how time flies ;)

Thought you said you had a Mirka sander or something that replaced the 4 or 5 sanders you already had? Can't recall the exact info you provided.
 
MrDavidRoberts":27b3zgif said:
So my questions are:
1-What kind of size plane I would need (would be the best) If I wanted to square up and finish off for example a board that is 20cm wide and 150cm long?

2- With a proper sharp plane how long do you think such task would take if the board would have minimal cupping/twisting (but still always there is some..)? - I guess It takes me about 10-15minutes to square up 2sides with planer and than run it through a thicknesser the normal way.

3-In past after I fed it through a P/T I was left with a finish that needed a lot of sanding to remove all planer marks and other imperfections behind, do you think there would be less marks left if you were to do it with a razor sharp hand plane? I have heard that in some cases you don't even need sanding after planing with handplanes? It took me about 60-80 minutes to properly sand a small 40x100cm worktop in past and still I was left with some sanding marks and the finish wasn't really that perfect, that's A LOT of effort/dust and noise pollution.

4- Can you suggest an easy to learn/not expensive system on how to properly sharpen handplane blades? I have tried to sharpen mine in past with just some regular dry sandpaper as I didn't had anything else but the results weren't really good and I wasn't really sure what I'm doing, I want to try to learn how to sharpen one so it's properly razor sharp - I have seen some articles where they suggest some crazy expensive £50 stones and you need few of them..there's gotta be a cheaper way to do that but without involving sandpaper? I have seen some cheap £10 honing guides/stone kits they sell but from the reviews those doesn't seem very good?


6- What make/model plane/s would you suggest to do such task? I have a budget of maybe £50-£70 (used) to get a larger jointer plane, however I'm not sure what's the best stuff you could get for such budget? Under no circumstances I want to buy cheap and buy twice, I want good quality stuff that would last a lifetime and be a pleasure to use - However my budget probably doesn't stretches to get something like lie nielsen planes as they cost like £400 new and I'm not sure what's the used market for them.


7- Let's be realistic , Is it possible to get rid of an super noisy P/T along with even noisier chip collector which takes up HUGE amounts of space in total and go do it the old-school way with just a handplane and get good results in reasonable time? There's gotta be an easier way than keeping a large/noisy/expensive Planer thickneser & chip extractor combo to use it only for maybe 1hour a month.


That's a lot of questions... If someone would have the time to chime in that would be really helpful for a total beginner in hand-planes like myself.
Thanks in advance.

1) I'd suggest a record 6 if you can find one inexpensively with a good iron. If you think you're really going to stick with this, a wooden jack plane and a 7 (or a 5 and a 7) would be money well spent if bought right, and money that you could get back if you change your mind later.

2) do your best to sort out boards that don't have cupping (when buying the wood). If you can manage to do that, or alternate those with minimal cupping (as you should, anyway, so that the glued together top doesn't cup), you can just edge joint the boards and put them together (perhaps into two halves) and thickness off enough to remove the curves all at once. It will be easier than single boards, and faster. If there is too much cup in the boards, you probably won't be able to do that. When we use hand tools, we generally put parts together and then do surface prep if possible, otherwise we end up doing it twice. I wouldn't worry about the time. It'll take a little bit longer, but you're building skills and you'll probably enjoy it.

3) you will probably need to follow your plane with something (sandpaper if you're using pine, scrapers are pretty nasty on pine and crush the surface of the wood). Do what you can planing, and then sand to a finish.

4) If you find a norton fine india stone and a tube of autosol, you're set for sharpening as sharp as you need to go. You do have a primary bevel to maintain, which you can do with a belt sander if you have one, a grinder, or with a coarse stone or coarse sandpaper. primary less steep, final bevel steeper. Freehand if possible. Camber all of your planes - see tutorials about amounts - camber on the smoother will allow you to finish directly off of the plane down the road.

You can easily work without power tools if needed. Some things will be difficult (excavating large mortises, but presume that you will allow yourself a power drill), and some things will take a fair bit longer (any significant amount of thicknessing on wood that's other than easy), but there's no great reason you can't do it. if you do a couple of projects, your speed will probably triple and your frustration third or less. Dimensioning by hand is a matter of practice more than method - I don't think anyone does it the same, and while the paint by number instructions will help you get started, you'll soon forget them and it will be a natural process.
 
MrDavidRoberts":f33r024w said:
So my questions are:
1-What kind of size plane I would need (would be the best) If I wanted to square up and finish off for example a board that is 20cm wide and 150cm long?

2- With a proper sharp plane how long do you think such task would take if the board would have minimal cupping/twisting (but still always there is some..)? - I guess It takes me about 10-15minutes to square up 2sides with planer and than run it through a thicknesser the normal way.

3-In past after I fed it through a P/T I was left with a finish that needed a lot of sanding to remove all planer marks and other imperfections behind, do you think there would be less marks left if you were to do it with a razor sharp hand plane? I have heard that in some cases you don't even need sanding after planing with handplanes? It took me about 60-80 minutes to properly sand a small 40x100cm worktop in past and still I was left with some sanding marks and the finish wasn't really that perfect, that's A LOT of effort/dust and noise pollution.

4- Can you suggest an easy to learn/not expensive system on how to properly sharpen handplane blades? I have tried to sharpen mine in past with just some regular dry sandpaper as I didn't had anything else but the results weren't really good and I wasn't really sure what I'm doing, I want to try to learn how to sharpen one so it's properly razor sharp - I have seen some articles where they suggest some crazy expensive £50 stones and you need few of them..there's gotta be a cheaper way to do that but without involving sandpaper? I have seen some cheap £10 honing guides/stone kits they sell but from the reviews those doesn't seem very good?


6- What make/model plane/s would you suggest to do such task? I have a budget of maybe £50-£70 (used) to get a larger jointer plane, however I'm not sure what's the best stuff you could get for such budget? Under no circumstances I want to buy cheap and buy twice, I want good quality stuff that would last a lifetime and be a pleasure to use - However my budget probably doesn't stretches to get something like lie nielsen planes as they cost like £400 new and I'm not sure what's the used market for them.


7- Let's be realistic , Is it possible to get rid of an super noisy P/T along with even noisier chip collector which takes up HUGE amounts of space in total and go do it the old-school way with just a handplane and get good results in reasonable time? There's gotta be an easier way than keeping a large/noisy/expensive Planer thickneser & chip extractor combo to use it only for maybe 1hour a month.


That's a lot of questions... If someone would have the time to chime in that would be really helpful for a total beginner in hand-planes like myself.
Thanks in advance.

1) I'd suggest a record 6 if you can find one inexpensively with a good iron. If you think you're really going to stick with this, a wooden jack plane and a 7 (or a 5 and a 7 if risk in setting up a jack plane seems unappealing) would be money well spent if bought right, and money that you could get back if you change your mind later.

2) do your best to sort out boards that don't have cupping (when buying the wood). If you can manage to do that, or alternate those with minimal cupping (as you should, anyway, so that the glued together top doesn't cup), you can just edge joint the boards and put them together (perhaps into two halves) and thickness off enough to remove the curves all at once. It will be easier than single boards, and faster. If there is too much cup in the boards, you probably won't be able to do that. When we use hand tools, we generally put parts together and then do surface prep if possible, otherwise we end up doing it twice. I wouldn't worry about the time. It'll take a little bit longer, but you're building skills and you'll probably enjoy it.
3) you will probably need to follow your plane with something (sandpaper if you're using pine, scrapers are pretty nasty on pine and crush the surface of the wood). Do what you can planing, and then sand to a finish.

4) If you find a norton fine india stone and a tube of autosol, you're set for sharpening as sharp as you need to go. You do have a primary bevel to maintain, which you can do with a belt sander if you have one, a grinder, or with a coarse stone or coarse sandpaper. primary less steep, final bevel steeper. Freehand if possible. Camber all of your planes - see tutorials about amounts - camber on the smoother will allow you to finish directly off of the plane down the road.

You can easily work without power tools if needed. Some things will be difficult (excavating large mortises, but presume that you will allow yourself a power drill), and some things will take a fair bit longer (any significant amount of thicknessing on wood that's other than easy), but there's no great reason you can't do it. if you do a couple of projects, your speed will probably triple and your frustration third or less. Dimensioning by hand is a matter of practice more than method - I don't think anyone does it the same, and while the paint by number instructions will help you get started, you'll soon forget them and it will be a natural process.
 
By the way, it's always nicer to buy planes that are actually in use if you can get them from someone for a reasonable price. I'll bet I've bought 100 planes in my woodworking hobby time over the last 12 years (I didn't keep them all, didn't even keep most of them). The risk is much lower in getting something that's currently in use.

You're too far away for me to set you up with something, otherwise I'd set up a couple of planes to make sure you're off on the right foot, as getting an inexpensive plane that's too hard to solve as a beginner can be off putting.

Translation - if you don't have a local source for planes in use, if there is a for sale part of this forum, you might want to make a request to see if someone has something in use that they'd part with.
 
Hello, I'm planing to make a few items which require a worktop (sideboard and a table) ,however I do not have a P/T ( I used to have but I don't have anywhere where to put one now + want to keep the noise down due to neighbors)

Hi David

Others have given you advice on planes and sharpening. I'd like to mention that there are many shortcuts when using handtools, ones that are not generally considered when using powertools. It is these that speed up work with handtools.

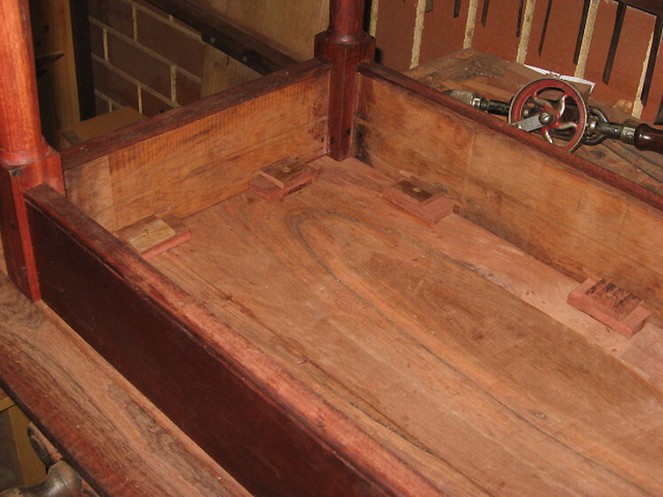
For example, when making panels for a sideboard and a table top, you only need to level and finish the upper side. Sides and parts that are not seen do not require thicknessing or even finishing if there is no structural reason.

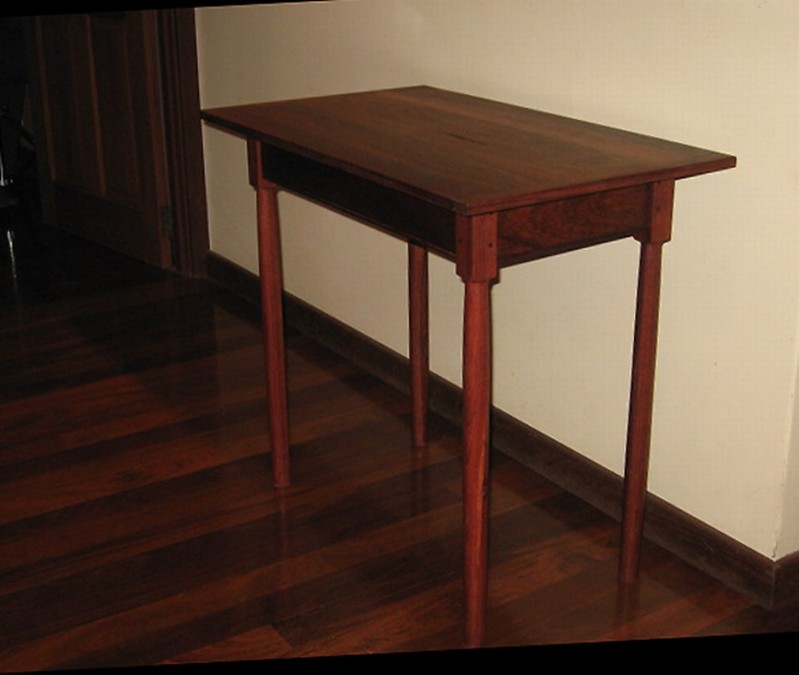
This Shaker-style table looks finished on the outside ..

AShakerTableforMothersDay_html_m63b86ce8.jpg


However, the tabletop is built from old floorboards of different thicknesses, and only the surround is level ...

AShakerTableforMothersDay_html_m7af1055e.jpg


Perhaps others here will mention some of the shortcuts of which they are fond.

Regards from Perth

Derek
 
If I were you, I would be looking to spend your money on a vintage plane, If you aren't in a rush for one
you will find one for a bargain. look for a thick soled plane with thick sides preferably.
You could get one at a car boot for very little.
An old oilstone I would be on the search for too in car boots.
I would buy a cheap generic eclipse clone 5quid honing guide to get started.

Most importantly, since you already have a plane you need a bench to work on.
How much space can you designate for this bench ?
Will this space be against a wall ?
First bench I made was against a wall.
Got a spirit level and chalked the wall and assembled a frame to this level.
I then laid a fire door on this frame. fire doors are usually composite, flat and rigid.
you could layer some other surface on this ...
Ply wont do, as it is not flat.

Your bench needs to be DEAD flat as you will be using this for a reference.
It will show you what you done wrong and you will learn more successfully.
You can even crayon your bench and rub the stock on this to get the result faster
The high spots that need to be removed will be visible, and you wont be chasing your tail trying to get the plane to cut into a low spot .
If you were planing thin stock it would deflect while your planing and you would not get a flat board.
This smooth fire door top should not be distorted by affixing it to the frame !
You will then check the flatness of your bench afterwards, by getting two long planks the length of your top and surface
your timber so there is absolutely no gaps anywhere along the length of either....crayon very handy here
Neither piece should rock or there's a hump in the middle, you will be aiming for the slightest hollow .
And the same thing goes for a hollow along the lenght .
You should see a TRACE of crayon on each end of the timber ...like 1cm or less.
Then you know your in contact on the outside permiter of the timbers .
Now you can compare the two lengths together.
there should be no gap whatsoever.
If there is you need to shim your bench.

Look up David W on youtube for cap iron settings if you get into trouble.

Good luck
Tom
 
Back
Top