I understood Derek to mean "metal removed on the honing stone". If you have a 25 deg primary bevel you don't have to remove much steel to hone it - it's a microbevel, even if honed at 50 deg. If you grind at 50 deg, you then have to remove metal from the whole face of the bevel to hone it (also at 50 deg). This right?
You are using an out of date browser. It may not display this or other websites correctly.
You should upgrade or use an alternative browser.
You should upgrade or use an alternative browser.
The secret to cambering Bevel Up plane blades
- Thread starter Derek Cohen (Perth Oz)
- Start date


Help Support UKworkshop.co.uk:
This site may earn a commission from merchant affiliate
links, including eBay, Amazon, and others.
dchenard
Established Member
promhandicam":3h3ehsbv said:In the initial set up of converting a blade from straight to cambered then yes more steel has to be removed if you are grinding a 25 degree bevel as opposed to a 50 degree bevel. However once the basic shape has been produced, when it comes to sharpening, less steel will be removed if you add a secondary bevel onto a 25 degree primary bevel than if you are trying to hone the whole of a 50 degree face.
I hope this helps,
Steve
Totally agree. Might be the term selection (grinding/sharpening/honing) that created the confusion...
Blame it on a language difference, as neither Derek nor I have English as their first language :lol:
I'll get my coat now :mrgreen:
DC-C
Derek Cohen (Perth Oz)
Established Member
Steve
Thank you for clarifying that point. It is amazing in how many ways the same sentence might be (mis)interpreted.
Here is what I originally wrote:
Regards from Perth
Derek (who is indeed bilingual, but admits that he has no excuses as English is his first language)
The DC Club
Thank you for clarifying that point. It is amazing in how many ways the same sentence might be (mis)interpreted.
Here is what I originally wrote:
Here it is in a nut-shell … grind the primary bevel on all plane blades to 25 degrees. Don’t try to camber any blade that is greater than this, such as one with a 38- or 50 degree primary bevel
Regards from Perth
Derek (who is indeed bilingual, but admits that he has no excuses as English is his first language)
The DC Club
dchenard
Established Member
promhandicam":22qpha7f said:dchenard":22qpha7f said:Pardon me for being insistent, but the statement that one will remove more steel on a 50 degree bevel than on a 25 degree bevel just plain doesn't work. . . . Cheers, DC-C
Having read through the hole post, I think that, in your own ways both Derek and Denis are correct.
In the initial set up of converting a blade from straight to cambered then yes more steel has to be removed if you are grinding a 25 degree bevel as opposed to a 50 degree bevel. However once the basic shape has been produced, when it comes to sharpening, less steel will be removed if you add a secondary bevel onto a 25 degree primary bevel than if you are trying to hone the whole of a 50 degree face. Perhaps the following will illustrate what I'm trying to say:

The red lines indicate where the iron would be honed to get a 50 degree angle.
I hope this helps,
Steve
Time for a mea culpa

Looks indeed like I did not interpret Derek's statement properly. As exposed here by Steve, I do not have any argument.
Furthermore, and this is where I must admit being red-faced, in my example where one grinds a camber on the whole face of a 25 degree bevel iron versus the same on a 50 degree iron, I've maintained that the 25 degree iron will require more metal being removed in order to form the same camber. Thanks to Wiley, I must admit that I was wrong #-o
In fact, no matter what the bevel on the iron, grinding a camber on the whole bevel of an iron will result in the same amount of metal removed, no matter what the bevel angle.
The point that I neglected was that, as the bevel angle goes down, the "effetive thickness" of metal removed to produce a camber goes down at the same time that its length goes up. Think "long and thin" versus "short and fat".
Definitions:
BLT: blade thickness
BET: "effective thickness" of metal removed
BL : bevel length
C : camber of the blade
(theta): bevel angle of the iron
The equations go like this:
BL = BLT / sin (theta)
BET = C sin (theta)
The section of metal removed at any point over the width of the blade is a parallelogram in section, which area can be computed as a rectangle of length BL and thickness BET. Multiplying the two, we get:
Section = BL * BET = BLT * C
Notice that the angle of the equation get cancelled out, or in other words, the bevel angle has no bearing on the amount of metal being removed, only blade thickness and amount of camber matter.
Thanks to Wiley for clarifying this
ccasion5: DC
David C
In Memorium
Ivan,
I have been using that New Jet jig, (which fits Tormek) and have written about it and camber in general, in the issue of F&C which is out about now.
It does a very good job on gentle and medium camber, may or may not do enough for a scrub plane, didn't have time to find out.
I like it a lot.
David Charlesworth
David C
In Memorium
Ivan,
There is one at the bottom of Bideford high street!
Where are you?
David
There is one at the bottom of Bideford high street!
Where are you?
David
bugbear
Established Member
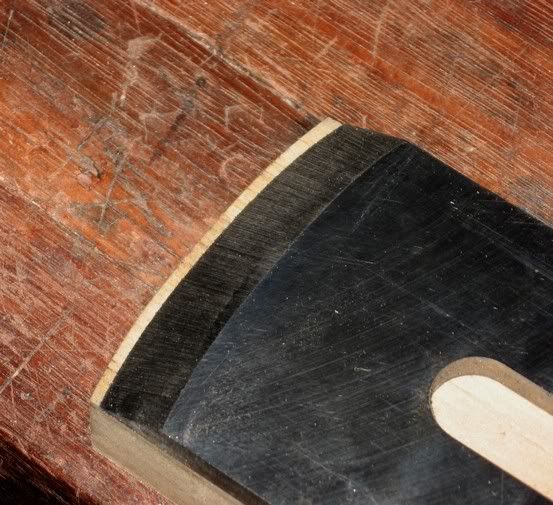
The result is a cambered 25 degree primary bevel ….
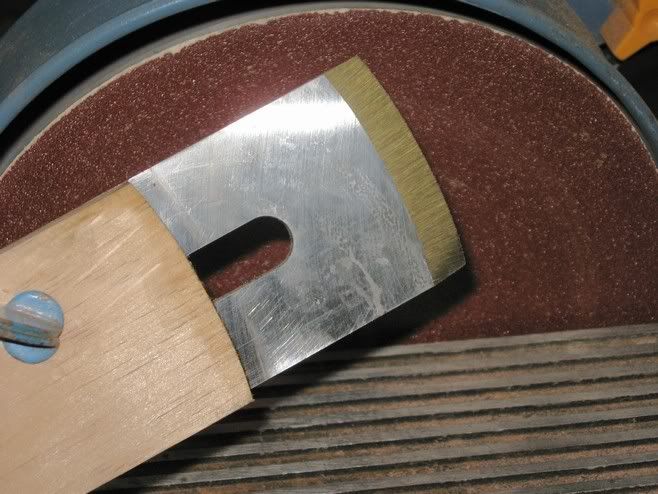
And, yes Bugbear, the camber does indeed match the template! Look …
I never denied that it would; my point was, and remains, that the blade camber is generated by your skill and care, not the template.
None of which is to deny the demonstrable fact that your procedure generates the blade you desire.
BugBear
David C
In Memorium
BB,
I was going to point out the same thing.
The skill required is to keep the long stick at the same angle.
A support at the top end of the stick would help to maintain consistent angle, would it not?
best wishes,
David
I was going to point out the same thing.
The skill required is to keep the long stick at the same angle.
A support at the top end of the stick would help to maintain consistent angle, would it not?
best wishes,
David
bugbear
Established Member
David C":w3aew68z said:BB,
I was going to point out the same thing.
The skill required is to keep the long stick at the same angle.
No., that all works fine. The bevel angle is maintained by the distance from the blade tip to the template resting on the guide bar.
It is the notion that the template (end) shape generates a matching camber that I take issue with.
It is (IMHO) obvious that simple leaving the blade in the central position would result in a simple square end. Indeed, leaving the blade in any one position would result in a splendid "flat", and this could be done at any position.
From this it follows that the desired curve is not being constrained by the template, but only allowed. As such, I claim that any "template" e.g. a simple point (or small radius'd end e.g. 10mm) would work just as well.
BugBear
promhandicam
Established Member
I agree with BB that the way that Derek has produced the camber isn't dependant on the form of the wooden template. The only way of using a template like that to reproduce the same form on the blade would be to have a set up similar to that used in key cutting - i.e. a stylus running against the template and using a thin grinding disk - it wouldn't be possible to do it using a belt sander setup.
If you look closely at the photos of the cambered blade, you can see that the striations are not parallel but that they radiate out from the centre indicating that the blade was pivoted around a central point which as BB says could just as easily be a small radius. What is more critical in producing the desired camber is the distance from the pivot point to the grinding surface (to give the desired curve) and the height of the pivot point above the grinding surface to give the angle of the camber.
Maybe a better jig for those who aren't as skilled grinding / using a belt-sander would be something similar to this:

Steve
If you look closely at the photos of the cambered blade, you can see that the striations are not parallel but that they radiate out from the centre indicating that the blade was pivoted around a central point which as BB says could just as easily be a small radius. What is more critical in producing the desired camber is the distance from the pivot point to the grinding surface (to give the desired curve) and the height of the pivot point above the grinding surface to give the angle of the camber.
Maybe a better jig for those who aren't as skilled grinding / using a belt-sander would be something similar to this:
Steve
sparky
Established Member
Well I'd like to ask a quick question :roll:
If someone sharpened just by hand (I do it that way with waterstones) isn't the higher bevel angle easier to work with since it is closer to the final angle.
It seems to me that this whole discussion presumes that the blades are initially ground mechanically. Which is fine, but I was curious about BU blades done by hand.
Also when I say by hand I mean freehand, (without a honing guide) which is a goal of mine to learn.
If anyone has any ideas, I appreciate it.
Sparky
David C
In Memorium
Sparky,
For pure hand honing I think you might like the Krenov method.
The grinding is done at the same angle you want to hone at.
The hollow grind then sits nice and stable on an oilstone.
Honing polishes both the heel and the tip of the bevel.
However once much of the bevel is honed and flat, it takes a long time to remove enough metal to resharpen....
So JK returns to his hand cranked grinder to start the cycle all over again.
David
David C
In Memorium
Steve,
I show a concocted jig which works something like your diagram on Page 50 of my second book.
I wanted to convert wooden Jack planes to hollowing planes (a GREAT idea from the Alan Peters book, a scandal that it is no longer in print) and designed the jig to give a fixed radius without any skill or feel involved. i.e. almost totally repeatable.
BB has summed things up rather nicely, as usual, the Derek jig involves some skill and feel, which he clarly has, judging by the nice looking results.
David
sparky
Established Member
Thanks Mr. C and all
So here is my next question. Since I am completely "cordless" :roll: where could I find a hand-powered grinder?
sparky
So here is my next question. Since I am completely "cordless" :roll: where could I find a hand-powered grinder?
sparky
Derek Cohen (Perth Oz)
Established Member
For pure hand honing I think you might like the Krenov method.
The grinding is done at the same angle you want to hone at.
Hi David
That is what I do with the BD blades and chisels. It makes freehanding a blade very easy.
To set the bevel angle/hollow I use the Tormek jig on a bench grinder.

Regards from Perth
Derek
woodbloke
Established Member
David C":20w71b4r said:Steve,
I show a concocted jig which works something like your diagram on Page 50 of my second book.
I wanted to convert wooden Jack planes to hollowing planes (a GREAT idea from the Alan Peters book, a scandal that it is no longer in print) and designed the jig to give a fixed radius without any skill or feel involved. i.e. almost totally repeatable.
BB has summed things up rather nicely, as usual, the Derek jig involves some skill and feel, which he clarly has, judging by the nice looking results.
David
I recently made one of David's jigs for grinding curved blades on a Tormek and it works very well...agree again about Alan Peters book (of which I have a copy), one of the very best books on woodwork that you will find anywhere - Rob
Yes, it's true that if you didn't move the blade, you'd get a straight(ish) edge. That's also true for a standard straight jig. ??! you say? The point is you have to slide even a straight jig from side to side whilst grinding, either to even out wear in the stone, or because the blade's wider than the wheel. Despite the helpful jig, it's still a 'hand' process needing a bit of skill.
If the camber was produced by the template acting just as a point pivot, the camber would have a rather extreme radius of about 2". From Derek's description and photos, he rolls the template back and forth on the rest. If the edge follows the template, he must do this for about the same number of revolutions at each point. (a bit like DC's camber honing) In practice a steady roll back and forth should do the trick.
I'm assuming that any required precision (straightness, skew, match edge of cap iron etc) can be obtained at the first honing?
Derek Cohen (Perth Oz)
Established Member
From Derek's description and photos, he rolls the template back and forth on the rest. If the edge follows the template, he must do this for about the same number of revolutions at each point.
Hi Ivan
That is exactly what I do.
I wish I could take a video to reveal the technique. Yes, there is handskill involved (I'd like to believe that!
) but the template is also doing its work to create a specific camber.Perhaps someone on the forum would try replicatng the template and the action as I described it?
Regards from Perth
Derek
Similar threads
- Replies
- 0
- Views
- 178
- Replies
- 31
- Views
- 3K
- Replies
- 20
- Views
- 2K
- Replies
- 117
- Views
- 9K