


Derek Cohen (Perth Oz)
Established Member
THE HNT GORDON SPOKESHAVES
Reviewed by Derek Cohen
I’ve had the HNT Gordon Flat- and Round spokeshaves on loan from Terry Gordon for several months now, having met up with him at the last Perth Wood Show. After a little tuition from Terry, I have spent the time finding projects to practice my skills with a view to assessing their strengths and weaknesses. These are reported here.
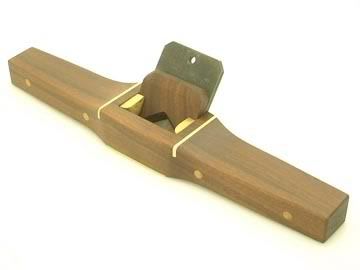
The HNT Gordon spokeshaves are clearly different from the more familiar Preston, Stanley, and Stanley-based fare, such as those from Lie Nielsen or Lee Valley. This is evident both visually, for they are larger and physically more substantial than most, and in their cutting angle, since these are bedded at a high 55 degrees to tame the wild grains of hard Australian timbers.
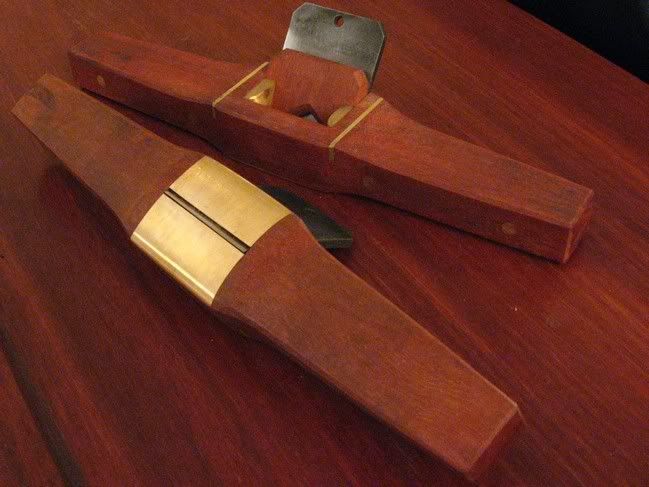
Immediately noticeable is the large size of the brass sole.
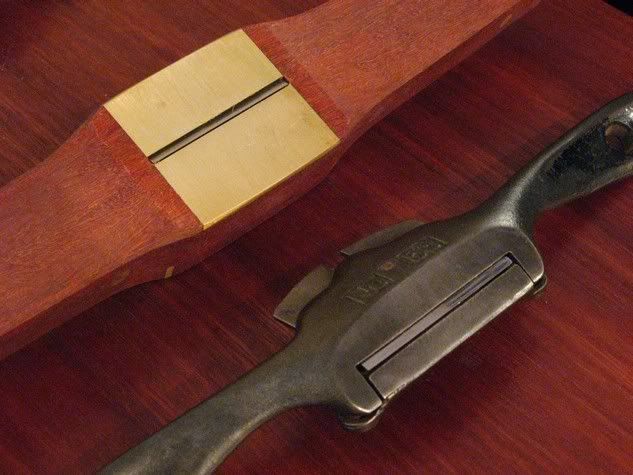
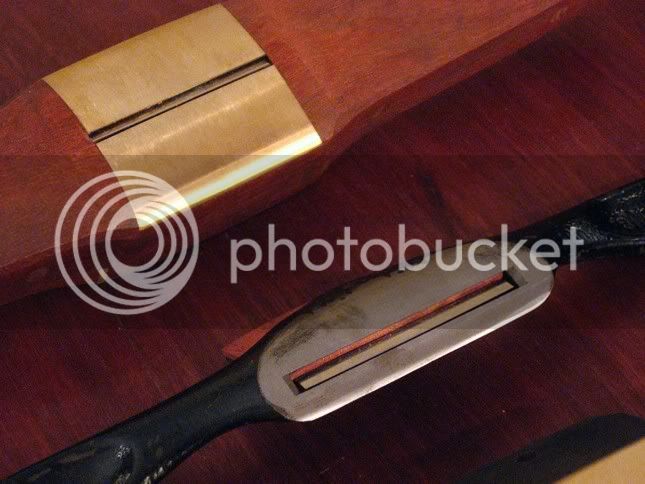
Here is the Flat compared with the Stanley #53.
And the Round compared with the Stanley #51R.
Specifications
The following data are taken from the HNT Gordon website.
· Size: 280mm long x 48mm wide x 27mm high.
· Average Weight: 0.5Kg
· Blade: 2 inches wide x 4 mm thick x 63mm long tool steel Rc 62-64
or HSS 18% Tungsten Rc 62.
· Abutment: Brass.
· Sole: Full brass sole either flat or with a 75mm radius.
· Blade Pitch: 55 degrees
The spokeshaves come with different primary bevel angles. The Flat uses a 30 degree angle, while the Round uses a 25 degree angle. A 30 degree bevel will not fit the Round.
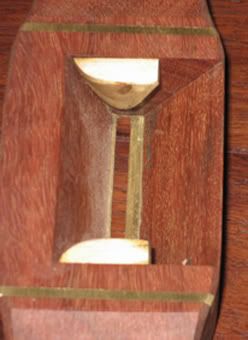
Internal construction, featuring brass abutments
Design Philosophy
I asked Terry Gordon to share his thoughts on the design – what aspects he was attempting to cover, and how he had dealt with them? This is what he had to say:
DC: “How did you decide on the length of the flat sole”.
TG: The design was tricky to get right and I used some valuable information from a couple of old woodworkers that I know who have used almost every tool made. The basic design is around the Japanese spoke shaves but altering the blade angle to suit our woods and moving the back brass plate up behind the blade to reduce the gap in the sole also improved the controllability of the shaves when going from flats to inside and outside curves.
The enemy of a spoke shave is the fact that it wants to roll when the blade engages the wood so the longer the front of the shave the more it will stop the role effect. So on the flat shave if you are actually making a straight square bit of wood into an oval, circle or half circle etc where the wood is straight in its length but is formed into a certain profile the longer front on the shave will make the shave very easy to control. And the 55-degree blade angle will minimise tearout. So the length of the sole was made to optimise the control of the shave when doing the job it was designed to do.
DC: “Is there a shorter soled version in the pipeline?”
TG: The drawback with a larger flat sole is that you can't use it on inside curves like you can with a small spoke shave. But I will argue that is why you need a curved sole shave and I suspect the main reason why the little short based shaves are used for gentle inside curves over the last 50 years was because the curved sole shaves were a mongrel to use with any success. The only problem with using the short based shave on a gentle inside curve is that if you have to transition to an outside curve then the depth of cut will change and most likely you will lose control at this point where you get nasty chatter marks. Lastly you are limited to gentle curves so at some point you will need to go to a curved sole shave.
DC: “How did you decide on the curvature of the round sole?”
TG: The radius on the curved sole shave was based on the curves that you encounter in furniture work and I feel to make a shave that will work on very tight curves would be almost impossible from a control point of view. And for those very tight curves a bobbin sander may be the best option, I hate saying that but it is probably one case where a cutting tool is beaten by sanding.
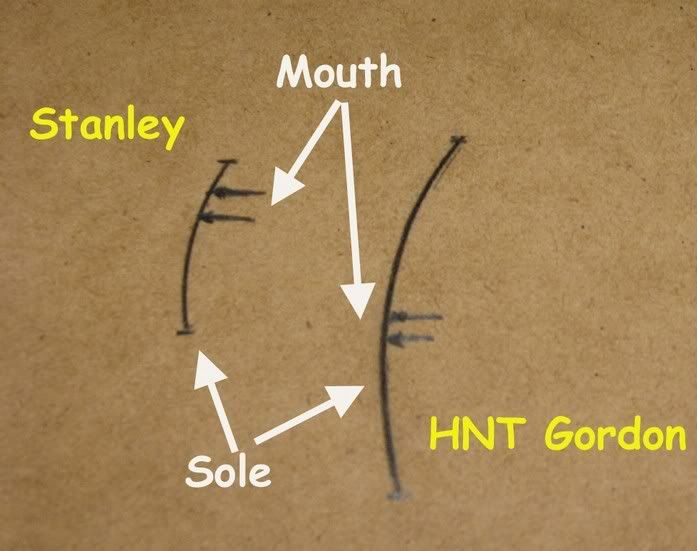
DC: “Why did you position the mouth in the centre of the sole?”
TG: Putting the blade in the centre of the flat sole is to stop the role effect. In the curved sole it allows you get better hand eye co-ordination so that you can keep the blade engaged with the wood as the curve changes shape. i.e. if you keep the top of the shave parallel with the curve as the blade passes over it the blade will stay engaged with the wood. If the blade was say moved forward then you would have to deal with holding the handle at an awkward angle (e.g. not parallel) to work which is much more difficult from a hand eye co-ordination POV.
As you may have found out, when you master the curved sole shave it will do inside and outside curves very easily, but it is no match for the flat sole shave when it comes to profiling a straight piece of wood.
Setting the blade
Setting and adjusting the blade in a HNT Gordon spokeshave is identical to the process in one of the planes.
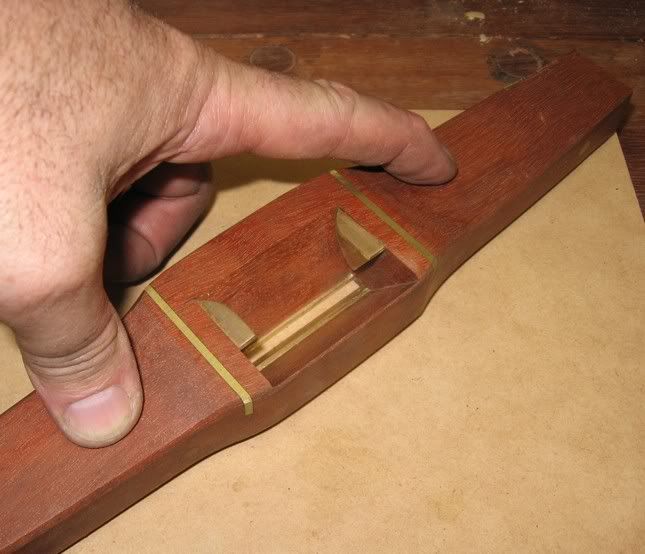
First press the mouth down squarely on a flat and hard surface. Here I am using a piece of MDF.
Second, drop in the blade so that the edge rests on the setting surface.

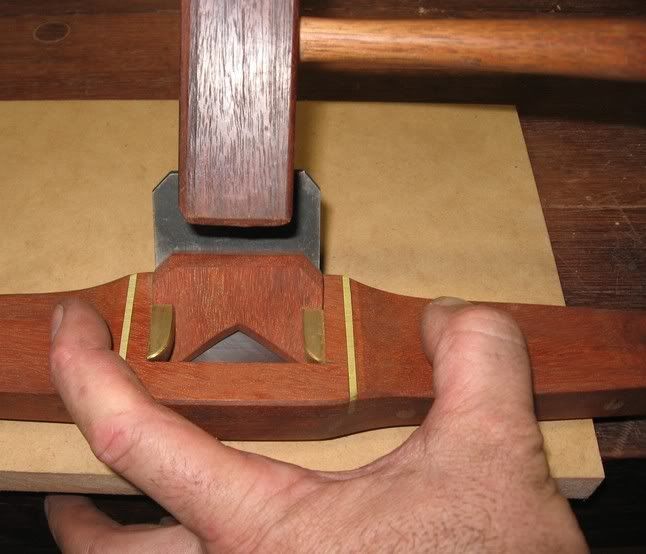
Third, fit the wedge and gently tap in the wedge until it is firm.
This is basically all that is needed. The spokeshave should now be ready to take fine shavings. If there is not enough blade projection, then tap the blade in further using the mallet. If you need to reduce the amount of blade projection, then rap the rear of the spokeshave’s body.
One can set the blade so that it sits squarely in the mouth. I used it this way for much of one project since I was after wide, even shavings. Another method is to set the blade at a slight angle in the mouth. This will create three settings: at one end the cut will be deep, ideal for hogging off wood fast. At the other side the cut will be fine, good for a final finish. And in the center the blade will take medium shavings, good for general shaping.
Holding the HNT Gordon spokeshave
All spokeshaves may be both pushed or pulled. There is no rigid “one way” to do this; instead, one tends to use what is comfortable or what “works”. With the Stanley spokeshaves I tend to use my fingertips and thumb pressure a good deal as the bodies tend to be narrow. The HNT Gordon spokeshaves, on the other hand, have a substantial feel. Their blocky “chunkiness”, in fact, was something that I found unappealing at the start. I must admit that I approached this review with very mixed feelings. I was so sure that I was going to hate these spokeshaves as they simply did not fit in with my idea of what a spokeshave should look like! I had read the review of Chris Gochnour in Fine Woodworking magazine (July/August 2006) in which he described the flat sole (the version he assessed) as “too large, and its flat edges made it hard to grasp”. I raised some of this with Terry and he pointed out that the flat surfaces made it easier to align the orientation of the cutting edge, a feature that quickly is noticed and appreciated when using the round bottom spokeshave (more on this a little later on). I then began to examine more closely this aspect in other spokeshaves, and it became apparent that only some wooden (low angle) ones offered something similar (e.g. Harris Tools, Kansas City Windsor, and Dave’s Shaves), but these did not appear to go as far at the HNT Gordon. None of the metal shaves have this feature as far as I am aware.
For either pushing or pulling, the handgrip that best suits the HNT Gordon spokeshaves is one where a “W” is formed with the thumbs. Like so …
The handles are set low, and the feeling is of a very low center of gravity. Altogether, this is experienced as being solid and stable. When one returns to a Stanley spokeshave this in turn now feels less secure.
Increasing or decreasing the depth of cut is made with a small mallet, as one would do with a wooden plane. With a little practice, this works well and fine adjustments are possible.
Using the HNT Gordon Spokeshaves
I had the opportunity recently to use the Flat and Round spokeshaves in the construction of a pair of demilune end tables. These features tapered and curved legs.
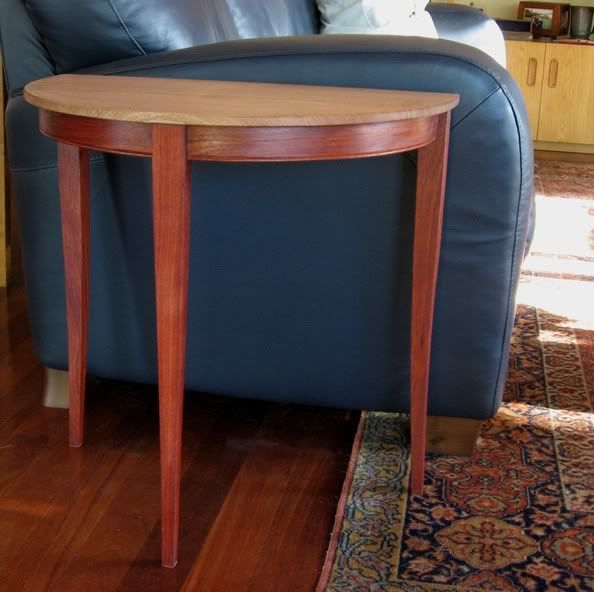
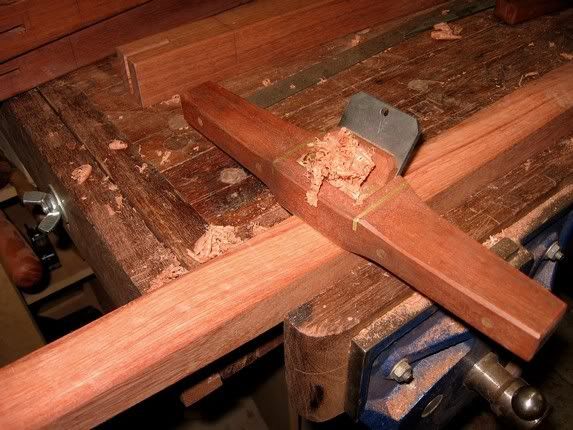
To shape these legs, templates were used to mark off each. These were cut to basic size on a bandsaw and then shaped and smoothed with the spokeshaves. The curves involved were quite gentle and the whole task was handled easily by the flat-soled shaves.
My control spokeshaves for the Flat were the two I tend to use most of the time: a vintage Stanley #53 (which has an adjustable mouth), a spokeshave that I cherish for its fine performance and flexibility of use on face grain; and a Veritas low angle spokeshave, which is essentially a metal version of the traditional low angle wooden design, typified by the Stanley Razor Edge shave. This is best on end grain.
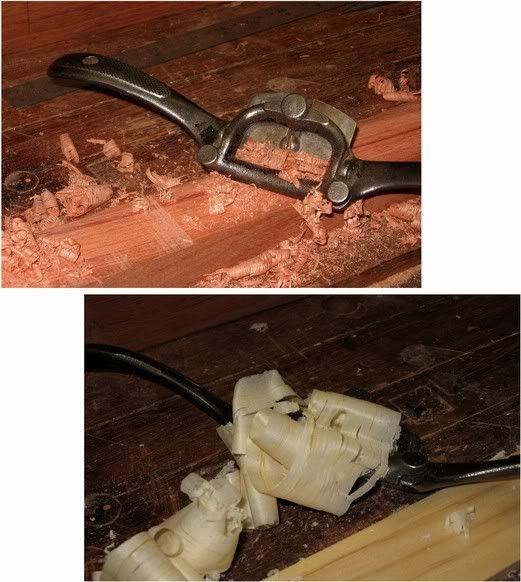
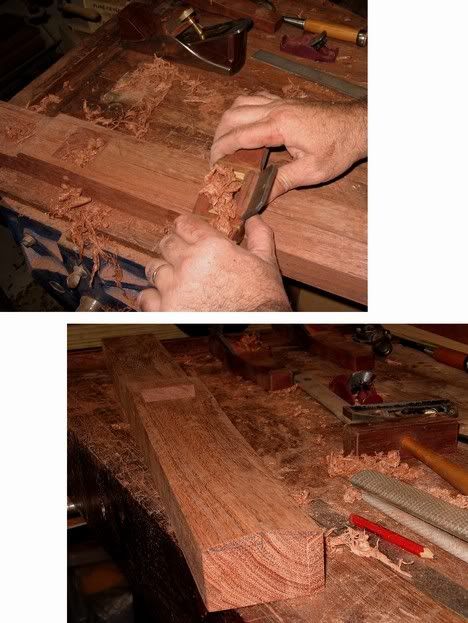
Below: The Stanley #53 struggling a little on this piece of Jarrah, and then making wonderful shavings in Pine.
Performance
The HNT Gordon Flat
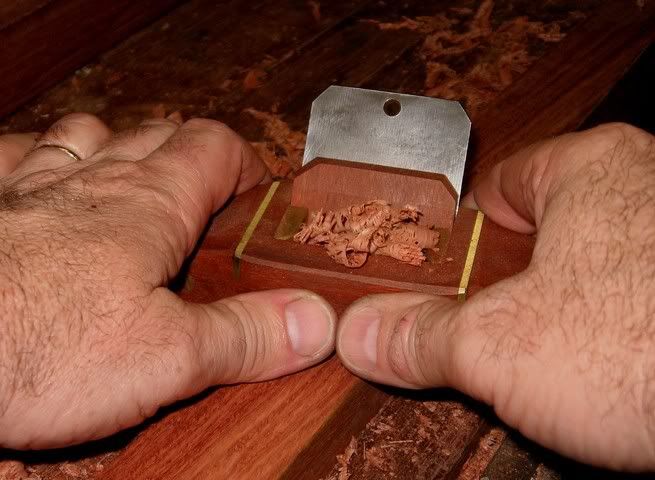
The Flat are capable of an extremely fine shaving in difficult timber.
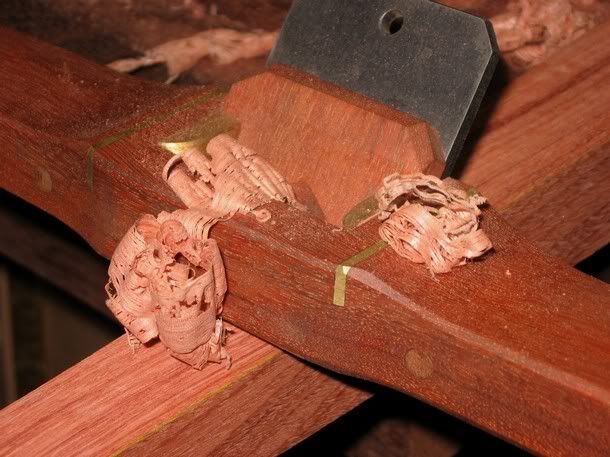
The standout feature is how solid it feels in the hand. This shave feels more like a little block plane. There is a reassuring predictability about the cut. The sole registers securely whether pushed or pulled.
The wide sole makes it easier to take the blade to the very edge of the timber.
The Stanley #53 managed to produce a good performance on the undemanding Pine, but it was variable on these pieces of Jarrah. While it was capable of a tearout-free cut on sections of straight grain, this ended as soon as the curve introduced a change in grain direction. On the other hand, the high angled HNT Gordon Flat continued cutting without any alteration in surface quality. Up hill and down dale, with the grain or into the grain ... it was all the same to this shave.
The HNT Gordon Flat planed end grain without difficulty, but the surface produced was more matt compared to the gloss finish of the Veritas LA. This is to be expected, bearing in mind the differences in cutting angles.
HNT Gordon (flat) verses Veritas LA
The HNT Gordon Round
The Round was not really necessary for shaping the table legs, but I did use it here and on a few other pieces.
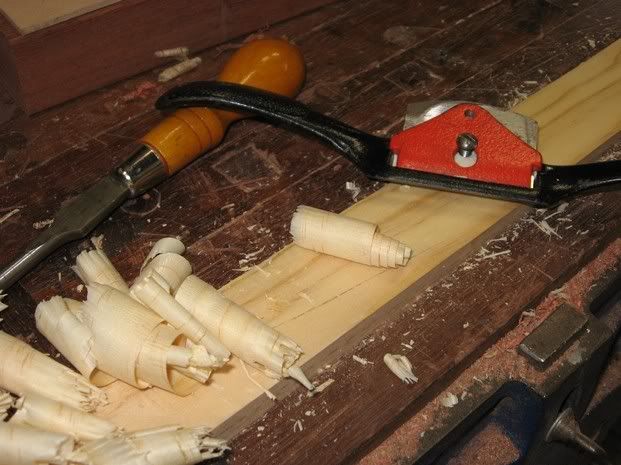
For comparison with the Round I used a Stanley #51R. Generally this (like most round soled spokeshaves) is a very frustrating tool, one that is prone to constant chatter. One of the problems is its large mouth. I have modified mine by adding veneer to close it up. The result is better shavings and less chatter, but the results are still not reliably consistent.
Below: The Stanley #51 R (round bottomed spokeshave)… working!.
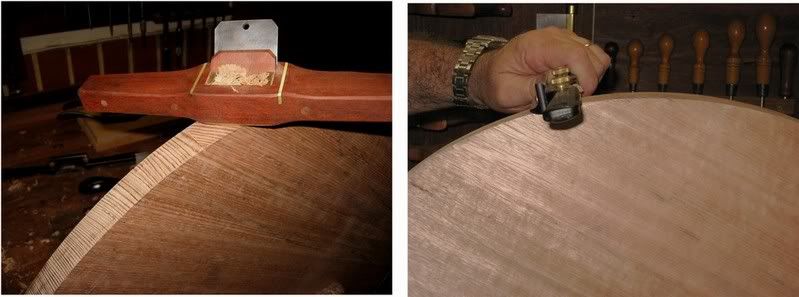
One of the tasks that I put the Round to was shaping the top curve (near the escapement) on a jointer plane I built. The Round made easy work of this. Similarly, on the curves of the table legs, it became evident that, compared to the Stanley #51R, this was a totally different beast.
For a start, the wide sole and the central position of the mouth on the Round made it considerably easier to register it securely on the work piece. Secondly, the flat tops of the handles provided a visual aid in angling the shave’s body. Together this made for a surprisingly easy job of planing. Compared to the Stanley, which chattered unpredictably, it was rare to obtain chatter with the Round. On the occasions that this did occur, it was easily planed out.
Planing the top of the jointer.
For a closer examination of the placement of the mouth on the Round, here is a drawing of the plan:
I was interested in the radius that could be planed by the Round, and how this compared with the two Stanleys and the Veritas LA. To evaluate this a series of curves (6”, 5” and 4” radius on Pine) were prepared and planed by each shave.
Fig 1. Stanley #53 (flat)
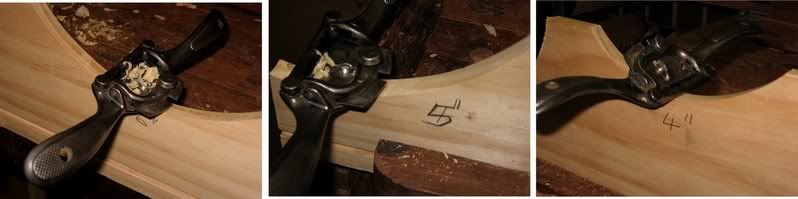
Fig 2. Stanley #51R (round)
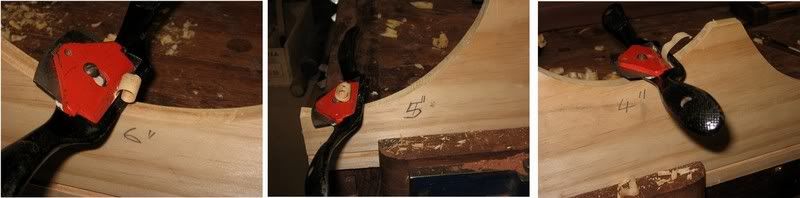
Fig 3. Veritas LA (round mode)
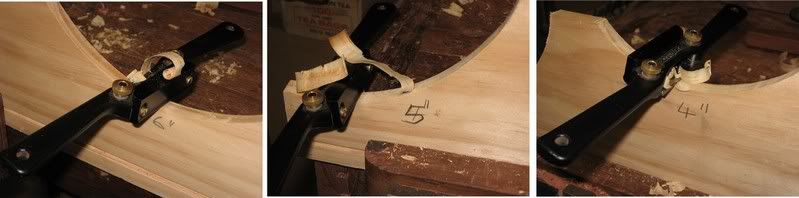
Fig 4. HNT Gordon Round
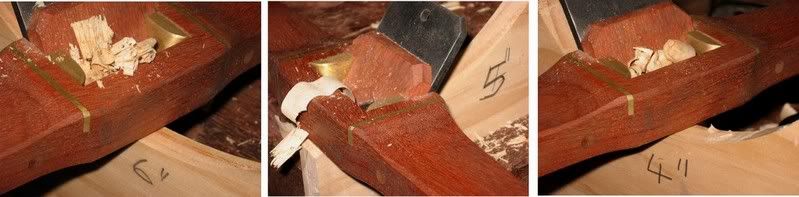
These sequences reveal that the Stanley #53 struggled to plane on a 6” radius curve, and was unable to do so on either the 5” or 4” curves (Fig 1). The Stanley #51R (Fig 2) and Veritas (Fig 3) were successful on all the curves, but neither of these were able to do this with shavings as fine as those produced with the HNT Gordon Round (Fig 4). With all bar the Round, the blades needed to be extended to take a moderate shaving before they would “bite”.
Summing up
While the two HNT Gordon spokeshaves are not going to win prizes in a beauty pageant, they are winners for those looking at a tool to shape and smooth difficult-grained curves.
There is no doubting that they feel different in the hand. But this is a good difference, and they are easy spokeshaves to manage. In fact, they make the whole process easier than usual.
The HNT Gordon spokeshaves are quality performers and certainly need to be short listed by those looking to work difficult woods.
Derek Cohen
Perth, Australia
April 2007
Reviewed by Derek Cohen
I’ve had the HNT Gordon Flat- and Round spokeshaves on loan from Terry Gordon for several months now, having met up with him at the last Perth Wood Show. After a little tuition from Terry, I have spent the time finding projects to practice my skills with a view to assessing their strengths and weaknesses. These are reported here.
The HNT Gordon spokeshaves are clearly different from the more familiar Preston, Stanley, and Stanley-based fare, such as those from Lie Nielsen or Lee Valley. This is evident both visually, for they are larger and physically more substantial than most, and in their cutting angle, since these are bedded at a high 55 degrees to tame the wild grains of hard Australian timbers.
Immediately noticeable is the large size of the brass sole.
Here is the Flat compared with the Stanley #53.
And the Round compared with the Stanley #51R.
Specifications
The following data are taken from the HNT Gordon website.
· Size: 280mm long x 48mm wide x 27mm high.
· Average Weight: 0.5Kg
· Blade: 2 inches wide x 4 mm thick x 63mm long tool steel Rc 62-64
or HSS 18% Tungsten Rc 62.
· Abutment: Brass.
· Sole: Full brass sole either flat or with a 75mm radius.
· Blade Pitch: 55 degrees
The spokeshaves come with different primary bevel angles. The Flat uses a 30 degree angle, while the Round uses a 25 degree angle. A 30 degree bevel will not fit the Round.
Internal construction, featuring brass abutments
Design Philosophy
I asked Terry Gordon to share his thoughts on the design – what aspects he was attempting to cover, and how he had dealt with them? This is what he had to say:
DC: “How did you decide on the length of the flat sole”.
TG: The design was tricky to get right and I used some valuable information from a couple of old woodworkers that I know who have used almost every tool made. The basic design is around the Japanese spoke shaves but altering the blade angle to suit our woods and moving the back brass plate up behind the blade to reduce the gap in the sole also improved the controllability of the shaves when going from flats to inside and outside curves.
The enemy of a spoke shave is the fact that it wants to roll when the blade engages the wood so the longer the front of the shave the more it will stop the role effect. So on the flat shave if you are actually making a straight square bit of wood into an oval, circle or half circle etc where the wood is straight in its length but is formed into a certain profile the longer front on the shave will make the shave very easy to control. And the 55-degree blade angle will minimise tearout. So the length of the sole was made to optimise the control of the shave when doing the job it was designed to do.
DC: “Is there a shorter soled version in the pipeline?”
TG: The drawback with a larger flat sole is that you can't use it on inside curves like you can with a small spoke shave. But I will argue that is why you need a curved sole shave and I suspect the main reason why the little short based shaves are used for gentle inside curves over the last 50 years was because the curved sole shaves were a mongrel to use with any success. The only problem with using the short based shave on a gentle inside curve is that if you have to transition to an outside curve then the depth of cut will change and most likely you will lose control at this point where you get nasty chatter marks. Lastly you are limited to gentle curves so at some point you will need to go to a curved sole shave.
DC: “How did you decide on the curvature of the round sole?”
TG: The radius on the curved sole shave was based on the curves that you encounter in furniture work and I feel to make a shave that will work on very tight curves would be almost impossible from a control point of view. And for those very tight curves a bobbin sander may be the best option, I hate saying that but it is probably one case where a cutting tool is beaten by sanding.
DC: “Why did you position the mouth in the centre of the sole?”
TG: Putting the blade in the centre of the flat sole is to stop the role effect. In the curved sole it allows you get better hand eye co-ordination so that you can keep the blade engaged with the wood as the curve changes shape. i.e. if you keep the top of the shave parallel with the curve as the blade passes over it the blade will stay engaged with the wood. If the blade was say moved forward then you would have to deal with holding the handle at an awkward angle (e.g. not parallel) to work which is much more difficult from a hand eye co-ordination POV.
As you may have found out, when you master the curved sole shave it will do inside and outside curves very easily, but it is no match for the flat sole shave when it comes to profiling a straight piece of wood.
Setting the blade
Setting and adjusting the blade in a HNT Gordon spokeshave is identical to the process in one of the planes.
First press the mouth down squarely on a flat and hard surface. Here I am using a piece of MDF.
Second, drop in the blade so that the edge rests on the setting surface.
Third, fit the wedge and gently tap in the wedge until it is firm.
This is basically all that is needed. The spokeshave should now be ready to take fine shavings. If there is not enough blade projection, then tap the blade in further using the mallet. If you need to reduce the amount of blade projection, then rap the rear of the spokeshave’s body.
One can set the blade so that it sits squarely in the mouth. I used it this way for much of one project since I was after wide, even shavings. Another method is to set the blade at a slight angle in the mouth. This will create three settings: at one end the cut will be deep, ideal for hogging off wood fast. At the other side the cut will be fine, good for a final finish. And in the center the blade will take medium shavings, good for general shaping.
Holding the HNT Gordon spokeshave
All spokeshaves may be both pushed or pulled. There is no rigid “one way” to do this; instead, one tends to use what is comfortable or what “works”. With the Stanley spokeshaves I tend to use my fingertips and thumb pressure a good deal as the bodies tend to be narrow. The HNT Gordon spokeshaves, on the other hand, have a substantial feel. Their blocky “chunkiness”, in fact, was something that I found unappealing at the start. I must admit that I approached this review with very mixed feelings. I was so sure that I was going to hate these spokeshaves as they simply did not fit in with my idea of what a spokeshave should look like! I had read the review of Chris Gochnour in Fine Woodworking magazine (July/August 2006) in which he described the flat sole (the version he assessed) as “too large, and its flat edges made it hard to grasp”. I raised some of this with Terry and he pointed out that the flat surfaces made it easier to align the orientation of the cutting edge, a feature that quickly is noticed and appreciated when using the round bottom spokeshave (more on this a little later on). I then began to examine more closely this aspect in other spokeshaves, and it became apparent that only some wooden (low angle) ones offered something similar (e.g. Harris Tools, Kansas City Windsor, and Dave’s Shaves), but these did not appear to go as far at the HNT Gordon. None of the metal shaves have this feature as far as I am aware.
For either pushing or pulling, the handgrip that best suits the HNT Gordon spokeshaves is one where a “W” is formed with the thumbs. Like so …
The handles are set low, and the feeling is of a very low center of gravity. Altogether, this is experienced as being solid and stable. When one returns to a Stanley spokeshave this in turn now feels less secure.
Increasing or decreasing the depth of cut is made with a small mallet, as one would do with a wooden plane. With a little practice, this works well and fine adjustments are possible.
Using the HNT Gordon Spokeshaves
I had the opportunity recently to use the Flat and Round spokeshaves in the construction of a pair of demilune end tables. These features tapered and curved legs.
To shape these legs, templates were used to mark off each. These were cut to basic size on a bandsaw and then shaped and smoothed with the spokeshaves. The curves involved were quite gentle and the whole task was handled easily by the flat-soled shaves.
My control spokeshaves for the Flat were the two I tend to use most of the time: a vintage Stanley #53 (which has an adjustable mouth), a spokeshave that I cherish for its fine performance and flexibility of use on face grain; and a Veritas low angle spokeshave, which is essentially a metal version of the traditional low angle wooden design, typified by the Stanley Razor Edge shave. This is best on end grain.
Below: The Stanley #53 struggling a little on this piece of Jarrah, and then making wonderful shavings in Pine.
Performance
The HNT Gordon Flat
The Flat are capable of an extremely fine shaving in difficult timber.
The standout feature is how solid it feels in the hand. This shave feels more like a little block plane. There is a reassuring predictability about the cut. The sole registers securely whether pushed or pulled.
The wide sole makes it easier to take the blade to the very edge of the timber.
The Stanley #53 managed to produce a good performance on the undemanding Pine, but it was variable on these pieces of Jarrah. While it was capable of a tearout-free cut on sections of straight grain, this ended as soon as the curve introduced a change in grain direction. On the other hand, the high angled HNT Gordon Flat continued cutting without any alteration in surface quality. Up hill and down dale, with the grain or into the grain ... it was all the same to this shave.
The HNT Gordon Flat planed end grain without difficulty, but the surface produced was more matt compared to the gloss finish of the Veritas LA. This is to be expected, bearing in mind the differences in cutting angles.
HNT Gordon (flat) verses Veritas LA
The HNT Gordon Round
The Round was not really necessary for shaping the table legs, but I did use it here and on a few other pieces.
For comparison with the Round I used a Stanley #51R. Generally this (like most round soled spokeshaves) is a very frustrating tool, one that is prone to constant chatter. One of the problems is its large mouth. I have modified mine by adding veneer to close it up. The result is better shavings and less chatter, but the results are still not reliably consistent.
Below: The Stanley #51 R (round bottomed spokeshave)… working!.
One of the tasks that I put the Round to was shaping the top curve (near the escapement) on a jointer plane I built. The Round made easy work of this. Similarly, on the curves of the table legs, it became evident that, compared to the Stanley #51R, this was a totally different beast.
For a start, the wide sole and the central position of the mouth on the Round made it considerably easier to register it securely on the work piece. Secondly, the flat tops of the handles provided a visual aid in angling the shave’s body. Together this made for a surprisingly easy job of planing. Compared to the Stanley, which chattered unpredictably, it was rare to obtain chatter with the Round. On the occasions that this did occur, it was easily planed out.
Planing the top of the jointer.
For a closer examination of the placement of the mouth on the Round, here is a drawing of the plan:
I was interested in the radius that could be planed by the Round, and how this compared with the two Stanleys and the Veritas LA. To evaluate this a series of curves (6”, 5” and 4” radius on Pine) were prepared and planed by each shave.
Fig 1. Stanley #53 (flat)
Fig 2. Stanley #51R (round)
Fig 3. Veritas LA (round mode)
Fig 4. HNT Gordon Round
These sequences reveal that the Stanley #53 struggled to plane on a 6” radius curve, and was unable to do so on either the 5” or 4” curves (Fig 1). The Stanley #51R (Fig 2) and Veritas (Fig 3) were successful on all the curves, but neither of these were able to do this with shavings as fine as those produced with the HNT Gordon Round (Fig 4). With all bar the Round, the blades needed to be extended to take a moderate shaving before they would “bite”.
Summing up
While the two HNT Gordon spokeshaves are not going to win prizes in a beauty pageant, they are winners for those looking at a tool to shape and smooth difficult-grained curves.
There is no doubting that they feel different in the hand. But this is a good difference, and they are easy spokeshaves to manage. In fact, they make the whole process easier than usual.
The HNT Gordon spokeshaves are quality performers and certainly need to be short listed by those looking to work difficult woods.
Derek Cohen
Perth, Australia
April 2007