kinsella
Established Member
Colleagues
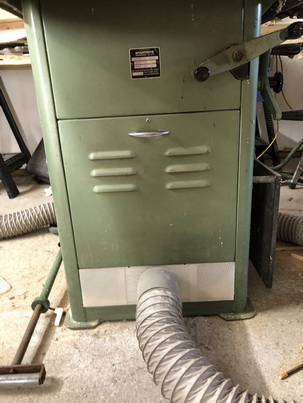
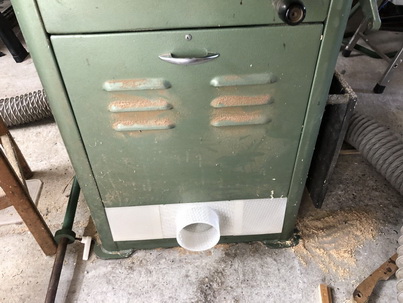
I own a Startrite 275 table saw and for a few years, my old method was to sweep up the chips from the sloped outlet. this became annoying over time so I decided to design and 3D print a new outlet that I can connect to my dust extractor.
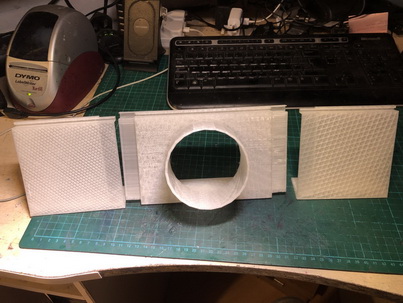
The internal edge of the door has a steel lip on the inside that can be used at a connector, so I designed a Z top-hat section to hook over the existing door edge (no fixings or connectors etc). I also designed it to have several 8mm x 2mm magnets (rounded size) at the bottom to fix to the steel base. (see the Sketchup or STL files)
I also make it in three pieces assuming I would glue to form one single piece. In the end, I connected them all loosely as the design is sufficient to simply slot together and is robust when in-situ.
Very pleased with the outcome. no chips on my floor anymore.
The 3D files are on Thingiverse https://www.thingiverse.com/thing:3822571 if you want to print yourself.
I own a Startrite 275 table saw and for a few years, my old method was to sweep up the chips from the sloped outlet. this became annoying over time so I decided to design and 3D print a new outlet that I can connect to my dust extractor.
The internal edge of the door has a steel lip on the inside that can be used at a connector, so I designed a Z top-hat section to hook over the existing door edge (no fixings or connectors etc). I also designed it to have several 8mm x 2mm magnets (rounded size) at the bottom to fix to the steel base. (see the Sketchup or STL files)
I also make it in three pieces assuming I would glue to form one single piece. In the end, I connected them all loosely as the design is sufficient to simply slot together and is robust when in-situ.
Very pleased with the outcome. no chips on my floor anymore.
The 3D files are on Thingiverse https://www.thingiverse.com/thing:3822571 if you want to print yourself.