


Pekka Huhta
Established Member
I wanted hand planed moldings to my bathroom, they were a big part of the design from the start. I actually started the whole project by planing the first moldings, the story can be found at http://www.sihistin.fi/en/woodwork/moldings.html
Starting from the material: I use pine, as slowly grown as I can find, free of knots and cross-grain. Here is an example of what I mean:

Also the grain orientation is very important. The main direction of the molded surface should be perpendicular to the growth rings. Otherwise some of the growth rings tend to “peel” off the surface when planing. On first picture the correct grain orientation is shown at left, wrong at right. On second picture the same moldings from the front: the right way on top, wrong way on bottom. The difference is even bigger when looking the surface closer.


The first molding is really really simple: I just needed a shot molding to copy the idea of paneling used around the window. I could have modified it from the paneling itself, but this was actually faster than filling the groove on the panel etc.
I started by planing a groove to the middle of the profile just for a reference mark. The profile is OK when the reference mark just disappears. I use a #45 with a V-shaped cutter for the reference marks.


Next I just rounded the corners with an appropriate hollow. Last picture is from the finished paneling: it seems like the paneling continues around the corner. I had to start the paneling from the corner and continue to both directions from that on to get the effect. The same molding is also used on the bottom of the paneling on the ceiling.

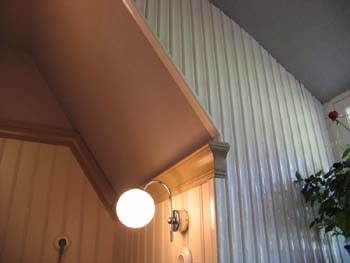
The molding between shower glass and wall paneling is pretty much the same, except for the double beads on the sides and 45° cuts on backside for fitting to the corner. I used a lot of beads on the bathroom as they seemed to fit nicely to the beaded T&G paneling on the walls.


The architrave was a bit different than usual. Instead of just using the same molding to frame the whole door, the top of the architrave continues around the room on top of the paneling. I first made a few sketches with 3 and 4 beads and decided to go for 3.

As you can see from the pictures, I did not have proper timber for this and the end result left a lot to be desired. I had tu use a bucketful of putty to get the architraves decent before painting.
First I planed the triple beads with a #45 and bevelled the edges with a #98.


Then I made a shallow bevel from the beaded part towards the edges and rounded the edges with a hollow. On the end result you see that the architrave is almost flush with the paneling.


I planed the skirting boards already when making the big moldings, but the ends of the skirting boards were a slight problem as the architrave was almost flush with the paneling. So I ended up rounding the ends of skirting boards. This was done with a plane on the lower part and several in-cannel gouges and small files on the molding.
Rounding the end of a molding isn’t that common, the big molding on top of the paneling was done in a more traditional way.
First I glued a piece of wood to the panel rabbet to be able to cut the molding profile to the end of the molding. On the same picture there is the first try of cutting the profile.


Next I drew the profile to the end of the molding and used a coping saw to get rid of most of the excess wood. And finally finished the profile with small files.


The mitres on the corner were a bit challenging, but ended up well. I just carved the profile to the side of second piece and that was it.


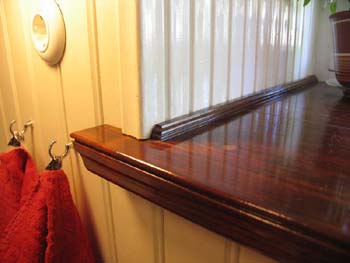
The front of the windowsill was done in a similar way. There is also a small molding between the paneling and windowsill to prevent water entering behind the panel and the end of it was carved as well.


All in all, it’s fairly simple. Of course you must have the proper tools, but you can do a lot with a few hollows and rounds, a couple of beads and a #45.
Finally, a few pictures of moldings and tools used to create them.


The ”teak floor” was also framed and I used a jack plane –sized molding plane to thin down the frames.


All in all, it was fun and definitely worth it, although building the bathroom took about a year. I prefer to think about it as building a room-sized piece of furniture
Pekka
Starting from the material: I use pine, as slowly grown as I can find, free of knots and cross-grain. Here is an example of what I mean:

Also the grain orientation is very important. The main direction of the molded surface should be perpendicular to the growth rings. Otherwise some of the growth rings tend to “peel” off the surface when planing. On first picture the correct grain orientation is shown at left, wrong at right. On second picture the same moldings from the front: the right way on top, wrong way on bottom. The difference is even bigger when looking the surface closer.


The first molding is really really simple: I just needed a shot molding to copy the idea of paneling used around the window. I could have modified it from the paneling itself, but this was actually faster than filling the groove on the panel etc.
I started by planing a groove to the middle of the profile just for a reference mark. The profile is OK when the reference mark just disappears. I use a #45 with a V-shaped cutter for the reference marks.


Next I just rounded the corners with an appropriate hollow. Last picture is from the finished paneling: it seems like the paneling continues around the corner. I had to start the paneling from the corner and continue to both directions from that on to get the effect. The same molding is also used on the bottom of the paneling on the ceiling.


The molding between shower glass and wall paneling is pretty much the same, except for the double beads on the sides and 45° cuts on backside for fitting to the corner. I used a lot of beads on the bathroom as they seemed to fit nicely to the beaded T&G paneling on the walls.


The architrave was a bit different than usual. Instead of just using the same molding to frame the whole door, the top of the architrave continues around the room on top of the paneling. I first made a few sketches with 3 and 4 beads and decided to go for 3.

As you can see from the pictures, I did not have proper timber for this and the end result left a lot to be desired. I had tu use a bucketful of putty to get the architraves decent before painting.
First I planed the triple beads with a #45 and bevelled the edges with a #98.


Then I made a shallow bevel from the beaded part towards the edges and rounded the edges with a hollow. On the end result you see that the architrave is almost flush with the paneling.


I planed the skirting boards already when making the big moldings, but the ends of the skirting boards were a slight problem as the architrave was almost flush with the paneling. So I ended up rounding the ends of skirting boards. This was done with a plane on the lower part and several in-cannel gouges and small files on the molding.

Rounding the end of a molding isn’t that common, the big molding on top of the paneling was done in a more traditional way.
First I glued a piece of wood to the panel rabbet to be able to cut the molding profile to the end of the molding. On the same picture there is the first try of cutting the profile.


Next I drew the profile to the end of the molding and used a coping saw to get rid of most of the excess wood. And finally finished the profile with small files.


The mitres on the corner were a bit challenging, but ended up well. I just carved the profile to the side of second piece and that was it.


The front of the windowsill was done in a similar way. There is also a small molding between the paneling and windowsill to prevent water entering behind the panel and the end of it was carved as well.


All in all, it’s fairly simple. Of course you must have the proper tools, but you can do a lot with a few hollows and rounds, a couple of beads and a #45.
Finally, a few pictures of moldings and tools used to create them.


The ”teak floor” was also framed and I used a jack plane –sized molding plane to thin down the frames.


All in all, it was fun and definitely worth it, although building the bathroom took about a year. I prefer to think about it as building a room-sized piece of furniture
Pekka
 I thought that as a small shelf at first, but it's only a bit more than two inches wide. A little narrow for everything else except maybe the shaving brush :wink: