


Almost finished this small chest of drawers. It began life as oak cupboard doors salvaged when we renewed the kitchen.

I did not do a WIP as it was enough just to concentrate on the task in hand.
I decided I wanted a small set of drawers to hold my marking tools and maybe chisels.
The size was somewhat dictated by the size of the finished wood I could get from the doors. The stripes from the mismatched wood look much worse in the photographs than in the flesh.
It ended up 500mm x 270mm x 300mm tall.

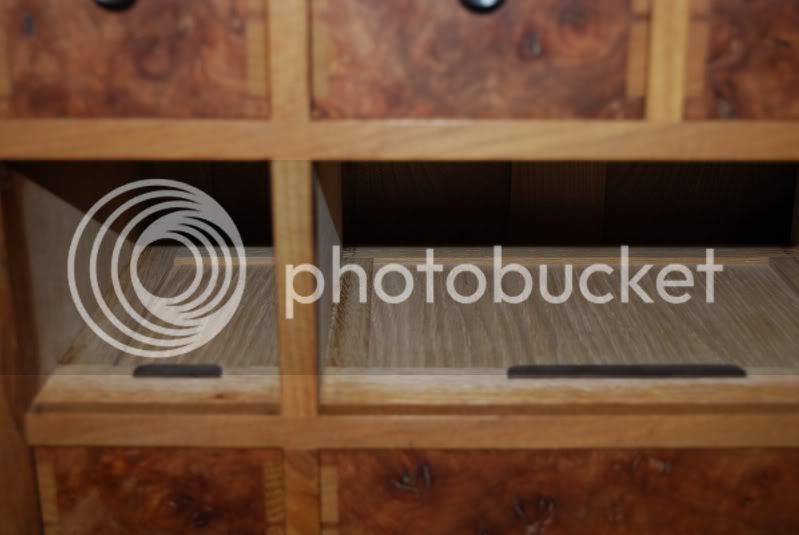
The carcass is merely a dovetailed box, the drawer frames are set into groves into the sides. Everything is 10mm thick except for the drawer fronts which are 15mm. The size of the dovetails in the drawers were dictated by the fact the smallest chisel I have is ¼" wide. The dovetails in the carcass, I think are a little too chunky but I can live with them. I did make a small error when finishing the top with a ROS, on the top front right I just lingered a little too long and created a small depression that I then tried to fill but just made it worse than had I just left it. I may re-visit that and route in a new leading edge.


On the first drawer I cut the dovetails then the groove to accept the drawer bottom into the front, then realised the grove will show at the sides so again some filler sorted them. On the others I made sure the bottom tail covered the groove.
I started with a plan to turn the feet and the drawer knobs but then found the knobs for 17p each from here so ordered 6 of each type and chose the flatter ones once I could actually see them, total bill £3.54.
http://www.tuxfordfurniturehardware...l-Knobs-for-Mirror-Drawers-Trinket-Boxes.html
Ordered Late Thursday, email on Friday to say despatched arrived on Saturday morning. So impressed with the service for such a small order, I had never used them before but will definitely use them again.
Finish is two coats of Fiddes Hard Wax Oil followed by a clear wax. Still need to finish the inside of the drawers.
Cost for the whole project was just the cost of the finish and the drawer knobs.
Just need some help with feet, I did turn these from mahogany but they just didn't look right. Not sure if it is the colour or the shape, I think it is both so I am thinking plain oak squares at each corner about 10mm high. Would welcome ideas.

I would welcome your opinions on how I could have done better, although a long time DIYer I am still a novice at this type of stuff.
At the top I said this was to be a tool chest, well it looks like that may change as my wife has tried to nab it several times. I am pleased she is so enthusiastic about it as that actually says a lot. I am pleased with my efforts, I learnt a tremendous amount doing this and know that I could do a better job next time.

Thanks for looking.
Mick
I did not do a WIP as it was enough just to concentrate on the task in hand.
I decided I wanted a small set of drawers to hold my marking tools and maybe chisels.
The size was somewhat dictated by the size of the finished wood I could get from the doors. The stripes from the mismatched wood look much worse in the photographs than in the flesh.
It ended up 500mm x 270mm x 300mm tall.
The carcass is merely a dovetailed box, the drawer frames are set into groves into the sides. Everything is 10mm thick except for the drawer fronts which are 15mm. The size of the dovetails in the drawers were dictated by the fact the smallest chisel I have is ¼" wide. The dovetails in the carcass, I think are a little too chunky but I can live with them. I did make a small error when finishing the top with a ROS, on the top front right I just lingered a little too long and created a small depression that I then tried to fill but just made it worse than had I just left it. I may re-visit that and route in a new leading edge.
On the first drawer I cut the dovetails then the groove to accept the drawer bottom into the front, then realised the grove will show at the sides so again some filler sorted them. On the others I made sure the bottom tail covered the groove.
I started with a plan to turn the feet and the drawer knobs but then found the knobs for 17p each from here so ordered 6 of each type and chose the flatter ones once I could actually see them, total bill £3.54.
http://www.tuxfordfurniturehardware...l-Knobs-for-Mirror-Drawers-Trinket-Boxes.html
Ordered Late Thursday, email on Friday to say despatched arrived on Saturday morning. So impressed with the service for such a small order, I had never used them before but will definitely use them again.
Finish is two coats of Fiddes Hard Wax Oil followed by a clear wax. Still need to finish the inside of the drawers.
Cost for the whole project was just the cost of the finish and the drawer knobs.
Just need some help with feet, I did turn these from mahogany but they just didn't look right. Not sure if it is the colour or the shape, I think it is both so I am thinking plain oak squares at each corner about 10mm high. Would welcome ideas.
I would welcome your opinions on how I could have done better, although a long time DIYer I am still a novice at this type of stuff.
At the top I said this was to be a tool chest, well it looks like that may change as my wife has tried to nab it several times. I am pleased she is so enthusiastic about it as that actually says a lot. I am pleased with my efforts, I learnt a tremendous amount doing this and know that I could do a better job next time.
Thanks for looking.
Mick

 The important thing to remember is that although the fixing of the dustboard/drawer runner assembly is fixed at the front (biscuit if memory serves) at the rear the drawer runner is screwed in place with a slot screw as the side of the cabinet is solid.