Shultzy's Shed (Workshop Build really - lots of pics)

UKworkshop.co.uk

Help Support UKworkshop.co.uk:

This site may earn a commission from merchant affiliate links, including eBay, Amazon, and others.
Hi all, thanks for your comments OLD, I think its due to my engineering background, I did try to make it on a "production-line" basis so perhaps that's why it looks so neat.

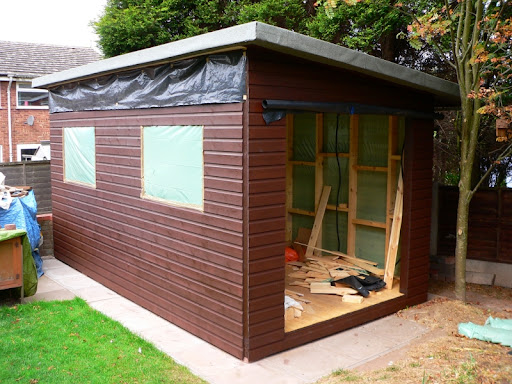
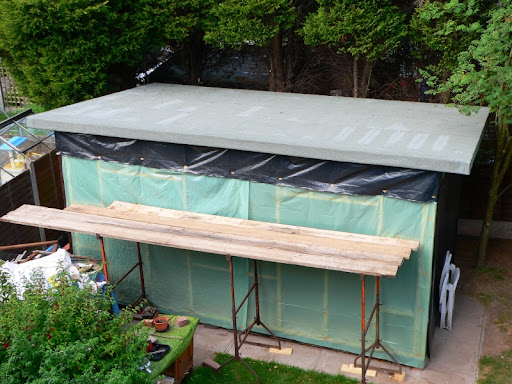
After such lousy weather this summer the sun came back with a vengeance just as I started work on the roof. It took me four days of sweat to complete :evil: . The roof is covered with ¾" ply and Wickes's "Easyseal". My neighbour helped me to get five of the 8x4 sheets up onto the trusses, where I had to cut two lengthways (not so easy freehand) and the others were cut on the ground and hauled up (ten cuts in all).

As the joists are covered I used masking tape to mark the centre lines of the trusses to position the ply, I also used a string line along the length of the roof to take out any inaccuracies in the "squareness" of the roof. before nailing. After all the ply was in position I ran the router around the edge using a bearing guided trim cutter.

After painting with primer I again used a string line and masking tape to provide a visual reference for the first layer of "Easyseal" underlay. After cutting to length the backing sheet is removed while rolling out the underlay and smoothing down with a paint roller. The "Easyseal" capsheet is put on in the same way. All of the sheets went down without any problems, except I had to use three tubes of mastic to glue down the edges and underneath as the start of the rolls seemed to have lost their "stickyness". I allowed 3" to fold underneath and then nailed with clout nails to make sure it remained in position.

Shed041.JPG


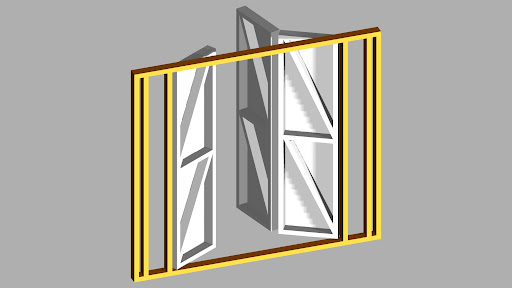
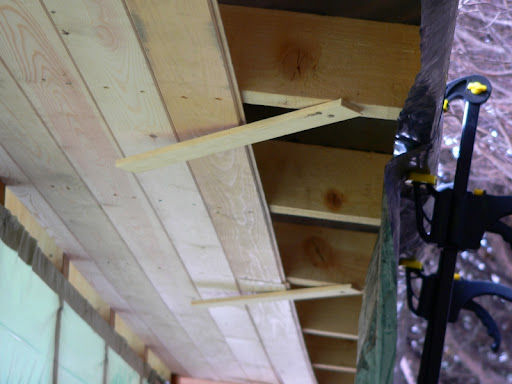
I though you might like to see how I managed to put the long under roof planks on my own. I screwed four battens loosely to the trusses and twisted them into position to allow me to mark the saw cut line without having to hold the planks in place.

Shed040.JPG


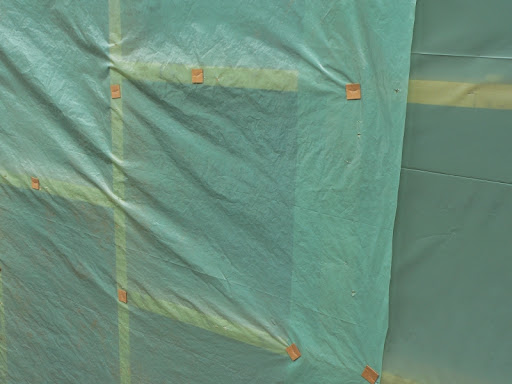
Another tip is to use 1" square pieces of cardboard to staple the sheeting on. This stops it from tearing in strong wind.

Shed039.JPG
 
Hi all, after enjoying a week in sunny Cornwall its back to the grindstone of building the workshop :D .

I've completed the cladding and the guttering and its now time to make the doors.

Shed042.JPG


Here is a drawing of the end wall and doors looking from the inside. Each door is 6' x 2' and is to be made from 4x2, cladded with shiplap and mdf on the inside to give a total thickness of 5 1/8"

Shed043.JPG


A few questions:-

1) How much space allowance around the doors, 1/8", 1/4" or more?

2) Tee hinges or gate hinges, bearing in mind the weight of the rh pair. 2 or 3 hinges per door?

3) Should the centreline or the edge of the bracing be on the diagonal of the rectangular box.
 
Looking good Shultzy. 8)
Yeh Your bracing is exactly how i would do it.
I'd use T hinge for the door to frame and a steel strap hinge between bifold doors. Like these www.e-hardware.co.uk/acatalog/Shed_and_ ... MAodNzLByg
I'd say 1/4" spacing around the door with the doors opening outward and closing against a rebate/clapping strip. Your going to have put double barrel bolts on the bi-fold doors and then some sort of haspen staple to lock the doors together.
Keep the pics coming they're inspiration to us all. Alex
 
I keep looking at your sketch of the proposed doors and think you would be better off going with a pair of asymmetric ones. The reason being that going through a 24" wide door is going to be annoying at best (unless you're real skinny) and having to open two each time won't be any better especially with an armload of new tools.

If you make the "man door" about 30" wide to go in and out of most of the time, then the other door will only be 42" wide and can be opened when the weather is nice or when big stuff is passing through. I would be tempted to look for a new "damaged or seconds" door (insulated steel preferred) or a salvaged one for the "man door" and build the second bigger one as planed. Easier to make and to weatherstrip, and less hardware to buy. Install them to open out rather than in to avoid having to keep that end of the shop clear for access.
 
Alex, thanks for the info, I hadn't known about the strap hinge. Still not sure if the "T" hinges will be strong enough to support two doors. Gate hinges would allow me to remove the doors completely but I wonder if that's really necessary.

Inspector, I had originally considered a pair of doors each 3' wide, but as you can see in the last picture there is a tree in the way. Making the entry door 2' wide means I don't have to chop another large branch off the tree.
 
If it was me Shultzy I would use the fire door hinges as they will take a large load and they have bearings too. I have hung many a garage door using these since Mel recommended them and they are great. They are about £8 a pair but are stainless and will last a long time. I fit three to each door by the way. :wink:
 
I second what Mailee said, fire door hinges are very good. But your doors are going to have to be very well made/strong as all the weight/leverage will all be on the style of the door. Where as heavy duty T hinge normally spread across the three rails of the door. Just a thought :wink:

edit:I've found a lot the gate hinges either need large space between door and frame or are offset. so just check if you go this way.

Alex
 
Mailee I have weighed a door :!: and it's 37kg, so the two doors together would be 74kg. I assume that three fire door hinges will be sufficient to hold that weight. I wonder whether the "T or gate hinges would be easier to fit.
 
shultzy
go for the stainless steel 4" fire door hinges
1 and a half pairs will suffice
three hinges will take a 250 kgs door that is in constant use

have you lent any thought to how you will stop cold winter draught blowing through the bi-fold door ??

mel
 
Hi Mel, fire door hinges seem to be the way to go. I went to my local wood yard today and had a word with one of the old-timers and he suggested using hook and band for the two outside doors and fire door hinges for the bi-fold. His reasoning for using hook and band was that any discrepancies in the door and the frame being out of square would be easier to compensate for in the fitting.

The cladding for the doors protrude above and below the door frame by one inch. The internal mdf covering will overlap the internal vertical joints by one inch as well. This will hopefully stop any draughts. Another possibility would be to route a groove and put a rubber or neoprene seal in.
 
hook and band will be fine , {if not a bit expensive} in particular , if you are looking for that rugged , industrial look .
myself and mailee were disgusing this topic earlier
the downfall of these hinges are
1 the entire hinge is showing
2 the screws are exposed on the hook , pin plate
3 they are mosty of poor manufacture and you will need to offset the hook to compensate for the slack fit to the band
4 the cost of them
the last time i bought 2 sets of 600mm they were in excess of £48

hth
all the best
mel
 
Mel, I hear what you are saying and I'm still pondering which way to go. I'm concerned that because the cladding is 5/8" some of the hinge screws might be into end grain.

The local yard have some 18" hinge and bands at £15 and a three pack of fire proof hinges at £11.30. If I go this way I'll put some security screws in when I've finished.
 
Hi all, here is the latest wip pics. After much deliberation I've used hook and band for the outer door and fire door hinges (as Mailee suggested) for the other two doors.

These are the door frames packed and clamped and half cladded. The gap for the left hand door has to be wider than normal, to allow for the swing, as the door is 5" thick.

Shed044.JPG


First door fixed with hook and band hinge.

Shed045.JPG


Half open view.

Shed046.JPG


Second door fixed with fire door hinges.

Shed047.JPG


Second door folded back.

Shed048.JPG


Both doors folded to give full opening.

Shed049.JPG


I'm quite pleased with the results so far as the cladding matches up quite nicely.
 
I've finally completed the workshop doors. I only allowed 1/4" gap under the double doors and in hindsight I think this should have been 3/8". The doors are 5" finished thickness and I had problems with the positioning of the 2 mortice locks due to the swing of the inside edge of the main door. You can see from this photo I put a wedged shaped piece on to bring the lock out.

Shed052.JPG


Here are the doors fully closed, and I'm pleased that all the cladding lines up.

Shed051.JPG


This shows the main door fitted with 2 mortice locks. Also in the picture is the one of the partly finished shutters, bathed in sunlight. I took some interesting shots of this sunlight from the inside as it filtered through the timber and will post them in general chat.

Shed050.JPG
 
Back
Top