Sharpening, Steel or both.

UKworkshop.co.uk

Help Support UKworkshop.co.uk:

This site may earn a commission from merchant affiliate links, including eBay, Amazon, and others.
you can get away with never really honing the back of an iron, but there's considerable wear on it. If you don't work the back of an iron with something with a good combination of fast and fine, it'll either be coarse or rounded just from wear.
I disagree with this view. Wear is on the edge. Sharpen it one-sided (as with a marking knife) and the back is 'removed' with the honed edge.
 
No, it won't. You don't hone far enough back to remove it all. you will chase some of it off each time but about half or so (or more) will remain and you'll get used to the feel of an iron that's rounded and not notice that it's a bit dull.

If you don't do a lot of planing, it probably won't matter.

Marking knives don't plane 1500 feet of wood before they're sharpened.

Here's the wear bevel on a smoothing plane iron just before resharpening. This picture is 2 hundredths of an inch tall, approximately, leaving that wear bevel around 3-4 thousandths back.

cMB8bte.jpg


This is what it looks like with a cap iron in use. It's blunter at the front and less scooped with larger scratches heading back further than the back edge of this lip if you use a single iron.

The cap iron lifts the chip away from the iron and confines it to a very defined area.

(this is the back flat side of the iron, of course). The "scoop" in this looks deep because of the effect of reflecting light, but it's probably a fraction of a thousandth. )
 
I disagree with this view. Wear is on the edge. Sharpen it one-sided (as with a marking knife) and the back is 'removed' with the honed edge.
And the cap iron limits wear to the very edge anyway, 1 to 2mm. Hence, if really necessary, the "ruler" trick - or flat with just slightly more pressure towards the edge. Normal anyway as you are only going to be working the edge end of the blade.
 
you don't. I didn't collect these pictures to prove you wrong, but if you're looking at edges with a loupe or by eye, you don't really know what's at the edge.

I didn't, either.

I collected these pictures during edge wear studies, partly out of curiosity and partially for my own purposes (I'll make tools with whatever works best).

You can measure iron length. What I want you to do to prove me wrong is go hone a hundredth of length off of an iron and see how long it takes. Use digital or dial calipers. I've been down this road much farther than probably anyone on here, and not to measure these things, but to test other variables (and they come up as secondary observations).

With a finish stone, I noticed that before restarting tests with worn irons, I had about 2/3rds (or more) of this wear bevel length left in stria at the edge. What I said stands - if you don't care, it doesn't matter. Before seeing it, I didn't care, either, but if you're going to test irons from sharpness, they can't have wear in them, so I had to go back for a second go around.

The bonkers things in forums is armchair types who show up on a thread like this talking about steeling knives walk away with "I'M RIGHT, YOU PROBABLY DON"T WOODWORK" as a response, as Jacob did rather than taking the information and using it or choosing not to.

If I wasn't removing all of the back wear intentionally removing it and you're dismissing the wear removal process, you weren't either.
 
And the cap iron limits wear to the very edge anyway, 1 to 2mm. Hence, if really necessary, the "ruler" trick - or flat with just slightly more pressure towards the edge. Normal anyway as you are only going to be working the edge end of the blade.

In order to remove the wear pictured above with the ruler trick, if you use a 0.5mm rule as the method dictates, you won't get the wear out without chasing the back bevel larger. It's probably better to leave it in if you're going to lean on a ruler, or get a slightly steeper ruler.

When I tested irons, the "charlesworth" method with a 0.5mm rule is actually where I found that all of the wear wasn't coming out with a ruler trick.

It's smarter in the long term to use a stone that's fast enough to remove the wear in 10-20 seconds on the back - one that would be too fast for the ruler trick.

You *can* do whatever you want, including leaving the wear in or partially removing it with a ruler trick.
 
The above is an open challenge to all - hone a hundredth of length off of an iron, measuring with calipers, and see how long it takes. Divide the effort by two (it's easier to measure a hundredth than 5 thousandths) and see if you can conclude that you hone 5 thousandths off per turn.

The answer will be no - it'll be quite a lot of work just to get a hundredth off with a carborundum stone.

This creates another 2/3rds myth with certain irons - the long wearing types. Long wearing irons don't chip any less easily or deeply (that's determined mostly by hardness), but you hone much less length off per turn, even if it feels like you're doing more. The high wear irons hone half as fast. Honing another 25% more feels like you're really doing "a lot extra".

I wrote these irons off as chippy, but when I did an iron test, what I really saw was that I wasn't honing enough off after an iron chipped to get rid of the full depth of the chipping (usually a couple of thousandths). Even with a couple of thousandths of depth (not 5), we come up short.

Someone here in the states asked me to measure iron length lost as part of my testing, but I didn't do it, because I wasn't aiming to remove large amounts of length and I was testing durability, not hoping to hone an iron, dent the edge by measuring it and hone again.

While all of this testing may come off as dumb, when it's about 2% of the time you've spent making tools, it's far dumber to just blindly build with things and call yourself an expert (like a lot of boutique toolmakers pass themselves off as). I state observations, I'm not an expert. I would love if someone else would spend a small fraction of their time posting observations, but recognize it's far more rewarding to assume something and put your head in the sand because confidence feels better than competence. It always does. Look how proud a salesman will be when they tell you something that's false vs. an engineer who tells you their best estimate of something to date.

These bits of experimenting that happen for me about once a year or so have paid off greatly making tools. Understanding the tools pays off greatly when working wood.
 
The above is an open challenge to all - hone a hundredth of length off of an iron, measuring with calipers, and see how long it takes. Divide the effort by two (it's easier to measure a hundredth than 5 thousandths) and see if you can conclude that you hone 5 thousandths off per turn.
What for? Per turn of what? Why bother?
In order to remove the wear pictured above with the ruler trick, if you use a 0.5mm rule as the method dictates, you won't get the wear out ....
Who's dictating? :rolleyes: You can use any ruler you like.
Easier without a ruler at all and to just lift the blade slightly - or even just press harder at the pointy end, which it was woodworkers have been doing for millennia, to solve the problem you think you have discovered!
...

You *can* do whatever you want, including leaving the wear in or partially removing it with a ruler trick.
OK thanks very much!
Understanding the tools pays off greatly when working wood.
No really? Working wood pays of greatly with understanding the tools too!
 
Last edited:
If you don't work the back of an iron with something with a good combination of fast and fine, it'll either be coarse or rounded just from wear.

I don’t quite get what you’re saying here. How are you suggesting working the back? You presumably are not suggesting working the whole back, keeping the two flat faces parallel, to remove the wear (which would seem a bit daft). Yet you also seem to be dismissing the ‘ruler trick’ as ineffective?
 
I don’t quite get what you’re saying here. How are you suggesting working the back? You presumably are not suggesting working the whole back, keeping the two flat faces parallel, to remove the wear (which would seem a bit daft). Yet you also seem to be dismissing the ‘ruler trick’ as ineffective?

In bullet points - if you want to keep using the ruler trick:
* ignore that it can leave a little bit of wear at the edge. If you didn't mind it when you couldn't see it, then don't worry. Better to leave a little wear than chase the ruler trick stripe wider
* this is on a smoothing plane with a cap iron set around 1 hundredth of an inch. I didn't look at this on a plane with the cap set far off, but the wear may be less deep and more rounded out rather than in without a cap - it's not very productive to use a smoother without the cap iron
* In my opinion, the solution with the cap iron used is probably as simple as increasing the rule thickness. I have a 0.5mm rule that I started using early on when I first started sharpening (learned from DC's video on plane sharpening). I'd be willing to bet 1mm instead of 0.5mm would solve the problem

About the ruler trick vs flat surface
* the idea of removing metal on the entire back is a logical trap. Metal bends, even under finger pressure. when you sharpen an iron or chisel, you apply finger pressure at the tip or on one side or the other. Wherever you apply pressure, that's where the back will be honed. If you apply pressure in the middle of an iron, the middle will become well burnished and the edge won't get much honing. If you forgo the rulertrick, think of the term directed pressure
* most people use a very fine stone with the ruler trick (if you don't, you'll get a wire edge. If you're working the back, you can use a coarser stone with directed pressure to speed things up (fingers at the tip, first heavy pressure for 10 seconds, then lighter)
* The first rule of sharpening is completing the job (at least that's my opinion). All of the potential in the world doesn't matter if it comes up short at the tip.


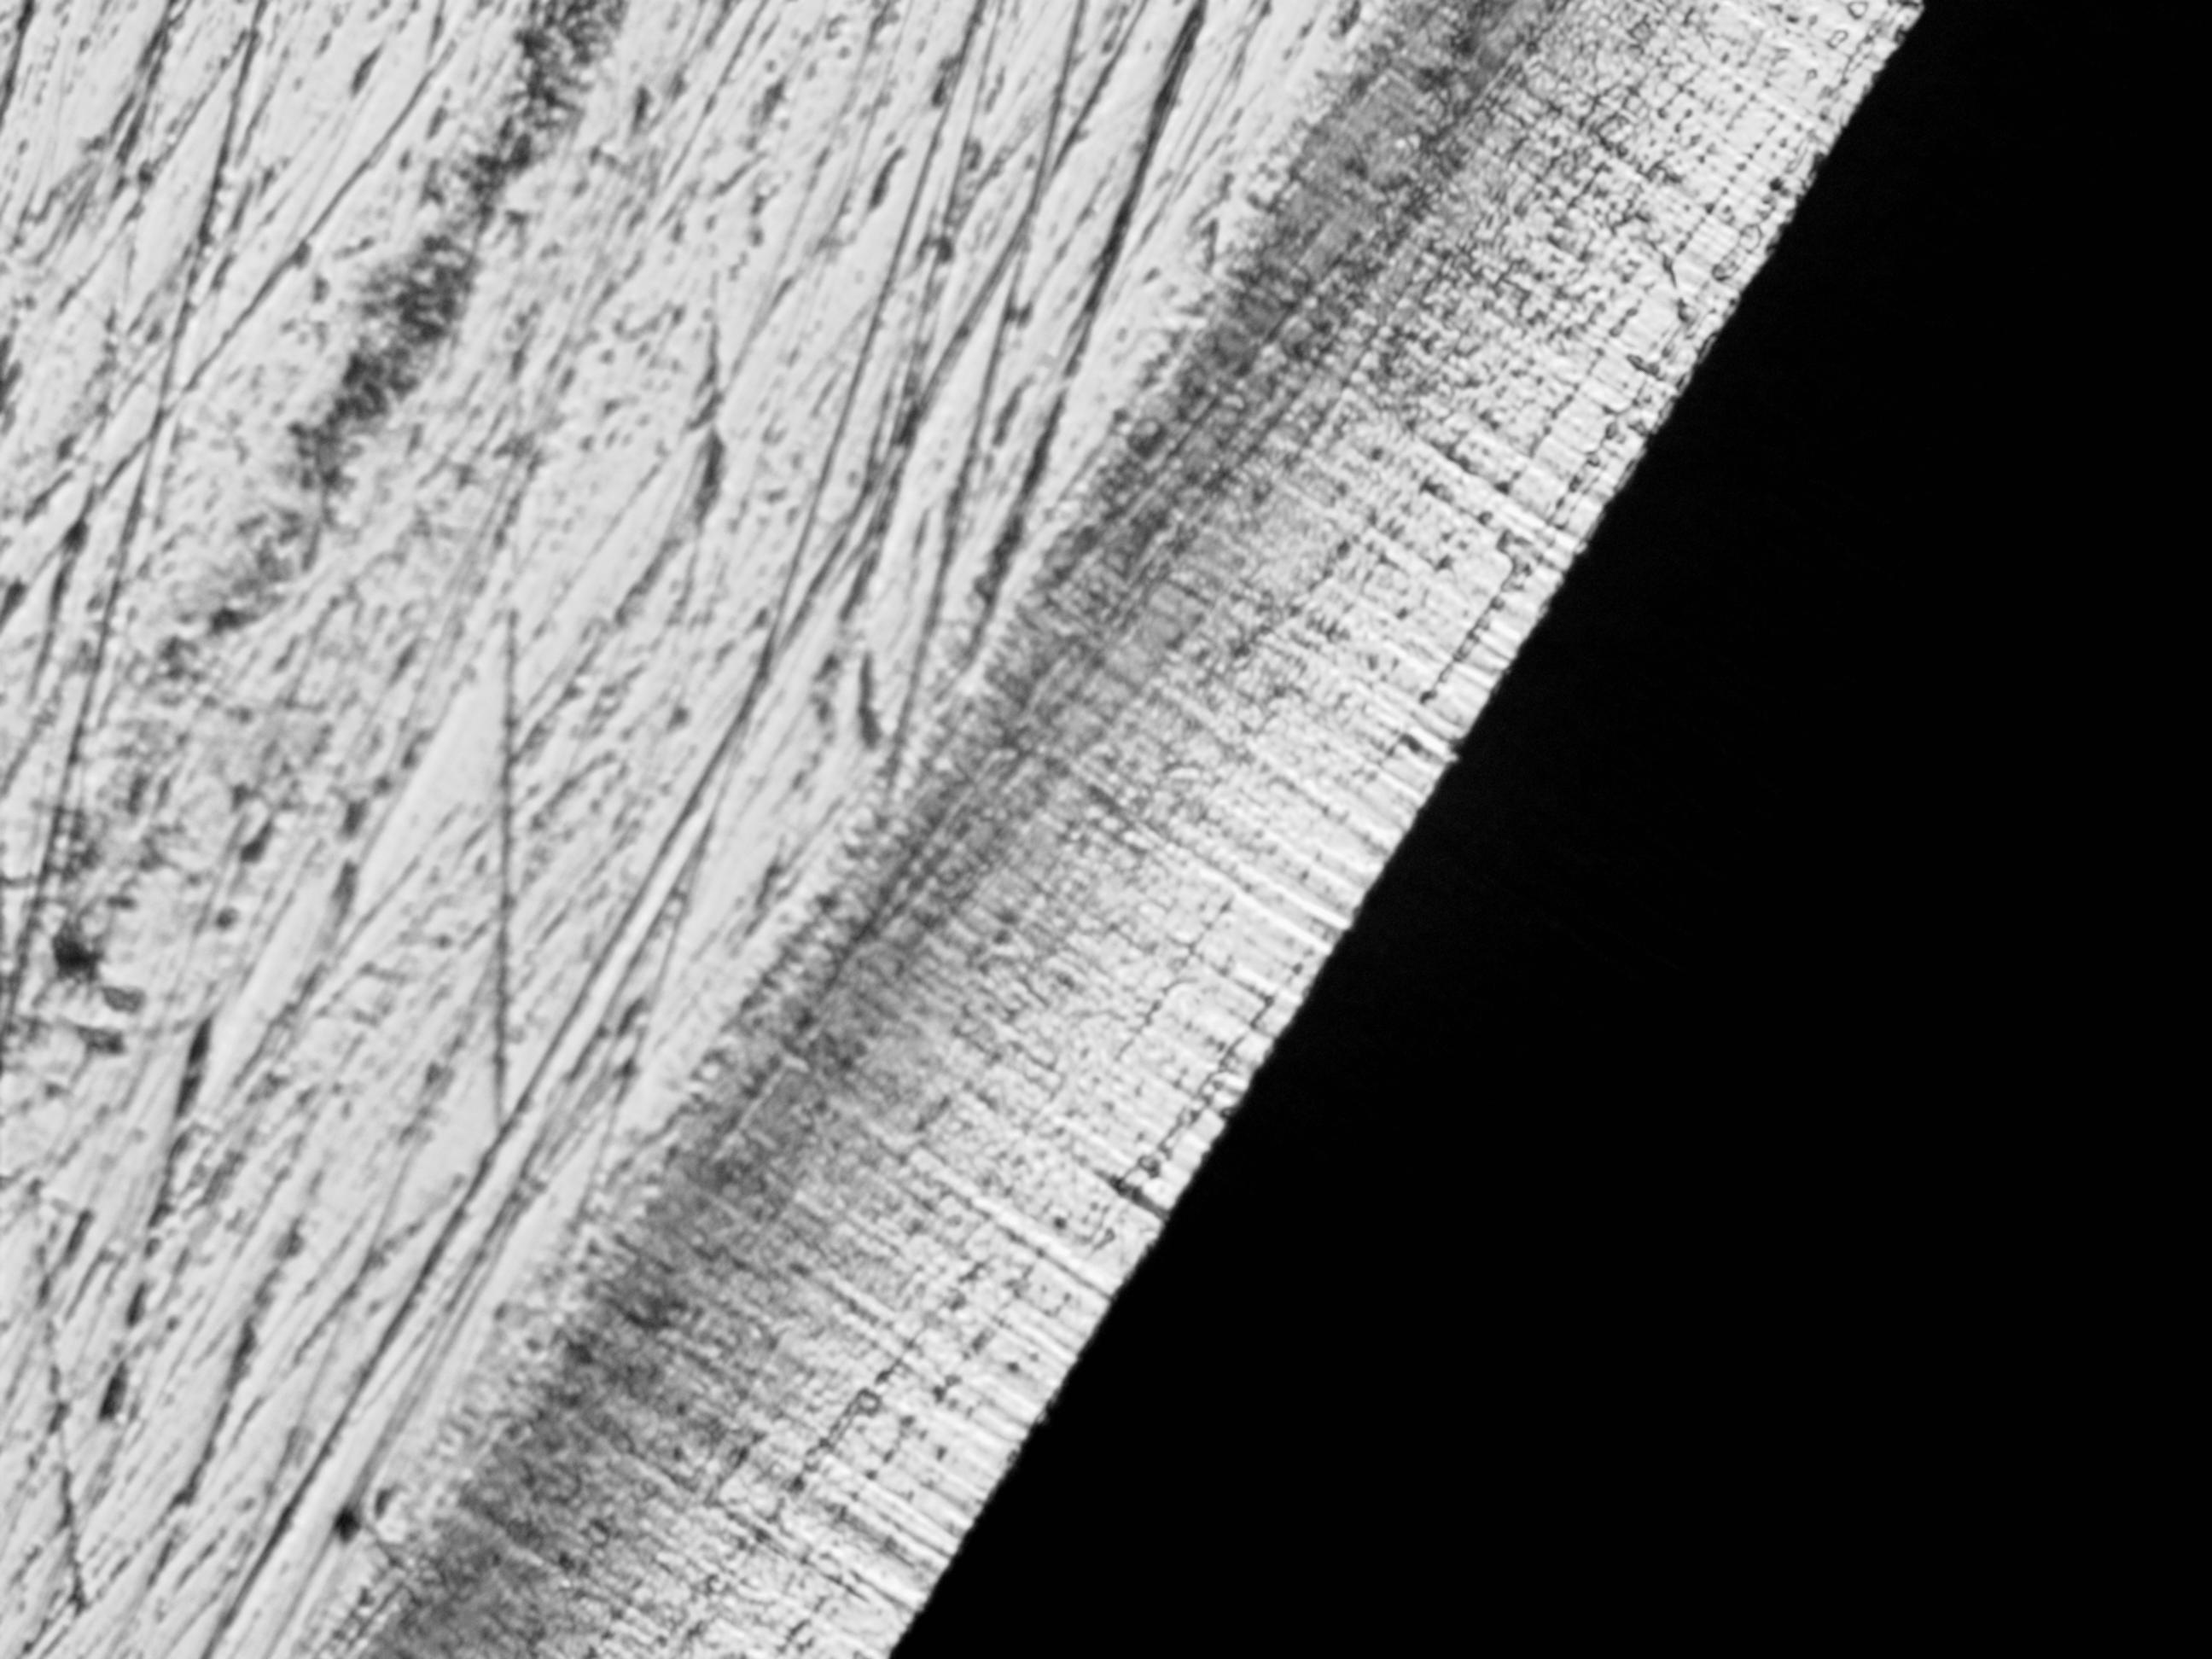
OK, so here's a picture illustration of pressure. Washita, flat back:

Heavy pressure for ten seconds with finger pressure at the tip (notice, the wear stripe is gone, but the surface looks pretty coarse):
washita heavy pressure.jpg


Same stone, 10 more seconds then with light pressure:
washita light pressure.jpg


20 seconds total. How long does it take to do the ruler trick? I don't know - you can do it quickly and remove a burr, but if you're using a fine stone and doing appreciable work to remove wear, it'll take 20 seconds.

In the case of this iron, I use a grinder and the washita on the bevel and back, and then buff the bevel side with a buffer (which is why the edge is so uniform).

Recall this vs. the shapton 12000 without a buffer:
shapton cream.jpg


Am I losing anything in sharpness by doing the above and not using the ruler trick?

I don't think so. compare the uniformity of the initial edge.

These are the kinds of things you'll do if you sharpen several things a day or maybe several a week, but if you don't do that, then maybe it doesn't make sense to speed up the process.

I've seen pictures of jacob's edges. They aren't close to the quality of the edges David Charlesworth produces in his instructional video.
 
(none of these pictures were taken to prove sharpness, they were taken as part of other studies. The nice thing about studying one thing, is that sometimes the time spent yields learning more than one thing. I took pictures of the edges of the stones themselves to make sort of a library of actual fineness of sharpening stones as there's a rumor that a washita can't create a fine edge, and some fairly drastic differences between stones that sounds like they're almost the same.

I also wanted to bust the idea that there is something to gain by spending $360 on a shapton 30k if what you really want is fine, but you don't want to spend the money just do indulge).

Here's an example of simlar numbered stones - refer back to the shapton cream above.

....now, compare it to the sigma power 13k. look closely at the edge beyond just the size of the scratches. Notice how much more uniform the SP13k.

sp13k.jpgk.jpg


Both of these stones are alumina, but the shapton is much faster. It's not hard to see why. The flip side of that is that using the SP13k only to remove back wear is impractically slow (the shapton can do it without issue).

There's no free lunch.

One other comment re: the ruler trick above. I can use the washita without stopping to flatten stones. The washita with the bevel side buffed lightly makes for a very uniform edge. It's functionally similar to the sp13k, but the washita used on bevel and back without the buffer will fall a little short.

So, should I use the 13k instead? No, the washita method is far faster. The buffer removes just a tiny bit of scraggle at the tip and the washita doesn't cut as deeply on the back (larger surface). You can't match the buffer just stropping unless you do a lot of it - like 50-100 strokes on a strop with light compound and heavy pressure - and contaminants in a leather strop will chip/nick an edge (I'm trying to avoid doing more work, not run toward it).
 
JUst to report back, following advice in this thread, instead of finishing up with stropping I switched to finishing off with the same green wax paste (comes in a solid block and you crayon it on) on wood. For wood I used birch ply as a soft-ish hardwood. I've noted the suggestion of using autosol as the polishing compound rather than the green wax and I'll give this a go when I locate the Sensible Place where I put my autosol ...

Took a bit of time because I decided to do remedial lapping grinds to clear the wear bevel from the flat sides of my blades, or at least most of it. I got to the point where flat strokes on the superfine stone remove most, but not quite all, of the burr resulting from sharpening the bevel before I got bored, and that's good enough for me to be able to clear the residual burr with entirely flat firm polishing strokes on the wood, relying on the wood yielding a tiny amount. A combo of flat strokes on the flat side and roundover strokes on the bevel got me to my target sharpness (no points of light on the edge viewed either side when angled under bright light) in pretty much the same number of strokes as I previously did on the leather. Because I'm polishing the flat side entirely flat I'd imagine this technique will keep the flat side flat much longer ... so all in all a success: thanks for the advice!

As regards what the edge angle is, I've no idea! I guess the main bevel angle is in the mid to high twenties on most of my tools, but you've got to add to this the roundover from the superfine stone (probably a couple of degrees after a big sharpen, but much more after quick sharpens) and then the roundover from the wax+ wood ...
 
Last edited:
I attended a sharpening course with David Charlesworth and his methods work for me. One of my favourite timber is quilted maple. Using A2 irons and sharpening on waterstones with a Veritas honing honing guide and the 'ruler trick' gives me a very sharp blade and very smooth finish on the wood.
 
Picture in post 35 (page 2 of this thread) illustrates just how fine something like autosol will be off of wood (above that is iron, corian is similar to that - too hard).

If you use something like that - wood has a bit of give, but less than leather. It is, however, plenty to make the abrasive softer but crisp cutting - the edge is spectacular and if the wood gets out of shape, you can plane it back to flat, scrape it or replace it.

You'll appreciate the speed and control - there's never a need to correct any growing problems.

(top picture is also buffing bar on wood - a fine polishing bar, but not something nutty fineness or expensive - no need for anything expensive - there's no nosebleed priced stone that makes better edges, and expensive natural stones don't make edges as good as either of those two clear pictures).

I did a four day course with Jögge Sundqvist last year, and as a part of that he did a quick primer primer on sharpening tools. One of his tips was to always have a tube of autosol nearby and use scrap pieces of wood to strop tools.

I don't have a buffer wheel, but I have autosol and scrap wood/MDF/plywood. Could this sharpening technique be replicated with autosol on a flat piece of wood?
Yes. Or on leather. Or on a slow spinning ply or mdf disc on the lathe for me. Spread the Autosol thin so it doesn't spin off and keep picking it up, putting it back, with a palette knife.
Come to think - the palette knife is essential! Buy a proper artists' job with a bendy off-set blade. You can buy them in little sets of different shapes - they are handy for glue as well.
PS - also shape the edge of the disc for polishing inside gouges

Screenshot 2021-03-15 at 08.24.36.png
 
Last edited:
I did a four day course with Jögge Sundqvist last year, and as a part of that he did a quick primer primer on sharpening tools. One of his tips was to always have a tube of autosol nearby and use scrap pieces of wood to strop tools.

I don't have a buffer wheel, but I have autosol and scrap wood/MDF/plywood. Could this sharpening technique be replicated with autosol on a flat piece of wood?

Yes - better to do it with wood than with a leather strop (it'll be faster).

For years, I had a very slow fine final stone that I did this with to stave off edge failure, just rounding the very tip of the chisel. The only virtue of the buffer is that it's so fine and even cutting, there's no pressure spot, but autosol on wood is great.

If you're not experiencing any edge failure on something like a carving tool, though, you may want to keep it minimal so you don't have to chase it out. For chisels that you pare or mallet with, though, it's wonderful.

I'll try it out on some chisels! To my mind the concept makes so much sense, especially when chopping through pine and old growth spruce and you encounter a knot... If i like it I might even get a very cheap bench grinder and put on a buffing wheel. Any preferences for rpms? Would something with around 3000 rpm:s work for this? I would probably only use if for buffing, already have an old tormek for sharpening knives, axes and gouges. The water is very handy for checking the bevel when freehand sharpening.
 
.......If you're not experiencing any edge failure on something like a carving tool, though, you may want to keep it minimal so you don't have to chase it out. ....
Translating the above incoherent sharpening jargon; "if it isn't blunt don't sharpen it"
Hope that helps.
 
Translating the above incoherent sharpening jargon; "if it isn't blunt don't sharpen it"
Hope that helps.

Grow up, Jacob. So far, your advice has been "sharpen it dull, use it dull".
 
I did a four day course with Jögge Sundqvist last year, and as a part of that he did a quick primer primer on sharpening tools. One of his tips was to always have a tube of autosol nearby and use scrap pieces of wood to strop tools.

I don't have a buffer wheel, but I have autosol and scrap wood/MDF/plywood. Could this sharpening technique be replicated with autosol on a flat piece of wood?

I've tried jewellers rouge and green compound on leather (not the same piece :confused:) and Autosol (or equivalent) on mdf. The autosol method works better for me.

Theres some many contrasting opinions with regards to leather. Hard pressure, light pressure, 30 times this side, 30 times on the other side, etc.
In my experience, hard pressure on leather results in an obvious rounded edge that was sharper before it touched the strop.

A bit of autosol (or equivalent) on mdf/timber, 3-4 light passes and on the bevel, a few on the flat side and that's good enough for me.
 
Last edited:
Back
Top