Sanding end-grain in bowls

UKworkshop.co.uk

Help Support UKworkshop.co.uk:

This site may earn a commission from merchant affiliate links, including eBay, Amazon, and others.

Kerrowman

Established Member
UKW Supporter
Joined
17 Mar 2021
Messages
60
Reaction score
3
Location
Penzance
Hi there,

I have a query about end grain and sanding in bowl turning.

When I come to sand the bowl, often the end grain areas look worse after sanding than before.

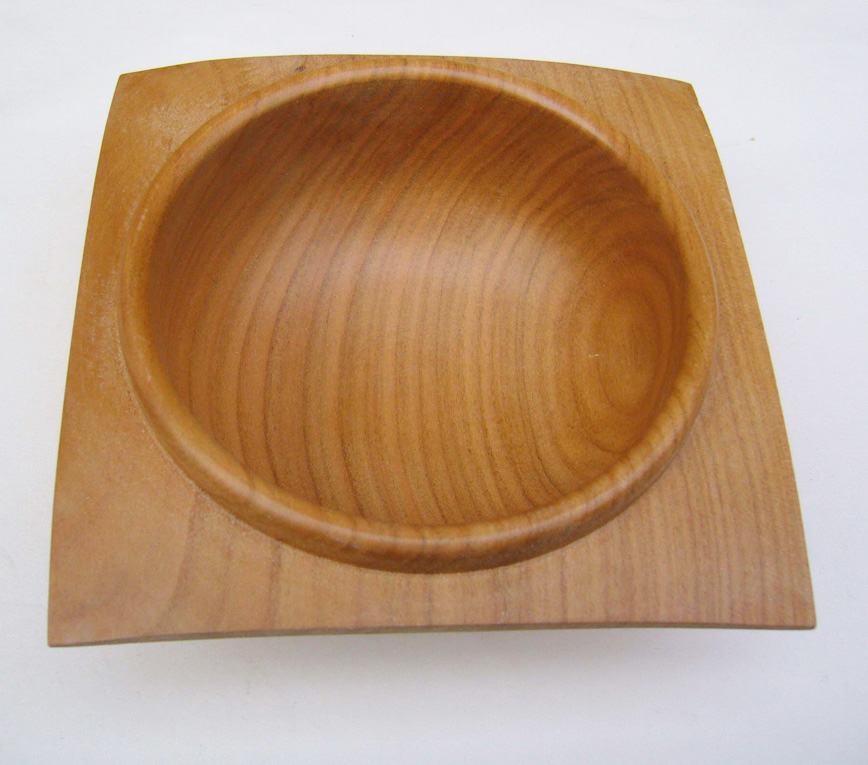
To give a specific example, with the aid of the attached pics; pic 1 shows the inside immediately after a ‘finishing’ cut. You may well say that I should get a smoother cut here but for the sake of the query let’s say this is the best I’m going to get for this stage.

Pic 2 shows the area after sanding to 400 grit and it’s become a grey mess with little detail. Pic 3 is after applying some sealer. The end result is not worth all the effort on the rest of the bowl.

Here are my thoughts on overcoming this: apart from getting a better ‘grain supported’ finishing cut in the first place perhaps I should use Abranet sanding pads and not regular sandpaper?

I will be removing the sealer on the lathe and trying again with some hopefully better techniques.

Thanks

Pic 1.JPG
Pic 2.JPG
Pic 3.JPG
 
Have you tried the Chesnut brand sanding sealer spray? I tend to spray it at the end of a session on the endgrain bits and leave it overnight to really soak in and dry. Then very light cuts with a freshly sharpened scraper, make sure your toolpost is very solid. Any slight vibration or movement in the toolrest will ruin it.

I think the greyness is the abrasive from the sandpaper rubbing off and getting into the wood, yes it looks rubbish. Get it as smooth as you can as described above and then see what sandpaper is needed, avoid sandpaper if possible.

I have found that oil will often hide/absorb the rougher parts, if its not too bad.
 
What speed are you using? You generally sand slower than you cut, some woods get hot if its too fast and it all goes horrid. I often sand those end grain bits without the lathe running.
 
It looks like tearout to me, you'd need quite a bit of sanding to get rid of it.
I agree with minilathe22, the grey looks like bits of the sandpaper. I get it sometimes when using cheap sandpaper. Sealing it first will help some with the grey, but I'd rather sort out the tearout before anything else.
 
The consensus seems to be hand sand those parts and therefore in effect the whole of the inside that way as you can’t skip parts of the circumference while the lathe is turning. I will try the Abranet sanding sheets that won’t, or shouldn’t, leave a residue in the wood and at a lower speed, say 750rpm.

I can see the logic of doing some sealing first and coming back the next day to sand but that adds a lot of time. Given correct cutting technique perhaps I should lightly sharpen my bowl gouges at the start of every turning session.
 
I bought one of these sets a few years ago, following advice on here:
https://hopewoodturning.co.uk/sandi...38/box-1-47mm-hex-shafts-for-power-drill?c=32I use them with a cordless drill - if end grain's caused a problem like that, stop the lathe, sand out the tearout by working through the grits, then finish with the finest grit and the lathe turning quite slowly.
Obviously, avoiding tearout in the first place helps!
 
I have the Hope sanding discs and arbor but had not yet found a way to use them in the context of dealing with end grain issues. Thanks for the tip 😁
 
The consensus seems to be hand sand those parts and therefore in effect the whole of the inside that way as you can’t skip parts of the circumference while the lathe is turning. I will try the Abranet sanding sheets that won’t, or shouldn’t, leave a residue in the wood and at a lower speed, say 750rpm.

I can see the logic of doing some sealing first and coming back the next day to sand but that adds a lot of time. Given correct cutting technique perhaps I should lightly sharpen my bowl gouges at the start of every turning session.

You really want to be keeping your gouge (or any tool) as sharp as possible on a regular basis. Dull tools aren't fun to use and can be dangerous.
Hope that doesn't sound pedantic.
 
As often as not, score marks aren't made by turning tools, but by hand sanding, not moving the paper back and forth and skipping grits. Also, if you start with say 80 grit, you can't skip any grits and just go to 320 grit without going to 120, 180, 240. You need to progressively go through the grits, always cleaning out the dust and abrasive fragments before the next grit. The aim is of course to get the best finish 'off the tool' and to 'sand the shape of the wood' - not 'sand the wood to shape'.

Most woodturners I know use 50mm (75mm for larger bowls), hook and loop sanding discs on an arbour held in an electric or battery powered drill. They certainly do in our club, and so do professional demonstrators who do demos for us. The Simon Hope sanding tool is top class like all of Simon's stuff, but it relies on the rotation of the bowl as the motive power for the arbour and the closer the arbour is towards the centre of the bowl, the slower is the speed (in inches per second) so the rotation of the arbor is slower. With an arbour held in an electric drill, whatever speed you set the drill to, is the speed that the arbor will rotate at. (though of course the amount of wood passing the disc will be less towards the centre of the bowl. There are countless sellers of discs and arbors on e-bay and the likes of Axminster, Turners Retreat, Amazon etc. etc.

240x 60-3000 Grits 50mm Sandpaper Sanding Discs Sander Pads Hooks Loop Tools UK | eBay
I've attached a few pics of bowls that I've made, as often as not, finishing the inside with a round-nosed scraper than a bowl gouge. All were sanded to 400g with a 2" sanding arbor held in a battery powered electric drill. I'd class myself as no higher than an averagely good hobbyist woodturner. I'm not holding them up as exemplars of bowl turning, just to illustrate that there are no visible sanding marks of any kind.

Hope that helps a bit.

David.
 

Attachments

  • London plane bowl2.jpg
    London plane bowl2.jpg
    254.1 KB · Views: 15
  • My bowl 4.jpg
    My bowl 4.jpg
    90.6 KB · Views: 15
  • Iroko bowl close up.jpg
    Iroko bowl close up.jpg
    203.3 KB · Views: 12
  • Cherry bowl1.jpg
    Cherry bowl1.jpg
    186.8 KB · Views: 11
  • Top view.jpg
    Top view.jpg
    78.4 KB · Views: 13
  • Yew change dish1.jpg
    Yew change dish1.jpg
    190.6 KB · Views: 13
Just for clarity, my suggestion of hand sanding with the bowl stationary relates to sanding just the tear out along the grain, not the entire bowl interior.
There’s a good video by Mike Peace on YouTube dealing with tear out; what causes it, how to avoid it, how to deal with it.etc He also makes the point that sometimes you have to accept that ‘this piece of wood is beyond help’.
D.
 
He also makes the point that sometimes you have to accept that ‘this piece of wood is beyond help’.

Agreed! It's frustrating after you've done so much of the work, sometimes the overall shape/grain/wood origin or whatever makes it interesting enough to keep even with a rough patch but you can't win them all.
 
This is a common occurence, in fact few timbers will give you a clean cut all round, even with the sharpest of tools. My preferred technique is to finish the inside shaping with a negative rake scraper anyway to remover ridges etc, so I always end up with end grain tear. The solution I came up with was to stop the lathe and lock it, then using the same sanding pad sequence with a drill, just work on those end grain patches, then carry on with the piece rotating, working may way through the different grits. In this manner you can completely eradicate and marks on the end grain. There is a potential drawback, care needs to be taken not to over do the sanding as you can dig a shallow hollow, this is especially true if the wood is spalted, white rot is very soft, but also tears out more, so a light touch is required, don't lean on the sander, just let the contact be enough and let the grit do the work. Overall though this works really well and results in a much better looking finish and is far quicker than trying to sand the entire bowl down to the level the tearout disappears.
 
Pic 1 shows torn grain before any sanding.
Pic 2 shows torn grain which hasn't been sanded away
Pic 3....

My suggestions -
First try sharpening your tools so they are as sharp as you can possibly make them before you take a few light finishing cuts. If you are still seeing torn grain, sharpen again and repeat.
If still having problems, try changing the cut to give a shearing/slicing cut to get a cleaner cut.
If still having problems, try applying some wax or oil (whichever is destined to be the final finish) and then take a couple more finishing cuts. This swells the grain and lubricates the cut so should give you a better finish off the tool. Any residue will be removed at the sanding stage so it won't affect the final finish.
Only once all the above has been tried and torn grain at an absolute minimum, then sand with something like 120 grit (use a good quality aluminium oxide abrasive). Once done, check to see if all torn grain has gone. If not, go coarser to 80 grit and sand again. Don't go to a finer grit until all evidence of sanding marks, torn grain etc. have been removed. If the coarse grit can't get it out, how do you expect the finer grits to do it? Their only job is to remove the scratches left by the previous grit.
 
It's difficult to see the shape of the bowl , It looks to have steep sides and a flat bottom , Sharp curve between the two , Also lots of what look like tool marks , As already said it's best on a finnishing cut to have a sharpened bowl gouge , Nice careful continues cut from rim into the centre of the bowl , Also you can try a round nose scraper again freshly sharpened , Good finishing cuts = less sanding
 
As well as the previous advice, one point no-one has mentioned is to try & get to the finish of the inside in one session. If the wood moves the job becomes much more difficult.
 

Latest posts

Back
Top