Routing thick end grain at the table

UKworkshop.co.uk

Help Support UKworkshop.co.uk:

This site may earn a commission from merchant affiliate links, including eBay, Amazon, and others.

Val

Established Member
Joined
17 Jan 2021
Messages
88
Reaction score
16
Location
Belfast
I need some help: I have cut a piece of sapele from a board, and with the bandsaw I have “carved” two thick pieces that I will use to make a solid wood box (one for the box itself and one for the lid) and then flattened them with a planer and a drum sander.

I think that the majority of the blocks are actually end grain, with a thickness of 60mm. This is the piece of sapele from which the two pieces have been cut from:
B1B0DBF3-F5C3-4738-8C81-D11591EB30C3.jpeg

My idea was to then apply a template and trim it at the router table:
07CED8E0-2BD4-4568-B5EE-1B6A769546DF.jpeg

However, even though there’s less than 2-3mm of waste around the template (I took a pass at the spindle sander), as soon as the router bites into the piece I have horrible kickback. There’s not even much tearout, I just manage to make a dent in the wood before the piece tries to fly away.

I am feeding the pieces freehand with paddles from right to left (I also use the “pivoty thingy” screwed on the router plate), I am using a template straight bit 50mm long, and for the first pass I’m using the bottom bearing - I plan to use the top bearing after I flip it to finish it.

I know the piece is quite thick, but that’s a requirement for both parts (the top will be domed and carved). The lid will have a rebate and dit inside the box opening.
It doesn’t matter what direction the wood comes in contact with the router, I always get kickback and I am scared of damaging the piece or - even worse - injure myself.

How can I successfully route it without risking the piece to fly away?

Thanks everyone in advance for the help.
 
That’s a dangerous set up, the template is far too small and the cutter is exposed.

My recommendation would be:

1. use a far larger template which does one half at a time….with some knobs or handles

2. Use an easy trim cutter from Wealdon - they are 19mm diameter and use disposable tips and effectively have cutter limiting.

3. make a guard for the cutter - it needs a bit of plywood just above the cutter, say round ended.

4. a run in peg
 
All of what robin said, but even then its asking a fair bit from that setup. Might pay to work out how you can do it in 8 to 10mm height passes. ( if at all possible)
 
Thank you for your feedback.
I do have a cutter guard, I slid it away as this 50mm router bit doesn’t fit inside the fence if I’m using the bearings.

@RobinBHM What do you mean by “run in a peg”?

@baldkev yes, I was thinking of making the template much thicker and cut only 8-10mm at a time rather than 50mm all at once

any other suggestions/improvements?
 
I guess if you got 9mm ply and made lots of 9mm templates, you could remove one after each pass.
The only other thing would be to try to get the block as close to the template size as possible so the cutter is nibbling less
 
It’s possible to fit a steel peg close to the router bit - which the template rests against as well as the router bit bearing - it adds support and reduces the chance of kickback.

you can’t really do staged cuts as bearing has to line up with the template. The only alternative would be a shorter cutter.
 
You other option is to rout opposite corners with the grain, then fix template to the other side - although my guess is you dont want screw holes on both sides.

I really highly recommend the easi tip cutters from Wealdon, I know they are quite expensive, but Ive done loads and loads of template work with them - they really are a cut above the conventional TCT cutters. You also gain from a bigger cutter diameter.


The other option you could do is make another template about 2mm bigger all round - that would allow you to take a lighter pass and when you do your final pass the cut depth would be exactly the same all the way around.
 
I guess if you got 9mm ply and made lots of 9mm templates, you could remove one after each pass.
The only other thing would be to try to get the block as close to the template size as possible so the cutter is nibbling less
Sounds like a plan! That’s going to be my course of action.
I am already quite close to the template (1-2mm max), so I don’t want to get any closer than this with the bandsaw or sander in case I actually remove too much material.
 
It’s possible to fit a steel peg close to the router bit - which the template rests against as well as the router bit bearing - it adds support and reduces the chance of kickback.

you can’t really do staged cuts as bearing has to line up with the template. The only alternative would be a shorter cutter.
I am already using it, I didn’t know the name and call it “the pivoty thingy screwed to the router plate” :D
I think that @baldkev solution can be used instead of a set of shorter bits.
 
Please don't try that - the cutter will definitely grab the piece and ruin it. There are spiral bearing mounted bits in 50 mm but I haven't tried them and they are mega expensive. I would get a top bearing mounted bit about 30 mm long and use it with the template with a hand held router. Take small nibbles and don't let the wood burn. Then chuck a flush trim bearing in the router, flip it over and use the routed surface to run the bearing on. A little sanding will finish it.
 
Please don't try that - the cutter will definitely grab the piece and ruin it. There are spiral bearing mounted bits in 50 mm but I haven't tried them and they are mega expensive. I would get a top bearing mounted bit about 30 mm long and use it with the template with a hand held router. Take small nibbles and don't let the wood burn. Then chuck a flush trim bearing in the router, flip it over and use the routed surface to run the bearing on. A little sanding will finish it.
I agree, I surely don’t want to ruin the piece.
Do you think that @baldkev ‘s method would work? I would rather do it on the table than with the handheld router as the piece is relatively small and I suspect it would be difficult to balance the 1/2” router while trying to prevent kickback.
 
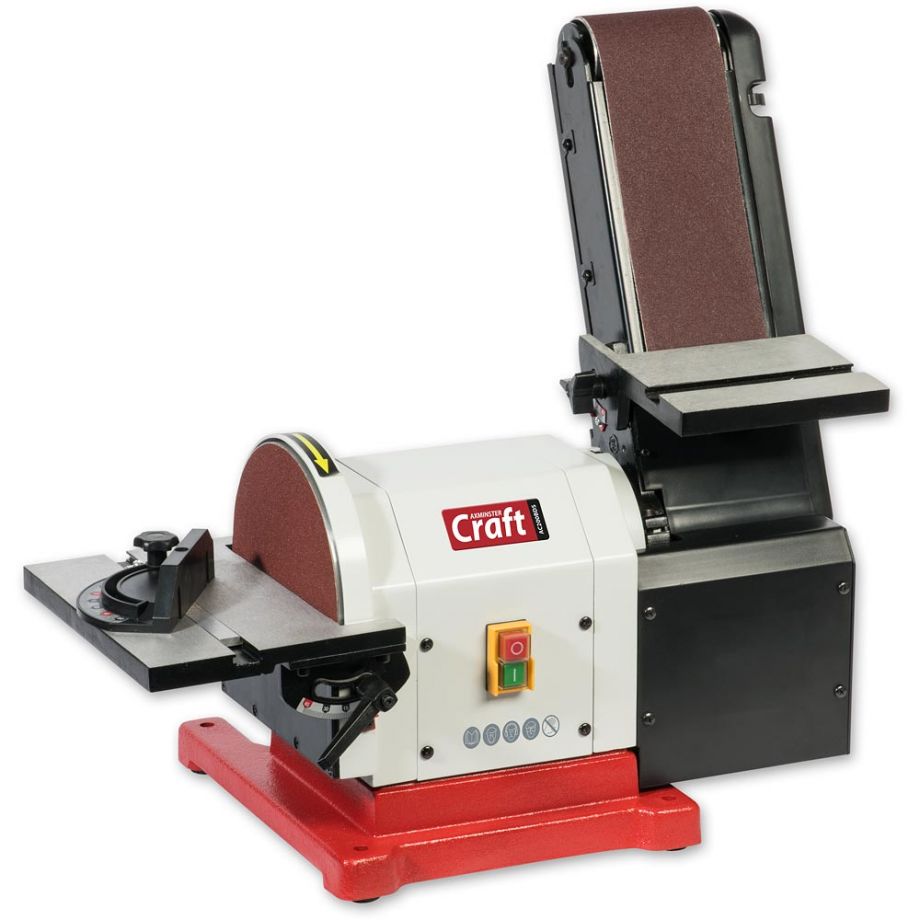
This might be more safely achieved with a belt sander (see below) than a router, either hand held or inverted. I say this because the items are small and it's difficult to devise safe holding for them.

With a belt sander such as the one below, (or other configurations) you could attach your template to your block of wood and create a stop of a fixed width and thickness that sits clamped parallel with the belt all across the width of the table. This stop could be part of a false table that attaches to the machine's table, e.g., making use of the cast iron table's slot. Then it would just be a case of sizing your template to match the offset of the stop from the belt attached to the sander's table and sanding until the template butts up against the stop.

Assuming you don't have a belt sander with a fixed table as below, it would still be possible I think to rig up a hand held belt sander on its side, or upright with the belt running vertically, with a false table and stop. Slainte.

Image source from Axminster: https://cdn.axminstertools.com/medi...93965a290622b2a179c050d4180/1/0/105245_xl.jpg

105245_xl.jpg
 
Last edited:
I need some help: I have cut a piece of sapele from a board, and with the bandsaw I have “carved” two thick pieces that I will use to make a solid wood box (one for the box itself and one for the lid) and then flattened them with a planer and a drum sander.

I think that the majority of the blocks are actually end grain, with a thickness of 60mm. This is the piece of sapele from which the two pieces have been cut from:

My idea was to then apply a template and trim it at the router table:

However, even though there’s less than 2-3mm of waste around the template (I took a pass at the spindle sander), as soon as the router bites into the piece I have horrible kickback. There’s not even much tearout, I just manage to make a dent in the wood before the piece tries to fly away.

I am feeding the pieces freehand with paddles from right to left (I also use the “pivoty thingy” screwed on the router plate), I am using a template straight bit 50mm long, and for the first pass I’m using the bottom bearing - I plan to use the top bearing after I flip it to finish it.

I know the piece is quite thick, but that’s a requirement for both parts (the top will be domed and carved). The lid will have a rebate and dit inside the box opening.
It doesn’t matter what direction the wood comes in contact with the router, I always get kickback and I am scared of damaging the piece or - even worse - injure myself.

How can I successfully route it without risking the piece to fly away?

Thanks everyone in advance for the help.
The biggest danger that you face is the breaking of the router bit just above the bottom guide bearing! If I were to try this job, I would brace the router cutter by fitting a top bearing and support, so that the tendency of the cutter to bend would be removed. There are two router mounting screws to the left of the pic which could be used to secure the bottom of braces which connect to the upper bearing mount.
 
I agree, I surely don’t want to ruin the piece.
Do you think that @baldkev ‘s method would work? I would rather do it on the table than with the handheld router as the piece is relatively small and I suspect it would be difficult to balance the 1/2” router while trying to prevent kickback.
My gut instinct is not to try it on a router table as it will probably be snatched from your hands no matter how good your technique. I would still suggest a 1/4" hand held router with the bits as above. They come in 30mm lengths so two will do the job. I have used a 1/4" spiral bit with bearing and they are smoother and easier to control for flush trimming. You could use the offcuts with a suitable gap to run the router on to prevent tilting - sitting on a non slip mat. ? Other than that you can buy sanding drums with a bearing which are about 70mm high and are used in a drill press. Be safe !
 
If you went with slainte's suggestion, you could use a template either side ( accurately aligned ) and an f clamp across the centre to give you a handle
 

Attachments

  • 16428570397551534156482022595818.jpg
    16428570397551534156482022595818.jpg
    117.7 KB · Views: 48
This is my take on slaintes suggestion
The sander could sit within a cradle/ box, box sides at the same height as the belt
 

Attachments

  • 16428573040261222848456575869278.jpg
    16428573040261222848456575869278.jpg
    93.6 KB · Views: 24
This might be more safely achieved with a belt sander (see below) than a router, either hand held or inverted. I say this because the items are small and it's difficult to devise safe holding for them.

With a belt sander such as the one below, (or other configurations) you could attach your template to your block of wood and create a stop of a fixed width and thickness that sits clamped parallel with the belt all across the width of the table. This stop could be part of a false table that attaches to the machine's table, e.g., making use of the cast iron table's slot. Then it would just be a case of sizing your template to match the offset of the stop from the belt attached to the sander's table and sanding until the template butts up against the stop.
I actually have the exact same disc/belt sander you have linked. I never thought of putting a stop on the table and create an offset template, that’s a really good idea (for other projects also). Thank you!
 
This is much like a guitar template rout (which involves endgrain). however, a guitar body is relatively large. You need to be able to make that piece seem like a large piece and limit what needs to be template routed (the picture looks fine for that, though - it's the size that's an issue.

I'd have a clamp on that thing and control the rout with the clamp and go slow, never climbing. If the router wants it, the router takes it and you're not in the fight - that's important.

When I do guitar bodies, I generally don't use the router as I also don't usually use something as agreeable as mahogany. The go-to when not using the router is just an OSS close to the line and hand work the rest of the way to fine things. It's not that bad and isn't unsafe, either.
 
The biggest danger that you face is the breaking of the router bit just above the bottom guide bearing! If I were to try this job, I would brace the router cutter by fitting a top bearing and support, so that the tendency of the cutter to bend would be removed. There are two router mounting screws to the left of the pic which could be used to secure the bottom of braces which connect to the upper bearing mount.
Before reading this post I had never heard of braces for router bits. Good to know, thanks
 
This is much like a guitar template rout (which involves endgrain). however, a guitar body is relatively large. You need to be able to make that piece seem like a large piece and limit what needs to be template routed (the picture looks fine for that, though - it's the size that's an issue.

I'd have a clamp on that thing and control the rout with the clamp and go slow, never climbing. If the router wants it, the router takes it and you're not in the fight - that's important.

When I do guitar bodies, I generally don't use the router as I also don't usually use something as agreeable as mahogany. The go-to when not using the router is just an OSS close to the line and hand work the rest of the way to fine things. It's not that bad and isn't unsafe, either.
That’s actually what I was wondering while trying to route it: how am I supposed to do a thick bass or guitar body on a template? :D
I think at this point I will give it a go clamping it on an f clamp and if it doesn’t work I will try the sled and custom template on the belt sander(y) I’ll keep you posted
Thanks everyone
 
Back
Top