Rebate planes

UKworkshop.co.uk

Help Support UKworkshop.co.uk:

This site may earn a commission from merchant affiliate links, including eBay, Amazon, and others.

quixoticgeek

Established Member
Joined
9 Jan 2012
Messages
38
Reaction score
0
Location
Amsterdam
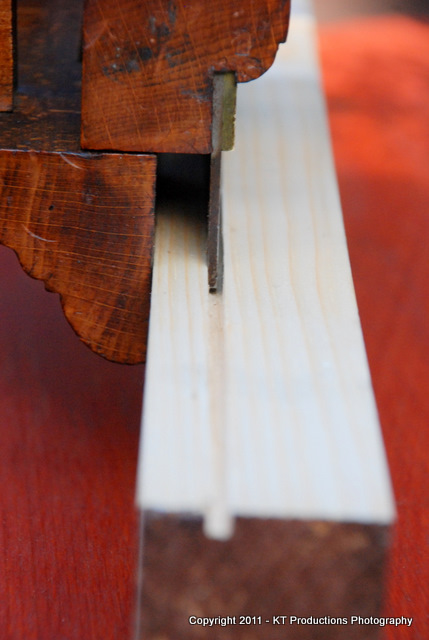
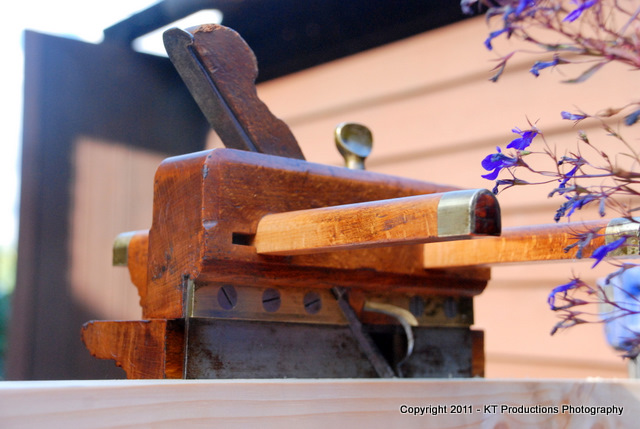
I would like to get a rebate plane that is capable of making a 3-6mm groove in a piece of wood, a few mm from the edge. When I learned carpentry at school we had some rebate planes that were perfect for this job, but I can't find anything similar in my searches. All the affordable rebate planes I can find only seem to be able to make a groove on the very edge of the work piece.

Can someone recommend an affordable rebate plane that can do what I am after?

Julia
 
Search for a Plough plane on ebay. The Stanley plastic handled ones work well and are almost free.
 
Hi Julia

They guys are quite correct...you need a plough plane and I tell you something...the wooden ones..properly tuned are superb.

This is an old Tyzak one that I got for very few pounds on FleaBay....

DSC_0606.JPG


Couple this with a nice set of cutters....

DSC_0505.JPG


...and you can get some really superb results....

DSC_0611.JPG


...really clean....

DSC_0604.JPG


The ideal tool for what you want....

DSC_0607.JPG


Doug's one is the modern version of this superb tool and as such is much easier to get cutters for and is a great deal and very versatile!

Cheers

Jimi
 
A Record 044 on the bay, check for a complete one, should not be expansive
 
jimi43":211ya4p3 said:
They guys are quite correct...you need a plough plane and I tell you something...the wooden ones..properly tuned are superb.

That's a nice looking plough. Apologies for the hijack, but what is your tuning process for a wooden plough?
 
Hi Dave

The key to the old wooden plough planes is the understanding of the mechanics of the cutter/skate.

There are a number of articles on the subject but the engineering is quite complex...which is why old cutters may or may not fit an old plane...they were generally made for each other

Each cutter has it's bevel downwards and that face also has a groove running through it which locates in the skate...the latter effectively becoming the bed. Cleaning out old rust and carefully clearing this groove is important...especially on the larger cutters as the skate edge wedges into it.

The accuracy of this fit is just one of the elements of keying the iron.

Next...the face will need to be cleaned off and polished near the cutting edge. The iron is tapered AND curved near the front edge...this taper angle and curve arc being important in fitting tightly preventing twist and therefore chatter. I remember reading somewhere a story where someone spent hours flatting this curve out under the misunderstanding that it was a distortion!

The skate itself is usually steel and brass and should be clean and polished as far as possible....without deforming the edge that the iron sits on.

Finally you will need to make sure all the gunk and years of wax and overzealous polishing are removed from the arms so they run smoothly from front to rear. These are almost always stiff or distorted. The accompanying wedges (removed in the above pictures) may be broken or missing totally...and need replacing. They are usually "captive" wedges and are quite simple to fabricate with a pattern.

Once all is complete, a last wipe-over with boiled linseed oil will preserve the wood.

Jim
 
jimi43":7ls70j07 said:
...which is why old cutters may or may not fit an old plane...
This is quite an important factor that Jim's hidden away there - it can turn a cheap option into an expensive and extremely frustrating one, if you're not particular in what you buy. As with all multi-part tools, it generally pays to stick with complete examples if you want to be a user and not a tool dealer. (Yes, this is a "do as I say not as I do" thing, since you ask... ;) )
 
Thanks for the tips Jim & Alf. I think (hope) my previous frustrations were due to poor setting of the iron. I've overcome that problem with another woody but I haven't had the chance to try the plough yet. I'm under orders from SWMBO to finish a project indoor before I go tinkering with the plough :oops: . One thing I did notice is that the front and rear skates are not quite coplanar, more convex. Is that something to be concerned about?

jimi43":vw9zcybr said:
The accompanying wedges (removed in the above pictures)

I was wondering about that! Your Tyzack looks identical to my Sorby except for the distict lack of wedges!

Alf":vw9zcybr said:
jimi43":vw9zcybr said:
...which is why old cutters may or may not fit an old plane...
This is quite an important factor that Jim's hidden away there - it can turn a cheap option into an expensive and extremely frustrating one, if you're not particular in what you buy. As with all multi-part tools, it generally pays to stick with complete examples if you want to be a user and not a tool dealer. (Yes, this is a "do as I say not as I do" thing, since you ask... ;) )

When I bought my plough it came with a single matching iron. For christmas SWMBO bought me a full set of irons but from different makes. I'm going to sharpen and try the irons regardless, but if the profiles and locating grooves match it should be ok?
 
Ah...yes ALF...I guess I did hide that bit a tad....although I did try to explain why they may not fit and what to look for.

Most of the larger makers...that being Tyzak and Sorby...would have made all their cutters with the same profiles...it's when you try to fit no name or smaller makers to the plane that you may or may not be lucky.

The "set" I got were silly money...a quid I think...at a bootfair so it was worth a punt. Some are Hildick's some Ward..oh and than strange "Monument" one! :mrgreen:

DSC_0508.JPG


Most fitted and worked brilliantly in the Tyzak others didn't so it just goes to show really...or maybe I'm just a bit lucky! If the taper profile, the contour of the arc and the groove appear to match...you are onto a good start...then of course...you have to try them out to be sure. In fact...the photo above coincidentally showed one on the right that didn't work...you can see why from the width of the groove.

It fitted but it chattered so much it was not worth it. I will probably use it for steel stock for something else...always has a use!

Jim
 
In a wooden plough restoring project I had some troubles in taking apart the skates for cleaning them better. The screws lost the strength and the results was a weak rear skate, moving a little when the wedge was inserted.
I thought that would have been better to leave the skates in their place. Any advice?

Ciao
Giuliano :D
 
ac445ab":1nyl57f1 said:
In a wooden plough restoring project I had some troubles in taking apart the skates for cleaning them better. The screws lost the strength and the results was a weak rear skate, moving a little when the wedge was inserted.
I thought that would have been better to leave the skates in their place. Any advice?

Ciao
Giuliano :D
Expand the old screw holes by drilling, plug with fresh new wood, drill new pilot holes and re-assemble? Otherwise epoxy perhaps? God luck :)
 
nanowire":384j84fv said:
ac445ab":384j84fv said:
In a wooden plough restoring project I had some troubles in taking apart the skates for cleaning them better. The screws lost the strength and the results was a weak rear skate, moving a little when the wedge was inserted.
I thought that would have been better to leave the skates in their place. Any advice?

Ciao
Giuliano :D
Expand the old screw holes by drilling, plug with fresh new wood, drill new pilot holes and re-assemble? Otherwise epoxy perhaps? God luck :)
Thanks, you are right, may be plug and drill new pilot holes is the better way of doing such a job.
Giuliano
 
ac445ab":1s5fvkhw said:
nanowire":1s5fvkhw said:
ac445ab":1s5fvkhw said:
In a wooden plough restoring project I had some troubles in taking apart the skates for cleaning them better. The screws lost the strength and the results was a weak rear skate, moving a little when the wedge was inserted.
I thought that would have been better to leave the skates in their place. Any advice?

Ciao
Giuliano :D
Expand the old screw holes by drilling, plug with fresh new wood, drill new pilot holes and re-assemble? Otherwise epoxy perhaps? God luck :)
Thanks, you are right, may be plug and drill new pilot holes is the better way of doing such a job.
Giuliano
I might be wise to only do one hole at a time to ensure correct positioning of the holes.
 
Back
Top