RAS measuring system

UKworkshop.co.uk

Help Support UKworkshop.co.uk:

This site may earn a commission from merchant affiliate links, including eBay, Amazon, and others.

rth

Established Member
Joined
8 Aug 2012
Messages
34
Reaction score
0
Location
sitting room
Can anyone suggest a simple adjustable way of adding a movable block attached to the fence which can be set to help in multiple cuts, I could use a clamp but something a bit more refined and permanently attached is better.
 
I don't think I have any photos and I don't have access to my saw right now, but I'll try to describe it.

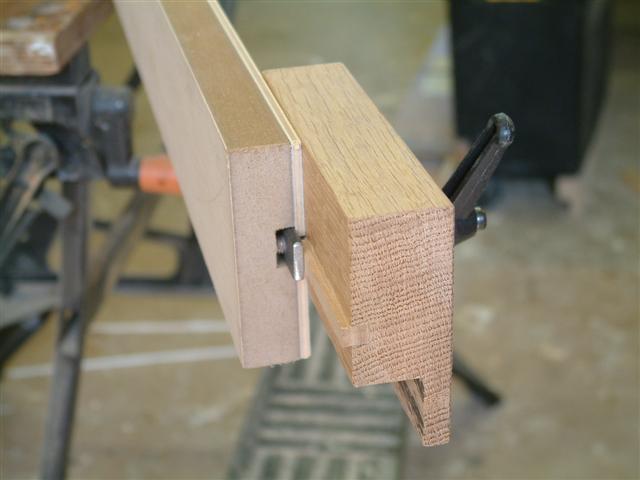
I have made a length of 75x25mm MDF, which has a T-slot all along its length. A sliding nut runs in this. This fence is screwed to the left-hand casting of the machine.

A block about 100x75x30 has a 20x20 rebate routed along on edge. This is the bottom edge closest to the fence. A groove in the back face of this block aligns with the T-slot. It has a key glued into it, so that the block slides along the T-slot without binding.

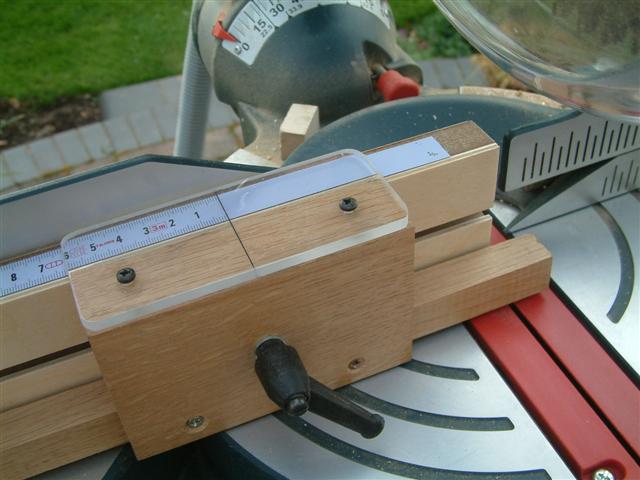
A knob or Bristol lever runs though the block to the sliding nut i the T-slot, so the block an be clamped anywhere along the fence.

The block is actually a couple of mm taller than the fence itself, so that a piece of acrylic fixed to the top of the block acts as a cursor. A length of self-adhesive ruler runs along the top of the fence, underneath the cursor. The cursor has a line scratched on the underside, close to the surface of the tape.

A length of wood, about 200x20x20 is screwed into the rebate. It is positioned so that it sticks out to the right. With the cursor set at the Zero mark on the tape, this piece of wood must extend beyond the line of cut of the saw. Switch on the saw and trim this piece. This is the stop. It is now set at zero as well as reading zero. If you alter the saw, you can re-calibrate it it by unscrewing the stop, moving it to the right a bit and trimming it again, as before.

I realise a photo would be a good idea! If I find one, I'll add it.
HTH
Steve
 
Thanks for the help from both of you, as stated a picture paints...etc, I have to say I cannot understand the first description, not your fault...mine, await a pic. The pictorial sequence is good and simple to construct, I willl compare the two and make one....... :)
 
Right, I've found some pics.

08 Clamping assembly (Small).JPG

09 Block on fence (Small).JPG


These two pics show the profile of the fence and the block, with its clamping Bristol lever. There are a couple of things to note:
Firstly, I wouldn't make the fence like that again. This one is a piece of MDF with a groove routed down it, then a piece of thin ply glued on top. The problem is that the fence does not stay straight, but bends according to the temperature. On a hot day it looks like a banana. I would laminate it from three layers of 6mm MDF next time (and there will be a next time - this is good!).
Secondly, make sure you position the the Bristol lever high enough so that it can swing. Mine just fouls the bed of the saw when it is close to the blade.

12 Before calib (Small).JPG

Here, the stop reads zero, but it is not yet calibrated. Trim the end so that it is zero as well as reading zero, like this:

13 After calib (Small).JPG


So now I can set it to any value I like and I know it is right, first time every time! :)

14 In use (Small).JPG


I would recommend making two, one about a metre long and one as long as you can - 3m, say. I made just a long one, but it is a bit unwieldy, especially as I rarely used its full length.

They can be attached with a toggle clamp quite easily, with a couple of locating dowels so that they always sit in exactly the same place:
10 Clamp (Small).JPG

It looks as if I took that photo before the locating dowels were in place. The only thing that is locating it in that picture is the togle clamp itself. I know that it does have a couple of locating dowels which fit in two holes in the casting.

One more thing, make sure you get a measure that reads from right to left. If you use a standard tape measure then the numbers are upside down and it is very easy to confuse 69 with 96, etc. DAMHIKT!

Cheers
Steve
 

Attachments

  • 08 Clamping assembly (Small).JPG
    08 Clamping assembly (Small).JPG
    52.3 KB
  • 09 Block on fence (Small).JPG
    09 Block on fence (Small).JPG
    37.8 KB
  • 12 Before calib (Small).JPG
    12 Before calib (Small).JPG
    48.9 KB
  • 13 After calib (Small).JPG
    13 After calib (Small).JPG
    48.9 KB
  • 14 In use (Small).JPG
    14 In use (Small).JPG
    46.2 KB
  • 10 Clamp (Small).JPG
    10 Clamp (Small).JPG
    53 KB
Steve Maskery":1jcjg3kw said:
it is very easy to confuse 69 with 96, Cheers
Steve
The wife has that problem... :D

Many thanks for the pics, very helpful indeed.
 
Back
Top