Post a photo of the last thing you made

UKworkshop.co.uk

Help Support UKworkshop.co.uk:

This site may earn a commission from merchant affiliate links, including eBay, Amazon, and others.
At the opposite end of the spectrum -today we launched the neighbourhood Tiki Bar I made - ready for alfresco drinks as and when permitted - it's shared by about 10 houses in our road.

It's made from an old bedframe, pallets, a couple of wheels I've had for about 30 years . . . the most sophisticated bit of woodworking is some pocket hole joints to hold the frame together - but hey, it's functional and fun. The name is derived from being in the lower part of the road that includes "Mary" in its name
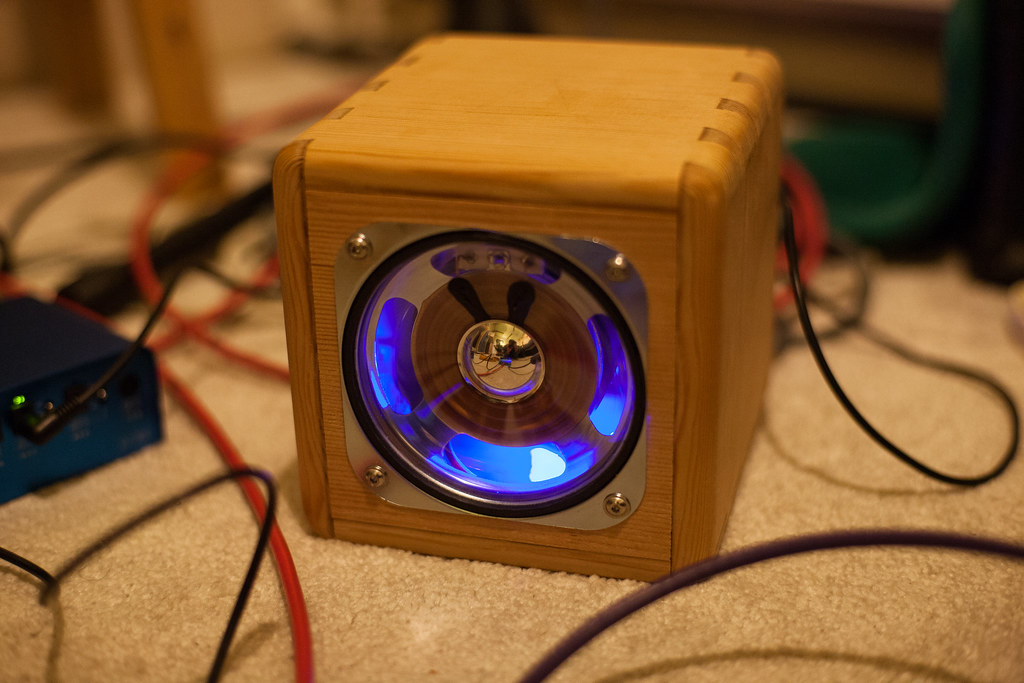
WhatsApp Image 2021-02-14 at 11.43.51.jpeg
 
Born of necessity; a knock down desk for teaching from home. Priority was quick, functional, can be stored away with minimal effort and using what I had knocking around (hence the desktop made from two IKEA chopping boards). Assembled with dominos, screws and glue. It’s lasted 5 weeks and looks like I only need it to last another three before I’m back in school.

It’s quite useful though and I might be tempted to tart it up and make a proper top for it.
 

Attachments

  • 792841D7-E9F8-46BE-AD8A-1C1524466348.jpeg
    792841D7-E9F8-46BE-AD8A-1C1524466348.jpeg
    187 KB · Views: 37
  • E1FDE905-B013-4D00-A261-79CFA4EDED2A.jpeg
    E1FDE905-B013-4D00-A261-79CFA4EDED2A.jpeg
    160.9 KB · Views: 36
  • 3401665C-B3B1-4C86-BE02-5D04F02C962A.jpeg
    3401665C-B3B1-4C86-BE02-5D04F02C962A.jpeg
    151.8 KB · Views: 38
  • 4E12520F-4F16-4291-8F28-F3B342DC48C9.jpeg
    4E12520F-4F16-4291-8F28-F3B342DC48C9.jpeg
    172 KB · Views: 38
AJB Temple had a post recently about his wife getting him to make things for her friends...... he's not the only one - "Darling, my friend wants a letter rack for her hubby. I said you could easily do one for his birthday, the day after tomorrow............" Made this last week in the freezing cold and gave myself the challenge of finishing it within an hour and a quarter including the sanding-sealer and two coats of wax. Made from offcuts of European oak and through the thickesser to 12.7mm and 9 for the central divider. All joints done on router table or hand-held router. I'm hoping that the recipient's name doesn't have these initials and that this is where he stores his vouchers for services to be administered!
A friend on my wife's was getting married last May and I said I would make a cheeseboard/wine bottle?wine glass holder. A bit like this, as I had already made one. I had a few months. Wedding got cancelled because of Covid - Phew, not done. It is now August this year. I'd better get started
 

Attachments

  • Wine caddy.jpg
    Wine caddy.jpg
    88.2 KB · Views: 75
Born of necessity; a knock down desk for teaching from home. Priority was quick, functional, can be stored away with minimal effort and using what I had knocking around (hence the desktop made from two IKEA chopping boards). Assembled with dominos, screws and glue. It’s lasted 5 weeks and looks like I only need it to last another three before I’m back in school.

It’s quite useful though and I might be tempted to tart it up and make a proper top for it.
Mother of invention
 
As with most things in my garage, and particularly with the table saw I own there is a great deal of DIY to get things working as I like.

Yesterday I got my crown guard installed and working. Quite happy with it, but as ever I always think there is room for improvement.

Inspiration taken from Attila's Workshop on YouTube.
 

Attachments

  • IMG_20210215_121503.jpg
    IMG_20210215_121503.jpg
    193.5 KB · Views: 89
My upholsterer friend asked me to make these beech bed stools for his customer, and after he's worked his magic in situ. He said Beech takes stain well. Which is good to know!
 

Attachments

  • IMG_20201209_100833.jpg
    IMG_20201209_100833.jpg
    118.2 KB · Views: 70
  • IMG-20201220-WA0001.jpg
    IMG-20201220-WA0001.jpg
    168.8 KB · Views: 74
  • IMG-20210124-WA0002.jpg
    IMG-20210124-WA0002.jpg
    115.4 KB · Views: 72
My other half has just got back into knitting and wanted a Cedar of Lebanon lined box to store some woollen hand warmers to help protect them from carpet moths.

This is only my second attempt at a box (it's much bigger than the last one too) and a few things didn't go according to plan, but overall I'm quite pleased.

1613501190892.png


I meant to stick a ruler on the bench for scale before taking the photo, but I forgot. Dimensions are about 315 × 196 × 110 mm.

Sides are American Black Walnut, lid and splines are maple, inset thingy is (I think) greenheart.

1613501212046.png


I was very careful to be sure all the saw/chisel cut outs for the splines were deep enough that the splines would sit flush with the rims, but some of them ended up with gaps to the side. I think it was all the ones that I put in first - they probably slipped while I was putting the others in and I didn't go back and check they were firmly pressed into place. I haven't decided whether I'm going to do anything about it yet - I thought I'd apply some finish for now and mull on it (two coats so far).

I wasn't sure whether I'd like the look of the cedar lining, but it's really grown on me since the finish is applied.

1613501240454.png


I'm also rather pleased that I got the grain of the side lining pieces to match on all four corners:

1613501259053.png


1613501270733.png


Carolyn approves as well, and that's obviously the most important thing!
 
My other half has just got back into knitting and wanted a Cedar of Lebanon lined box to store some woollen hand warmers to help protect them from carpet moths.

This is only my second attempt at a box (it's much bigger than the last one too) and a few things didn't go according to plan, but overall I'm quite pleased.

View attachment 103703

I meant to stick a ruler on the bench for scale before taking the photo, but I forgot. Dimensions are about 315 × 196 × 110 mm.

Sides are American Black Walnut, lid and splines are maple, inset thingy is (I think) greenheart.

View attachment 103704

I was very careful to be sure all the saw/chisel cut outs for the splines were deep enough that the splines would sit flush with the rims, but some of them ended up with gaps to the side. I think it was all the ones that I put in first - they probably slipped while I was putting the others in and I didn't go back and check they were firmly pressed into place. I haven't decided whether I'm going to do anything about it yet - I thought I'd apply some finish for now and mull on it (two coats so far).

I wasn't sure whether I'd like the look of the cedar lining, but it's really grown on me since the finish is applied.

View attachment 103705

I'm also rather pleased that I got the grain of the side lining pieces to match on all four corners:

View attachment 103706

View attachment 103707

Carolyn approves as well, and that's obviously the most important thing!
Absolutely love this, I'm in the process of designing a jewellery box our my daughter. I be just bought a piece of Ovangkol & am between splined corners or doves. Seeing your contrast splines now I think they'll show off the timber & doves probably won't show up so much. So thanks for these pictures.
 
Really nice, and the attention to detail on the grain inside is brilliant!

how did you do the inlay in the lid, only inlay ive done is on picture frames, where I cut a slot in each piece of the frame, then glue in contrasting wood and plane flat.

Have you had to chisel all that out?

Did you make the whole box 'as one' and then cut off the lid? And grooves for the top and bottom panels floating in?
 
Really nice, and the attention to detail on the grain inside is brilliant!

how did you do the inlay in the lid, only inlay ive done is on picture frames, where I cut a slot in each piece of the frame, then glue in contrasting wood and plane flat.

Have you had to chisel all that out?

No, I cheated on that bit. I couldn't think of a way of doing it neatly with hand tools so I resorted to a router for that. I had no spare maple, so I really didn't want to mess it up by slipping with a chisel! I used a 10 mm end mill (as I didn't have an appropriate sized router bit) in the router table and cut a groove about 1.5 mm deep (the maple is 4 mm thick). I finished the corners off with a chisel, glued the strips of greenheart in (which were about 2 mm thick offcuts from another project) and then sanded flat.

Did you make the whole box 'as one' and then cut off the lid? And grooves for the top and bottom panels floating in?

Yes. The grooves were cut with some home-made grooving planes; the lid was cut off by double-sided taping a dozuki saw to a block of wood and rubbing the block of wood back and forth against the worktop with the saw teeth cutting into the box - that kept the saw at a consistent height. I cut the splines after separating the lid as I wanted the lid spline to be exactly in the middle of the lid and the base splines to be evenly spaced in the base.
 
My other half has just got back into knitting and wanted a Cedar of Lebanon lined box to store some woollen hand warmers to help protect them from carpet moths.

This is only my second attempt at a box (it's much bigger than the last one too) and a few things didn't go according to plan, but overall I'm quite pleased.

View attachment 103703

I meant to stick a ruler on the bench for scale before taking the photo, but I forgot. Dimensions are about 315 × 196 × 110 mm.

Sides are American Black Walnut, lid and splines are maple, inset thingy is (I think) greenheart.

View attachment 103704

I was very careful to be sure all the saw/chisel cut outs for the splines were deep enough that the splines would sit flush with the rims, but some of them ended up with gaps to the side. I think it was all the ones that I put in first - they probably slipped while I was putting the others in and I didn't go back and check they were firmly pressed into place. I haven't decided whether I'm going to do anything about it yet - I thought I'd apply some finish for now and mull on it (two coats so far).

I wasn't sure whether I'd like the look of the cedar lining, but it's really grown on me since the finish is applied.

View attachment 103705

I'm also rather pleased that I got the grain of the side lining pieces to match on all four corners:

View attachment 103706

View attachment 103707

Carolyn approves as well, and that's obviously the most important thing!
It's a shame to cover that grain ;-)
 
That look awesome. Nothing I make ever really looks pretty. It's always functional and does the job I want but never good enough to put on display. Did you build this from a plan or make up as you went along?
 
That look awesome. Nothing I make ever really looks pretty. It's always functional and does the job I want but never good enough to put on display. Did you build this from a plan or make up as you went along?

If that question is about my box, then I made it up as I went along. Dimensions for the box were dictated by the length of the piece of walnut I had left and the width of the piece of maple I had left (combined with a desire to get it to be a suitable size for storing hand warmers). I had a length of circa 20 mm thick walnut that was about 520 mm long and just over 110 mm wide, so I split it in half (to 9 mm thick) to make the sides, then cut each bit off in a 1.61-ish ratio. I then cut the mitres on the shooting board and tweaked the length of the shorter sides until they were short enough for the width of the maple plank (which I'd previously split and glued back together to make a wide piece).

I cut the lid off at a thickness that looked sensible (and ensured there was no risk of a mid-spline cutting into the groove for the maple lid). I then spaced the top and bottom splines on the base so that they were the same distance from the edge as the lid spline was (that made it easy as I could use the same block of wood taped to my saw). I then put the other spline in the middle. The greenheart width (10 mm) was chosen as I'd trimmed some 10 mm thick greenheart down and it had produced a 2 mm thick offcut, which I'd saved. The space from the edge was just a guess of what I thought might look good.

If that question was about the guitar amp that was posted after my box, then you'll have to ask @thetyreman!
 
My other half has just got back into knitting and wanted a Cedar of Lebanon lined box to store some woollen hand warmers to help protect them from carpet moths.

This is only my second attempt at a box (it's much bigger than the last one too) and a few things didn't go according to plan, but overall I'm quite pleased.

View attachment 103703

I meant to stick a ruler on the bench for scale before taking the photo, but I forgot. Dimensions are about 315 × 196 × 110 mm.

Sides are American Black Walnut, lid and splines are maple, inset thingy is (I think) greenheart.

View attachment 103704

I was very careful to be sure all the saw/chisel cut outs for the splines were deep enough that the splines would sit flush with the rims, but some of them ended up with gaps to the side. I think it was all the ones that I put in first - they probably slipped while I was putting the others in and I didn't go back and check they were firmly pressed into place. I haven't decided whether I'm going to do anything about it yet - I thought I'd apply some finish for now and mull on it (two coats so far).

I wasn't sure whether I'd like the look of the cedar lining, but it's really grown on me since the finish is applied.

View attachment 103705

I'm also rather pleased that I got the grain of the side lining pieces to match on all four corners:

View attachment 103706

View attachment 103707

Carolyn approves as well, and that's obviously the most important thing!
 
Back
Top