


Hi All,
As requested here are several photographs of the production process for producing the pendants and I would like to thank Alan who took all the pics while I was showing him how to make them. I do not claim any originality for this method and was inspired by a demonstration by Gerry Marlow who actually re-machines his off centre.
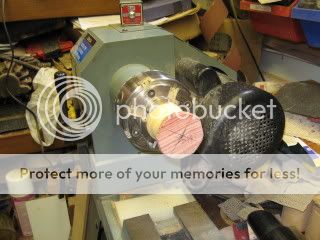
So here goes, you need to make a screw chuck with a No 8 screw protruding less than 1/4" and as shown standing well off the chuck jaws.
Cut the blanks you wish to use down the length of say 2x2 to 2" and then cut across, centre and drill a suitable pilot hole. I make the blank between 1/4 and 5/16inch thick.

True up the circumference
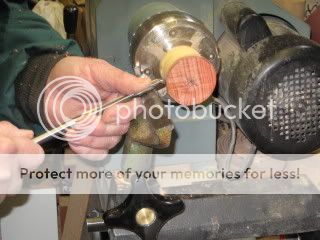
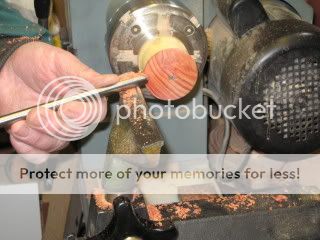
With the gouge at 10 o'clock draw cut out to the edge until this side is chamfered to the centre
Remove and refit to do the other side, do not make the final outer edge less than 1/16 inch other wise after sanding and polishing it may become rather sharp!

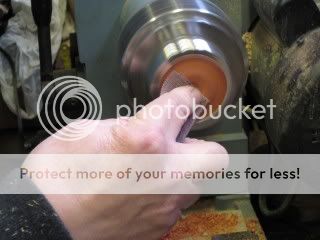
Sand to 600 both sides

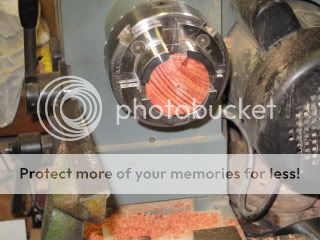
Once satisfied with the finish replace the screw chuck and standard jaws with Shark jaws and carefully insert the part completed pendant into the first grooves.
Now chamfer into the centre on both sides increasing the size of the centre hole

Sand both sides to 600 and blend in the surface. Your choice and style.
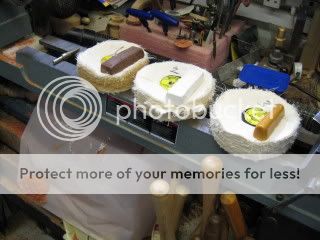
We are now ready for buffing first with medium buffing soap and then fine and finally on the third buffing wheel carnauba wax. I wear the hi grip gloves to help to keep hold of the pendant not to protect my hands.
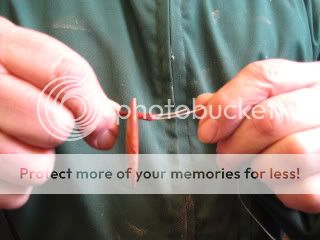
Using your preferred miniature drill a suitable hole for the cord and then push a piece of wire through bent round to use in the same way as a needle threader to pull the centre of the loop of cord, I fit about 36 inch with the ends knotted.
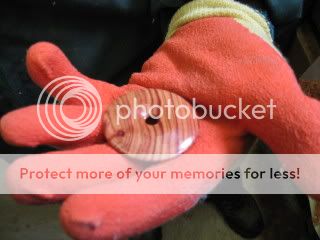
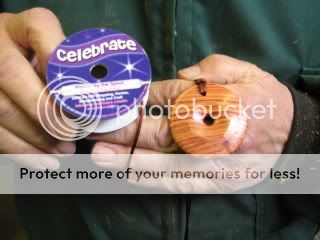
Here is a pic of the end result and the type of cord used, I buy it from a store in Hull called The Range from a display stand having all forms of cords and ribbons.
And so finally a picture of your truly with the finished article.

I trust this has helped those of you wishing to make something special for her in doors as well as just bringing in the shaving.
Best regards,
Ian
As requested here are several photographs of the production process for producing the pendants and I would like to thank Alan who took all the pics while I was showing him how to make them. I do not claim any originality for this method and was inspired by a demonstration by Gerry Marlow who actually re-machines his off centre.
So here goes, you need to make a screw chuck with a No 8 screw protruding less than 1/4" and as shown standing well off the chuck jaws.
Cut the blanks you wish to use down the length of say 2x2 to 2" and then cut across, centre and drill a suitable pilot hole. I make the blank between 1/4 and 5/16inch thick.
True up the circumference
With the gouge at 10 o'clock draw cut out to the edge until this side is chamfered to the centre
Remove and refit to do the other side, do not make the final outer edge less than 1/16 inch other wise after sanding and polishing it may become rather sharp!
Sand to 600 both sides
Once satisfied with the finish replace the screw chuck and standard jaws with Shark jaws and carefully insert the part completed pendant into the first grooves.
Now chamfer into the centre on both sides increasing the size of the centre hole
Sand both sides to 600 and blend in the surface. Your choice and style.
We are now ready for buffing first with medium buffing soap and then fine and finally on the third buffing wheel carnauba wax. I wear the hi grip gloves to help to keep hold of the pendant not to protect my hands.
Using your preferred miniature drill a suitable hole for the cord and then push a piece of wire through bent round to use in the same way as a needle threader to pull the centre of the loop of cord, I fit about 36 inch with the ends knotted.
Here is a pic of the end result and the type of cord used, I buy it from a store in Hull called The Range from a display stand having all forms of cords and ribbons.
And so finally a picture of your truly with the finished article.
I trust this has helped those of you wishing to make something special for her in doors as well as just bringing in the shaving.
Best regards,
Ian
