AndyBoyd
Established Member
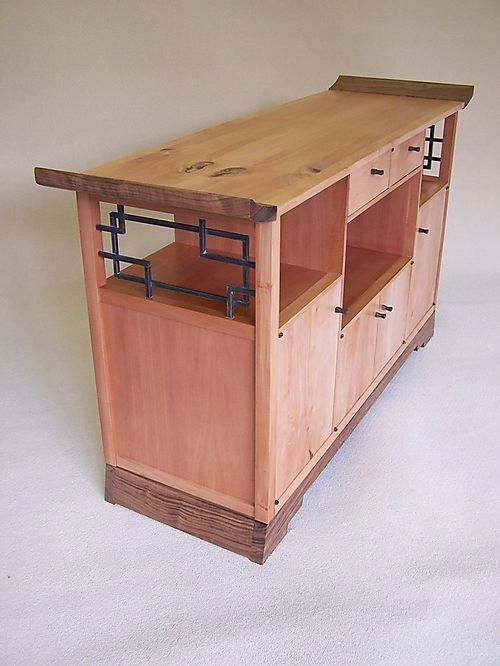
Having just finished it, this competition came up just at the right time, I've never entered one before so here goes.
The vertical and horizontal panels are 12mm multiplex which is lipped with pear and veneered on both sides.
The doors are 15mm multiplex veneered with hand cut pear veneer.
The idea for the cabinet came from our buying a very nice Japanese teapot and me thinking Hmm we something nice to show it.
The TV stand came need came later.
So a Japanese theme coupled with mimicking the 1930s styling of our house (the hand made brass end pieces, and the steps in the walnut foot). I liked the Pear I saw in the local fine wood dealership and needed a contrast wood, we tried Wenge but that was too 70s I felt, so steamed european walnut met the need. The wings were originally at a lower angle but I steepened them as it seemed much nicer.
The joints between the veneered multiplex sections are mainly biscuit joints, although the drawer dovetails and mortise and tenons of the frame are hand cut.
The dimensions are driven by the space it has to occupy the DVD player the amplifier and the TV that now sits on top.
My favourite non wood working bit is the infra red remote control repeater that means we can zap with the doors shut.
I patched some holes in the pear with bronze filled epoxy, which has left a very nice effect on the cabinet top.
The finish is with 3 coats of Gel Varnish
The piece was finished in about 240 hours and as I'm a hobbyist that's just over a year.


My work in progress weblog is here:
http://croeso.typepad.com/photos/furniture/index.html
The vertical and horizontal panels are 12mm multiplex which is lipped with pear and veneered on both sides.
The doors are 15mm multiplex veneered with hand cut pear veneer.
The idea for the cabinet came from our buying a very nice Japanese teapot and me thinking Hmm we something nice to show it.
The TV stand came need came later.
So a Japanese theme coupled with mimicking the 1930s styling of our house (the hand made brass end pieces, and the steps in the walnut foot). I liked the Pear I saw in the local fine wood dealership and needed a contrast wood, we tried Wenge but that was too 70s I felt, so steamed european walnut met the need. The wings were originally at a lower angle but I steepened them as it seemed much nicer.
The joints between the veneered multiplex sections are mainly biscuit joints, although the drawer dovetails and mortise and tenons of the frame are hand cut.
The dimensions are driven by the space it has to occupy the DVD player the amplifier and the TV that now sits on top.
My favourite non wood working bit is the infra red remote control repeater that means we can zap with the doors shut.
I patched some holes in the pear with bronze filled epoxy, which has left a very nice effect on the cabinet top.
The finish is with 3 coats of Gel Varnish
The piece was finished in about 240 hours and as I'm a hobbyist that's just over a year.


My work in progress weblog is here:
http://croeso.typepad.com/photos/furniture/index.html


